Table of Contents
Advertisement
Advertisement
Table of Contents

Related Manuals for Husqvarna Viking Huskylock 901


Summary of Contents for Husqvarna Viking Huskylock 901
-
Page 1: Operating Manual
Operating Manual Huskylock 901... - Page 2 OVERLOCK MACHINE Record in space provided below the Serial No. of this appliance. The Serial No. is located rear of arm. Serial No. Model No. 901 Retain these numbers for future reference. Use foot control type YC-482T for USA/Canada and YC-190 for other countries with overlock machine Model 901.
-
Page 3: Important Safety Instructions
This houshold sewing machine is designed to comply with IEC/EN 60335-2-28 and UL1594 IMPORTANT SAFETY INSTRUCTIONS When using an electrical appliance, basic safety precautions should always be followed, including the following: Read all instructions before using this household sewing machine. DANGER - To reduce the risk of electric shock: •... -
Page 4: Table Of Contents
Contents 1. SUMMARY ............1 1-1. - Page 5 4. MAINTENANCE ........... 23 4-1.
-
Page 6: Summary
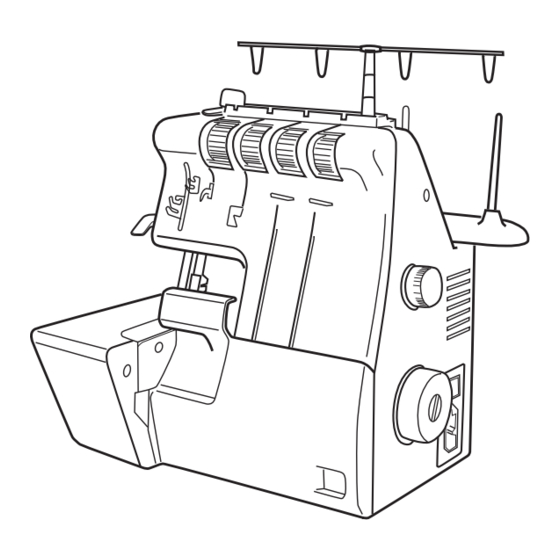
1. SUMMARY 1-1. Name of Parts Spool pin Presser foot lifter 3. Thread take up lever Pressure regulator screw 5. Thread tension support 6. Telescopic thread stand 7-1. Left needle thread tension dial 7-2. Right needle thread tension dial 7-3. Upper looper thread tension dial 7-4. -
Page 7: Accessories
1-2. Accessories Needle plate for rolled hem (B) Screw drivers Lower cutter Tweezers 2-Thread overlock convertor Needles ❈ Size Spool holder (4 pcs.) #11..2 pcs. ✕ #14..3 pcs. Thread Net (4 pcs.) Oiler Cleaning brush Vinyl cover Accessory Box Waste tray –2–... -
Page 8: Connecting Foot Control And Power Cord
1-3. Connecting Foot Control and Power Cord ❈ Connect the foot control and power cord Before plug in your machine, be sure that the voltage is same as that of your machine. (indicated on the plate on the back of the ➀... -
Page 9: Opening And Closing Front Cover And Side Cover
1-5. Opening and Closing Front Cover and Side Cover • How to Open the Front Cover a. Push the cover to the right as far as it will go; and b. Pull it downward. • How to Close the Front Cover a. -
Page 10: Changing Needles
1-6. Changing Needles Replace the needles in the following order: Needle clamp screw Note: Unplug the machine before replacing the needles. (1) Bring needles to its highest position by turning the handwheel toward you. (2) Loosen the needle clamp screw and remove two needles together. - Page 11 (2) Lower looper threading (B) ➉ Open the front cover and the side cover. Take the thread drawn from the spool and pass it through guide of the thread stand and then, in ➈ order, through guide and thread tension dial (Fig.
-
Page 12: Changing Thread
2-2. Changing Threads Tying threads Cutting thread The following is an easy way to change threads; (1) Cut the thread in use near the spool (behind the telescopic thread stand). Place the new thread on the spindle and tie it to the end of the original thread. -
Page 13: Test Sewing
When using synthetic threads that easily unwind from the spool, slip the net over the thread from the bottom of the spool leaving the thread hanging loosely at the top as shown. When using standard thread spool, insert the spool holder (supplied with the machine) as shown (leave about 2mm between the spool and the holder). -
Page 14: Sewing
3. SEWING 3-1. 4-Thread Overlock Stitch Using 2 Needles Before Sewing When threading is complete, sew a few inches of chain stitches. Presser Foot Lifter Position the fabric by lowering the presser foot lifter to raise the presser foot. Place the fabric underneath the presser foot and push the fabric toward the front of the cutter. -
Page 15: Presser Foot Pressure Adjustment
(2) End of sewing Make chain stitches at the end of the sewing to prevent the threads from coming undone and to prepare for the next sewing (this is called chaining off). Draw the finished fabric gently backward and to the left as the machine is operating and make chain stitches. - Page 16 Thread Tension Adjustment Adjust thread tensin to suit the type of fabric ➁ ➀ and size of thread used. As the number on the thread tension discs increases, the thread tension becomes tighter. ➃ ➂ (1) Correct tension • Lower looper thread and upper looper thread Lower looper should be well balanced with same tension (both thread...
- Page 17 (3) When the lower looper thread is unbalanced and appears on the top-side of the fabric: Tighten the thread tension of the lower looper (Dial ) or loosen the thread tension of the upper looper (Dial Lower looper thread Wrong side Left needle thread Right needle...
-
Page 18: Differential Feed Adjustment
Differential Feed Adjustment The feed teeth work independently of each other to give perfect results when sewing speciality fabrics. Use differential feed to prevent stretching of knit fabrics and puckering of lightweight fabrics. ❈ “N” indicates the neutral position. Indicator Differential feed dial Refer to the following chart and test stitch performance on a scrap of fabric you are going to use. -
Page 19: Stitch Width Adjustment
Stitch Width Adjustment • Adjust the stitch width from 4.2mm to 6.2mm according to the kind of fabric. Typically, wider stitch widths are used for heavier fabrics. • The standard width is 4.5mm. • Open the side cover to adjust the width. (1) To increase the stitch width, turn the stitch width adjustment dial to a larger number. -
Page 20: Stitch Length Adjustment
Stitch Length Adjustment The machine is pre-set to 2.5mm stitch length for regular seaming and overlock. You may adjust the stitch length from 1mm (narrow rolled hemming) to 5mm by adjusting the stitch length adjustment lever. ❈ For normal overlock, set the stitch length from 2.5mm to 4.4mm. -
Page 21: Setting Waste Tray
3-2. Setting Waste Tray (1) Insert the right guide of the waste tray to the right leg of the machine as illustrated. Turn the waste tray in the direction of arrow. (2) Push the left end of the waste tray in the direction of arrow. -
Page 22: 3-Thread Overlock Stitch Using 1 Needle
3-3. 3-Thread Overlock Stitch Using 1 Needle Though this machine is used mainly for 4-thread overlock using 2 needles, 3-thread overlock 1 needle can be easily operated by just removing either needle. Use 3-thread stitch for decorative purposes. (1) Removing the right needle: Create a wide 3-thread stitch by using only the left needle and the left thread tension (Dial The differential feed is normally set at “N”... -
Page 23: 2-Thread Overlock Stitch Using 1 Needle
3-4. 2-Thread Overlock Stitch Using 1 Needle 1. Use 1 needle thread (left needle or right needle) and lower looper thread. Remove upper looper thread. 2. Attach 2-thread overlock convertor to the upper 2-Thread overlock convertor looper. Conversion to 2-Thread Overlock (1) Open the front cover. -
Page 24: Stitch Selection Table
Stitch Selection Table THREAD Left Right Upper Lower Stitch Stitch TENSION Needle Needle Looper Looper Length Width MATERIAL Dial Adjusting (see p.22) Dial PATTERN STITSHES 2-Thread Light Overlock Medium (Narrow) Heavy 2.5~3 Light 2-Thread Overlock Medium (Wide) 2.5~3 Heavy Light 2-Thread Narrow edge Medium... -
Page 25: Thread Tension Adjustment
Thread Tension Adjustment (1) Correct tension Needle Wrong side Thread Lower looper Thread Right side Needle Thread (2) Unbalanced lower looper thread wraps around the back. Tighten the thread tension of the lower looper (Dial ) or loosen the needle thread tension (Dial Wrong side Lower looper Thread... -
Page 26: How To Roll Hem
3-5. How to Roll Hem 3-Thread Rolled Hem Rolled hemming is achieved by adjusting the thread tensions, so that the fabric is overlocked while rolling underneath at 1.5mm width. This is ideal for lightweight fabrics. (1) Remove the left needle (see p. 3-8). (2) Change the needle plate for rolled hemming. -
Page 27: 2-Thread Rolled Hem
2-Thread Rolled Hem (1) Convert to 2-thread overlock (see p. 18). (2) Use only the right needle and change the needle plate for rolled hemming (see p. 21). Rolled Hem Narrow Edge Wrong side Right side Wrong side Right side STANDARD CHART FOR ROLLED HEM (2-Thread Rolled Hem) Rolled Narrow... -
Page 28: Corded Overlock
3-6. Corded Overlock Corded overlock can be used to strengthen stitches when joining elastic fabrics such as knits. There are two ways to sew corded overlock. (1) Thread cord through the hole on the front of the foot. (2) Place a slightly wide cord or tape (about 3mm) under the right needle and start to sew catching cord or tape in stitching. -
Page 29: Changing The Light Bulb
4-2. Changing the Light Bulb Warning: Let the light bulb cool down before replacing it to avoid burning your fingers. When the light does not come on even the power switch is turned on, it is time to change the light bulb. -
Page 30: Trouble Shooting
5. TROUBLE SHOOTING If the machine is used under normal conditions and the operating instructions are carefully followed, no difficult or special adjustment is necessary. Following cases are not failure of the machine. Check your machine before you call for service. REFERENCE PROBLEM CAUSE... -
Page 31: Table Of Sewing Fabrics, Needles And Machine Settings
6. TABLE OF SEWING FABRICS, NEEDLES AND MACHINE SETTINGS Medium to thick Thick fabric Thin fabric fabric (denim, jersey) (crepe, georgette) (cotton, wool) ✕ Needle HA ✕ #11 or #14 (130/705H) (75) or (90) (90) (75) (For home-use sewing machine) Polyester (spun filament) Twisted thread... -
Page 32: Optional Accessories
7. OPTIONAL ACCESSORIES 7-1. Gathering Foot (1257002-560) Gathering foot (also known as shirring foot) is used to join two pieces of lightweight fabric while gathering only one of the fabric layers as it is stitched to the flat layer. Gathering foot is used with 4-thread 2-needle overlock sewing. -
Page 33: Piping Foot
7-2. Piping Foot (1650002-460) Piping foot is used with 4-thread 2-needle overlock sewing. (1) Replace the regular foot with the piping foot (see p. 5). (2) Place the piping with its welt/cord edge opposite the seamilne, between two fabrics with the right sides together. (3) Place your fabric under the foot, making sure the welt/cord part of the piping is in the groove underneath the presser foot. -
Page 34: Elastic Foot
7-3. Elastic Foot (1650002-450) Elastic foot is used with both 3-thread 2-needle, and 4-thread 2-needle overlock sewing. This foot guides your elastic and stretches the elastic with the tension control screw on the foot while sewing. (1) Replace the regular foot with the elastic foot (see p. -
Page 35: Blind Hem Foot (0.5Mm / 1.0Mm)
7-4. Blind Hem Foot (0.5mm / 1.0mm) (1650002-440 / 1650012-440) There are two sizes of blind hem foot. The foot marked 0.5 is used for fine to medium fabrics and 1.0 is for medium to heavy fabrics. • They are used with 4-thread 2-needle overlock sewing. -
Page 36: Specifications
8. SPECIFICATIONS 4-Threads (3-, 2-Threads) Number of threads Number of needles 2 Needles (1 Needle) ✕ Organ HA 1T #11, #14 Needles (SCHMETZ 130/705H #75, #90) Width between two needles Standard 4.5mm (Range 4.2~6.2mm) Stitch width 1~4.4mm Stitch length 0.7~2 Differential feed 1200 RPM Maximum sewing speed... -
Page 37: Index
9. INDEX Accessories .....2 Skipping Stitches ....25 Optional . - Page 38 We reserve the right to change the machine equipment and the ass ort ment of accessories without prior notice, or make modifi cations to the performance or design. Such modifi cations, however, will always be to the benefi t of the user and the product. Please note that on disposal, this product must be safely recycled in accordance with relevant National legislation relating to electrical/electronic...
- Page 40 4128020-26B...