Table of Contents
Advertisement
Advertisement
Table of Contents

Subscribe to Our Youtube Channel
Related Manuals for Avery Weigh-Tronix E1010


Summary of Contents for Avery Weigh-Tronix E1010
- Page 1 Model E1010 Indicator User’s Manual...
- Page 2 ATTENTION: LE CORDON D’ALIMENTATION EST UTILISÉ COMME INTERRUPTEUR GÉNÉRAL. LA PRISE DE COURANT DOIT ÊTRE SITUÉE OU INSTALLÉE À PROXIMITÉ DE L’ÉQUIPEMENT ET ÊTRE FACILE D’ACCÉS”. Avery Weigh-Tronix reserves the right to change specifications at any time. 12/12/05 E1010_U.P65 PN 43030-0012E e1 Printed in USA...
-
Page 3: Table Of Contents
Performing a Checkweighing Weighment ........13 Using Cutoffs .................13 Counting .....................14 Using Cutoffs .................14 Batch Weighing ..................15 Peak Weighing ...................16 Using Cutoffs..................16 Communications and Printing ..............17 Error Messages ..................17 Indicator Diagnostics .................18 Indicator Test Functions ...............18 Model E1010 Indicator User’s Manual... -
Page 4: Specifications
• Canadian Weights and Measures pending • Zero range, motion detection, automatic zero • UL/CUL tracking, five-point linearization • CE marked Time and date / RAM • Battery backed up real time clock and RAM Model E1010 Indicator User’s Manual... -
Page 5: Introduction
Introduction The Model E1010 is an easy to use, uncomplicated indicator for general weighing applications. It is ideal for bench scales, floor scales and tank weighing applications. The display includes a multi-segment fan graph for fast visual awareness for checkweighing. The indicator can perform count- ing functions, peak weight functions, act as a remote display and operate on battery power. -
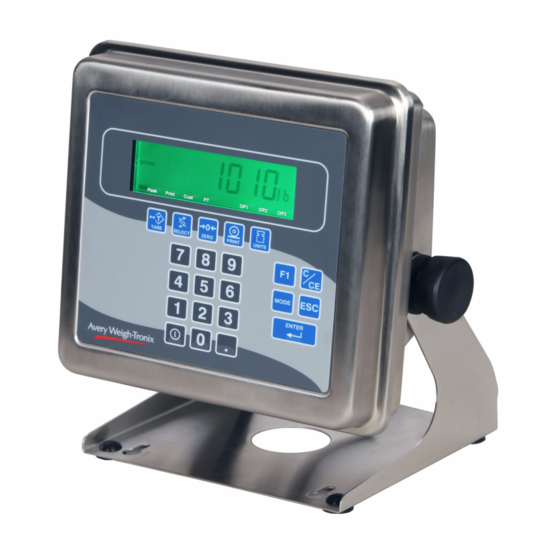
Page 6: Front Panel
Comm port. Also acts as a down arrow key when in the User menu. Press the UNITS key to scroll through the available units of measure while in normal operating mode. Also acts as a right arrow key when in the User menu. Model E1010 Indicator User’s Manual... - Page 7 • Password entry To turn the unit on, press and hold the ON/OFF key until the display turns on. To turn the unit off, press and hold the ON/ OFF key until the unit turns off. Model E1010 Indicator User’s Manual...
-
Page 8: Battery Information
Entering an ID Number You can enter an ID number which is then part of the active PLU channel. To enter an ID, key in a number on the keypad then press the ENTER key. Model E1010 Indicator User’s Manual... -
Page 9: Menu Mode
Menu Mode The E1010 has a User menu which you can use to do the following: • Audit the number of configurations and calibrations performed • See software information • Display test • Button test • Serial port test 1. Access the User menu by pressing and holding the ESC key for 3-5 seconds. -
Page 10: Indicator Operations
Indicator Operations The E1010 comes equipped with several weighing applications; • Accumulator weighing (default setting) • Batch weighing When the indicator goes to • Checkweigher sleep you must press the • Counting ON/OFF switch to restart the • Peak capture indicator. -
Page 11: Accumulator Weighing
OP2 is displayed. 4. Repeat steps 2 and 3 for each output. Press ESC key to return to normal operation with the ingredients active. Indicator will automatically return to normal weighing mode after OP3 value is entered. Model E1010 Indicator User’s Manual... -
Page 12: Checkweighing
Figure 4 shows how the graphic display works in Sample mode. Each graduation is equal to 1 scale division. The TARGET light stays lit if weight is ±1 division of the target weight. Figure 4 Sample mode Directions for each mode follows. Model E1010 Indicator User’s Manual... -
Page 13: Limit Mode: Entering Upper And Lower Limits
OP2 is displayed. 4. Repeat steps 2 and 3 for each output. Press ESC key to return to normal operation with the ingredients active. Indicator will automatically return to normal weighing mode after OP3 value is entered. Model E1010 Indicator User’s Manual... -
Page 14: Counting
Applications are activated through a password protected menu. See the Service Manual for instructions. Follow these steps to perform a counting function with the E1010: This indicator has a 10 channel 1. In gross weight mode, press the F1 key. . . -
Page 15: Batch Weighing
OP2 is displayed. 4. Repeat steps 2 and 3 for each output. Press ESC key to return to normal operation with the ingredients active. Indicator will automatically return to normal weighing mode after OP3 value is entered. Model E1010 Indicator User’s Manual... -
Page 16: Peak Weighing
OP2 is displayed. 4. Repeat steps 2 and 3 for each output. Press ESC key to return to normal operation with the ingredients active. Indicator will automatically return to normal weighing mode after OP3 value is entered. Model E1010 Indicator User’s Manual... -
Page 17: Communications And Printing
Communications and Printing The E1010 provides an RS-232 output for data transmission to a peripheral device. Refer to the Service Manual for RS-232 interface connections. If your indicator has a peripheral device connected, from the gross/net weighing mode press the PRINT key to transmit the selected output(s). -
Page 18: Indicator Diagnostics
5. Press the PRINT key to perform a dynamic test of the display. 6. Press ESC key to stop the dynamic test. 7. Press the UNITS key. . . BUTTON is displayed. This is the button test item. Model E1010 Indicator User’s Manual... - Page 19 16. Press the PRINT key to see the number of times the configuration has been altered on this indicator. 17. Press the SELECT key. . . CFG is displayed. 18. Press the UNITS key. . . CAL is displayed. This stands for the calibration audit counter. Model E1010 Indicator User’s Manual...
- Page 20 19. Press the PRINT key. . . The number of times the indicator has been calibrated is displayed. 20. Press the ESC key twice. . . The display returns to normal operation mode. This completes the User menu. Model E1010 Indicator User’s Manual...
- Page 21 Model E1010 Indicator User’s Manual...
- Page 22 Model E1010 Indicator User’s Manual...
- Page 23 Model E1010 Indicator User’s Manual...
- Page 24 Pointe Claire, QC H9R 4R7 Canada Weigh Bar ® is a registered trademark Telephone: 514-695-0380 of Avery Weigh-Tronix and may be registered in certain jurisdictions. Toll free: 800-561-9461 All brands and product names used Facsimile: 514-695-6820 within this document are trademarks www.weigh-tronix.ca...
Need help?
Do you have a question about the E1010 and is the answer not in the manual?
Questions and answers