
Subscribe to Our Youtube Channel
Related Manuals for Digitus DN-16023


Summary of Contents for Digitus DN-16023
- Page 1 Pan/Tilt Remote Control & With Audio & Night Vision User’s Guide...
-
Page 2: Table Of Contents
ETUP 5.6 A ......................41 DMINISTRATION ETUP 5.7 SOFTWARE U ......................42 PDATE ..........................45 PPENDIX A. U DDNS DN-16023 EZ IPCAM (U PPENDIX SING A DIALUP ONNECTION AND WITH THE SING IP CAM USER’S GUIDE PAGE 2/57 Rev. PV1.0... -
Page 3: Overview
TV screen (supporting NTSC and PAL) in families with combining fast Motion Detection and SD Expansion Card in hardware. Moreover, DN-16023 is equipped with IR LED lightening, so it has the function of night vision. Besides, this device also has the function of recording and real-time photographing. -
Page 4: Product Accessories Include
1.4 P RODUCT CCESSORIES NCLUDE IP-Camera DN-16023 Power adaptor, 5V/ 1A Switching Power adaptor Ethernet Cable (red), used to connect to the network card of PC for testing and configuring the product IP CAM USER’S GUIDE PAGE 4/57 Rev. PV1.0... -
Page 5: System Requirement
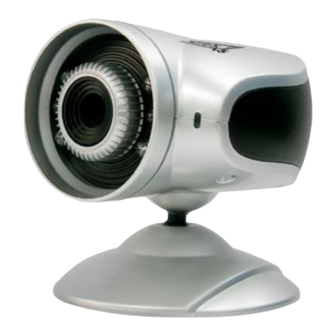
Network Setup: Accessing Internet normally Web Browser: Microsoft Internet Explorer 6.0 or above Connect Network Equipment: ADSL modem, IP Share or Hub Active-X for activating control items and plug-in 1.6 DN-16023 EXTERIOR UNCTION INTRODUCE IR LEDX6 Focus Adjustable Microphone Status Light IP CAM USER’S GUIDE... -
Page 6: Tv_Out Function Introduce
IP CAM User’s Guide DC JACK RJ-45 JACK TV_OUT JACK SD Card Slot Reset Switch Usage of Reset Switch: While the system is active normally, press and hold Reset Switch for a short time (about 3 to 5 seconds) till Status LED lights up. The system will restart the device and recover to the factory default settings. -
Page 7: Product Set-Up
IP CAM User’s Guide 1. First, insert the TV_OUT cable to the place as shown in Figure 1. 2. Next, plug in power adapter as shown in Figure 2. Press and hold Reset switch for three seconds. Then, release it. The IP-CAM will access into TV_OUT mode. ... -
Page 8: Utilities And Tools
IP CAM User’s Guide 2. U TILITIES AND TOOLS 2.1 CAM_EZ S EARCH CAM_EZ Search is an IP search engine offered by this product. It can search IP CAM connected in LAN. Through sending the inquiry of broadcasting packets, after IP CAM responds the question, the window will display a list of all IP CAMs in the network. - Page 9 IP CAM User’s Guide B. Check if the IP addresses for PC network and CAM_EZ Search are on the same network section: Usually, static IP address will be used to access into Internet, so the IP address will vary. When you want to change IP address, please write down the original IP address on your computer first.
-
Page 10: 2.3 How To Set Up Ip Cam
IP CAM User’s Guide Step 1. Click Update. You can see 255DN-16023. Step 2. Click 255DN-16023. You can see Name : DN-16023 : 192.168.9.1 SubMask :255.255.255.0 GateWay :192.168.9.254 HTTP Port:Http communication port. The default setting is 80. UDP Port : UDPport, Per-seting is 1500 Step 3. - Page 11 Port numbers, e.g, 1025、 1026、1039…..) UDP Port : UDP Port,Pre-setting is 1500 Step 5. Choose STATIC. Step 6. After finishing the settings, click Submit. The network settings for DN-16023 IP-CAM will be renewed. IP CAM USER’S GUIDE PAGE 11/57 Rev. PV1.0...
-
Page 12: Dhcp - Ip Address Setting
IP CAM User’s Guide Example: 1. Set up the IP CAM with fixed IP address. 2. Turn on your computer and open IE browser. Type 211.78.174.94:( 1025、 in the Address line. Now you can access into the monitoring 1026、1039….) screen of network. 2.4-2 DHCP - IP Address Setting: ... - Page 13 80. Step 3. Choose DHCP. Step 4. After finishing the settings, click Submit. The network settings for DN-16023 IP-CAM will be renewed. (That is, you can obtain a virtual IP address) Step 5. Click Update. You can see 255DN-16023.
- Page 14 IP CAM User’s Guide Example: Now, IP-CAM is set up with the IP address in LAN. Or, use CAM_EZ Search to access into monitoring screen of network according to the instructions in Figure 5. Or, turn on your PC and open IE Browse. Type 10.1.10.82 in Address lint to access into monitoring screen of network.
- Page 15 IP CAM User’s Guide Open CAM_EZ Search and click Update. Wait for 60 seconds (it varies according to the connection quality). Then the system will search M6820 IP-CAM automatically. 1. Click the searched IP-CAM. 2. Check the IP address and Gateway. Floating IP address, SubMask and Gateway will be shown in dimmed color.
-
Page 16: Ip-Cam Network Framework Installation
IP CAM User’s Guide 2.5 IP-CAM N ETWORK RAMEWORK NSTALLATION 一. IP-CAM Network Framework Installation 1 Way to access Internet Use Permanent ADSL or Cable Modem Physical IP Address Owns several physical IP addresses IP Share or LAN Hub General model is OK. Network Setup for IP -CAM LAN Enable / Manually Suitable Objects... - Page 17 IP CAM User’s Guide 二. IP-CAM Network Framework Installation 2 Way to access Internet Use Permanent ADSL or Cable Modem Physical IP Address Owns more than one IP address IP Share or LAN Hub Must be equipped with DHCP function Network Setup for IP -CAM LAN Enable / Manually Web Server Port Number, need to be...
- Page 18 IP CAM User’s Guide 三. IP-CAM Network Framework Installation 3 Way to access Internet Use dial-up ADSL or Cable Modem Physical IP Address Owns one float IP address (dispatched by ISP dynamically) IP Share or LAN Hub Must be equipped with DHCP and NAT functions Network Setup for IP -CAM LAN Enable / Manually...
- Page 19 IP CAM User’s Guide 四. IP-CAM Network Framework Installation 4 Way to access Internet Use Permanent ADSL or Cable Modem Physical IP Address Owns one physical IP address IP Share or LAN Hub Not necessary Network Setup for IP -CAM LAN Enable / Manually Web Server Port Number, no need to be adjusted...
- Page 20 IP CAM User’s Guide 五. IP-CAM Network Framework Installation 5 Way to access Internet Use dial-up ADSL or Cable Modem Physical IP Address Owns one float IP address (dispatched by ISP dynamically) IP Share or LAN Hub Not necessary Network Setup for IP -CAM PPPoE function should be set, LAN Enable Web Server Port Number, no need to be adjusted...
- Page 21 IP CAM User’s Guide 六. IP-CAM Network Framework Installation 6 Way to access Internet Use dial-up ADSL or Cable Modem Physical IP Address Owns several float IP addresses (dispatched by ISP dynamically) IP Share or LAN Hub Must be equipped with DHCP and NAT functions Network Setup for IP -CAM LAN Enable / Manually...
- Page 22 IP CAM User’s Guide 七. IP-CAM Network Framework Installation 7 Way to access Internet Use Permanent ADSL or Cable Modem Physical IP Address Owns one physical IP address IP Share or LAN Hub Must be equipped with DHCP and NAT functions Network Setup for IP -CAM LAN Enable / Manually...
-
Page 23: Installation For Ip Share
IP CAM User’s Guide 2.6 I IP S NSTALLATION FOR HARE When IP-CAM is installed under Share, it can obtain a dynamic IP address from DHCP server. If you want to install the IP-CAM in WAN interface, you have to set a fixed IP address for the device. - Page 24 IP CAM User’s Guide (3) Enable DHCP function of IP Share. (Refer to Figure 3. The range of available IP address is 192.168.0.100~192.168.0.199) Figure 3 (4) Access into the web page of Virtual Server. Add the fixed IP address specified by CAM_EZ Search in step (1) and enable it.
- Page 25 IP CAM User’s Guide (5) After adding the IP address, you can see jeffipcam1 in the virtual server list (refer to Figure 4.2). Figure 4.2 (6) Restart PC and IP Share. After restarting, if you want to connect IP-CAM from WAN interface, please key in http://59.104.28.251:5000 if you wish to link to IP cam (Figure 5)
-
Page 26: Internet Ip Sharing & Audio Setting
IP CAM User’s Guide 2.7 I & A NTERNET SHARING UDIO SETTING Please use the following steps for setting up if your IP cam does not have Audio Step 1, setting Audio Part : the Pre-setting is 1500 (setting range is 1500~65535) and press Submit step 2, add one new UDP part 1500 in router (UDP port setting range is 1500~65535) as one port can only appoint to the use of one IP cam. -
Page 27: Getting Started
IP CAM User’s Guide 3. G ETTING TARTED 3.1 S YSTEM OGIN The system login is the process of identifying all users trying to log into the system to confirm user identify and grant permission to access to the system’s functions. This system provides two layers of security access: “administer”... -
Page 28: Live View
IP CAM User’s Guide 3.2 L When using IP Cam for the first time, users must change the Internet Explorer security settings (please refer to settings step 3.2.1). Otherwise, the system will display the following warning, and be unable to display the surveillance feeds. After having successfully set up the IP CAM settings during the first use, users do not need to change the settings again for later use. - Page 29 IP CAM User’s Guide Step 3. After pressing “ok”, a warning window shall appear. Click on “Yes” , and you shall return to the last window. Press “OK”, and the setup is complete. Step 4. At this time, the computer should display a warning window, as shown above : Press “Yes”...
-
Page 30: Take A Shot
ActiveX component of your browser to interact with the DN-16023 each time you access it. When you view the stream from the IP CAM and you see the prompts regarding downloading, running or enabling ActiveX content from the IP address of the DN-16023, click “Yes”... -
Page 31: Advanced Function With Live View
IP CAM User’s Guide Step 4. Release the Ctrl key, and the single still shot image will have been successfully captured. Step 5. Select the menu to browse through the captured images. Refer to Chapter 5.2 for details. Note: Snapshot can only be stored to PC, can't store to SD Card 4. -
Page 32: Image Adjustment
IP CAM User’s Guide Image:Adjust image values Record:Setup for recording into AVI format. Zoom:Select digital zoom value for window. Motion Detect Set:Settings for motion detection These settings are described in detail in the next chapter 4.1 I MAGE DJUSTMENT After selecting an Image, you may change various image settings, as shown below: 4.2 AVI R ECORD ETUP... -
Page 33: Zoom I N Display
IP CAM User’s Guide 4.3 Z N DISPLAY Using your mouse, click and drag out a box to select the portion of video that you wish to view as shown by the black box in the image below. The image will zoom in according to the dimensions entered and will show an image similar to this below 4.4 M OTION... -
Page 34: Advanced Application
IP CAM User’s Guide 5% change in the MD range. The lower the number entered, the higher the sensitivity of the MD. When motion is detected, the screen should display an MD warning in red in the upper left hand corner if there is movement within MD1 or MD2, as shown in below: - Any motion detection range can be selected in 640x480 and 320x240 resolutions - In 160x120 resolution, the motion detection is fixed to the entire image. -
Page 35: Capture View
IP CAM User’s Guide to a ceiling; Default setting is “off”. - IR Auto Detection:IR LED auto activation in low light. Default setting is “on” - Message : LiveView characters are hidden, Default setting is “on” Image Setup Directions: Step 1. Click on to view the menu, the default settings are shown below;... -
Page 36: Event Trigger
IP CAM User’s Guide Step 2. You can set the system to read from either your computer or your SD Memory card. After making your selection, click on Apply Step 3. Select desired thumbnail image using the cursor to view image at the default dimensions. -
Page 37: Network Setup
IP CAM User’s Guide Detailed explanations are presented in the next chapter. 5.3.1 Event Event settings, including: - Motion Detection (set 1) - Motion Detection (set 2) Individual or both set signal input triggers can be seleced. How to Use Event Settings: Step 1. - Page 38 Note: Because PPPoE utilizes a dynamic IP address from an ISP, the IP settings for the DN-16023 could differ for each use. It is suggested that an IP Router be used to connect to the PPPoE or DDNS. This will assist your computer in finding the IPCAM.
-
Page 39: Server Setup
IP CAM User’s Guide 5.4.4 DNS Server This menu allows you to enter the IP address of the DNS (Domain Name Server ). By doing this, you can replace the IP address of the IP CAM with an http name (such as myIPCAM.XXX), making it easier to remember. - Page 40 IP CAM User’s Guide Step 6: Enter whether or not your mail server requires authorization in “Authorization” Step 7: Click on when you are finished. Submit 5.5.2 FTP Server This menu allows you to enter the FTP (File Transfer Protocol) Server settings. You must also make sure that the FTP Image settings from 5.3 are enabled to send a file to the designated FTP server via FTP upon event trigger.
-
Page 41: Administration Setup
IP CAM User’s Guide Using the NTP Server settings: Step 1: Enter the NTP Server IP or HTTP address in “IP/Host” Step 2: Select the correct time zone in the “Time Zone” menu Step 3: Click on when finished. Submit 5.6 A DMINISTRATION ETUP... -
Page 42: Software Update
IP CAM User’s Guide Step 2: Enter existing password you wish to change in the “Old Password” field. Step 3: Enter the new password in the “New Password” field. Step 4: Confirm the password by entering it once more in the “Re-type” field; Step 5: Click on to finish. - Page 43 IP CAM User’s Guide displayed on the screen. Step 8. After finishing update, please close the window of Internet Explorer and delete CSQ objects in the following path: My Computer\Control Panel\Internet Options\Settings…(Figure1)\View Objects…(Figure2)\CSQ Object (Figure3) (Figure1) (Figure2) IP CAM USER’S GUIDE PAGE 43/57 Rev.
- Page 44 IP CAM User’s Guide (Figure3) Step 9. Re-login IP CAM and type the Account ID and Password. Step10. View Current Version to check if the upgrade is successful or not. Note: After finishing Step 6., do not operate IPCAM and cause it disconnected. Otherwise, it would be damaged and needed to be repaired by factory.
-
Page 45: Appendix
DN-16023 using DDNS. The directions are as described below: A. Apply for a DDNS account using your home computer. B. Connect to the DN-16023 with your home computer (using the CAM_EZ Search Tool). C. Setup your DN-16023 to connect via PPPoE, and enter your DDNS settings. -
Page 46: Ip Cam User's Guide
IP CAM User’s Guide Step 4. mark the following two selects and press Create Account to complete the application Step 5: If the application is successful, the following shall appear on your screen. Step 6: After your application has been completed successfully, respond by E-mail to confirm, and go back to http://www.dyndns.org/ to enter your user name and... - Page 47 IP CAM User’s Guide Step 8: The “Services” menu should automatically appear. Choose your Domain Name (gotdns.com has been used in this example for your reference). Step 9: Enter your Host Name (domain has been used in this example for your reference). Click on “Add Host”...
- Page 48 B. Connecting to the DN-16023 EZ IPCAM with Your Home Computer (Using the CAM_EZ Search Tool) Step 1: Please connect the DN-16023 EZ IPCAM to the HUB as shown in following chart: Step 2: Open CAM_EZ Search. Click on “Update” to begin searching for any DN-16023 EZ IPCAM connected to the local network.
- Page 49 IP CAM User’s Guide Step 4: Select “Internet Protocol (TCP/IP)”, and click on the preferences (R). Click on “Ok”. -select Step 5: Change the IP Address to 192.168.9.2. Change Subnet mask to 255.255.255.0. The default gateway is 192.168.9.254 (Change the IP address to any numbers within the range of 192.168.9.2 –...
- Page 50 IP CAM User’s Guide C. Changing the IP CAM EZ IPCAM 7100 Settings to PPPoE / Using DDNS Step 1: Select “Network” to open the network menu. Enter your account ID and password in the appropriate field in “PPPoE” (in this example, we have used Chung Hwa Telecom ADSL for your reference).
- Page 51 IP CAM User’s Guide Step 3: At this time, you must change the IP settings of your home computer back to their original values (automatically retrieve IP address). To do this, click on “Network Neighborhood”, right click on the preferences (R). Select your local connection and right click to view the preferences (R).
- Page 52 IP CAM User’s Guide Step 5: Select “automatically retrieve IP Address (O)” and “Automatically retrieve DNS server address (B)”. Click on “ok”. D. Using the IP CAM EZ IPCAM 7100 with DDNS Viewer. Step 1: Open CAM_EZ Search, and Click on Update. Wait for about 60 seconds (actual time dependant on the quality of your connection), and the IP CAM EZ IPCAM should be detected automatically.
- Page 53 A: Eight IP Cameras are allowed to be connected in LAN at one time. Transmitting too many packets through LAN might lower down the efficiency of the network. Q3: What algorithm that DN-16023 uses for compressing images? A: IP CAM uses JPEG file format to compress the images and uses dynamic JPEG image IP CAM USER’S GUIDE...
- Page 54 CAM. If yes, please connect IP CAM to your computer to get rid of the interference of other devices. Then, the update of IP address can be carried out. Q11: Why DN-16023 can be searched by IP Search Tool but cannot be linked by IE browser? IP CAM USER’S GUIDE PAGE 54/57 Rev.
- Page 55 Internet Explorer and close it. Restart Internet Explorer and try to browse and login again. Q17: There is something wrong with the focal distance of DN-16023. How can I improve it? A1:Focus the IP CAM manually. You can adjust the focal distance to a proper focal length.
- Page 56 Q20: When the mails cannot be sent out, what things will DN-16023 do for it? A: If DN-16023 found that the mails could not be sent out due to some reasons, it would stop the action of sending this mail out and return to the status of normal operation. It will not execute the work of retry.
- Page 57 IP CAM User’s Guide settings manually. A5: If the IP Camera is installed inside LAN (behind NAT Router), then the external Internet Explorer of NAT Router cannot join to this IP Camera. You can modify DMZ or NAT forwarding function of the router to assist the packets in Internet to be directed to this IP Camera correctly. At the same time, you can open DDNS function to make the network address connecting to this IP Camera easily and conveniently.
Need help?
Do you have a question about the DN-16023 and is the answer not in the manual?
Questions and answers