
Related Manuals for MagicBox VIP


Summary of Contents for MagicBox VIP
- Page 1 MagicBox ® User Manual v1.65 Copyright © 2005 MagicBox, Inc. All Rights Reserved...
-
Page 3: Table Of Contents
Find a Suitable Location................. 12 Connections ..................... 12 Select a Television Standard................13 Connect a Monitor ..................13 Connect the Ethernet Adapter VIP “Express” Models Only ....... 14 Connect the Power..................15 Test the Demo Disk..................15 Configure the VIP Unit .................. 16 Set the Date.................... - Page 4 Opt 1, Opt 2, Tag, Esc - ............. 24 Starting the Unit ....................24 The Main Menu Screen................... 25 Load Pictures From VIP Disk ..............25 Enter Setup Screen ................... 26 Loading a Project..................... 26 The Gallery Screen ..................27 The Setup Menu ....................
- Page 5 Starting Setup… ....................39 Using Setup...................... 40 Typical....................... 42 Compact ....................42 Custom ...................... 42 VIP Composer Configuration................45 Launching VIP Composer ................45 The Setup Menu ....................46 The “Preferences” Tab................46 The “Sites” Tab..................46 “Floppy” Sites ................... 48 “Serial” Sites..................48 “Modem”...
- Page 6 Default Dwell.................... 75 Reordering Pages .................... 78 Saving Your Work................... 80 More Time Domain Examples............... 80 Publishing to a VIP Unit................. 83 Creating Your Own Project................86 Linked Pages....................89 More About Publishing.................. 91 Publishing to a Single Site............... 91 Publishing to Multiple Sites..............
-
Page 7: Introduction
VIP Plus Express 30 Images via Disk VIP Composer Express 150 Images via Serial 150 Images via Modem 150 Images via Network * To use a VIP1’s modem capabilities, an upgrade to VIP Composer Express is required. VIP User Manual... -
Page 8: Software
VIP Composer. You should skim through this manual once before setting up your unit or installing your software in order to get an overview of how the VIP works. Then, read through each chapter, especially the tutorial, following the examples given. -
Page 9: Customer Support
Customer Support Should you have any questions about installing or using your MagicBox VIP system, please call our technical support line at 541-752-5542, send a fax to 541-752-5614, or write to: MagicBox, Inc. 1600 SW Western, Suite 130 Corvallis, OR 97333 You can also send email to: support@magicboxinc.com... -
Page 10: Copyright And Use
Inc. Other terms, including TrueType, InstallShield, Windows, JPEG, etc., are trademarks of their respective manufacturers. The software in the VIP player unit was jointly developed. Portions of the software are copyrighted by Avicor, Inc., and other portions by MagicBox, Inc. -
Page 11: Credits
Credits Executive Producer: Tom Searcy Project Director: Bob Richardson Production Manager: Karl Frederick VIP Composer Software: Karl Ott VIP Player Development: Gavin Bradshaw Brian Larsen Bryan Silbermann Special Thanks: Garrett Andres Scott Bowman Anne Davies Ramona Perry-Campbell VIP User Manual... -
Page 12: Warranty
Warranty The VIP player unit hardware is warranted against defects in parts and labor for a period of one year from the date of purchase. This warranty does not apply to damage caused by misuse or external forces such as power fluctuations, extreme temperatures, exposure to excessive moisture, or other acts of nature. -
Page 13: Software License
90 (ninety) days after the date of original purchase. If a defect occurs during the 90-day period, you may return the disks to MagicBox, Inc. for a free replacement. The remedy for breach of this warranty shall be limited to replacement and shall not encompass any other damages, including but not limited to loss of profit, and special, incidental, or other similar claims. -
Page 14: Fcc Statement
Radio Interference Regulation of the Canadian Department of Communications. “Le présent appareil numérique n’èmet pas de bruits radioélectroniques dépassant les limites applicable aux apparils numéeriques de las class B prescrites dan le Règlement sur le brouillage radioélectrique édicté par le ministrère des Communications du Canada.” VIP User Manual... -
Page 15: Important Safety Instructions
12. If the device will not be used for a long time period, you should disconnect it. 13. Any objects or liquids should never enter the device via its openings. This could cause a fire or an electric shock. VIP User Manual... - Page 16 Use of unsuitable parts can cause more damage and may void your warranty. 17. Please turn to the manufacturer for all questions concerning service and repair. 18. The power outlet must be installed near the equipment and must be easily accessible. VIP User Manual...
-
Page 17: Hardware Setup
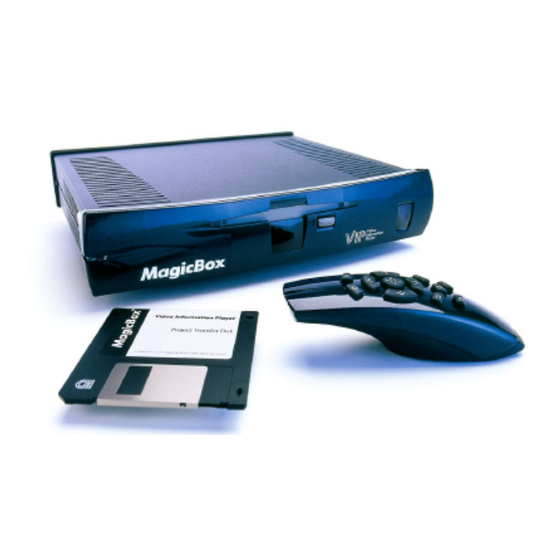
Box Contents Before you begin setup of your VIP unit, make sure that the following components are included in the original packaging: __ VIP Main System Unit __ Remote Control __ Power Cord __ Ethernet Adapter (“Express” Models Only) __ Ethernet Adapter Power Supply (“Express” Models Only) -
Page 18: Find A Suitable Location
In addition, a serial port is located on the front of the unit, behind a flip- up plastic cover. If you intend to use the serial port, you must use a VIP Serial Cable from MagicBox, Inc. Use of other cables which may seem to fit, such as Macintosh serial cables or S-Video cables, could damage the VIP unit. -
Page 19: Select A Television Standard
North America is called “NTSC”. The standard used in many European countries is called “PAL”. On the back of the VIP unit is a switch labeled “NTSC / PAL” – ensure that this switch is set to the standard used at your location. -
Page 20: Connect The Ethernet Adapter Vip "Express" Models Only
“Xircom” Ethernet Adapter and Power Supply With the power cable disconnected from the VIP unit, connect the adapter to the “Parallel” port on the rear of the VIP, tightening the screws for a secure connection. Then, connect the Ethernet adapter’s power supply and your network cable. -
Page 21: Connect The Power
Connect the Power Once you are sure everything is connected properly, connect the power cable to the rear of the VIP unit and then plug it into a power outlet. Test the Demo Disk Once you’ve connected a monitor to your VIP unit and have applied... -
Page 22: Configure The Vip Unit
At any point you may press the “Menu” button on the remote control, and the VIP unit will enter the Setup Screen: If you have a VIP “Express” model, you will also see a “Network” option above the “Preferences” option. -
Page 23: Set The Time
“Set” and press Select ( ). You will be returned to the Setup Screen. It is important to set the date and time because the VIP unit uses this information to determine when to play certain pages that you have created. -
Page 24: Exit The Setup Screen
Play ( ) on the remote. For more details on the Setup Screen, including the “Network” menu for VIP “Express” models, refer to the next section of this manual, “VIP Unit Reference.” The network information is under the heading “Network Setup.”... -
Page 25: Vip Unit Reference
30 pages on a disk. Serial Transfer All VIP units can be updated using a serial cable connected to a PC, instead of needing a floppy disk for transfer. ⌧... -
Page 26: Modem Transfer
Modem Transfer In addition to the direct serial cable, VIP units can receive images via a modem. The VIP unit automatically detects a modem when it boots. ⌧ If you intend to use the serial port with a modem, you must use a VIP Modem Cable from MagicBox, Inc. -
Page 27: Important Considerations
When you create pages in VIP Composer, you can schedule them to only show up at certain times. Because of this, it is important that the VIP unit be set to the correct date and time. See the previous chapter on setting up the hardware for information on programming the date and time. - Page 28 The VIP unit turns on automatically. The VIP unit has no hard power switch. When you plug the unit in, it will immediately turn on. You can put the unit into sleep mode using the remote control, but the unit will turn on again after a power interruption.
-
Page 29: Using The Remote Control
This button will enter and exit the VIP unit’s sleep mode. If the VIP unit is on, press the Power ( ) button to make the unit go to sleep. The display will go blank and the power light will turn off. -
Page 30: Arrows
Gallery view (more about the Gallery view later in this chapter). Menu - The Menu ( ) button takes you to the VIP setup menu. Opt 1, Opt 2, Tag, Esc - These buttons are reserved for new functions in the future and are not currently used by the VIP unit. -
Page 31: The Main Menu Screen
The Main Menu Screen If no disk is inserted in the VIP unit, you will be taken to the Main Menu screen when you turn the unit on. This screen appears below: The main menu screen offers two choices:... -
Page 32: Enter Setup Screen
VIP Composer software (described later in this manual), or VIP software upgrade disks. Enter Setup Screen Selecting the rabbit icon will take you to the VIP setup menu. The same thing can be accomplished by pressing the Menu ( ) button on the remote control. -
Page 33: The Gallery Screen
The Gallery Screen In addition to playing pages automatically, you can use the VIP unit’s remote control to access pages individually. This is useful for live presentations, where you can use the VIP just like a slide projector. -
Page 34: The Setup Menu
The disk icon will cause the VIP to reload all of the pages from the disk. Use this for times when you have interrupted the loading process and want to start over, or if for some reason the VIP does not initially detect the insertion of a new disk. - Page 35 Selecting “Show Time Overlay” will display the current time in the lower right hand corner of the screen. By selecting “Hide Time Overlay”, the time will not be displayed. **Dwell times for pages to display the time must have a minimum of seconds** VIP User Manual...
-
Page 36: Time / Date
Used with VIP Plus Widescreen and VIP Plus Express Widescreen units only** Time / Date The VIP unit uses the current time and date to determine when to display pages from your project. Setting the Date A 6-digit digital display showing the current Month, Day, and Year will appear. -
Page 37: Setting The Time
It is important to set the date and time because the VIP unit uses this information to determine when to play certain pages that you have created. When you create pages on your PC, you can set starting and ending dates and times. -
Page 38: Reset
Upgrade Future upgrades to the software inside the VIP unit, if applicable, will be available on floppy disk. When you insert an upgrade disk, the unit will automatically detect it and ask you if you want to perform the upgrade (see later in this chapter). -
Page 39: Select A Network Adapter Type
From the Setup Screen, select the “Network” menu and then select “Adapter”. The following menu will appear: Several Ethernet Adapter types are available for the VIP. Note the name on the Ethernet Adapter. It will correspond to the correct menu item. Two adapters: GVC and MagicBox 1 are supported, but not pictured. -
Page 40: Set The Network Address
⌧ When connecting the adapter to the VIP’s parallel port, ensure that the power cord to the VIP unit is unplugged in order to prevent damage. After connecting the adapter, first connect the adapter’s own power supply cable, then connect the VIP’s power cable. -
Page 41: Set The Gateway
Network Administrator should verify that the network is operating properly. The Network Adapter on the back of the VIP unit should have it’s power light on. (The “Xircom”-style adapter will not show a power light until it has been properly configured.) -
Page 42: Updating The Unit's Software
To verify that data can reach the VIP unit, use a PC on the same network. Open an MS-DOS prompt on the PC, then type in a “ping” command: ping x.x.x.x Substitute your IP address for the “x.x.x.x” shown above. For example, if the IP address of your VIP unit is “10.1.4.52”, then you... - Page 43 Do not disconnect the power from your unit during the upgrade process. Although the unit is designed to survive a power failure during the upgrade process, a power interruption at exactly the wrong time can permanently damage your unit. VIP User Manual...
-
Page 45: Vip Composer Installation
Requirements To install the VIP Composer software, your computer must meet the following requirements: • 100MHz 486 or better (Pentium-class recommended) • 32MB RAM • 50MB Hard Drive Space (10MB for “Compact” Install) • CD-ROM Drive • Super VGA card with True Color modes (800x600 or higher resolution recommended) •... -
Page 46: Using Setup
After this is complete, the InstallShield® Wizard will be started. The first InstallShield® Wizard page is shown below: This page shows copyright information and also informs you that you should shut down any Windows programs before continuing. When you are ready to continue, click “Next >”. VIP User Manual... - Page 47 The Wizard will now display the software license agreement for VIP Composer. This software license agreement is also printed in the Introduction section of this manual. After you have read the license agreement, click “Yes” if you want to continue. Clicking on “Yes” constitutes your acceptance of the terms of the license agreement.
-
Page 48: Typical
Before you can continue with the installation, you must enter your VIP Composer serial number. This number is printed on your CD-ROM and your registration card. This number is not the serial number of your VIP player unit itself. It should start with a “Z” and will be in the format “ZXX-XXXX-XXXX”, where “X”... - Page 49 Next, the Wizard will ask for the name to use for the Program Group containing VIP Composer. This is normally called “VIP Composer”, and will be placed inside the “MagicBox” Program Group – you only need to change the selection if you want to use your own custom Program Group.
- Page 50 When you are done, click “Finish” and the installation process will be complete. See the next sections (“VIP Composer Setup” and “VIP Composer Tutorial”) for information on how to launch, configure, and begin using the VIP Composer software.
-
Page 51: Vip Composer Configuration
This section will describe how to launch the VIP Composer software and configure the program’s settings. Launching VIP Composer To launch the VIP Composer software, use these steps: Click on the Windows “Start” button on the taskbar. Click on “Programs”... -
Page 52: The Setup Menu
The “Sites” Tab The sites tab is where VIP Composer is configured to publish completed work to your VIP unit(s). When you first install VIP Composer, the list of sites under the sites tab will be empty:... - Page 53 If you do not plan on always using the same file, leave “Ask at Publish Time” selected. (If this is your first time using VIP Composer, then you probably have not created a project yet, so skip this step and come back later if you want to change this setting.)
-
Page 54: Floppy" Sites
Publish”, and “Print Dymo Label at Publish Time” are reserved for future expansion and are not currently used. Depending on the way each VIP unit is connected, there are different ways to set up each site description, depending on how you want to publish your files to the VIP unit. -
Page 55: Modem" Sites
#’s you normally dial) of your VIP unit’s modem. At publish time, VIP Composer will automatically dial the modem and send your project’s pages to the VIP unit. “Network” Sites The “Network” publish method is for VIP units... -
Page 56: Completing Site Setup
The names of the sites will be listed in Alphabetical order, and an icon will appear next to each site name indicating the connection method selected: Floppy Serial Modem Network Click on “OK” to save your setup changes and to return to the main menu. VIP User Manual... -
Page 57: Vip Composer Tutorial
This section will introduce you to the main concepts in creating pages for the VIP unit using the VIP Composer software. Be sure that you have already installed and configured the software using the instructions in the previous two chapters. The instructions on launching the program... -
Page 58: The Tutorial Disk
If it does not, or if you see the screen below, then your VIP unit needs to have the correct date and time set. Do so now using the remote control. (If you need help, please refer to the hardware setup chapter earlier in this manual.) -
Page 59: Opening The Tutorial Project
In Thumbnail Mode, you view actual images of your pages in a miniature grid similar to the Gallery View in the VIP unit itself. You may use either mode your prefer – the rest of this tutorial will use List Mode. - Page 60 A closer view of the List Mode: A closer view of the Thumbnail Mode: To change the mode between, click on the “View” menu at the top of the page and select or deselect the checkmark next to “Pages As List”. VIP User Manual...
-
Page 61: The Project Editor
To select a page you want to work on, simply click the mouse once on that page’s entry in the list. For this example, click on Page #15 – “Background”, which is the last page in the tutorial. VIP User Manual... - Page 62 To work on the selected page, click on the “Edit” button on the right of the screen. Alternately, you can double-click on an entry in the list. You will now be taken to the Page Editor screen where you can change the appearance of a particular page. VIP User Manual...
-
Page 63: The Page Editor
Most of the work in the Page Editor is accomplished by using the Tool Palette and Tool Bar. The Tool Palette The Tool Bar Each of the above icons will be described later in this manual. This example focuses on the Page Background icon: The Page Background Icon VIP User Manual... -
Page 64: The Safe Text Area Guides
This problem has led video professionals to define what is known as the “Safe Text Area”. Text placed inside this area will show up for sure on any TV that isn’t terribly out of alignment. In VIP Composer, this area is represented by the thin rectangle. VIP User Manual... -
Page 65: Changing The Background
Notice that along the bottom of the Page Background dialog, there are four sets of color buttons – “Color 1” through “Color 4”. These buttons control which colors will be used to draw a ramp background. VIP User Manual... - Page 66 Currently, “Color 1” and “Color 2” are set to black. Click on the “Color 1” button. A Color Dialog like the one below will appear: VIP Composer lets you select from a palette of 64 predefined colors designed to look good on video. You can also design your own custom colors –...
- Page 67 The Exit icon on the Tool Palette is the normal way to exit from the page editor. You will need to turn the Tool Palette back on using the View menu before you can exit from the Page Editor. VIP User Manual...
- Page 68 Click on the “Browse” button to select a background file. A File dialog will appear. If this is the first time you have run VIP Composer, you will need to locate the folder containing the included backgrounds. Look for a folder named “Backgrounds_HiRes”, “Backgrounds_LoRes”...
-
Page 69: Changing The Text
Text Object. Try moving the text around – just click and hold the mouse down anywhere inside the Tracker Control and drag the mouse around. Let go when the text is where you want it. VIP User Manual... - Page 70 Now type “has” using the keyboard. The text will now read “This page has a background.” Now click on “OK” to be returned to the Page Editor. Notice that the Text Object has changed to reflect your alterations. VIP User Manual...
- Page 71 Text Object Enhancements The same boxes that allow you to adjust image coordinates and size are also available on VIP text objects. When viewing a text object’s Text Settings dialog, notice the additional boxes near the bottom: These text settings work in a similar manner to how they function with Image Objects with the exception that the “Height”...
- Page 72 Just as with text objects, image objects can have a border (outline) and a shadow. Use the controls in the Picture Properties dialog to select a border type, thickness and color, and/or a shadow type, thickness, direction, and color(s). VIP User Manual...
- Page 73 Ratio”, you can stretch or distort the object horizontally or vertically. Image Processing VIP Composer Professional allows to adjust the brightness and contrast of an image object for optimum results. Simply fill in your desired value in the “Brightness” and “Contrast” boxes. You will have to click on OK to exist the Picture Properties dialog in order to see the effect of the values you enter.
-
Page 74: Page Properties
Click on the first page in the list – “Welcome” – and then click on “Edit”. You will be taken to the Page Editor: VIP User Manual... -
Page 75: General
Description, Dwell Time, Transition Style and Speed, and Output Quality. Description This is a short description of the contents of your page. This description shows up in the Project Editor next to the page number. VIP User Manual... -
Page 76: Dwell Time
A “Fast” transition takes about one to two seconds, depending on the style. A “Slow” transition takes three to five seconds. If you are using the “Fast Cut” transition, the speed is ignored. VIP User Manual... -
Page 77: Output Quality
Normally, pages are set to Medium quality. As you project grows to include more pages, you may hit the limit of the single floppy disk that goes to the VIP Player. A typical number of pages to expect is about 30. -
Page 78: Time Domain
For example, if you were advertising an item that is supposed to be on sale from December 3, 2001 until December 24, 2001, you can set the Starting Date to “12/3/01” and the Ending Date to “12/24/01”. VIP User Manual... -
Page 79: Starting Time / Ending Time
Time Domain, imagine a page that you wanted to show up only from March 15, 2001 through (and including) April 30, 2001, and only on Mondays, Wednesdays, and Fridays between 10am and 2pm. To do this, enter: VIP User Manual... -
Page 80: Project Properties
Output Quality, which must be done only from within the Page Editor. Project Properties In addition to every page having its own properties, the Project itself has a set of properties. Click on the “Project Properties” button and the Project Properties dialog will appear: VIP User Manual... -
Page 81: Author / Company / Notes
Version / Created By These fields tell you what program created this project. In the future, other utilities besides VIP Composer may be able to output VIP projects. Default Dwell The default dwell is the duration a page will be displayed if its own dwell is set to zero. - Page 82 Many TV networks today display a continuous logo in a corner of the screen. This is known as a “Logo Bug”. Now your VIP projects can have a logo or graphic in the corner of all or most of your pages as well.
- Page 83 As mentioned earlier, you can enable or disable the logo from within any page by clicking on “Page Properties” to display the Page Settings dialog, then click on the “Logo” tab: By removing the “Show Logo” checkbox, the logo for this page will be omitted. VIP User Manual...
-
Page 84: Reordering Pages
“Down”. These buttons allow you to move a selected page up or down in the list of pages, thereby changing the order of pages. Start by clicking once on Page 4 – currently “Easy as A.” Your list should look like this: VIP User Manual... - Page 85 Things still aren’t quite right, though. The order is now “Easy as A”, “Easy as ABC”, and “Easy as AB”. Click on Page 3 – currently “Easy as ABC”: Now click the “Down” button once, and the page will move down to Page 4: VIP User Manual...
-
Page 86: Saving Your Work
Save your work now by clicking on the Save icon ( More Time Domain Examples This tutorial contains more pages which use the Time Domain feature under Page Properties. Consider the following pages: These seven pages show up in the Project Editor like this: VIP User Manual... - Page 87 Although there are seven pages, when you play back the project on the VIP Unit, only one of the pages will show up. This is because the time domain settings for each page are set to specific days of the week. The page that says “Today is Monday”, for example, only has the “MON”...
- Page 88 Ordinarily, this page would appear as: You may have noticed that this page did not show up when you played the tutorial disk in the VIP unit. This is because the page’s time domain settings are currently like this: This page is set to run from March 1, 1999 to March 31, 1999, a date that has already passed.
-
Page 89: Publishing To A Vip Unit
The Publish Wizard will now appear. The first step in the Publish Wizard is selecting if you want to publish to disk, to a single site (VIP Composer supports creating projects to multiple VIP units. Each unit is referred to as a “site”.), or to multiple sites in one publish session:... - Page 90 Transfer” disks into your PC’s floppy drive. (Do not use the Tutorial Disk – preserve the original tutorial for future users). After inserting the Project Transfer disk, select “Tutorial.VIP” from the file list. (Click on the file name and then on “Select”.) You can also just double-click on the file name as a shortcut.
- Page 91 Insert the disk into your VIP unit’s floppy drive. The unit should automatically detect the presence of the floppy and begin loading. When the VIP unit loads and plays back your project, it should resemble the one below. The “Today is Sunday” page will be the one matching the current day of the week.
-
Page 92: Creating Your Own Project
Refer to the additional publish method information if you intend to use the Serial, Modem, or Network connection methods, or if you have more than one VIP playback unit and would like to publish to multiple units in one publish session. - Page 93 This section describes each resolution mode. 640x480 (Standard Aspect 4:3) This is the standard mode supported by all VIP players and all editions of VIP Composer. Use this mode if you intend to output compose video or S-Video, or want to create a project that is compatible with any VIP player regardless of version.
- Page 94 VIP unit, it “squishes” the image horizontally to fit in an 800x600 file. Then, the widescreen monitor takes the signal from the VIP and stretches it back out to fit the whole screen. This is known as “Anamorphic” compression.
-
Page 95: Linked Pages
Some users prefer to enter the name of a client or other additional info about the page. Notice this window also allows you to select between “VIP Page” and “Linked JPEG Image”. For now, only select “VIP Page” (the default), and click “OK”... - Page 96 Rather than being edited by VIP Composer, they are merely passed on to the VIP unit “as-is” at publish time. This can lead to a quality savings as the JPEG file is directly copied, rather than reprocessed by VIP Composer.
-
Page 97: More About Publishing
More About Publishing The Publish Wizard offers several different options for publishing your projects to VIP units. Earlier in this chapter, the “Publish to Floppy” method was explained. There are two additional methods, “Publish to Single Site”, and “Publish to Multiple Sites” which are explained here. -
Page 98: Publishing To Multiple Sites
After you have selected all the sites to which you want to publish, click on “Finish”, and move on to the next heading of this tutorial: “Project Selection”. VIP User Manual... -
Page 99: Project Selection
Project Selection VIP Composer is just about ready to begin publishing. But first, it needs to know what project to publish to the current site. (This step will be repeated for each site if you are using the “Publish to Multiple Sites” option.) -
Page 100: Floppy
The top progress bar indicates the overall progress (it will reach the right when publishing to the disk is complete), while the bottom progress bar indicates the progress of the current file being copied. VIP User Manual... -
Page 101: Serial
A bottom progress bar will appear for each file that is being transferred. Modem This publish method works in a very similar fashion to “Serial”, with the addition of modem dialing at the beginning of the process. VIP User Manual... -
Page 102: Network
Network The “Network” publish method uses TCP/IP networking to connect to a VIP unit at high speed. It displays the following progress window: The top progress bar shows the overall publishing process for this site, while the bottom bar shows the progress of the current file being transferred. -
Page 103: Frequently Asked Questions
.JPG, .JFIF, .PCD, .PCX, .PNG, .TGA, .TIF, .WMF, .WPG, .BMP, .JP2, & .GIF. Currently only static .GIF images (non animated) are supported. Can I preview my project in Composer before publishing it to the VIP? VIP Composer does not have a specific preview function at this time. - Page 104 Try to publish to your VIP unit. If you are still receiving the same error, contact your network administrator to verify that your settings haven’t been changed. Contact Technical Support if you have exhausted both possibilities. Can I use Microsoft PowerPoint in a Composer Project? PowerPoint allows you to save the presentation as a series of .JPG images –...
Need help?
Do you have a question about the VIP and is the answer not in the manual?
Questions and answers