Table of Contents
Advertisement
Quick Links
Advertisement
Table of Contents

Related Manuals for Telstra Slim Touch 9650


Summary of Contents for Telstra Slim Touch 9650
- Page 1 Telstra Slim Touch 9650 DECT 6.0 cordless phone with integrated answering machine User Guide This telephone has been designed for ease of use. Please read the instructions and keep it handy for future reference. If you have any problems with your phone, refer to the Help...
- Page 2 Introduction To your Telstra Slim Touch 9650 DECT 6.0 Cordless Telephone with Answering Machine • Phonebook – lets you store up to 200 contact * IMPORTANT You need to subscribe to Telstra’s numbers for easy dialling. Calling Number Display service to be able to see •...
- Page 3 This product has been designed and tested Hearing aid? for Australian conditions for use with Telstra’s Please note that the Telstra Slim Touch 9650 works by sending radio signals between the base network. and handset. These signals may interfere with This User Guide provides you with all the some hearing aids, causing a humming noise.
-
Page 4: Table Of Contents
Location End a call Setting up Receive a call Setting up for multiple packs Earpiece/ handsfree volume Using your Telstra Slim Touch 9650 phone on a Broadband ADSL line? Mute Date and time Handsfree Set date and time manually Make a handsfree call... -
Page 5: In This Guide
Delete the Entire Call List Settings Flashing Message Indicator (FMI) Handset settings Telstra Home Messages 101® Ringer volume To call Telstra Home Messages 101® Ringer tone Clear flashing message indication Alert tones To manually turn off the new voicemail Handset reset... - Page 6 Turn on/off the message alert Cleaning Remote access Environmental To remotely access your answering Telstra accessories and replacement items system How many telephones can you have Set the remote access code Using the answering machine at the base Product warranty & Customer service...
-
Page 7: Important Safety Instructions
Important safety instructions When using your telephone equipment, • When the power supply cord or plug basic safety precautions should always is damaged or frayed. be followed to reduce the risk of fire, • If the product does not operate electric shock and injury, including the normally by following the operating following:... - Page 8 Important safety instructions damage. Telstra will not be held liable for damage arising from such noncompliance. 11 Use only the AC power adaptors supplied with this product. Please contact TecHelp on 1300 369 193 for replacement adaptors. 12 Please ensure that the polarity plug is inserted correctly.
-
Page 9: Getting Started
Getting started Location Putting it as high as possible ensures the best signal. Place your Telstra Slim Touch 9650 within 2 metres of the mains power socket and telephone Setting up socket so that the cables will reach. 1. Plug the mains power cable into the base... -
Page 10: Battery Low Warning
2. To fit the NiMH battery into the handset, slide WARNING out the battery compartment cover. Place Do not place your Telstra Slim Touch 9650 in the the supplied rechargeable battery pack in bathroom or other humid areas. the battery compartment, with the battery IMPORTANT connector plugged in, as shown. -
Page 11: Setting Up For Multiple Packs
Getting started Setting up for multiple packs During charging, the will appear to be filling If you have purchased a Telstra Slim Touch in the display. 9650 multiple pack, you will need to prepare Battery performance additional handsets and chargers for use. -
Page 12: Using Your Telstra Slim Touch 9650 Phone On A Broadband Adsl Line
Place each answering machine message you receive. the supplied rechargeable battery pack in If you have not subscribed to Telstra Calling the battery compartment, with the battery Number Display you can set the date and time connector plugged in, as shown on page 10. -
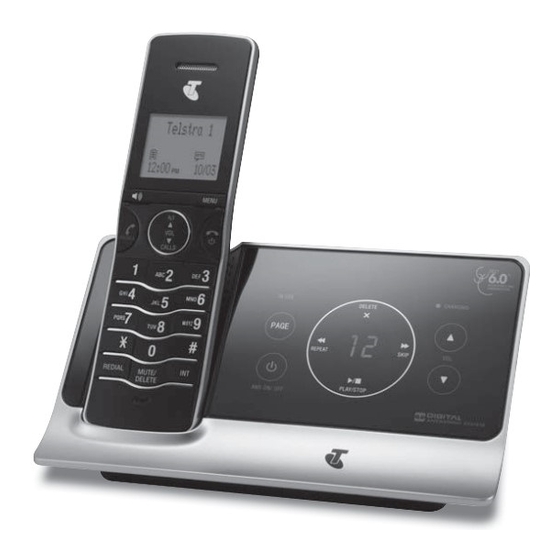
Page 13: Getting To Know Your Phone
1. EARPIECE 2. MENU In idle mode: press to access main menu. Press and hold to access Telstra Service Number list. In menu/editing mode: press to confirm and save the settings. During a call: press to access the sub-menu list. -
Page 14: Star Key
Key 1, 2 and 3 press to decrease volume. In Idle: Call list/phonebook/redial list entry: press and hold KEY 1 to dial Telstra Home press to scroll down the list. Messages 101® or MessageBank® service During a call: 6. ALPHANUMERIC KEYPAD press and hold KEY 2 to access a Call Waiting Call. - Page 15 During a call: press to mute/un-mute the microphone. Press during a call to activate Recall for use with Telstra Network Features such as Call Waiting. Call list/phonebook/redial list entry: press to delete the selected entry. 12. SPEAKER...
-
Page 16: Handset Display
Off when microphone is unmute during a call. On when new voicemail received Display icons on Telstra Home Messages 101® or Icons can be On (visible), MessageBank® service. Flashing or Off (not visible): Off when there is not new voicemail. -
Page 17: Answering Machine Base
Getting to know your phone Answering machine base 1. IN USE LED 3. DELETE Flashes when there is an incoming call. During message playback: Steadily on when the handset is in use. touch to delete the current message. In idle: 2. -
Page 18: Navigating The Menus
12. SPEAKER 5. CHARGING LED Navigating the menus Steadily On: Your Telstra Slim Touch 9650 has an easy to use when the handset is put into base cradle for menu system. Each menu has a list of options, charging. as outlined on the following page. When the 6. -
Page 19: Message Counter Display
Getting to know your phone Message counter display Display Description Display Description --/XX 0F->-- Flashing alternatively with : Time When answering machine is OFF. is not set and there are XX new voice When answering machine is OFF and messages received where XX is from 01 no new TAM messages received. -
Page 20: Menu Layout
Getting to know your phone Menu layout Ans. System Phonebook Call Log Ringer Ringer Tone Tones Register HS De-register Volume Play message Review Review Ringer off Ringer tone Key tone System PIN System PIN Del all old Store Del all calls Level 1- 6 1- 10 Battery low... -
Page 21: Keystroke Table
Getting to know your phone Keystroke table Upper case Lower case Highlighted characters: Only upper case supported. -
Page 22: Using The Phone
Using the phone Switch handset off End a call To switch the handset off: 1. Press or put the handset in the telephone 1. Press and hold . base or charger. 2. Press to confirm. The screen displays the elapsed time as you talk (in hours, minutes and seconds). -
Page 23: Earpiece/ Handsfree Volume
Using the phone Earpiece/ handsfree volume Make a handsfree call Press to adjust the listening 1. Dial the number then press on the volume of the earpiece or loudspeaker with handset. is displayed. You will then hear five levels when during a call. Each press of the your call over the handset loudspeaker. -
Page 24: Redial
Using the phone Redial Temporary ringer silencing Up to 20 of the last telephone numbers called Press or while the telephone is ringing to are saved in the redial list. You can select any of silence the ringer temporarily. This will silence the numbers to redial or delete. -
Page 25: Phonebook
Phonebook You can store up to 200 names and numbers Review an entry in the phonebook. Names can be up to 15 1. In standby mode, press . The first entry in characters long and numbers up to 30 digits. the phonebook will be displayed. -
Page 26: Edit A Name And Number
Phonebook Edit a name and number 1. In standby mode, choose and press PHONEBOOK to select 2. Press twice 3. Press , or use the alphabetical search to browse. 4. Press to select an entry. EDIT NUMBER The screen shows 5. -
Page 27: Settings
Settings Handset settings 3. Press to browse each volume level. A sample of each ringer volume Using the feature menu, you can customize plays as you scroll through the choices. Level 1 many of the telephone’s settings. to 6 and Ringer Off are available. 1. -
Page 28: Alert Tones
The default recall (flash) time is suitable for the 1. Press when in idle mode to enter the Telstra network. It is unlikely that you should feature menu. need to change this setting unless advised to do TONES 2. -
Page 29: Date/Time
Time format 1. Press when in idle mode to enter the Set date and time feature menu. Provided you have subscribed to the Telstra’s IME FORMAT 2. Press to scroll to T Calling Number Display service, the date and 12-HOUR 3. -
Page 30: Telstra Network Services
Telstra Network Features XX MISSED CALL Missed calls are marked with call Telstra on 13 22 00.To ensure the caller’s Each time you review a call list entry marked name is displayed, make sure you have stored... -
Page 31: View Call Details
Telstra Network Services View call details • Press to move the cursor to the left or to the right. 1. Press to access the call list. • Press and hold to insert a dialing pause appears). 1. Press when the handset is not in use. -
Page 32: Delete The Entire Call List
Telstra Home Messages 101® or MessageBank® service. To arrange connection of the Flashing Message Indicator service, simply call Telstra on 13 2200. When a new message is left, the will be displayed on the handset. After you have listened to your message(s) the... -
Page 33: Clear Flashing Message Indication
3. After the second call is answered press and procedure. hold NOTE: For information about using your message service, please contact Telstra on 13 2200 for assistance. To Split a 3-Way Chat or switch between callers 1. Press and hold... -
Page 34: Pre-Stored Telstra Network Features
In idle, 1. Press and hold and press CALL RETURN select 1. Press and hold key to access 10 Telstra services number (non-user programmable) 2. Press or to call the number. FEAT. ASSIST. (To call Feature Assist) To turn Call Forward lmmediate On C.W. -
Page 35: Answering Machine
Answering machine The answering machine records unanswered Play Messages calls when it is activated. It can store up to 99 If you have new messages, the telephone plays messages within the maximum recording time only the new messages (oldest first). If there are of 28 minutes. -
Page 36: Delete All Old Messages
Answering machine Delete all old messages 5. Press to stop playing, press 1. Press when in idle mode to enter the delete the memo. feature menu. NOTE: Memos shorter than one second are not recorded. ANS. SYSTEM 2. Press to select DEL ALL OLD 3. -
Page 37: Ogm Settings
Answering machine OGM settings Play the outgoing message This is the message your callers hear on the 1. Follow steps 1 to 4 in the previous section. answering machine. There is one pre-recorded PLAY 2. Press to select outgoing message, or you can record your own. 3. -
Page 38: Remote Access
Answering machine Remote access Keys Description Remote access allows you to operate your During message Message is not answering machine and listen to your messages playback playing by calling your phone from another phone. Play all messages 1. Press when in idle mode to enter the feature menu. -
Page 39: Set The Remote Access Code
Answering machine Set the remote access code Play Messages If you have new messages, the telephone plays 1. Press to show the menu when the only the new messages (oldest first). If there are handset is not in use. no new messages, the telephone plays back all ANS. -
Page 40: Additional Handsets (Multi Packs Only)
Additional handsets (multi handset packs only) If you have purchased a multi handset pack you 4. Press on the calling handset or place your are able to make internal calls, transfer external handset back in the telephone base or charger calls from one handset to another and use the to transfer the external call to the called conference option. -
Page 41: Deregister A Handset
Additional handsets De-register a handset Register an additional handset Your additional handset(s) will come pre- 1. In standby mode, press to enter the registered but should you need to register a feature menu. handset, follow these steps. DE-REGISTER HS 2. Press to select 1. -
Page 42: Help
Help Phone does not work Cannot dial out or receive calls • Have you installed the battery correctly? • Check that the mains power is correctly See page 10. connected. • Check that the mains power is correctly • The battery may need recharging. connected. -
Page 43: Another Phone
• Another handset registered to your Telstra activate the answering machine. Slim Touch 9650 base may be on the line. • The answering machine might not detect the Answering machine does not record any... - Page 44 • Have you subscribed to Telstra Calling Number • Sometimes your Telstra Slim Touch 9650 can Display? See page 30. interfere with other electrical equipment if it is placed too close. It is recommended that you •...
-
Page 45: General Information
General information Replacing the handset batteries 1300 369 193 or your local electrical retailer. After a time, you may find that the handset • Do not open the handset (except to replace the battery is running out of charge more quickly. handset battery) or the base. -
Page 46: Environmental
Your conditions, such as bathrooms. Telstra Slim Touch 9650 has a REN of 0.1. A total REN of 3 is allowed, if the total REN of 3 • Do not expose your product to fire, explosive or is exceeded, the telephone may not ring. -
Page 47: Product Warranty & Customer Service
Voluntary Product Warranty, VTech will, tcpsupport_au@vtech.com. at no cost to you, repair or replace the If you are trying to access a Telstra product within a reasonable time. Network Service and require assistance Subject to your Statutory Rights, if your... - Page 48 In this guide You will need to ensure that: The benefits conferred by this Voluntary Product Warranty are in addition to other You provide proof of purchase; rights and remedies that are available to Your product is suitably packaged you under law, which cannot be (original packaging is not required);...
- Page 49 Customer service & Product warranty IMPORTANT NOTE: THIS IS NOT A PRODUCT RETURN OR SERVICE ADDRESS - PLEASE CONTACT TECHELP BY PHONE OR EMAIL FOR PRODUCT AND WARRANTY SUPPORT. NO LIABILITY WILL BE ACCEPTED BY VTECH FOR PRODUCTS RETURNED TO THIS ADDRESS UNDER THIS VOLUNTARY PRODUCT WARRANTY.
- Page 52 Telstra Corporation Limited ABN 33 051 775 556. ™ Trade Mark of Telstra Corporation Limited ® Registered Trade Mark of Telstra Corporation Limited...
Need help?
Do you have a question about the Slim Touch 9650 and is the answer not in the manual?
Questions and answers