Table of Contents
Advertisement
Quick Links
Download this manual
See also:
Owner's Manual
Advertisement
Table of Contents

Related Manuals for Grizzly G0619


Summary of Contents for Grizzly G0619
- Page 1 MODEL G0619 DELUXE SMALL MILL/DRILL OWNER'S MANUAL COPYRIGHT © JANUARY, 2007 BY GRIZZLY INDUSTRIAL, INC. REVISED MAY 2007. WARNING: NO PORTION OF THIS MANUAL MAY BE REPRODUCED IN ANY SHAPE OR FORM WITHOUT THE WRITTEN APPROVAL OF GRIZZLY INDUSTRIAL, INC.
- Page 2 ���� ������ �������� �������� ������ ������������ �� ��� ������ ������ ���������� ����������� ��� ������� �� ���� ������������������ ������� �� ����� ���������� ��� ������ ��� ������������ ����� �� ���� ������ ��� ������ �� ������� �������� ������� ��������� ����������� ������������� �� ������ ���...
-
Page 3: Table Of Contents
Test Run and Spindle Break-in ... 14 SECTION 4: OPERATIONS ... 15 Operation Safety ... 15 Spindle Height Control ... 15 Drill Chuck ... 16 R-8 Collets ... 17 Headstock Travel (Z-Axis and Rotation) ... 18 Table Travel (X-Axis and Y-Axis) ... 19 Control Panel ... -
Page 4: Introduction
INTRODUCTION Foreword We are proud to offer the Model G0619 Deluxe Small Mill/Drill. This machine is part of a growing Grizzly family of fine metalworking machinery. When used according to the guidelines set forth in this manual, you can expect years of trouble-free, enjoyable operation and proof of Grizzly’s com-... -
Page 5: Data Sheet
Cord Length... 7 ft. Cord Gauge...14 gauge Recommended Breaker Size... 15 amp Plug...NEMA 5-15 Power Supply...110V, Single-Phase Motor: Type...IP44, Class F, Brushless DC Motor (BLDC) Horsepower...1HP Amps...12A Speed...3500 RPM Cycle...60 Hz Power Transfer ...Belt Bearings...Sealed, Permanently Lubricated G0619 DELUXE SMALL MILL/DRILL ⁄ "H... - Page 6 Digital Milling Depth Readout Digital Tapping Controls and RPM Adjustment Tapping Direction Quick-Shift Buttons on Quill Levers Manual Micro Depth Adjustment Dovetailed Table Ways Dovetailed Column Ways ⁄ " x 20 TPI G0619 DELUXE SMALL MILL/DRILL ⁄ " ⁄ " ⁄ " ⁄...
-
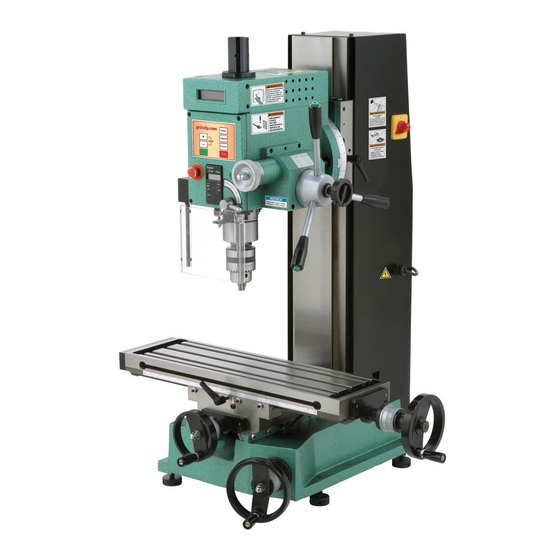
Page 7: Identification
G. Precision Dovetailed Column H. Longitudinal (X-Axis) Handwheel Cast-Iron Base Vertical (Z-Axis) Handwheel K. Cross (Y-Axis) Handwheel Adjustable Foot G0619 DELUXE SMALL MILL/DRILL Identification Figure 1. G0619 Identification. M. Table Locks N. Longitudinal Scale O. Milling Table P. Quill Handle Tapping Button Q. -
Page 8: Section 1: Safety
Wear protective hair covering to con- tain long hair and wear non-slip footwear. 6. NEVER OPERATE MACHINERY WHEN TIRED, OR UNDER THE INFLUENCE OF OPERATING DRUGS OR ALCOHOL. Be mentally alert at all times when running machinery. OPERATING MACHINERY. G0619 DELUXE SMALL MILL/DRILL... - Page 9 Follow instructions for lubricating and changing accessories. 16. MAKE SURE GUARDS ARE IN PLACE AND WORK CORRECTLY BEFORE USING MACHINERY. G0619 DELUXE SMALL MILL/DRILL 17. REMOVE WRENCHES. Make a habit of checking for keys and adjusting wrenches before turn- ing machinery ON.
-
Page 10: Additional Safety For Mill/Drills
No list of safety guidelines can be complete. Every shop environment is different. Like all machines there is danger associated with the Model G0619. Accidents are frequently caused by lack of familiarity or failure to pay attention. Use this machine with respect and caution to lessen the possibility of operator injury. -
Page 11: Section 2: Circuit Requirements
DO NOT connect the machine to the power source until instructed to do so. Amperage Draw The Model G0619 motor draws the following amps under maximum load: Motor Draw ... 12 Amps Circuit Recommendations... -
Page 12: Section 3: Set Up
Hex Nuts M12-1.75 ... 4 • An Assistant ... 1 moving The Model G0619 was carefully packed when it left our warehouse. If you discover the machine is damaged after you have signed for delivery, please immediately call Customer Service at (570) 546-9663 for advice. -
Page 13: Inventory
G. Spindle Spanner Wrench ... 1 H. Hex Wrench Set 3, 4, 5, & 6mm ... 1 ea Drawbar Hex Wrench ... 1 Figure 3. G0619 out of the crate. G0619 DELUXE SMALL MILL/DRILL Figure 4. Inventory. In the event that any nonproprietary parts are missing (e.g. -
Page 14: Clean Up
The unpainted surfaces are coated with a waxy oil to prevent corrosion during shipment. Remove this protective coating with a solvent cleaner or citrus-based degreaser such as Grizzly’s G7895 Citrus Degreaser. To clean thoroughly, some parts must be removed. For optimum performance from your machine, clean all moving parts or sliding contact surfaces. -
Page 15: Feet
Adjust the hex nut(s), as shown in Figure 7, until the mill/drill is level side-to-side and front-to-back. Hex Nut Figure 7. Leveling the mill/drill. G0619 DELUXE SMALL MILL/DRILL Mounting to Workbench Your mill/drill should be bolted to a workbench to provide maximum rigidity and safety. -
Page 16: Test Run And Spindle Break-In
Test Run and Spindle Break-in The Model G0619 spindle speed can be set from 100–1750 RPM. You must follow the proper break-in procedures to ensure the spindle bear- ings break-in and seat before putting any milling load on the machine. -
Page 17: Section 4: Operations
OMMEND that you read books, trade maga- zines, or get formal training before begin- ning any projects. Regardless of the con- tent in this section, Grizzly Industrial will not be held liable for accidents caused by lack of training. G0619 DELUXE SMALL MILL/DRILL... -
Page 18: Drill Chuck
Inspect the chuck from time to time to make sure it is still tight on the arbor. If it is loose, use a dead-blow or other soft headed ham- mer to re-seat the taper. G0619 DELUXE SMALL MILL/DRILL... -
Page 19: R-8 Collets
If you do not use the drill chuck and arbor, you need to use a collet to insert the cutting tool into the spindle. Your Model G0619 features an R-8 spindle taper, which gives the freedom to use standard R-8 collets. These optional collets come... -
Page 20: Headstock Travel (Z-Axis And Rotation)
For unique mill- ing operations, the headstock can be tilted right or left between 0° and 90°. Your mill/drill has a dovetailed slide that allows you to reposition the headstock and change tooling without losing your alignment with a hole or milling path. -
Page 21: Table Travel (X-Axis And Y-Axis)
Table Travel (X-Axis and Y-Axis) The mill/drill table can be moved in the X-axis and Y-axis. Longitudinal Feed The longitudinal feed or (X-axis) is moved by the handwheel shown in Figure 16 at the end of the table. The handwheel will move the table in both directions side-to-side. -
Page 22: Control Panel
Control Panel It is vital that you become familiar with the power controls before operating the Model G0619 (see Figure 18). A. Spindle RPM Display: Shows spindle RPM with an accuracy of +/- 10%. B. Spindle Rotation Mode: Shows the direc- tion the spindle is turning. -
Page 23: Calculating Spindle Rpm
Measure the diameter of your cutting tool in inches. Use the following formula to determine the needed RPM for your operation: (Cutting Speed x 4) /Tool Diameter = RPM G0619 DELUXE SMALL MILL/DRILL Cutting Speeds for High Speed Steel (HSS) Cutting Tools Workpiece Material Cutting Speed (sfm) Aluminum &... -
Page 24: Milling/Drilling Mode
Milling/Drilling Mode This mill/drill is designed to use most end mills, drill bits, and face cutters that are 2" in diameter or less. The milling table has a coolant trough with drain for an optional cutting fluid system. Failure to follow RPM and Feed Rate Guidelines may threaten operator safety from ejected parts or broken tools. -
Page 25: Section 5: Accessories
Mill/Drill machine. Let it do your work! Figure 20. Variable speed power feed kit. H8179—Horizontal Milling Table Take advantage of the G0619 mill/drill 90° tilting headstock feature. Install this lifted cast-iron hori- zontal milling table for the correct clearance when making those side-milling operations. - Page 26 The perfect rotary table for all you model makers and those doing smaller precision work. Comes with clamping kit. " Figure 28. H5685 4" Rotary Table. ⁄ ", ⁄ ", ⁄ ", ⁄ ", ⁄ ", ⁄ ⁄ " x 20. G0619 DELUXE SMALL MILL/DRILL ", ⁄ ",...
-
Page 27: Section 6: Maintenance
Protect the unpainted cast iron surfaces with regular applications of products like G96 Treatment, SLIPIT , or Boeshield ® G0619 DELUXE SMALL MILL/DRILL Figure 29. Headstock ball oiler locations. Figure 30. Table and base ball oiler locations. ® Figure 31. Table ball oiler location. -
Page 28: Section 7: Service
4. Adjust gib (Page 27). 1. Slow feed rate or adjust RPM. 2. Tighten table locks. 3. Adjust gib (Page 27). 1. Loosen/replace lock lever and adjust gib (Page 27). 2. Clean and relubricate headstock leadscrew and gears (Page 28). G0619 DELUXE SMALL MILL/DRILL... -
Page 29: Gibs And Backlash
Gibs and Backlash During the life of your mill drill, you may have to adjust the gibs and the handwheels to remove any lash or looseness that is a result of normal wear. Do not overtighten the gibs or half-nuts, or premature wear will occur. -
Page 30: Service Lubrication
Paint the headstock leadscrew and gear teeth with lithium grease, and oil the bearings as outlined in Figure 35. Reinstall the cabinet assembly on the col- umn. Lithium Grease G0619 DELUXE SMALL MILL/DRILL Lithium Grease Light Machine Oil... -
Page 31: Electrical Components
Electrical Components Note: Available in color online at grizzly.com Main Power Switch Fuse 20 Amp Fuse Figure 37. Main power switch and fuse. Figure 36. Motor power supply circuit board. -29- G0619 DELUXE SMALL MILL/DRILL... - Page 32 Figure 41. Tachometer electrical. Figure 38. Control panel electrical. Figure 39. Chip guard safety switch. Figure 40. Tapping button slip ring contact. -30- G0619 DELUXE SMALL MILL/DRILL...
-
Page 33: Wiring Diagram
����������� ���� � � � � Figures 38 & 41 ���������� ������������� See Figure 39 �������������� ������������� G0619 DELUXE SMALL MILL/DRILL ���� ������ ������� ��� �� ������ ������ �� ���� ����� �� ���������������� ����� ����� ������� �� �� �� �������... -
Page 34: Parts Breakdown
Parts Breakdown -32- G0619 DELUXE SMALL MILL/DRILL... - Page 35 P0619046 TAPER PIN 3 X 18 PSB130M CAP SCREW M10-1.5 X 16 PFH32M FLAT HD SCR M4-.7 X 6 P0619049 DISPLAY HOUSING G0619 DELUXE SMALL MILL/DRILL PART # DESCRIPTION P0619050 LENS P0619051A DIGITAL SPD. DISPLAY UNIT N/S P0619052 BELT COVER...
- Page 36 INSULATION WASHER P0619169 SUPPORT PLATE PSB18M CAP SCREW M4-.7 X 8 P0619171 MAGNET P0619172 BLOCK PS38M PHLP HD SCR M4-.7 X 10 P0619174 SAFETY LENSE P0619175 SHAFT PRP15M ROLL PIN 3 X 8 P0619177 COVER P0619178 SPACER G0619 DELUXE SMALL MILL/DRILL...
-
Page 37: Parts Breakdown
Parts Breakdown -35- G0619 DELUXE SMALL MILL/DRILL... - Page 38 SET SCREW M6-1 X 25 PW01M FLAT WASHER 8MM PRP42M ROLL PIN 3 X 20 PS37M PHLP HD SCR M6-1 X 6 P0619288 RIVET PN18M ACORN NUT M8-1.25 P0619292 SEALED FLEX CONDUIT (LONG) P0619293 SEALED FLEX CONDUIT (SHORT) G0619 DELUXE SMALL MILL/DRILL...
-
Page 39: Label Placement
MUST maintain the original location and readability of the labels on the machine. If any label is removed or becomes unreadable, REPLACE that label before using the machine again. Contact Grizzly at (800) 523-4777 or www.grizzly.com to order new labels. G0619 DELUXE SMALL MILL/DRILL... -
Page 40: Warranty And Returns
WARRANTY AND RETURNS Grizzly Industrial, Inc. warrants every product it sells for a period of 1 year to the original purchaser from the date of purchase. This warranty does not apply to defects due directly or indirectly to misuse, abuse, negligence, accidents, repairs or alterations or lack of maintenance. - Page 41 ���������������������������������������������������������������������������������� � ������������������������������������������������������������������������������������ ����� ����������������������� ������ � ������������������������ ���� ��������������������� ���������������������������� ������ ������������������������ ���������� � ���������������� ���������������������������� ������������������������������� ��������������������������� ��� ��������� ����������� �� ����� �� � ��������� ������ �� ���� �� ���� ��� ��������� �������� �� ���� �� ������� ������ �������� ��� ��������� �� ������� ��� ����������� �� �������� ������������� ���...
- Page 42 ���������������������� ���������������������� ����������������������������������� ����������������������������������� ������������������������������������� �������������������������������������� ������� ����������� ���� ���� ��� ���� ����������� �� ���������� �������������������������������������� ����� ����� ����...
- Page 44 ��� ������ ��� ���� ���� ������� ����� ��� ������� ����� ��� �������� ��� ������� � � � ���� ����� ��� � � �������� ������ ��� � ����� ������ � �� ��� �������� ������� � ������ �������� ������ ������� ������ �� ����� ������...
Need help?
Do you have a question about the G0619 and is the answer not in the manual?
Questions and answers