Avaya 9400 Series User Manual
Digital deskphone
Hide thumbs
Also See for 9400 Series:
- User manual (51 pages) ,
- Installation and maintenance manual (30 pages) ,
- Quick reference (3 pages)

Related Manuals for Avaya 9400 Series


Summary of Contents for Avaya 9400 Series
- Page 1 Avaya 9400 Series Digital Deskphone User ® Guide for Avaya Aura Communication Manager 16-603535 Issue 1 August 2011...
- Page 2 Product provided by Avaya including the selection, arrangement and the products, services, or information described or offered within them. design of the content is owned either by Avaya or its licensors and is Avaya does not guarantee that these links will work all the time and has protected by copyright and other intellectual property laws including the no control over the availability of the linked pages.
- Page 3 For the most current versions of Documentation, see the Avaya Support Web site: http://support.avaya.com. Contact Avaya Support Avaya provides a telephone number for you to use to report problems or to ask questions about your Product. The support telephone number is 1-800-242-2121 in the United States. For additional support telephone numbers, see the Avaya Web site: http://support.avaya.com.
- Page 4 Avaya 9400 Series Digital Deskphone User Guide August 2011 Comments? infodev@avaya.com...
-
Page 5: Table Of Contents
Contents Chapter 1: Introduction to the Avaya 9400 Series Digital Deskphones......Overview of phone buttons and features....................8 Description of LEDs..........................11 Description of icons in the telephone display.................... 12 Navigation tips............................12 Chapter 2: Making calls...................... Making a call............................. 13 Redialing a number........................... - Page 6 Making a call using an abbreviated dial button..................52 Adjusting the brightness of the button module display................52 Adjusting the contrast of the button module display................. 53 Customizing button labels......................... 53 Using the feature buttons.......................... 54 Index............................. Avaya 9400 Series Digital Deskphone User Guide August 2011...
-
Page 7: Chapter 1: Introduction To The Avaya 9400 Series Digital Deskphones
Chapter 1: Introduction to the Avaya 9400 Series Digital Deskphones The Avaya 9400 Series Digital Deskphones are digital telephones for use by enterprises with the Avaya ® Aura Communication Manager call processing system. These telephones put convenient features and capabilities at your fingertips, including a display to view and manage your calls, a contacts list, call history, a menu of options and settings to customize your telephone, and access to your voice mail. -
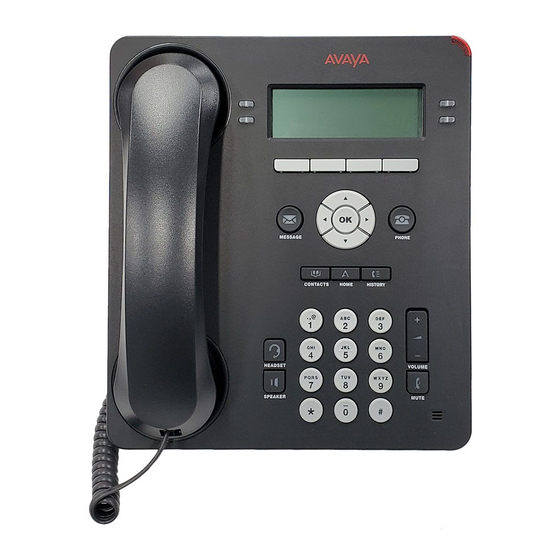
Page 8: Overview Of Phone Buttons And Features
Introduction to the Avaya 9400 Series Digital Deskphones Overview of phone buttons and features Avaya 9404 telephone Avaya 9400 Series Digital Deskphone User Guide August 2011 Comments? infodev@avaya.com... - Page 9 Buttons call on hold. Press a labeled feature button to enable or disable that feature. The feature buttons provide access to the Avaya call management system features that have been administered for your extension. The green LED next to each function key indicates whether the feature is currently on or off.
- Page 10 Press the Contacts button to view the entries in your Contacts list. Avaya Home Press the Home button to gain access to the Avaya menu. The Avaya menu provides options that you can use to customize telephone settings, configure call logging, select the display language, and verify the telephone operation.
-
Page 11: Description Of Leds
Steady green Feature is active. Blinking green Feature is pending (request is being processed and not immediately available). Blinking red Feature is shown on the phone display. Feature is not active. Avaya 9400 Series Digital Deskphone User Guide August 2011... -
Page 12: Description Of Icons In The Telephone Display
Introduction to the Avaya 9400 Series Digital Deskphones Description of icons in the telephone display Icons are provided in the telephone display to indicate call status and navigation choices. The icons that appear in the phone display are described in the following table. -
Page 13: Chapter 2: Making Calls
• Press the Headset button. • Press an available call appearance button. 2. Dial the number you want to call. Redialing a number Procedure To redial the last number dialed, press the Redial softkey. Avaya 9400 Series Digital Deskphone User Guide August 2011... -
Page 14: Calling A Person From The Contacts List
3. Scroll up or down to select the person or number you want to call. 4. Press the Call softkey or the OK button. Avaya 9400 Series Digital Deskphone User Guide August 2011 Comments? infodev@avaya.com... -
Page 15: Chapter 3: Handling Calls
If Auto Hold is not enabled, you must put your active call on hold before answering the incoming call; otherwise, you will drop the active call when you answer the incoming call. Avaya 9400 Series Digital Deskphone User Guide August 2011... -
Page 16: Sending An Incoming Call Directly To Voicemail
The fast blinking green LED next to the call appearance button indicates the call is on hold. 2. To resume the call, press the call appearance button for the call on hold. Avaya 9400 Series Digital Deskphone User Guide August 2011 Comments? infodev@avaya.com... -
Page 17: Transferring A Call
To transfer the call to a call that is on hold, press the call appearance button for the call that is on hold. 4. Press the Transfer softkey to transfer the call. Once the transfer is complete, Transfer Completed appears in the phone display. Avaya 9400 Series Digital Deskphone User Guide August 2011... - Page 18 Handling calls Avaya 9400 Series Digital Deskphone User Guide August 2011 Comments? infodev@avaya.com...
-
Page 19: Chapter 4: Using The Conference Feature
Be sure not to choose the call appearance button for the call that is on soft hold. 4. Press the Conf softkey again to add the person to the conference call. Avaya 9400 Series Digital Deskphone User Guide August 2011... -
Page 20: Putting A Conference Call On Hold
2. Press the call appearance button to resume the conference call. Dropping the last participant from a conference call Procedure While active on a conference call, press the Drop softkey. Avaya 9400 Series Digital Deskphone User Guide August 2011 Comments? infodev@avaya.com... -
Page 21: Chapter 5: Getting Your Messages
Contact your system administrator with any questions. Logging into your voicemail Procedure 1. To log in to your voicemail, press the Message button. 2. Follow the voice prompts from your voicemail system. Avaya 9400 Series Digital Deskphone User Guide August 2011... - Page 22 Getting your messages Avaya 9400 Series Digital Deskphone User Guide August 2011 Comments? infodev@avaya.com...
-
Page 23: Chapter 6: Using Bridged Call Appearances
Joining a call on a bridged call appearance Procedure 1. Scroll to the call in progress that you want to join. 2. Press the call appearance button for the bridged call appearance. Avaya 9400 Series Digital Deskphone User Guide August 2011... -
Page 24: Making An Outgoing Call On A Bridged Call Appearance
1. Press the call appearance button associated with the bridged call appearance. 2. Do one of the following: • Dial the telephone number. • Call the person from the contacts list. • Call the person from the call history. Avaya 9400 Series Digital Deskphone User Guide August 2011 Comments? infodev@avaya.com... -
Page 25: Chapter 7: Using The Contacts Feature
If this is the first contact you are adding, go to step 3. 2. Press the More softkey. 3. Press the New softkey. 4. Enter the name using the dialpad. To enter characters using the dialpad: Avaya 9400 Series Digital Deskphone User Guide August 2011... -
Page 26: Editing A Contact
5. Scroll up or down to choose the field you want to edit. 6. Use the dialpad and softkeys to make changes to the contact information. 7. Press the Save softkey to save your changes. Avaya 9400 Series Digital Deskphone User Guide August 2011 Comments? infodev@avaya.com... -
Page 27: Deleting A Contact
If your contacts list is full, the +Contact softkey is not displayed. 4. To edit the name or number, scroll up or down and edit as appropriate. 5. Press the Save softkey to save your changes. Avaya 9400 Series Digital Deskphone User Guide August 2011... - Page 28 Using the contacts feature Avaya 9400 Series Digital Deskphone User Guide August 2011 Comments? infodev@avaya.com...
-
Page 29: Chapter 8: Using The Call History Feature
Then scroll down one line at a time to view the date and time of the call and then the duration of the call. 4. Press the Back softkey to return to the list view. Avaya 9400 Series Digital Deskphone User Guide August 2011... -
Page 30: Adding An Entry From The Call History To Your Contacts List
For example, if you are viewing the Outgoing calls list, only outgoing calls are deleted from the call history. You are also able to clear all calls from the entire call history. Avaya 9400 Series Digital Deskphone User Guide August 2011... -
Page 31: Setting The Call History Feature
To turn the Log Unanswered option on or off, scroll to this option, and then do one of the following: • Press the Change softkey. • Press the OK button. • Press the associated call appearance/feature button. Avaya 9400 Series Digital Deskphone User Guide August 2011... - Page 32 The Log Bridged option is available only if your telephone has bridged call appearances. 5. Press the Save softkey to save your changes. 6. To turn call logging on or off for another call type, repeat Steps 3 through 5. Avaya 9400 Series Digital Deskphone User Guide August 2011 Comments? infodev@avaya.com...
-
Page 33: Chapter 9: Using Advanced Telephone Features
Chapter 9: Using advanced telephone features Avaya call management systems provide many advanced telephone features such as Directory, Call Forwarding, and Abbreviated Dial buttons.These features are administered on the feature buttons on your telephone. The features that are available to you depend on what your administrator has assigned to your telephone. -
Page 34: Calling A Person From The Corporate Directory
The green LED next to the feature button turns on. 2. To turn the EC500 feature off, press the EC500 feature button. The green LED next to the feature button turns off. Avaya 9400 Series Digital Deskphone User Guide August 2011 Comments? infodev@avaya.com... -
Page 35: Chapter 10: Using The Avaya Home Menu
Chapter 10: Using the Avaya Home menu Use the Avaya Home menu to perform tasks such as adjust and customize phone settings, select the display language, turn call logging on or off for different call types, and set visual and audible alerting. -
Page 36: Setting The Audible Alerting Option
About this task You can set the audio path of your phone so that when you initiate a call, the audio path automatically goes to either the speakerphone or your headset. Avaya 9400 Series Digital Deskphone User Guide August 2011 Comments? infodev@avaya.com... -
Page 37: Setting The Telephone Screen Behavior
• Press the Change softkey. • Press the OK button. • Press the associated call appearance/feature button. • Press the right or left navigation arrow. 6. Press the Save softkey to save your changes. Avaya 9400 Series Digital Deskphone User Guide August 2011... -
Page 38: Setting The Telephone Behavior When Making A Call From Your Contacts List
You can turn call logging on or off for any of these call types. Procedure 1. Press the Home button. 2. Scroll to Applications Settings. 3. Press the Select softkey or the OK button. 4. Do one of the following: Avaya 9400 Series Digital Deskphone User Guide August 2011 Comments? infodev@avaya.com... - Page 39 When set to On, all incoming and outgoing calls on bridged call appearances are stored in the call history. Note: The Log Bridged option is available only if your telephone has bridged call appearances. Avaya 9400 Series Digital Deskphone User Guide August 2011...
-
Page 40: Customizing Button Labels
Availability of this feature depends on how your telephone is administered. See your system administrator for more information. Procedure 1. Press the Home button. 2. Scroll to Applications Settings. Avaya 9400 Series Digital Deskphone User Guide August 2011 Comments? infodev@avaya.com... -
Page 41: Adjusting The Brightness Of The Telephone Display
7. Press the Save softkey to save your changes. Adjusting the contrast of the telephone display Procedure 1. Press the Home button. 2. Scroll to Screen & Sounds. 3. Press the Select softkey or the OK button. Avaya 9400 Series Digital Deskphone User Guide August 2011... -
Page 42: Changing The Ringing Pattern
There are eight personal ringing patterns from which to choose. 6. To listen to the selected ringing pattern, and press the Play softkey. 7. Press the Save softkey to save your changes. Avaya 9400 Series Digital Deskphone User Guide August 2011 Comments? infodev@avaya.com... -
Page 43: Setting The Button Clicks Option
• Press the Change softkey. • Press the OK button. • Press the associated call appearance/feature button. • Press the right or left navigation arrow. 6. Press the Save softkey to save your changes. Avaya 9400 Series Digital Deskphone User Guide August 2011... -
Page 44: Erasing Customized Settings
Press the Erase softkey or the OK button again to confirm. 10. To erase your customized language setting and reset it to English: a. Scroll to Language. b. Press the Erase softkey or the OK button. Avaya 9400 Series Digital Deskphone User Guide August 2011 Comments? infodev@avaya.com... -
Page 45: Verifying Telephone Operation
8. Press the Done softkey when finished. Changing the telephone display language Procedure 1. Press the Home button. 2. Scroll to Advanced Options. 3. Press the Select softkey or the OK button. Avaya 9400 Series Digital Deskphone User Guide August 2011... -
Page 46: Setting Audio Levels On The Handset, Headset, And Speaker
The default setting is On. b. To turn the Headset AGC option on or off, scroll to this option, and then do one of the following: • Press the Change softkey. Avaya 9400 Series Digital Deskphone User Guide August 2011 Comments? infodev@avaya.com... - Page 47 To turn the Headset RCV Loud option on or off, scroll to this option, and then do one of the following: • Press the Change softkey. • Press the OK button. • Press the associated call appearance/feature button. Avaya 9400 Series Digital Deskphone User Guide August 2011...
-
Page 48: Setting The Remote Headset Option
Headset button on the telephone. Note: ™ This feature is currently supported only by the wireless Plantronics Savi Office headset. Other wireless headsets are not supported. Unless you are using the wireless Plantronics Avaya 9400 Series Digital Deskphone User Guide August 2011 Comments? infodev@avaya.com... -
Page 49: Setting The Echo Canceller Option
4. Scroll to Audio. 5. Press the Select softkey or the OK button. 6. Scroll to Echo Canceller. 7. To turn the Echo Canceller option on or off, do one of the following: Avaya 9400 Series Digital Deskphone User Guide August 2011... - Page 50 • Press the OK button. • Press the associated call appearance/feature button. • Press the right or left navigation arrow. 8. Press the Save softkey to save your changes. Avaya 9400 Series Digital Deskphone User Guide August 2011 Comments? infodev@avaya.com...
-
Page 51: Chapter 11: Using The Bm12 Button Module
Chapter 11: Using the BM12 button module The BM12 button module extends the number of call appearances and feature buttons on your Avaya 9408 telephone. It provides 12 additional lines for incoming calls, outgoing calls, and call features. You can connect up to three BM12 button modules to the 9408 telephone. The BM12 button module cannot be used with the Avaya 9404 telephone. -
Page 52: Answering A Call
Adjusting the brightness of the button module display Procedure 1. Press the Home button. 2. Scroll to Screen & Sounds. 3. Press the Select softkey or the OK button. 4. Select Brightness. Avaya 9400 Series Digital Deskphone User Guide August 2011 Comments? infodev@avaya.com... -
Page 53: Adjusting The Contrast Of The Button Module Display
40. Procedure 1. Press the Edit button on the front of the button module. 2. Scroll to Personalize Labels. 3. Press the Change softkey or the OK button. Avaya 9400 Series Digital Deskphone User Guide August 2011... -
Page 54: Using The Feature Buttons
Your button module might have feature buttons for features like Call Forwarding, Call Pickup, Go to Coverage, or Auto Callback. Procedure To use a feature button, press the button next to the feature you want to activate. Avaya 9400 Series Digital Deskphone User Guide August 2011 Comments? infodev@avaya.com... -
Page 55: Index
............answering a call ........... making a call with an AD button ......forwarding incoming calls ........... using the feature buttons ........call history ..........– getting your messages ..........Avaya 9400 Series Digital Deskphone User Guide August 2011... - Page 56 ....... telephone operation, verifying ........telephone screen behavior, setting ......making calls ..............transferring a call ............muting calls ..............visual alerts, setting ............ navigation arrows ............voicemail, logging in ........... Avaya 9400 Series Digital Deskphone User Guide August 2011...
Need help?
Do you have a question about the 9400 Series and is the answer not in the manual?
Questions and answers