Advertisement
Advertisement

Related Manuals for Viper VN1500


Summary of Contents for Viper VN1500
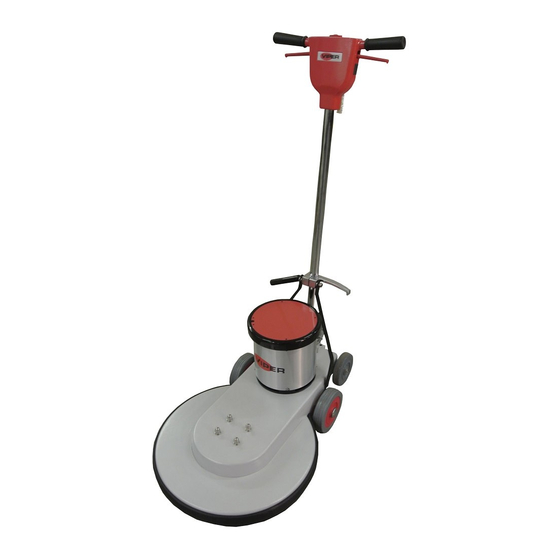
- Page 1 VENOM HIGH SPEEDS www.usviper.com OWNERS MANUAL IMPORTANT: READ OWNERS MANUAL CAREFULLY Please fill out & return your warranty card! VN1500 MODEL# SERIAL# VIPER NORTH AMERICA VIPER ...exceptional P.O. BOX 104 value HAMILTON, MI 49419 (866) 418-4737 REV.04(12-08) (866) 41 - VIPER VF53023...
-
Page 2: Table Of Contents
CONGRATULATIONS on your purchase of a Viper product, and welcome to the V.I.P. family. We appreciate your business and will do everything in our power to keep you happy with your purchase for many years to come. As part of the V.I.P. family, you are entitled to the best protection by one of the most comprehensive warranties the industry. -
Page 3: Safety Precautions
SAFETY PRECAUTIONS !!! This machine must be grounded! 2) Before operating machine: Grounding provides the path of least - Make sure all safety devices are resistance for electrical current. To in place and operate properly. reduce the risk of electrical shock should the machine malfunction, the 3) When using machine: machine has a special grounding plug. -
Page 4: Machine Operation
Operation of High Speed Floor Machine * READ OPERATORS MANUAL THOROUGHLY PRIOR TO OPERATING OR SERVICING THIS MACHINE. 9. To stop the machine at any time, simply release the operating trigger(s) GENERAL USE and the machine will stop automatically. 1. Remove any obstructions or other obstacles in the area which is to be cleaned. -
Page 5: Handle Release Assembly Instructions
Handle Release Assembly Instructions STEP 2 STEP 1 1) Remove handle clamp 1) Remove nut and spacer from handle blocks with hex head bracket assembly. 2) Push the two handle brackets forwa- 2) Place handle assembly into rd so they lean against the motor. handle clamp blocks 3) Re-attach the blocks to the base with... -
Page 6: Parts Lists
PARTS LIST HANDLE GROUP FOR VN1500... - Page 7 HANDLE GROUP PARTS LIST FOR VN1500 PART DESCRIPTION NUMBER REQ'D VF53109 TUBE HANDLE, VN1500 VF13493 SCREW, M6 x 10, HEX SOCKET VF30013 HOOK, CABLE VF14114 SCREW, M8 x 55, HEX WASHER, PLAIN, Φ10xΦ20x2.5 VF13517 VF13504 NUT, M10, NYLON INSERT VF30011...
- Page 8 PARTS LIST BASE GROUP FOR VN1500...
- Page 9 BASE GROUP PARTS LIST FOR VN1500 PART DESCRIPTION NUMBER REQ'D ZD41000C MOTOR, 120V VF53112 BRACKET, LEFT (New Release Mechanism Serial # 301+) AS1212A03 BRACKET, LEFT (Original Release Mechanism) VF53104 AXLE, TRANSPORT VF53106 SPACER, WHEEL, TRANSPORT RETAINING RING, EXTERNAL, Φ12 VF13520 WAVING WASHER, Φ12...
- Page 10 BASE GROUP PARTS LIST FOR VN1500 PART DESCRIPTION NUMBER REQ'D 38 VF52006 SPACER, BEARING RETAINING RING, INTERNAL, Φ42 39 VF14003 40 VF52001 KEY, DRIVEN SHAFT 41 VF52005 DRIVEN SHAFT 42 VF14007 SCREW, M10x32, HEX 43 VF52007 MOUNTING PLATE, DRIVEN SHAFT...
-
Page 11: Wiring Diagram
Wiring Diagram VN1500 Switch Housing Circuit Switch Breaker Black White Motor Green STO 14/3C Handle Motor Power Cord Cord Supply Cord...
Need help?
Do you have a question about the VN1500 and is the answer not in the manual?
Questions and answers
I need help wiring the motor up I didn’t take any pictures before taking apart
This picture is of the motor