Table of Contents
Advertisement
Quick Links
Advertisement
Table of Contents

Subscribe to Our Youtube Channel
Related Manuals for Planet VIP-360PT


Summary of Contents for Planet VIP-360PT
- Page 1 Enterprise PoE IP Phone VIP-360PT User’s manual Version 1.0.0...
- Page 2 Copyright (C) 2010 PLANET Technology Corp. All rights reserved. The products and programs described in this User’s Manual are licensed products of PLANET Technology, This User’s Manual contains proprietary information protected by copyright, and this User’s Manual and all accompanying hardware, software, and documentation are copyrighted.
- Page 3 Trademarks The PLANET logo is a trademark of PLANET Technology. This documentation may refer to numerous hardware and software products by their trade names. In most, if not all cases, their respective companies claim these designations as trademarks or registered trademarks.
-
Page 4: Table Of Contents
TABLE OF CONTENTS Chapter 1 Introduction ....................6 Overview...........................6 Product Features ......................6 VoIP Features........................7 Package Content ......................7 Physical Details ........................7 Chapter 2 System Setup and Basic Operating ............10 System Configurations for LCD / WEB ................10 Network Setup (Static)....................10 Network Setup (PPPoE) ....................14 Network Setup (DHCP) ....................17 Chapter 3 SIP Service Configurations ............... - Page 5 Reboot ..........................54 Security ........................54 MMI Filter .........................54 Firewall ..........................55 NAT Config ........................57 VPN Config ........................60 Appendix A........................ 63 VIP-360PT Specifications ....................63...
-
Page 6: Chapter 1 Introduction
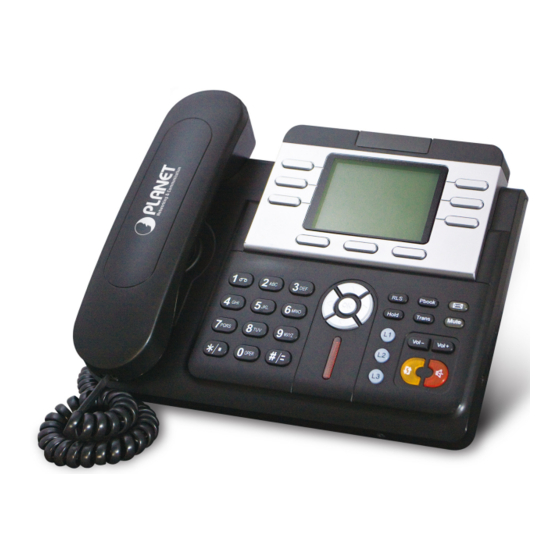
To give most flexibility to users, the VIP-360PT platform contains a graphic LCD with Back light, 3 Line keys, 6 memory key, 3 soft-buttons, 9 fixed function keys and a navigation key. The PLANET VIP-360PT desktop phone is engineered to make Easy-to-install communications, cost-effective to deploy, self-contained, service-integrated, intelligent phone features offering and powerful voice processing power as possible. -
Page 7: Voip Features
Voice processing: VAD, CNG, AEC, Adaptive Jitter Buffer Management Package Content The contents of your product should contain the following items: ‧ Enterprise PoE IP Phone VIP-360PT unit ‧ Power Adapter ‧ Quick Installation Guide ‧ CD-ROM containing the user’s manual. -
Page 8: Keypad Description
Keypad Description LCD Display Menu and all status shall be displayed for users. To make 3 line accounts dial call by pressing the Line1 ~ Line 3. SIP Line Key Soft-button To control SMS, SDial, Memo, etc function button. Users could store their commonly used number in these keys, and call Memory Key them as speed dial PBook... - Page 9 Physical Interfaces RJ-45 connector, for Internet access, connected directly to Switch/Hub through straight CAT-5 cable. The WAN interface also can be connected with 802.3af PoE switch or converter for power supply RJ-45 connector, to maintain the existing network structure, LAN/PC connected directly to the PC through straight CAT-5 cable 5V DC Power input outlet Power...
-
Page 10: Chapter 2 System Setup And Basic Operating
Chapter 2 System Setup and Basic Operating System Configurations for LCD / WEB After Power on IP phone, you should see some text on the LCD screen of IP phone now. If not, please redo step 5 to 6 until you can see some text on the LCD screen. PLANET 13: 40: 45 2010/ 08/ 08... - Page 11 2. Press key until ‘Network’ is selected, then press "OK" or Soft2 ‘Enter’ key. Menu System Config LCD screen will display “WAN”. User Config Network Next Enter Quit LCD screen will display “WAN”. Network VLAN Next Enter Quit 3. Press "OK" or Soft2 (Enter), then choose “Static”. Net Mode <>Static DHCP...
- Page 12 4. Press Soft1Edit) and screen will show “IP”, then press Soft1 (Del) to delete. Input your IP address and press Soft2 (Save) to save what you input. After “Saved” shown, the screen will jump to show the Net mask information. Static Set 192.168.0.36_ Save...
- Page 13 Static Set 8.8.8.8_ Save Quit Press Soft1 (Del) to delete. Input your DNS server address and press Soft2 (Save). After “Saved” shown, the screen will return to show IP information. Static Set 192.168.0.36_ Save Quit 8. Press Soft3 (Quit) once, the screen shows” Net Mode”. the cursor stay at“<>Static”; with Soft2(Save) pressed,the screen shows “Saved”...
-
Page 14: Network Setup (Pppoe)
Network Mode: Static IP: 192.168.0.36 GW:192.168.0.1 Quit Network Setup (PPPoE) By using PPPoE, you don’t have to setup IP address by yourself. Instead, an IP address will be issued to your IP phone by internet service provider automatically, which is more convenient. To complete your network setup using PPPoE, please follow instructions described in this chapter: 1. - Page 15 LCD screen will display “WAN”. Network VLAN Next Enter Quit 4. Press "OK" or Soft2 (Enter), then choose “PPPoE”. Net Mode Static DHCP <> PPPoE Edit Save Quit 5. Press Soft1 (Edit), the screen will display “Account”. The screen will show the current account information.
- Page 16 PPPoE Set Password *********** Save Quit 6. Press Soft2 (Del) again, then input your PPPoE password and press Soft2 (OK), With “Saved” displayed, screen will display the current password: ******,press soft2 (OK) to save the Account and password. The screen will show “Saved” and then jump to show the current net mode. Net Mode Static DHCP...
-
Page 17: Network Setup (Dhcp)
Network Setup (DHCP) By using DHCP, you don’t have to setup IP address by yourself. Instead, an IP address will be issued to your IP phone by DHCP server on your local network automatically, which is more convenient. To complete your network setup using DHCP, please follow instructions described in this chapter: 1. - Page 18 3. Press "OK" or Soft2 (Enter), then choose “DHCP”. Net Mode Static <> DHCP PPPoE Save Quit 4. Press Soft2 (Save), with “saved” shown, screen will jump to show the current net mode. Net Mode Static <> DHCP PPPoE Save Quit to main interface and at this time phone is trying to Press...
- Page 19 Network set up from web 1. Use the web browser on your computer to connect to the IP address of IP Phone. For example, The IP Phone’s default IP address is 192.168.0.1, please type ‘http://192.168.0.1’ in the browser’s address bar. A login window will appear, please enter the username and password. If you do not know the IP address, you can look it up on the phone’s display by pressing button.
- Page 20 3. here, you can choose connection mode (static IP, PPPoE, or DHCP), enter IP address for static IP mode, and enter PPPoE username and password directly on web page. If you want to enable VLAN function of PC and phone Ethernet port of this IP Phone, you can also set it up here. After you have entered the setting you need, remember to click ‘APPLY’...
-
Page 21: Wan Config
The current Gateway IP address. Get MAC Time Shows the time of getting MAC address Please select the proper network mode according to the network condition. VIP-360PT provides three different network settings: Static: If your ISP server pr ovides you the static IP address, please select this mode, and then finish Static Mode setting. - Page 22 Get DNS server automatically Select it to use DHCP mode to get DNS address, if you don’t select it, you will use static DNS server. The default is selecting it. If you use static mode, you need set it. IP Address Input the IP address distributed to you.
-
Page 23: Lan Config
LAN Config LAN Config LAN IP Specify LAN static IP. Netmask Specify LAN Netmask. DHCP Service Select the DHCP server of LAN port or not. After you modify the LAN IP address, phone will amend and adjust the DHCP Lease Table and save the result amended automatically according to the IP address and Netmask. -
Page 24: Qos Config
Qos Config The VOIP phone support 802.1Q/P protocol and DiffServ configuration. VLAN functionality can use different VLAN IDs by setting signal/voice VLAN and data VLAN. The VLAN application of this phone is very flexible. In chart 1, there is a layer 2 switches without setting VLAN. Any broadcast frame will be transmitted to the other ports except the send port. -
Page 25: Qos Configuration
QoS Configuration Field name explanation VLAN Enable Before select it to enable VLAN, you need enable Bridge mode in LAN config. VLAN ID Check Enable Enable VLAN ID check by selecting it. After enable VLAN ID check, if VLAN ID of a data package is not the same with the phones or a data package do not have VLAN ID, the data package will be discarded. -
Page 26: Service Port
5) If Disable the VLAN, regardless to set the Voice/Data VLAN differentiated or not, all packets will not take the VLAN tag; If enable the DiffServ, all packets will only take the DiffServ value. 6) One must to notice, enable the VLAN ID Check Enable that is default, If enable it, the phone will match the VLAN ID strictly. - Page 27 DHCP SERVER DHCP SERVER Field name explanation DHCP Leased IP-MAC mapping table. If the LAN port of the phone connects to a device, this Table table will show the IP and MAC address of this device. Shows the DHCP Lease Table, the unit of Lease time is Minute. Lease Table Name Specify the name of the lease table Start IP...
- Page 28 Set the default DNS server IP of the lease table; Click the Add button to submit and add this lease table Select name of lease table, click the Delete button will delete the selected lease table from DHCP lease table. DNS Relay Select DNS Relay, the default is enabled.
- Page 29 SNTP Setting time zone and SNTP (Simple Network Time Protocol) server according to your location, you can also manually adjust date and time in this web page. SNTP Field name explanation Server Set SNTP Server IP address. Time Zone Select the Time zone according to your location. Time Out Set the time out, the default is 60 seconds.
- Page 30 Time Setup the variety length shift(minutes) Month Setup stat and end month Week Setup start and end week Setup start and end day Hour Setup start and end hours Minute Setup start and end minutes Notice: You need specify the above all items.
-
Page 31: Chapter 3 Sip Service Configurations
Chapter 3 SIP Service Configurations Configuring SIP setting for IP Phone SIP is a request-response protocol, dealing with requests from clients and responses from servers. Participants are identified by SIP URLs. Requests can be sent through any transport protocol. SIP determines the end system to be used for the session, the communication media and media parameters, and the called party's desire to engage in the communication. -
Page 33: Sip Config
SIP Config Field name explanation Register Status Shows if the phone has been registered the SIP server or not; or so, show Unapplied; Server Name Set the server name. Server Address Input your SIP server address. Server Port Set your SIP server port. Account Name Input your SIP register account name. - Page 34 Transfer Expire Time For the phone supports the transfer of certain special features server, set interval time between sending “bye” and hanging up after the phone transfers a call. Enable subscribe Enable the option, the phone will receive the notify from the server. Enable Keep Enable/Disable Keep Authentication System will take the last Authentication...
- Page 35 Transport Protocol Set transport protocols, TCP or UDP; RFC Privacy Edition Set Anonymous call out safely; Support RFC3323and RFC3325; Subscribe Expire Time Overtime of resending subscribe packet. Suggest using the default config. Enable Conference Set to use sever conference. number MWI Number Input the number of the server's voice-mail box Click to Talk...
-
Page 36: Iax2 Config
IAX2 Config IAX2 Config Field name explanation Register Status Shows if the phone has been registered the IAX2 server or not. IAX2 Server Addr Input your IAX2 server address. IAX2 Server Port Set your IAX2 server port, the default is 4569. Account Name Input your IAX2 register account name. -
Page 37: Stun Config
Echo Test Text Specify echo test text’s name. Refresh Time Set expire time of IAX2 server register, you can set it between 60 and 3600 seconds. Enable Register Start to register the IAX2 server or not by selecting it or not. Enable G.729 Enable or disable code G.729 by selecting it or not Stun Config... -
Page 38: Dial Peer Setting
STUN Field name explanation STUN NAT Transverse Shows STUN NAT Transverse estimation, true means STUN can penetrate NAT, while False means not. STUN Server Addr Set your SIP STUN Server IP address STUN Server Port Set your SIP STUN Server Port STUN Effect Time Set STUN Effective Time. -
Page 39: Dial Peer
1、x Match any single digit that is dialed. If user makes the above configuration, after user dials 11 digit numbers started with 13, the phone will send out 0 plus the dialed numbers automatically. 2、 [] Specifies a range that will match digit. It may be a range, a list of ranges separated by commas, or a list of digits. - Page 40 Destination Set Destination address. This is optional config item. If you want to set peer to peer call, please input destination IP address or domain name. If you want to use this dial rule on SIP2 line, you need input 255.255.255.255 or 0.0.0.2 in it.SIP3 into 0.0.0.3 Port Set the Signal port, the default is 5060 for SIP.
- Page 41 This setting will realize speed dial When you dial “2”, function, after you dialing the the SIP1 server numeric key “2”, the number after will receive all will be sent out. 33334444 The phone will automatically send When you dial out alias number adding your “8309“, the SIP1 dialed number, if your dialed...
-
Page 42: Phone
Phone DSP Config In this page, you can configure voice codec, input/output volume and so on. DSP Configuration Field name explanation First Codec The fist preferential DSP codec: G.711A/u, G.722, G.723, G.729 Second Codec The second preferential DSP codec: G.711A/u, G.722, G.723, G.729 Third Codec The third preferential DSP codec: G.711A/u, G.722, G.723, G.729 Forth Codec... -
Page 43: Call Service
Call Service In this web page, you can configure Hotline, Call Transfer, Call Waiting, 3 Ways Call, Black List, white list Limit List and so on. Call Service Field name explanation Hotline Specify Hotline number. If you set the number, you can not dial any other numbers. -
Page 44: Digital Map Configuration
Enable Call Transfer Enable Call Transfer by selecting it. Enable Call Waiting Enable Call Waiting by selecting it. Enable Three Way Call Enable Three Way Call Accept Any Call If select it, the phone will accept the call even if the called number is not belong to the phone. - Page 45 1). End with “#”: dial your desired number, and then press #. 2). Fixed Length: the phone will intersect the number according to your specified length. 3). Time Out: After you stop dialing and waiting time out, system will send the number collected. 4).
-
Page 46: Phone Book
Cause extensions 1000-8999 to be dialed immediately Cause 8 digit numbers started with 9 to be dialed immediately Cause 911 to be dialed immediately after it is entered. Cause 99 to be dialed after 4 seconds. Cause any number started with 9911 to be dialed 4 seconds after dialing ceases. Notice: End with “#”, Fixed Length, Time out and Digital Map Table can be used simultaneously, System will stop dialing and send number according to your set rules. -
Page 47: Function Key
Phone Book Field name explanation Shows the detail of current phonebook. Name Shows the name corresponding to the phone number Number Shows the phone number Ring Type Shows the ring type of the incoming call. Click “Modify” to change the selected information and click the “Delete” to delete the selected record. Notice: the maximum capability of the phonebook is 500 items Function Key Function Key... - Page 48 Line: select SIP1, SIP2, SIP3, Dial peer, or IAX2 in function key type. After you set it, you pick up handset or hands-free, press this function key, and then you can use the corresponding IP line. Memory Key: you can set a number for each memory key. After set it, you can dial the number you set by pressing this memory key.
-
Page 49: Maintenance
Maintenance Auto Provision Auto Provision Field name explanation Current Config Version Show the current config file’s version. Server Address Set FTP/TFTP/HTTP server IP address for auto update. The address can be IP address or Domain name with subdirectory. Username Set FTP server Username. System will use anonymous if username keep blank. -
Page 50: Syslog Config
Syslog Config Syslog is a protocol which is used to record the log messages with client/server mechanism. Syslog server receives the messages from clients, and classifies them based on priority and type. Then these messages will be written into log by some rules which administrator can configure. -
Page 51: Config Setting
Config Setting Config Setting Field name explanation Save Config You can save all changes of configurations. Click the Save button, all changes of configuration will be saved, and be effective immediately. . Backup Config Right clicks on “Right click here…” and select “Save Target As….” then you will save the config file in .txt format Clear Config User can restore factory default configuration and reboot the phone. -
Page 52: Update
Update You can update your configuration with your config file in this web page. Update Field name explanation Web Update Click the browse button, find out the config file saved before or provided by manufacturer, download it to the phone directly, press “Update” to save. You can also update downloaded update file, logo picture, ring, mmiset file by web. -
Page 53: Account Config
Account Config You can add or delete user account, and change the authority of each user account in this web page Account Configuration Field name explanation Keyboard Password Set the password for entering the setting menu of the phone by the phone‘s key board. -
Page 54: Reboot
Reboot If you modified some configurations which need the phone’s reboot to be effective, you need click the Reboot, then the phone will reboot immediately. Notice: Before reboot, you need confirm that you have saved all configurations. Security MMI Filter MMI Filter User could make some device own IP, which is pre-specified, access to the MMI of the phone to config and manage the phone. -
Page 55: Firewall
MMI Filter IP Table list: Add or delete the IP address segments that access to the phone. Set initial IP address in the Start IP column, Set end IP address in the End IP column, and click Add to add this IP segment. You can also click Delete to delete the selected IP segment MMI Filter Select it or not to enable or disable MMI Filter. - Page 56 Firewall supports two types of rules: input access rule and output access rule. Each type supports at most 10 items. Through this web page, you could set up and enable/disable firewall with input/output rules. System could prevent unauthorized access, or access other networks set in rules for security. Firewall, is also called access list, is a simple implementation of a Cisco-like access list (firewall).
-
Page 57: Nat Config
Click the Delete button to delete the selected rule. NAT Config NAT is abbreviated from Net Address Translation; it’s a protocol responsible for IP address translation. In other word, it is responsible for transforming IP and port of private network to public, also is the IP address mapping which we usually say. - Page 59 NAT Configuration Field name explanation IPSec ALG It is an encryption technology. Select it to enable IPSec ALG, the default is enable FTP ALG FTP is a service of connection layer which can transform intranet IP into extranet IP when intranet IP is sending out packet. Select it to enable FTP ALG, the default is enable PPTP ALG Select it enable PPTP ALG, the default is enable...
-
Page 60: Vpn Config
VPN Config This web page provides us a safe connect mode by which we can make remote access to enterprise inner network from public network. That is to say, you can set it to connect public networks in different areas into inner network via a special tunnel. -
Page 61: Vpn Configuration
VPN Configuration Field name explanation VPN IP Shows the current VPN IP address Select UDP Tunnel (VPN Tunnel) or VPN L2TP. You can choose only one for current state. After you selec t it, you’d bette ave configuration and reboot your phone. Enable VPN Select it or not to enable or disable VPN;... - Page 62 Logout Click Logout,and you will exit web page. If you want to enter it next time, you need input user name and assword again...
-
Page 63: Appendix A
Appendix A -360P T Specification Product Enterprise PoE IP Phone Model VIP-360PT Hardware 1 x 10/100 Base-TX RJ-45 port (802.3af support) 1 x 10/100 Base-TX RJ-45 port Display LCD with backlight Function Keys 3 x Line Buttons (Yellow LED) 6 x Memory Key... - Page 64 Network Setting Time Zone Setting SIP port configurable RTP port configurable*/ Call Forwar Call Waitin Call Transfer Call Hold 3-way Conference Black list for reject authenticated call White list Limit call No disturb. Caller ID CLIR (reject the anonymous call) CLIP (make a call with an onymous) Support SMS...
-
Page 65: Ec Declaration Of Conformity
EC Declaration of Conformity For the following equipment: *Type of Product : Enterprise PoE IP Phone *Model Number : VIP-360PT * Produced by: Manufacturer‘s Name : Planet Technology Corp. Manufacturer‘s Address: 11F, No 96, Min Chuan Road, Hsin Tien, Taipei, Taiwan, R.O.C.
Need help?
Do you have a question about the VIP-360PT and is the answer not in the manual?
Questions and answers