Advertisement
Quick Links
Download this manual
See also:
User Manual
Trademarks
Copyright © PLANET Technology Corp. 2004
Contents subject to revise without prior notice.
PLANET is a registered trademark of PLANET Technology Corp. All other trade-
marks belong to their respective owners.
FCC Warning
This equipment has been tested and found to comply with the limits for a
Class A digital device, pursuant to Part 15 of the FCC Rules. These limits are
designed to provide reasonable protection against harmful interference when
the equipment is operated in a commercial environment.
generates, uses, and can radiate radio frequency energy and, if not installed
and used in accordance with the Instruction manual, may cause harmful inter-
ference to radio communications. Operation of this equipment in a residential
area is likely to cause harmful interference in which case the You will be re-
quired to correct the interference at his own expense.
CE Mark Warning
This is a Class A product. In a domestic environment, this product may cause
radio interference, in which case the You may be required to take adequate
measures.
Revision
PLANET IP Phone VIP-150T
QUICK INSTALLATION GUIDE
For model: VIP-150T
Part No.: EMQ-VIP150TV1
This equipment
Advertisement

Related Manuals for Planet VIP-150T


Summary of Contents for Planet VIP-150T
- Page 1 Trademarks Copyright © PLANET Technology Corp. 2004 Contents subject to revise without prior notice. PLANET is a registered trademark of PLANET Technology Corp. All other trade- marks belong to their respective owners. FCC Warning This equipment has been tested and found to comply with the limits for a Class A digital device, pursuant to Part 15 of the FCC Rules.
-
Page 2: Table Of Contents
Table of Contents Chapter 1 Overview 1.1 Before Startup 1.2 Physical Details Chapter 2 Basic Configuration 2.1 Initialize VIP-150T Chapter 3 Making calls 3.1 IP address call (P2P mode): Chapter 4 Quick reference in CD-ROM guide... -
Page 3: Chapter 1 Overview
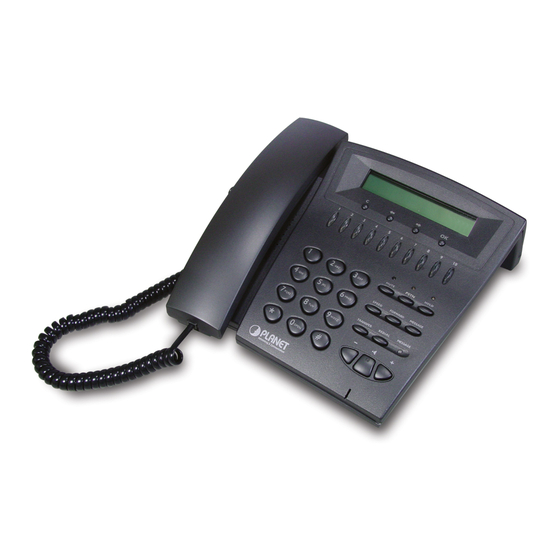
Chapter 1 Overview Thank you for purchasing PLANET IP Phone VIP-150T (VIP-150T, in the following terms). You can now ease the cost of long distance call yet still enjoy the toll voice quality via Internet. 1.1 Before Startup Before your first time start up, please check if the package comes with following items: •... - Page 4 1.2.1 Front view and keypad function: • C: Cancel and Clear • çè : Move to left /previous and right/next. • OK: Press OK to confirm the modification. • Direct Line (DL) Button 1 – 10: Speed dialing according to phone book data 1-10.
- Page 5 • Corresponding list of keypad and symbol: “Space” ; “,” ; “.” ; “!” ; “1” “A” ; “ B” ; “C” ; “2” “D” ; “E” ; “F” ; “3” “G” ; “H” ; “I” ; “4” “J” ; “K” ; “L” ; “5” “M”...
- Page 6 This page is intentionally left blank...
-
Page 7: Chapter 2 Basic Configuration
Chapter 2 Basic Configuration This chapter shows you the starting point of VIP-150T to be integrated into your network and/or Internet. Configuration steps in this quick guide will be focused on keypad configuration. More detail configuration, including keypad, web, and telnet instructions will be illustrated in respective chapters in user’s manual. - Page 8 Please be sure to check and confirm the configurations you’ve done. All the modified parameters should be activated via the Reboot menu. In this session, we will introduce the main configuration of VIP-150T for you to quickly and easily establish voice communication.
- Page 9 User can adjust ring volume by press ç or è on the keypad to decrease or increase ringer volume. • Style There are three tone styles for VIP-150T. Move the “>” symbol by press ç or è on the keypad to select the tone style preferred, then press OK to confirm it.
- Page 10 (Fixed IP), DHCP, or PPPoE. IP, Mask, Gateway: display current IP information. • Network Mode Set up network mode of VIP-150T to be Static (Fixed IP), DHCP, or PPPoE. • IP address Set up IP address of VIP-150T. • Subnet Mask: Set up subnet mask address of VIP-150T.
- Page 11 User can specify a SNTP server for VIP-150T to capture current time. Time Zone: User can set time zone via pressing ç or è according to the location VIP-150T is. For example, in Taiwan the time zone should be set as GMT+8:00. • Behind IP-Sharing...
- Page 12 OK to confirm it. FTP/TFTP Sever User has to offer one TFTP/FTP server IP Address and set this IP Address via keypad. The IP Address is necessary for upgrading VIP-150T new application rom file. Set FTP user account User has to input user name and password for FTP server login .It is...
-
Page 13: Chapter 3 Making Calls
Chapter 3 Making calls There are several ways to make calls to desired destination in VIP-150T. In this chapter, we’ll lead you step by step to establish your first voice communication via keypad operations. 3.1 IP address call (P2P mode): Please refer to the descriptions in previous chapter to complete machine network parameter configurations. - Page 14 After logging in machine, please browse to the “Phone Book” configuration menu, and assign the index, name, and the IP address/domain name of the calling party you’d like to connect to. For those who are making calls to PLANET VIP-160/260 SIP voice gateway A call setup example could be as like following:...
- Page 15 (www.addavoice.com) a) Go to www.addavoice.com to register an account for voice calls. b) After signing up, browse to SIP configuration page of VIP-150T. Insert the Proxy server, server communication port, username, and password field. c) After these parameters are inserted, click “DONE”, and browse to “Reboot”...
- Page 16 Machine default running mode is P2P mode. If you’d like to connect others via SIP proxy mode, please log in machine via web browser, and modify machine mode to “Proxy” in the Hint “SIP Configuration” menu.
-
Page 17: Chapter 4 Quick Reference In Cd-Rom Guide
Chapter 4 Quick reference in CD-ROM guide This guide is used to help you startup your VIP settings. It is also recommended to check the user manual CD-ROM for more details information, and how to set the device back to default value. - Page 18 This page is intentionally left blank...
- Page 19 This page is intentionally left blank...
- Page 20 This page is intentionally left blank...
Need help?
Do you have a question about the VIP-150T and is the answer not in the manual?
Questions and answers