
Subscribe to Our Youtube Channel
Related Manuals for Vantec NST-400MX-53


Summary of Contents for Vantec NST-400MX-53
- Page 1 N S T - 4 0 0 M X - S 3 U S B 3 . 0 I n t e r f a c e N S T - 4 0 0 M X - S 3 R U S B 3 .
- Page 2 MS-DOS, Microsoft, Windows NT/2000/XP/Vista/7/8 are trademarks of Microsoft Corporation. Apple, Macintosh and Mac are trademarks of Apple Computer. NexStar is a registered trademark of Vantec Thermal Technologies. *All other third-party brands and names are the property of their respective owners.
-
Page 3: Table Of Contents
Table of Contents: Introduction Specifications/Features System Requirements Parts Layout Installation LED Indicator Mode Configuration Disconnecting the NexStar MX Hardware Formatting Guide Warranty Contact Table of Contents... -
Page 4: Introduction
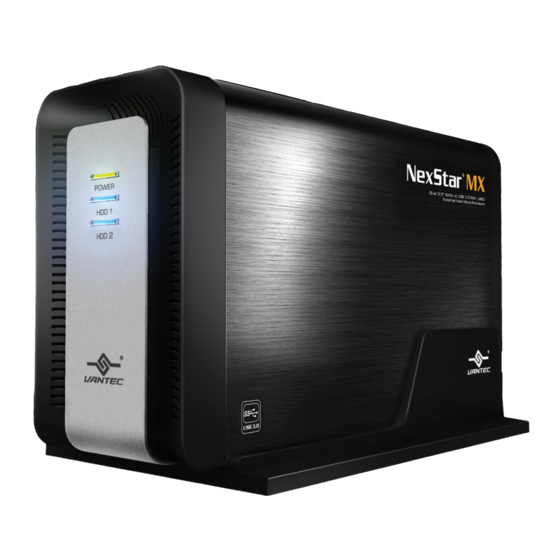
1.Introduction: Vantec NexStar® MX Dual Bay External HDD Enclosure now in USB 3.0 only or USB 3.0 plus eSATA interface is a quick and simple way to expand storage capacity to your computer. It comes without the hassle of diving inside the PC and messing with all those wires, cables and connections. -
Page 5: Specifications/Features
2.Specifications/Features: face Dual 3/5” RAID Enclosure w/FAN USB 3.0 (S3) or USB3 & eSATA (S3R) inter Features: • Aluminum Casing Cools Down Your Hard Drive • 40mm Rear Heat Exhaust Fan • Easily Add Storage to Any System with USB 2.0, 3.0 or eSATA (for 400MX-S3R only) •... -
Page 6: System Requirements
3.System Requirements: Microsoft Windows XP/Vista/7/8 Mac OS 10.4 & greater 1. For USB 2.0 speeds, the system must 1. For USB 2.0 speeds, the system must support USB 2.0 specifications support USB 2.0 specifications 2. For USB 3.0 speeds, the system must 2. -
Page 7: Parts Layout
4.Parts Layout: NST-400MX-S3 Power ON/OFF Switch USB 3.0 Port Power Jack NST-400MX-S3R Power ON/OFF Switch eSATA Port USB 3.0 Port Power Jack Parts Layout... -
Page 8: Installation
5.Installation: Dual 3/5” RAID Enclosure w/FAN USB 3.0 (S3) or USB3 & eSATA (S3R) interface 5.1.Hardware Installation: Installing the hard drive: (1) Release the four screws then pull out the rear panel and tray of the NexStar MX. ( figure 5.1-A ) ( figure 5.1-A ) (2) Place the first HDD onto the drive caddy then insert the HDD... - Page 9 (4) Secure the hard drive onto the drive caddy with the provided screws. ( figure 5.1-D ) ( figure 5.1-D) (5) Choose the Mode Configuration for the NexStar MX. Connect the power adapter and power on the unit. Press the reset button and hold for 10-15 seconds.
- Page 10 Connecting the NexStar to your computer: USB 3.0(S3 and S3R) NOTE: Connect the type (B) USB connector to the For new hard drives, you will need to initialize and NexStar and the type (A) USB connector to an partition your hard drive before it will appear in available USB port on your system.
-
Page 11: Led Indicator
6.LED Indicator: Dual 3/5” RAID Enclosure w/FAN USB 3.0 (S3) or USB3 & eSATA (S3R) interface General Operation: ON : Power on Power LED Green OFF: Power off ON : HDD inserted Flash Randomly: Accessing (Read/Write/Rebuild) HDD 1 LED Blue Flash Consistently (3 flashes per second): HDD error OFF: HDD not installed/Removed/sleep mode ON : HDD inserted... -
Page 12: Mode Configuration
7.Mode Configuration: Individual Drive Mode: This mode enables each Hard Drive to be seen as separate single drives with separate Hard ( figure 6-A) ( figure 6-B) Drive capacities. NST-400MX-S3 NST-400MX-S3R Individual Mode Individual Mode ( figure 6-A) Volume A Volume B Volume A Volume B... -
Page 13: Jbod Mode
JBOD Mode: This mode concatenates a series of physical drives as a single large volume; Hard Drive 1 and 2 are combined into a storage capacity that is equal to the sum of each of the physical hard drives 1 and 2. Switching to this mode will prompt to initialize and format the hard disks. - Page 14 RAID 0 Mode (Striped): NST-400MX-S3R This mode splits data evenly across the two Hard Drives resulting in capacity that is the sum of 2 times the smaller volume. Data access speed is increased however at the cost of no data redundancy.
- Page 15 RAID 1 Mode (Mirror): NST-400MX-S3R This mode allows the device automatically to copy data to both hard drives. It stores all data in duplicate on separate drives to protect against data loss due to drive failure. It provides the highest level of data protection for critical data that you cannot afford to lose if a hard drive fails.
-
Page 16: Disconnecting The Nexstar Mx
8.Disconnecting the NexStar MX: Dual 3.5” RAID Enclosure w/Fan USB 3.0 & eSATA Interface Microsoft Windows XP/Vista/7/8 : Mac OS: Make sure all operations using the hard Make sure all operations using the hard drive within the NexStar MX has ceased. drive within the NexStar MX has ceased. -
Page 17: Hardware Formatting Guide
9.Hard Drive Formatting Guide Dual 3/5” RAID Enclosure w/FAN USB 3.0 (S3) or USB3 & eSATA (S3R) interface Please make sure your External Enclosure is turned on and connected to the PC before formatting the Hard Drive. In order to use a disk volume larger than 2 TB’s, you will need an operating system that supports GUID Partitioning Table. - Page 18 STEP3: Right-click on the “Unallocated” box and select “New Partition”. (Disk number may vary) STEP4: The “New Partition Wizard” will appear. Please follow the “New Partition Wizard” step by step instructions to complete the Hard Drive formatting procedure Hard Drive Formatting Guide...
- Page 19 STEP5: Once the Hard Drive formatting procedure is completed, the Hard Drive will be recognized as a “New Volume” (New Volume drive letter may vary i.e. “New Volume (Z:)” ) STEP6: Double-click “My Computer”. You will see “New Volume” appear on your PC (Drive letter may vary i.e.
- Page 20 For Mac Users: STEP1: When you connect the NexStar MX Dual to a Mac with a new hard drive, the dialog “Disk Insertion” will appear. Please select “Initialize”. (A formatted HDD will not display this dialog) STEP2: Select which HDD you want to erase. Individual Mode : This mode can show each hard disk as individual device.
- Page 21 RAID 0 Mode : Raid 0 Mode can integrate two different brands of hard drives with different capacity to a larger format hard drive. >Two hard drives of the same capacity: the total capacity is the sum of the two hard drives. >Two hard drives of the different capacity: the total capacity is the twice volume of the smaller hard...
- Page 22 Select how you want to use your new Volume or click “Cancel” if you want to use default settings. This will conclude the Hard Drive Formatting guide. Hard Drive Formatting Guide...
-
Page 23: Warranty
11.Contact: Vantec Thermal Technologies www.vantecusa.com Copyright © 2013 Vantec Thermal Technologies. All Right Reserved. All Registered Trademarks Belong To Their Respective Companies. Warranty/Contact...
Need help?
Do you have a question about the NST-400MX-53 and is the answer not in the manual?
Questions and answers