Table of Contents
Advertisement
Quick Links
Advertisement
Table of Contents

Related Manuals for Minolta PagePro 1200W


Summary of Contents for Minolta PagePro 1200W
- Page 1 PagePro 1200W ® User’s Guide 1800691-001B...
-
Page 2: Proprietary Statement
MINOLTA-QMS, Inc. All Rights Reserved. This software may not be reproduced, modified, displayed, transferred, or copied in any form or in any manner or on any media, in whole or in part, without the express written permission of MINOLTA- QMS, Inc. -
Page 3: Table Of Contents
Contents Contents Introduction Welcome ..................1-1 Roadmap of this manual ..............1-2 Brief explanation of special type styles and method of presentation ..................1-3 Installing and setting up the printer Overview of the printer ..............2-1 External features ................2-1 Inside the printer ................2-2 Optional accessories...............2-3 Printer control panel ................2-4 Installing your laser printer............2-5 Place of installation .................2-5... - Page 4 Contents Installing the USB device driver and printer driver under Windows 98................. 3-21 Installing the printer driver under Windows 95 ....... 3-26 Installing the printer driver under Windows NT 4.0 ....3-29 Uninstalling the printer driver and USB device driver .... 3-31 Working with the printer driver Displaying printer driver settings ..........
- Page 5 Contents Troubleshooting Clearing media jams ..............9-1 General printing problems ............9-8 Print quality problems ..............9-8 Printer messages ................9-11 Indicator functions .................9-11 Status message ................9-12 Error messages................9-12 Service message................9-13 10 Appendix 10.1 Safety specifications ..............10-1 10.2 Technical specifications.............10-1 Printer....................10-1 Lower feeder unit (option) .............10-3 Parallel interface connectors and cable ........10-3 USB interface connectors and cable..........10-3 10.3...
-
Page 7: Introduction
Introduction Introduction Welcome Thank you for purchasing a PagePro 1200W. So you can use your new laser printer effectively and achieve the best possible results, this manual provides you with information on the follow- ing topics: Installing the printer driver... -
Page 8: Roadmap Of This Manual
Introduction Roadmap of this manual The following table is designed to help you find the information you need. Alternatively, to find information on a specific problem quickly and precise- ly, refer to the index at the end of this manual. Title of chapter Content of chapter Introduction... -
Page 9: Brief Explanation Of Special Type Styles And Method Of Presentation
Introduction Brief explanation of special type styles and method of presentation Special type styles and methods of presentation are used in this manual to highlight various circumstances. The following examples will help you recognize and deal with the most important of these. CAUTION OR WARNING This is a caution or warning! A caution alerts you to damage that could result to the printer by treating... -
Page 11: Installing And Setting Up The Printer
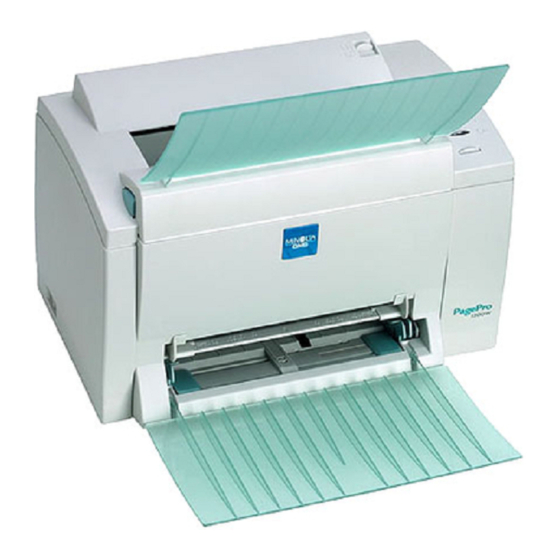
Installing and setting up the printer Installing and setting up the printer Overview of the printer External features Description Description Top cover release button Paper guides for manual feed tray Manual feed tray Tray1 (multipurpose tray) Power switch (ON/OFF) USB interface connector Face-down tray (printed side down) Parallel interface connector Control panel... -
Page 12: Inside The Printer
Installing and setting up the printer Inside the printer Description Description Fusing unit Drum cartridge Toner cartridge... -
Page 13: Optional Accessories
Installing and setting up the printer Optional accessories Description Description Face-up tray Lower feeder unit (Tray 2) (printed side up) (500-sheet capacity) -
Page 14: Printer Control Panel
Installing and setting up the printer Printer control panel The control panel has two indicators and one button. Description Error indicator (orange) Ready indicator (green) Panel button For further information on the control panel, see chapter 6. -
Page 15: Installing Your Laser Printer
Installing and setting up the printer Installing your laser printer Place of installation Set up the printer in a place that is dry and free from dust on a stable surface well ventilated near an easily accessible power socket away from objects which might obstruct the printer’s ventilation grille away from highly flammable items (such as curtains) away from splashing liquids away from organic gases (such as ammonia) -
Page 16: Space Requirements
Installing and setting up the printer Space requirements Be sure to provide enough space around the printer to ensure easy printer operation, paper and toner replacement, and maintenance. 3.9" (100 mm) 5.9" 11.8" (150 mm) (300 mm) 3.9" (100 mm) 35.1 in. -
Page 17: Setting Up Your Laser Printer
Installing and setting up the printer Setting up your laser printer Loading paper in Tray 1 Lay Tray1 down flat. Squeeze the right paper guide and open the media guides. Place a stack of paper in the tray. How many sheets may I place in the tray? Tray 1 has a capacity of 150 sheets of plain paper. - Page 18 Installing and setting up the printer If you installed an optional face- up tray and you want the sheets to come out face up, then open Face-up output the face-up tray instead of the face-down tray, and set the face-up/face-down selection switch as shown.
- Page 19 Installing and setting up the printer Insert a sheet of media as far as possible into the manual feed tray with the side to be printed facing up. How many sheets may I place in the tray? Load only one sheet of media at a time.
- Page 20 Installing and setting up the printer Connecting the power cord WARNING Use only the power cord shipped with the printer. Using the wrong power cord may lead to a short-circuit! The use of a power cord of inadequate cross-section can lead to a short- circuit.
-
Page 21: Turning The Printer On And Off
Installing and setting up the printer Turning the printer on and off Note Improper handling may damage the printer! - Never turn off the printer while a print job is in progress, the printer is receiving data from the computer (blinking green “Ready” indicator on control panel), or the printer is being reset. -
Page 22: Connecting The Printer To A Computer
Installing and setting up the printer Connecting the printer to a computer Parallel interface Turn off both the printer and the PC. Connect one end of the interface cable to the parallel port on the PC. Connect the other end of the interface cable to the parallel interface connector on the back of the printer. - Page 23 Installing and setting up the printer USB interface Note Windows 95/NT4.0 do not support USB connections. Turn off both the PC and the printer. Turn on the PC. Turn on the printer. When Windows and the printer are both ready, connect one end of the interface cable to the PC’s USB port .
-
Page 25: Installing The Printer Driver
The printer driver is delivered on a CD-ROM along with the printer. No CD-ROM drive? You can download the printer driver from the Internet. You can find the latest version of the printer driver at http://www.minolta-qms.com (choose "Online Help & Drivers"). -
Page 26: Information On Installation Using "Add Printer
Installing the printer driver Information on installation using “Add Printer” We strongly recommend that you install the printer driver using the Installer (“setup.exe” file). If you install the printer driver using the Add Printer wizard, note the following points: The dialog box for installing options is not displayed. Adjust the additional options after you have completed the installation in the printer driver. - Page 27 Installing the printer driver Connect the printer to the PC with the USB cable (see chapter 2) to display the Found New Hardware Wizard dialog box. Choose [Cancel] to close the Found New Hardware Wizard dialog box. Choose [start], and then choose “My Computer.”...
- Page 28 Installing the printer driver In the System Tasks list choose “View system information.” Choose the “Hardware” tab of the System Properties dialog, and then choose the [Device Manager...] button. Under “Universal Serial Bus controllers” double-click “USB Printing Support.” The USB Printing Support Properties dialog box displays.
- Page 29 Installing the printer driver Choose the “Driver” tab of the USB Printing Support Properties dialog box, and then choose [Update Driver...]. Choose the “Install from a list or specific location (Advanced)” option button, and then choose [Next].
- Page 30 When the following dialog box displays, choose [Finish] to finish the installation. This completes the installation of the USB device driver for the PagePro 1200W printer. Now go on to the following section to install the printer driver. To install the printer driver using the Installer under Windows XP The CD-ROM that came with your printer starts automatically after being loaded into the CD-ROM drive of your PC.
- Page 31 Follow the instructions for the installation program. Once the printer driver has been successfully installed, the “MINOLTA-QMS PagePro 1200W” printer icon displays in the Printers dialog box. Remove the CD-ROM from your PC’s CD-ROM drive. This completes the installation of the printer driver.
- Page 32 Choose [OK], and then choose [Next]. Follow the instructions on the screen to complete the installation. Check that the “MINOLTA-QMS PagePro 1200W” printer icon is dis- played in the Printers dialog box. Remove the CD-ROM from your PC’s CD-ROM drive. This completes the installation of the printer driver.
- Page 33 Installing the printer driver Choose [start], and then choose “Control Panel.” In “Pick a category” choose “Printers and Other Hardware.”...
- Page 34 Browse the CD-ROM and navigate to “\Drivers\language\Win2000.” Choose [Open]. Choose [OK], and then choose [Next]. Follow the instructions on the screen to complete the installation. Check that the “MINOLTA-QMS PagePro 1200W” printer icon is dis- played in the Printers dialog box. 3-10...
-
Page 35: Installing The Usb Device Driver And Printer Driver Under Windows Me
Installing the printer driver Remove the CD-ROM from your PC’s CD-ROM drive. This completes the installation of the printer driver. Installing the USB device driver and printer driver under Windows Me When connecting the printer to your PC with a USB cable, install the USB device driver according to the following instructions before installing the printer driver. - Page 36 When the following dialog box displays, choose [Finish] to finish the installation. This completes the installation of the USB device driver for the MINOLTA-QMS PagePro 1200W printer. Now go to the following section to install the printer driver. To install the printer driver using the Installer under Windows Me The CD-ROM that came with your printer starts automatically after being loaded into the CD-ROM drive of your PC.
- Page 37 Installing the printer driver Follow the instructions for the installation program. Once the printer driver has been successfully installed, the “MINOLTA-QMS PagePro 1200W” printer icon displays in the Printers dialog box. Remove the CD-ROM from your PC’s CD-ROM drive. This completes the installation of the printer driver.
- Page 38 Choose [OK], and then choose [Next] twice. Follow the instructions on the screen to complete the installation. Check that the “MINOLTA-QMS PagePro 1200W” printer icon is displayed in the Printers dialog box. Remove the CD-ROM from your PC’s CD-ROM drive. This completes the installation of the printer driver.
-
Page 39: Installing The Usb Device Driver And Printer Driver Under Windows 2000
If you are using a USB connection, select “USB001:” Follow the instructions on the screen to complete the installation. Check that the “MINOLTA-QMS PagePro 1200W” printer icon is displayed in the Printers dialog box. Remove the CD-ROM from your PC’s CD-ROM drive. This completes the installation of the printer driver. - Page 40 Installing the printer driver Printing Support may automatically be incorporated, depending on the operating system. In order to activate all functions of the PagePro 1200W, the USB device driver for PagePro 1200W must be installed. Install the USB device driver for PagePro 1200W according to the following procedure.
- Page 41 Installing the printer driver Chose the “Driver” tab of the USB Printing Support Properties dialog box, and then choose [Update Driver...]. Choose [Next] to display the next dialog box. Check the “Search a suitable driver for my device (recommended)” option button, and then choose [Next]. 3-17...
- Page 42 When the following dialog box displays, choose [Finish] to finish the installation. This completes the installation of the USB device driver for the PagePro 1200W printer. Now go on to the following section to install the printer driver. To install the printer driver using the Installer under Windows 2000 The CD-ROM that came with your printer starts automatically after being loaded into the CD-ROM drive of your PC.
- Page 43 Follow the instructions for the installation program. Once the printer driver has been successfully installed, the “MINOLTA-QMS PagePro 1200W” printer icon displays in the Printers dialog box. Remove the CD-ROM from your PC’s CD-ROM drive. This completes the installation of the printer driver.
- Page 44 Choose [OK], and then choose [Next]. Follow the instructions on the screen to complete the installation. Check that the “MINOLTA-QMS PagePro 1200W” printer icon is dis- played in the Printers dialog box. Remove the CD-ROM from your PC’s CD-ROM drive. This completes the installation of the printer driver.
-
Page 45: Installing The Usb Device Driver And Printer Driver Under Windows 98
Choose [OK], and then choose [Next]. Follow the instructions on the screen to complete the installation. Check that the “MINOLTA-QMS PagePro 1200W” printer icon is dis- played in the Printers dialog box. Remove the CD-ROM from your PC’s CD-ROM drive. This completes the installation of the printer driver. - Page 46 Installing the printer driver Connect the printer to the PC with the USB cable (see chapter 2) to display the Add New Hardware Wizard dialog box. Choose [Next] to display the next dialog box. Check the “Search for the best driver for your device. (Recommended).”...
- Page 47 When the following dialog box displays, choose [Finish] to finish the installation. This completes the installation of the USB device driver for the PagePro 1200W printer. Now go to the following section to install the printer driver. To install the printer driver using the Installer under Windows 98 The CD-ROM that came with your printer starts automatically after being loaded into the CD-ROM drive of your PC.
- Page 48 Installing the printer driver To install the printer driver using Plug-and-Play under Windows 98 For a simple way of installing the printer driver, we recommend using the Installer (see the previous section). However, there are other ways of installing the printer driver without using the Installer. This section describes Plug-and-Play installation with a parallel connection.
- Page 49 Installing the printer driver Check that the “MINOLTA-QMS PagePro 1200W” printer icon is dis- played in the Printers dialog box. To display the Printers dialog box, choose [Start], point to [Settings], and then choose [Printers]. Remove the CD-ROM from your PC’s CD-ROM drive. This completes the installation of the printer driver.
-
Page 50: Installing The Printer Driver Under Windows 95
If you are using a USB connection, select “USB001.” Follow the instructions on the screen to complete the installation. Check that the “MINOLTA-QMS PagePro 1200W” printer icon is dis- played in the Printers dialog box. Remove the CD-ROM from your PC’s CD-ROM drive. This completes the installation of the printer driver. - Page 51 Installing the printer driver Follow the instructions for the installation program. Once the printer driver has been successfully installed, the “MINOLTA-QMS PagePro 1200W” printer icon displays in the Printers dialog box. Remove the CD-ROM from your PC’s CD-ROM drive. This completes the installation of the printer driver.
- Page 52 Installing the printer driver Check that the “MINOLTA-QMS PagePro 1200W” printer icon is displayed in the Printers dialog box. Remove the CD-ROM from your PC’s CD-ROM drive. This completes the installation of the printer driver. To install the printer driver using the Add Printer Wizard under Windows 95 Turn on the PC.
-
Page 53: Installing The Printer Driver Under Windows Nt 4.0
Installing the printer driver Check that the “MINOLTA-QMS PagePro 1200W” printer icon is displayed in the Printers dialog box. Remove the CD-ROM from your PC’s CD-ROM drive. This completes the installation of the printer driver. Installing the printer driver under Windows NT 4.0 To install the printer driver using the Installer under Windows NT 4.0... - Page 54 Choose [OK], and then choose [Next]. Follow the instructions on the screen to complete the installation. Check that the “MINOLTA-QMS PagePro 1200W” printer icon is displayed in the Printers dialog box. Remove the CD-ROM from your PC’s CD-ROM drive. This completes the installation of the printer driver.
-
Page 55: Uninstalling The Printer Driver And Usb Device Driver
Installing the printer driver Uninstalling the printer driver and USB device driver This section describes how to uninstall the PagePro 1200W printer driver when necessary. Note If the uninstallation program is used to remove the printer driver, the USB device driver is also removed. - Page 56 Installing the printer driver In “Pick a category” choose “Add or remove Programs” to open the Add or Remove Programs dialog box. Select “MINOLTA-QMS PagePro 1200W,” and then choose [Change/ Remove] to uninstall the printer driver. 3-32...
- Page 57 Installing the printer driver Select “MINOLTA-QMS PagePro 1200W” in the Uninstall dialog box. Choose [Uninstall] to proceed with the uninstallation or [Cancel] to abort. When the following dialog box displays, choose [Yes] to restart the PC. Note If is recommended that you restart your computer after uninstallation.
- Page 58 Installing the printer driver Double-click the “Add/Remove Programs” icon in the Control Panel di- alog box to open the Add/Remove Programs Properties dialog box. 3-34...
- Page 59 Installing the printer driver For Windows Me/98/95/NT 4.0, select “MINOLTA-QMS PagePro 1200W,” and then choose [Add/Remove] to uninstall the printer driver. For Windows 2000, select “MINOLTA-QMS PagePro 1200W,” and then choose [Change/Remove] to uninstall the printer driver. 3-35...
- Page 60 Installing the printer driver Select “MINOLTA-QMS PagePro 1200W” in the Uninstall dialog. Choose [Uninstall] to proceed with the uninstallation or [Cancel] to abort. After the PagePro 1200W printer driver has been removed, choose [OK]. Choose [Yes] to close the window. Note It is recommended that you restart your computer after uninstallation.
-
Page 61: Working With The Printer Driver
In Pick a Category choose Printers and Other Hardware. In Pick a task choose View installed printers or fax printers. In the Printers and Faxes dialog box, select the MINOLTA-QMS PagePro 1200W printer icon. To display the printer driver settings, from the File menu choose Printing Preferences... - Page 62 Working with the printer driver Display the printer driver settings: Windows Me/98/95—From the File menu choose Properties, and then choose the --> 32-bit Driver Setup tab. The operating system also uses tabs! The “General” and “Details” tabs are automatically determined by the operating system and are therefore not described in this manual.
- Page 63 Working with the printer driver Windows 2000—From the File menu choose Printing Preferences. The following window displays. Windows NT 4.0—From the File menu choose Document De- faults. A window similar to the Windows 2000 window shown above displays.
-
Page 64: Setup Tab
Working with the printer driver Setup tab The Setup tab allows you to Print several pages of a document on the same page (n-up printing) Provide a watermark on printed documents Design custom watermarks Specify manual duplex printing Specify paper feed from different trays Define the type of paper/media Print using a form overlay Create/edit a form overlay... -
Page 65: Paper Tab
Working with the printer driver Paper tab The Paper tab allows you to Specify the size of the original document Define custom media sizes Fit printed documents to a specified media size Select the output media size Scale (enlarge/reduce) documents Specify the number of copies Turn on/off the printer’s sorting function Turn on/off the Proof Print function... -
Page 66: Quality Tab
Working with the printer driver Quality tab The Quality tab allows you to Specify the resolution Adjust the contrast and brightness of the printed document Turn on/off Toner Save mode Refer to the printer driver’s online help for information on all of these functions. -
Page 67: Device Options Setting Tab
Working with the printer driver Device Options Setting tab The Device Options Setting tab allows you to Activate the optional lower feeder unit (Tray 2) View information about the printer driver. Refer to the printer driver’s online help for information on all of these functions. -
Page 69: Working With The Status Display
Working with the Status Display Working with the Status Display If you used the CD-ROM Installer to install the printer driver, the Status Display was also installed. It was not installed, however, if you used Add Printer to install the printer driver. Environment The Status Monitor and Printer Control Panel can be used with the follow- ing operating systems and interfaces. -
Page 70: Opening The Status Display
Opening the Status Display Use one of the following steps to open the Status Monitor. Windows Me2000//98/95/NT 4.0—From the Start menu, choose Programs, then MINOLTA-QMS PagePro 1200W Utilities, and then MINOLTA-QMS PagePro 1200W Status. Windows XP—Choose Start, choose All Programs, then MINOLTA- QMS PagePro 1200W Utilities, and then MINOLTA-QMS PagePro 1200W Status. - Page 71 Working with the Status Display Altering the size of the Status Display window From the Display menu choose Status (Reduce)” to decrease the size of the window. From the Display menu choose Status (Expand) to increase the size of the window.
-
Page 72: Using The Status Display
Working with the Status Display Using the Status Display When the background of the printer graphic is green, the printer is in Stand-by mode or a job is printing normally. When the background to the printer graphic is red, there is an error and the job has been interrupted. -
Page 73: Closing The Status Display
Working with the Status Display Closing the Status Display To close the Status Display from the File menu choose Exit. Note If you choose [X] button in the upper-right corner of the Status Display window to close the window, the Status Display remains available at the bottom right end of the taskbar. -
Page 75: Working With The Printer
Working with the printer Working with the printer Please note the following points: What should I watch out for when loading paper? To avoid paper misfeeds, observe the following points: Do not use any paper with the following features: Paper that has already been used in a thermal or ink-jet printer. Creased or wavy paper. -
Page 76: Which Sizes Of Paper Can I Use
Working with the printer Which sizes of paper can I use? This printer is designed for use only with these media sizes. Media source Media size Tray 1 Tray 2*(optional) Manual feed tray Standard sizes Letter 8.5" x 11.0" Legal 8.5"... -
Page 77: What Types Of Paper Can I Use
Working with the printer What types of paper can I use? This printer is designed for use with the following media types. Media source Media type Tray 1 Tray 2 (optional) Manual feed tray Plain paper 16–24 lbs (60–90 g/m Thick paper/Labels 24–43.25 lbs (90–163 g/m Envelopes... -
Page 78: Using The Panel Button
Working with the printer Using the panel button The control panel has two indicators and one button. Description Description Error indicator (orange) Panel button Ready indicator (green) The panel button allows you to Continue a print job after an error message Cancel a print job Continuing a print job after an error message You can continue the print job after correcting the following types of errors:... -
Page 79: Loading Media
Working with the printer Cancelling a print job You can cancel a print job that is currently being processed. While data is being processed or printed (the green “Ready” indicator is blinking), hold down the panel button for more than 5 seconds. Release the panel button after both indicators light up. - Page 80 Working with the printer Squeeze the right media guide and adjust the media guides so that both the left and right sides of the media are secure. Loading media in the manual feed tray Open the media guides. Insert the piece of media as far as possible into the manual feed tray (with the side to be printed facing up).
-
Page 81: Determining The Direction Printed Sheets
Working with the printer Remove the cover from the tray. Press down on the paper lifting plate until it locks into place. Place a stack of paper into the tray. Make sure that the paper fits under under the triangular clips. How many sheets of paper may I place in the tray? Tray 2 has a capacity of 500... - Page 82 Working with the printer The face-down output tray can hold up to 100 sheets while the optional face-up output tray holds 20 sheets. Note the following points: Do not change the output direction while a print job is in progress. Make sure that the output selector switch is in the correct position when the optional output tray is not installed.
-
Page 83: Installing Printer Options
Installing printer options Installing printer options The following options are available for your printer: Lower feeder unit (Tray 2, 500-sheet capacity) Legal and executive/B5 JIS trays for the lower feeder unit Face-up tray Installing the lower feeder unit (Tray 2) The lower feeder unit can hold up to 500 sheets of plain paper. - Page 84 Installing printer options Replace the tray cover. Insert the tray into the lower feeder unit. Be sure to use both hands whenever you are inserting the tray into or removing it from the lower feeder unit. Reconnect the power cord and interface cable, and turn on the printer.
-
Page 85: Installing The Face-Up Tray
Installing printer options Installing the face-up tray The printer is fitted with a tray for face-down output. A tray for face-up out- put is available as an option. This tray is especially useful for thick paper, envelopes, labels, and transparencies because the path through the print- er is straighter. -
Page 87: Maintaining The Printer
You could damage the unit by using incorrect accessories and parts! If you use accessories and parts from manufacturers other than MINOLTA-QMS, we cannot guarantee that the laser printer will operate properly. Use only MINOLTA-QMS accessories and parts unless specified otherwise. -
Page 88: Replacing The Toner Cartridge
Maintaining the printer Replacing the toner cartridge Replace the toner cartridge when it is empty or when the printed docu- ments are too light. Two toner cartridges are available: The regular toner cartridge has a capacity of about 3000 letter/A4 pages at about 5% toner coverage. - Page 89 Maintaining the printer What precautions should I take when handling the toner cartridge? Never touch the developing roller under the flap; otherwise, print qual- ity may decline. Turn off the printer and disconnect the power cord from the printer. Close the face-down tray. Press the top cover release button and open the top cover.
- Page 90 Maintaining the printer Press in the marked positions of the handle to fold down the handle. Dispose of the used toner car- tridge properly. Remove the new toner cartridge from its package. Holding it firmly with both hands, rock the toner cartridge left and right, forward and backward, to distribute the toner evenly.
- Page 91 Maintaining the printer The toner cartridge clicks into place when it is completely installed. Close the top cover and press it down gently but firmly until it locks into place. Resetting the counter for the toner cartridge After you have replaced the toner cartridge, reset the counter for the toner cartridge.
-
Page 92: Replacing The Drum Cartridge
Maintaining the printer After the green “Ready” indicator has blinked for about 5 seconds, re- lease the panel button. Both indicators begin to blink. After confirming that both indicators are blinking, press and hold down the panel button again for at least 5 seconds. Both indicators light up for about 5 seconds, and then both indicators begin to blink again. - Page 93 Maintaining the printer What precautions should I take when handling the drum cartridge? Never touch the drum under the flap; otherwise, print quality may decline. Turn off the printer and disconnect the power cord from the printer. Close the face-down tray. Press the top cover release button and open the top cover.
- Page 94 Maintaining the printer Remove the toner cartridge and the old drum cartridge. Remove the new drum cartridge from its carton. Install the drum cartridge in the printer, aligning the guides of the cartridge with the grooves inside the printer. Color coordinated “1” labels have been affixed to the drum cartridge and to the inside of the printer.
- Page 95 Maintaining the printer Place the toner cartridge back into the printer, aligning the four pins (two on each side) with the grooves inside the printer. Color coordinated “2” labels have been affixed to the toner cartridge and to the inside of the printer.
-
Page 96: Cleaning The Printer
Maintaining the printer Resetting the counter for the drum cartridge After you have replaced the drum cartridge, reset the drum cartridge counter. Turn off the printer. While holding down the panel button, turn on the printer. The green “Ready” indicator begins to blink. Continue holding down the panel button, and the green “Ready”... - Page 97 Maintaining the printer Cleaning the paper feed roller Clean the paper feed roller if paper feed problems occur frequently. WARNING The fusing unit can become very hot! The fusing unit, which is located beneath the top cover, can become very hot when the printer is in operation.
- Page 98 Maintaining the printer Remove the toner cartridge and the drum cartridge. Wrap the drum cartridge with a cloth to protect it from exposure to light. Wipe the paper feed roller with a soft, dry cloth. 8-12...
- Page 99 Maintaining the printer Reinstall the drum cartridge and the toner cartridge. Close the top cover and press it down gently but firmly until it locks into place. 8-13...
-
Page 101: Troubleshooting
Troubleshooting Troubleshooting Note Some computers connected with the parallel cable may not be able to communicate correctly with the printer. CAUTION The fusing unit can become very hot! The fusing unit, which is located beneath the top cover, can become very hot when the printer is in operation. - Page 102 Troubleshooting Press the top cover release button, and then open the top cover. Remove the toner cartridge and the drum cartridge.
- Page 103 Troubleshooting Carefully pull the misfed media out of the printer. If paper is misfed at the fusing unit, grasp the bottom of the paper with both hands and gently pull it out. Reinstall the drum cartridge. Reinstall the toner cartridge. Close the top cover, and then open the face-down tray.
- Page 104 Troubleshooting Clearing a media jam in the output tray Carefully pull the misfed media out of the tray. Open the top cover and close it again in order to reset the printer.
- Page 105 Troubleshooting Clearing a media jam at Tray 1 Remove the tray cover and any media in Tray 1. Carefully pull the misfed media out of Tray 1. Reload the media in Tray 1, and replace the tray cover. Do not reload curled or wrinkled media. Reinstall Tray 1 in the printer.
- Page 106 Troubleshooting Clearing a media jam in the manual feed tray Remove the Tray 1 cover and the plate at the inlet of the manual feed tray. Remove the misfed media. Reinstall the plate at the inlet of the manual feed tray and the Tray 1 cover.
- Page 107 Troubleshooting Clearing a media jam in the lower feeder unit (Tray 2) Slide the tray out of the lower feeder unit. Remove any folded or misfed media from the inside of the lower feeder unit. Remove the tray cover and any media in the tray. Carefully pull the misfed media out of the tray.
-
Page 108: General Printing Problems
ZIP drive). For further information and assistance... can be found in the Internet at www.minolta-qms.com/support Print quality problems If you are having problems with print quality, follow these steps: Remove the toner cartridge and gently shake it back and forth to dis- tribute the remaining toner evenly. - Page 109 Troubleshooting Problem Possible cause Action Blank pages The toner cartridge is empty or Remove the toner cartridge and damaged. check for damage. If necessary, replace the toner cartridge. (See page 8-2.) Black pages The toner cartridge is damaged. Remove the toner cartridge and check for damage.
- Page 110 Troubleshooting Problem Possible cause Action Pages are too dark The toner cartridge is damaged. Remove the toner cartridge and check it for damage. If necessary, replace the toner cartridge. (See chapter 8.) The toner density is not set Set the toner density to the correctly in the printer driver.
-
Page 111: Printer Messages
Troubleshooting Problem Possible cause Action White or black lines The toner cartridge is damaged Remove the toner cartridge and (white lines). check for damage. If necessary, replace the toner cartridge.(See page 8-2.) The drum cartridge is damaged Remove the drum cartridge and (black lines). -
Page 112: Status Message
Troubleshooting Status message Status messages indicate the current condition of the printer. Ready indicator Error indicator Condition Action (green) (orange) None Ready to print None Rapid blinking Warming up None Blinking Receiving data None Processing data Printing Initializing None Cancelling a print job Resetting a counter Slow blinking Power save mode... -
Page 113: Service Message
Troubleshooting Service message This message indicates a more serious fault that can only be corrected by a customer service engineer. If this message is signalled, turn the printer off, then on again. If the problem persists, contact your vendor or authorized service provider. -
Page 115: Appendix
GB 9254 class B Australian model: AS/NZS 3548 class B 10.2 Technical specifications To check on the availability of third-party options, such as an Ethernet network adapter... go to www.minolta-qms.com/products Printer Type Desktop laser beam printer Print system Electrostatic dry powder imaging system... - Page 116 Appendix Paper/Media • Plain paper (16 to 24 lbs.; 60 to 90 g/m • Transparencies • Envelopes • Thick paper (24 to 43 lbs.; 90 to 163 g/m • Postcard Paper feeding • Tray 1 (Universal tray) • Manual feed tray •...
-
Page 117: Lower Feeder Unit (Option)
Require twisted data conductors or a shielded Pin assignments 1: V 2: D+ 3: D- 4: GND Shell: Shield CAUTION Danger of fire from cable! MINOLTA-QMS undertakes no guarantee for any specific cable. The user is responsible for the quality and performance of the cable. 10-3... -
Page 118: Our Concern For Environmental Protection
Appendix 10.3 Our concern for environmental protection As an ENERGY STAR Partner, we have determined that this machine meets the ENERGY STAR Guidelines for energy efficiency. What is an ENERGY STAR product? An ENERGY STAR product has a special feature that allows it to automatically switch to a “low-power mode”... -
Page 119: Safety Information
Appendix 10.7 Safety Information This section contains detailed instructions on the operation and mainte- nance of this machine. To achieve optimum utility of this device, all oper- ators should carefully read and follow the instructions in this manual. Please keep this manual in a handy place near the machine. Please read the next section before using this device. - Page 120 Appendix • Do not modify this product, as a fire, electrical shock, or breakdown could result. If the product employs a laser, the laser beam source could cause blindness. • Do not attempt to remove the covers and panels which have been fixed to the product.
- Page 121 Appendix • Do not use flammable sprays, liquids, or gases near this product, as a fire could result. • Do not leave a toner unit or drum unit in a place within easy reach of children. Licking or ingesting any of these things could injure your health. •...
-
Page 122: Working Safely With Your Laser Printer
Appendix 10.8 Working safely with your laser printer Notes on your safety and operating safety Working improperly with the printer can result in health hazards, electric shocks and even fires. Before you unpack the laser printer, you should make yourself familiar with this information on your safety and operating safety. - Page 123 Appendix Do not place any heavy objects on the machine. Do not open any covers on the machine while printing is in progress. Do not switch off the unit while printing is in progress. Do not place any magnetic objects near the machine. Do not use any flammable sprays, liquids or gases in the vicinity of the machine.
-
Page 124: Laser Safety
Appendix Laser safety This is a page printer which operates by means of a laser. There is no pos- sibility of danger from the laser, provided the printer is operated according to the instructions in this manual. Since radiation emitted by the laser is completely confined within protec- tive housing, the laser beam cannot escape from the machine during any phase of user operation. -
Page 125: Laser Safety Label
Appendix Laser safety label A laser safety label is attached to the outside of the machine as shown be- low. For United States users CDRH Regulations This machine is certified as a Class 1 Laser product under the Radiation Performance Standard according to the Food, Drug and Cosmetic Act of 1990. -
Page 126: For Users In All Countries
Appendix For users in all countries CAUTION Use of controls, adjustments or performance of procedures other than those specified in this manual may result in hazardous radiation exposure. This machine is certified as a Class 1 laser product. This means that the machine does not produce hazardous laser radiation. -
Page 127: Ozone Release
Appendix VARNING! Om apparaten används på annat sätt än i denna bruksanvisning specifi- cerats, kan användaren utsättas för osynlig laserstrålning, som överskrid- er gränsen för laserklass 1. Det här är en halvledarlaser. Den maximala effekten för laserdioden är 5 mW och våglängden är 770 – 810 nm. VARO! Avattaessa ja suojalukitus ohitettaessa oletPP alttiina näkymättömälle la- sersäteilylle. -
Page 129: Index
Index Index Accessories see Optional accessories ...............7-1 Add Printer ...................3-2 Button see Panel button ................6-4 Cleaning the printer ................8-10 paper feed roller ................8-11 Connecting the printer ...............2-12 Consumables storage ...................2-5 Control panel button see Panel button ................6-4 Control panel indicators Error ....................6-4 Ready .....................6-4 Envelopes ....................6-1... - Page 130 Index Installing .................... 3-21 Installing the printer ................2-5 see Media jam ................9-7 Loading envelopes ................6-1 Loading paper ..................6-1 lower feeder unit ................6-6 manual feed tray ..............2-8 Tray 1 ..................2-7 Tray 2 .................... 6-6 Maintenance ..................8-1 Media jam inside of the printer ................
- Page 131 Index external features ................2-1 internal features ................2-2 optional accessories ..............2-3 Panel button ..................6-4 functions ..................6-4 Paper jam see Media jam ................9-7 Paper sizes ..................6-2 Place of installation ................2-5 Power cord ..................2-10 Power switch ..................2-11 Print quality problems ................9-8 Printable area ..................6-3 Printer control panel see also Control panel ..............2-4 Printer driver...
- Page 132 Index Ready indicator ................... 6-4 Replacing drum cartridge ..............8-6 Replacing the toner cartridge .............. 8-2 Service messages ................9-13 Setting up the printer ................2-7 ambient conditions ................ 2-6 connecting the printer to a computer ........... 2-12 manual feed tray ................2-8 Space required ..................
Need help?
Do you have a question about the PagePro 1200W and is the answer not in the manual?
Questions and answers