
Related Manuals for DeDietrich Oven


Summary of Contents for DeDietrich Oven
- Page 1 99644001_A_ml.qxp 21/12/2007 10:35 Page 1 FR GUIDE D'UTILISATION EN USER GUIDE ES MANUAL DE UTILIZACIÓN PT MANUAL DE UTILIZAÇÃO Four Oven Horno Forno...
- Page 2 Page 20 Dear Customer, You have purchased a D D E E D D I I E E T T R R I I C C H H oven and we would like to thank you. Our research teams have designed a new generation of appliances for...
-
Page 3: Table Of Contents
• • Using the timer function_____________________________________ • • Customising the recommended temperature ___________________ • • Locking the controls________________________________________ 3 / OVEN COOKING MODES_______________________________________ 4 / CARING FOR AND CLEANING YOUR OVEN • • Performing a pyrolysis º Instant pyrolysis _______________________________________ º Delayed pyrolysis ______________________________________... -
Page 4: Introduction To Your Oven
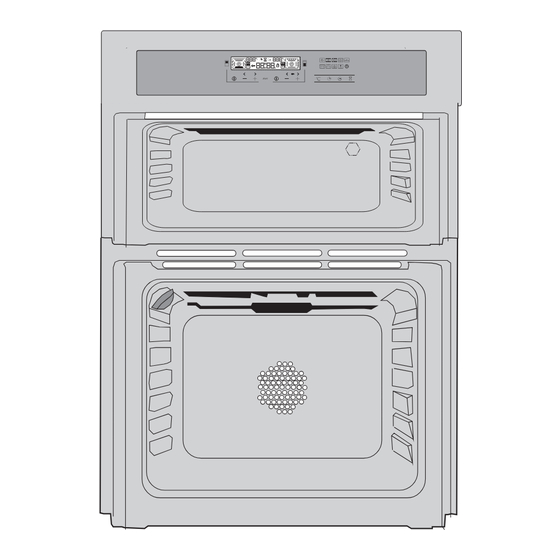
99644001_A_ml.qxp 21/12/2007 10:36 Page 22 1 / DESCRIPTION OF YOUR APPLIANCE • • INTRODUCTION TO YOUR OVEN Programmer Wire shelf supports Control buttons Hole for rotisserie Lamp... -
Page 5: Accessories
99644001_A_ml.qxp 21/12/2007 10:36 Page 23 1 / DESCRIPTION OF YOUR APPLIANCE •Accessories Your appliance is equipped with two safety grids with handles, one with handles for a 45 mm dish, a Lissium pastry dish and a 45 mm dish. -
Page 6: Introduction To The Programmer
99644001_A_ml.qxp 21/12/2007 10:36 Page 24 1 / DESCRIPTION OF YOUR APPLIANCE • • INTRODUCTION TO THE PROGRAMMER Oven temperature display. Clock or timer display Pyrolysis locking Cooking time indicator Timer indicator Cooking end time indicator Shelf support indicator and selected cooking mode indicator. -
Page 7: Introduction To The Selecting Touch Controls
99644001_A_ml.qxp 21/12/2007 10:36 Page 25 1 / DESCRIPTION OF YOUR APPLIANCE INTRODUCTION TO THE SELECTING TOUCH CONTROLS • • Oven cooking mode indicator Top oven start Temperature button Setting buttons Cooking time indicator Start Cooking end time indicator Lower oven start... -
Page 8: Using Your Appliance
99644001_A_ml.qxp 21/12/2007 10:36 Page 26 2 / USING YOUR APPLIANCE • How to set the time When supplied with electricity The display flashes at 12:00 (fig.1). fig.1 Set the time by pressing the + or - touch controls (holding your finger on the touch control allows you to scroll through the numbers rapidly) (fig.2). -
Page 9: Instant Cooking
The oven begins heating. fig.2 Place your dish in the oven based on the re- commendation indicated in the display. Your oven recommends the optimal tempera- ture for the chosen cooking mode. -
Page 10: Programmed Cooking
. . At the end of cooking (end of programmed ti- me), A series of beeps will be emitted when the oven stops, fig.3 - the cooking time indicator and 0:00 both start to flash (fig. -
Page 11: º Delayed Start
. . At the end of cooking (end of programmed ti- me), - the oven turns off; - the cooking time indicator and 0:00 both start fig.3 to flash (fig. -
Page 12: Using The Timer Function
99644001_A_ml.qxp 21/12/2007 10:36 Page 30 2 / USING YOUR APPLIANCE USING THE TIMER FUNCTION • • Y Y o o u u r r o o v v e e n n ’ ’ s s p p r r o o g g r r a a m m m m e e r r c c a a n n b b e e u u s s e e d d a a s s a a n n i i n n d d e e p p e e n n d d e e n n t t t t i i m m e e r r t t h h a a t t a a l l l l o o w w s s y y o o u u t t o o c c o o u u n n t t d d o o w w n n a a t t i i m m e e w w i i t t h h o o u u t t o o p p e e r r a a t t i i n n g g t t h h e e o o v v e e n n . -
Page 13: Customising The Recommended Temperature
You have the option of preventing access to the oven controls by taking the following steps: when the oven i i s s o o f f f f , , hold down the + and - buttons for a few seconds (fig.1), “key”... -
Page 14: Oven Cooking Modes
C C I I R R C C U U L L A A T T I I N N G G H H E E A A T T (recommended temperature 1 1 8 8 0 0 ° ° C C min 35°C max 235°C) • Cooking is controlled by the heating element located at the back of the oven and by the fan. - Page 15 (recommended temperature 8 8 0 0 ° ° C C min. 35°C max. 100°C) •This position allows you to keep your food warm by spurts of heat from the element at the back of the oven combined with fan. •Recommended for letting dough rise for bread, brioche, kugelhopf...without exceeding 40°...
-
Page 16: Performing A Pyrolysis
PERFORMING A PYROLYSIS •Instant pyrolysis Warning Take out the oven fittings out, as well as the sliding dish support (see the chapter on accessories in the “installation guide”) and remove any large splashes that may have have formed. - - Check that the programmer is displaying the time of day and that it is not flashing. -
Page 17: Perform A Pyrolysis
99644001_A_ml.qxp 21/12/2007 10:37 Page 35 4 / CARING FOR AND CLEANING YOUR OVEN • • PERFORM A PYROLYSIS •Delayed pyrolysis - - Follow the instructions described in the “Instant pyrolysis” section. After validating the pyrolysis cycle with the S S t t a a r r t t b b u u t t t t o o n n : : - - Press the button. -
Page 18: Notes
99644001_A_ml.qxp 21/12/2007 10:37 Page 36 5 / NOTES... -
Page 19: After-Sales Service
99644001_A_ml.qxp 21/12/2007 10:37 Page 37 6 / AFTER-SALES SERVICE • REPAIRS Any repairs that are made to your appliance must be handled by a qualified professional authorised to work on the brand. When you call, mention your appliance’s complete refe- rence (model, type, serial number). - Page 20 99644001_A_ml.qxp 21/12/2007 10:39 Page 76 Translation / DTP¨by Technicis SA, Boulogne-Billancourt, France 9 9 9 9 6 6 4001 10/07 D D O O D D 7 7 9 9 8 8 X X...
Need help?
Do you have a question about the Oven and is the answer not in the manual?
Questions and answers