Table of Contents
Advertisement
Advertisement
Table of Contents

Related Manuals for DeDietrich DME1140B


Summary of Contents for DeDietrich DME1140B
- Page 1 EN USER GUIDE Oven...
- Page 2 Dear Customer, When you discover D D e e D D i i e e t t r r i i c c h h products you experience the same feelings that only objects of value can arouse. You are immediately attracted as soon as you see them. The quality of the design is illustrated by its timelessness, degree of refinement and elegance, and high standard of finish, resulting in perfect harmony between different appliances.
-
Page 3: Table Of Contents
CONTENTS 1 / DESCRIPTION OF YOUR APPLIANCE • • Introduction to your oven ____________________________________ • • Introduction to the programmer ______________________________ 2 / USING YOUR APPLIANCE • • Using the programmer º Resetting the time ______________________________________ º Immediate cooking _____________________________________ •... -
Page 4: Introduction To Your Oven
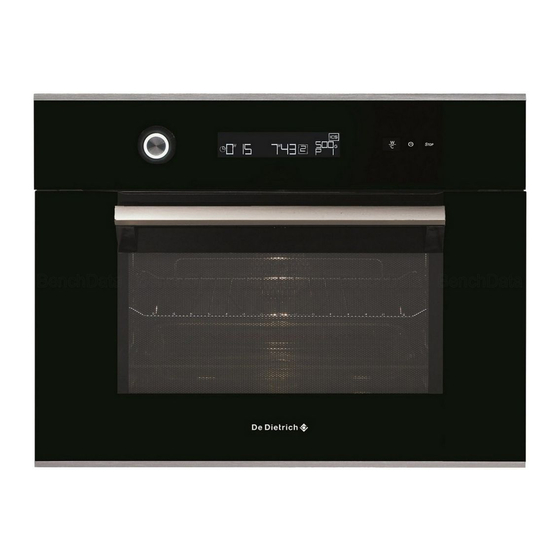
1 / DESCRIPTION OF YOUR APPLIANCE • • INTRODUCTION TO YOUR OVEN Programmer Control knob Wire shelf supports... -
Page 5: Introduction To The Programmer
1 / DESCRIPTION OF YOUR APPLIANCE • • INTRODUCTION TO THE PROGRAMMER Cooking mode display Clock display Cooking time symbol Shelf /Stop turntable symbol Cooking time/”minute minder” display Keypad locking symbol (child safety device) “Minute minder” symbol Oven temperature display End of cooking time symbol Temperature/power setting touch button Time, cooking time, end of cooking time and “minute minder”... -
Page 6: Using The Programmer
2 / USING YOUR APPLIANCE • • USING THE PROGRAMMER • Resetting the time When power is switched on The display flashes 12:00. - Set the time using the knob. Example: 12:30. - Press the knob to confirm. The display stops flashing. - T T o o a a l l t t e e r r t t h h e e t t i i m m e e o o n n t t h h e e c c l l o o c c k k - Press the button for a few... -
Page 7: Immediate Cooking
2 / USING YOUR APPLIANCE • • USING THE PROGRAMMER •Immediate cooking — The programmer should only display the time. It should not be flashing. - Use the knob to select the required cooking setting. - Example: —> Power setting 1000W. - Confirm by pressing the knob once. -
Page 8: Programmed Cooking
2 / USING YOUR APPLIANCE PROGRAMMED COOKING • • Cooking with immediate start and a set cooking time - Select the desired cooking mode and adjust the temperature (see paragraph: “Immediate cooking”). - Press the button. - The display flashes to indicate that a setting may be entered. -
Page 9: º Delayed Start
2 / USING YOUR APPLIANCE PROGRAMMED COOKING • • Cooking with delayed start and selected end of cooking time P P r r o o c c e e e e d d a a s s f f o o r r p p r r o o g g r r a a m m m m e e d d c c o o o o k k i i n n g g . . - Press the button until the cooking end time indicator flashes. -
Page 10: Using The "Minute Minder" Function
2 / USING YOUR APPLIANCE USING THE “MINUTE MINDER” FUNCTION • • Y Y o o u u r r o o v v e e n n ’ ’ s s p p r r o o g g r r a a m m m m e e r r c c a a n n b b e e u u s s e e d d a a s s a a n n i i n n d d e e p p e e n n d d e e n n t t t t i i m m e e r r t t h h a a t t a a l l l l o o w w s s y y o o u u t t o o c c o o u u n n t t d d o o w w n n t t i i m m e e w w i i t t h h o o u u t t u u s s i i n n g g t t h h e e o o v v e e n n . -
Page 11: Locking The Controls
2 / USING YOUR APPLIANCE LOCKING THE CONTROLS (CHILD SAFETY) • • OVEN OFF You have the option of preventing access to the oven controls by taking the following steps: when the oven is off, press the S S T T O O P P buttons simultaneously for a few seconds. -
Page 12: Adjusting Screen Contrast
2 / USING YOUR APPLIANCE ADJUSTING THE DISPLAY CONTRAST • • Set the time to 00:10 (see “Resetting the time” on p.6) - Press the button until -CO- is displayed. - Adjust the contrast, using the knob. - Press the knob to confirm. DEMO MODE •... -
Page 13: Starting And Stopping The Turntable
2 / USING YOUR APPLIANCE • • STOPPING AND STARTING THE TURNTABLE If you think that there is insufficient space for the turntable to rotate freely in the oven, you can stop it before or during the programme. Stopping the turntable - - To stop the turntable rotating, press and hold the knob. -
Page 14: Oven Cooking Modes
3 / OVEN COOKING MODES M M I I C C R R O O W W A A V V E E (recommended power setting 1 1 0 0 0 0 0 0 W W , min 100 W, max 1000 W) D D E E F F R R O O S S T T (fixed power setting: 2 2 0 0 0 0 W W ) F F A A N N C C O O O O K K I I N N G G + + M M I I C C R R O O W W A A V V E E... - Page 15 3 / OVEN COOKING MODES T T U U R R B B O O G G R R I I L L L L (recommended temperature 2 2 0 0 0 0 ° ° C C , min 50°C, max 200°C) •Cooking is done by the upper element and the fan.
-
Page 16: Microwave
3 / OVEN COOKING MODES • • MICROWAVE USING THE POWER LEVELS Power Quickly reheating drinks, water, dishes containing a lot of water. 1000W / 900W Cooking foods containing a lot of water (soups, sauces, tomatoes, etc.) 800W / 700W Cooking fresh or frozen vegetables. -
Page 17: º The "Keep Warm" Function
3 / OVEN COOKING MODES T T H H E E “ “ K K E E E E P P W W A A R R M M ” ” F F U U N N C C T T I I O O N N T T h h i i s s f f u u n n c c t t i i o o n n k k e e e e p p s s t t h h e e f f o o o o d d a a t t t t h h e e t t e e m m p p e e r r a a t t u u r r e e i i t t w w a a s s w w h h e e n n c c o o o o k k i i n n g g f f i i n n i i s s h h e e d d . -
Page 18: º Defrosting
3 / OVEN COOKING MODES • • DEFROSTING This oven allows you to access two different types of programmes in the defrost mode - Automatic defrost programme P1 or P2. You simply select the type of programme and enter the weight. -
Page 19: º Defrost Guide
3 / OVEN COOKING MODES DEFROSTING GUIDE • • Food Quantity Time Recommendations Place on absorbent paper and turn Flaky or short crust pastry 400 g 1 - 3 min over halfway through. Food Quantity Time Recommendations Scallops 500 g 5 - 7 min Shelled prawns 100 g... -
Page 20: º Fan Cooking + Microwave
3 / OVEN COOKING MODES • • FAN COOKING + MICROWAVE The fan cooking + microwave function lets you combine microwave cooking with fan cooking, which will save you a lot of time. The microwave power levels available to you are 100-200-300- 400-500W. -
Page 21: º Grill+Microwave
3 / OVEN COOKING MODES • • GRILL + MICROWAVE This function lets you use the grill and the microwave simultaneously, which makes cooking very quick. There are two grill + microwave settings: High grill + microwave and low grill + microwave You can combine them with the following 7 power levels: 100 W/200 W/300 W/400 W/500 W/ 600 W/700 W GRILL + MICROWAVE COOKING GUIDE... -
Page 22: Turbo Grill
3 / OVEN COOKING MODES TURBO GRILL • • This setting allows you to use the grill function + fan assistance at the same time,allowing thick foods to be cooked evenly. The cooking temperature is adjustable between 50 and 200°C in increments of 5°C. TURBO GRILL COOKING GUIDE Place the food in a dish on the shelf on level 1. -
Page 23: Fan Cooking
3 / OVEN COOKING MODES • • FAN COOKING The fan cooking function lets you cook and brown foods like in a traditional oven. Tips: The cooking temperature is adjustable between 50 and 250°C in increments of 5°C. Always insert the accessories (shelf or drip tray) at level 1 or 2. This will ensure better heat distribution and optimum cooking results. -
Page 24: Fan Cooking Guide
3 / OVEN COOKING MODES • • FAN COOKING GUIDE Food Temperature Rack level Time Meat Roast pork (1 Kg) 160°C Grill, level 2 90 min Roast veal (1 Kg) 180°C Grill, level 2 70 - 75 min Roast beef (1 Kg) 220°C Grill, level 2 38 - 40 min... -
Page 25: º Automatic Ics Function
3 / OVEN COOKING MODES •AUTOMATIC COOKING FUNCTIONS With the automatic cooking function, the cooking time and function are calculated automatically based on the type of food concerned and its weight. Automatic cooking programme by weight. — The programmer should only display the time. -
Page 26: º Guide To The Automatic Ics Function
3 / OVEN COOKING MODES •GUIDE TO AUTOMATIC COOKING Turkey, pork, This function is used to cook and brown turkey, pork or veal roasts from 500 g to 2000 g. veal Cooking is done using the combined microwave + fan cooking function. Use a heat-resistant, microwave-safe dish, preferably earthenware (fewer splashes than with a glass dish). - Page 27 3 / OVEN COOKING MODES This function allows you to cook and brown a whole chicken or chicken pieces (legs) weighing between 500 and 2000g. Poultry Cooking is done using a combination of microwave + fan cooking and/or grill mode. Use a heat-resistant, microwave-safe dish, preferably earthenware (fewer P P 4 4 splashes than with a glass dish).
- Page 28 3 / OVEN COOKING MODES Pizza This function lets you reheat and brown frozen pizzas weighing between 100 and 750 g. - frozen Defrosting or cooking is carried out using the fan cooking function. P P 8 8 Remove the pizza from its packaging and place it on the rack at level 2. This function allows you to reheat and brown prepared frozen dishes Gratin (lasagne bolognese, gratin dauphinois, cottage pie, fish pie, etc.) from 250g...
-
Page 29: Function Suitability Tests
4 / FUNCTION SUITABILITY TESTS F F u u n n c c t t i i o o n n a a l l s s u u i i t t a a b b i i l l i i t t y y t t e e s s t t s s i i n n a a c c c c o o r r d d a a n n c c e e w w i i t t h h I I E E C C / / E E N N / / N N F F E E N N 6 6 0 0 7 7 0 0 5 5 s s t t a a n n d d a a r r d d s s ; ; T T h h e e I I n n t t e e r r n n a a t t i i o o n n a a l l E E l l e e c c t t r r o o t t e e c c h h n n i i c c a a l l C C o o m m m m i i s s s s i i o o n n , , S S C C . -
Page 30: Service Calls
5 / AFTER-SALES SERVICE • SERVICE CALLS Any repair made to your appliance must be carried out by a qualified professional, authorised to work on the brand. When you call, state your appliance’s complete reference information (model, type, serial number). This information appears on the manufacturer’s nameplate (Fig.1). - Page 31 F F a a g g o o r r B B r r a a n n d d t t S S A A S S , , tenant-manager – SAS with share capital of 20 000 000 euros RCS Nanterre 440 303 196. CZ5700743-00 - 08/11...
Need help?
Do you have a question about the DME1140B and is the answer not in the manual?
Questions and answers