Table of Contents
Advertisement
Quick Links
Advertisement
Table of Contents

Related Manuals for CONSTRUCTA CF12550


Summary of Contents for CONSTRUCTA CF12550
- Page 1 CF12550 Instruction manual...
- Page 3 In the unlikely event of a fault, look here for information on how to rectify minor faults yourself. A detailed table of contents will help you to find your way around quickly. Enjoy your meal! Instruction manual CF12550 9000484345 B-101189-02...
-
Page 4: Table Of Contents
Important information ......Before installation ........Safety information . - Page 5 Table of contents Cleaning the shelf frames ......Troubleshooting ........Replacing the oven light on the ceiling of the oven .
-
Page 6: Important Information
Important information Before installation Disposing in an environmentally responsible manner ó Transport damage Electrical connection Safety information... - Page 7 Children Children may prepare meals only if they have been properly instructed. They must be able to operate the appliance correctly. They must understand the hazards indicated in the instruction manual. Children must be supervised when using the appliance, to ensure that they do not play with it. Hot oven Open the oven door carefully.
-
Page 8: Reasons For Damage
Reasons for damage Baking tray, aluminium foil Do not place the baking tray on the oven floor. Do not cover or dishes on the oven floor it with aluminium foil. Do not place dishes on the oven floor. This will cause heat accumulation. The baking and roasting times will no longer be correct and the enamel will be damaged. -
Page 9: Your New Cooker
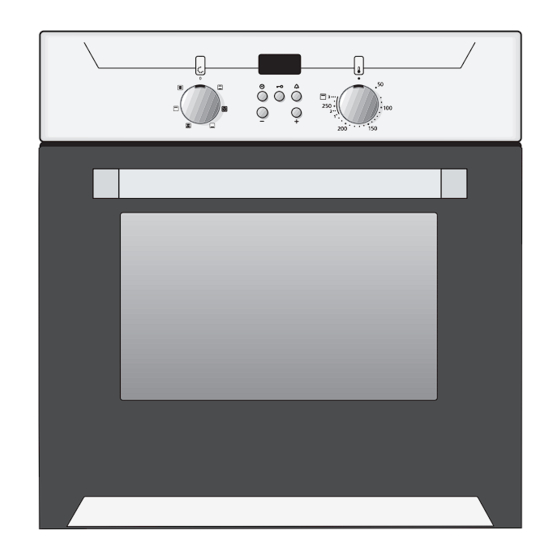
Your new cooker Here you will learn more about your new oven. The control panel and its switches and indicators are explained here. The heating modes and the accessories included with your oven will be explained here. Control panel Details vary according to the appliance model. Function selector Temperature selector Operating switches and... -
Page 10: Oven
Oven Function selector With the function selector knob you can set the heating mode for the oven. The function selector knob can be rotated to the right or to the left. When the function selector knob is set the oven lighting is switched on. -
Page 11: Temperature Selector
Control buttons and display panel Clock button j Use this button to set the time of day, the cooking time ? and the completion time !. Key button p Use this button to switch the childproof lock on and off. Timer button a Use this button to set the timer. -
Page 12: Oven And Shelving Accessories
Oven and shelving accessories The shelf can be inserted at 4 different heights in the oven. You can remove the shelf two thirds of the way without it tipping. This makes it easier to take food out of the oven. Accessories Accessories may be purchased at a later date from the after sales service or from specialist shops. -
Page 13: Cooling Fan
Optional accessories* Protective grid The protective grid is fixed to the oven door. This prevents small children from touching the hot oven door. The protective grid can be ordered from the factory after-sales service with number 361480. You will find a comprehensive range of products for your cooker in our brochures and on the Internet. You can buy optional accessories from your local retailer. -
Page 14: Before Using For The First Time
Before using for the first time This section will tell you everything you need to do before using the cooker for the first time. Heat the oven and clean the accessories. Read the safety instructions in the Important information" section. Firstly, check to see if the j symbol and three zeros are flashing in the display. -
Page 15: Pre Cleaning The Accessories
Pre cleaning the accessories Please wash the accessories thoroughly with soapy water and a cleaning cloth before using them. Setting the oven You have various options for setting the oven. Switching off the oven When your meal is ready, switch off the oven yourself. manually The oven switches off You can leave the kitchen for a long period. - Page 16 Use the temperature selector to set the temperature or grill setting. Changing the setting You may change the temperature or grill setting at any time. Switching off the appliance 1. Turn the operating mode selector back to the Û position. 2.
-
Page 17: If The Oven Is To Switch Off Automatically
If the oven is to switch off Example: Top/bottom heating t, 200 ºC, cooking time of 45 minutes automatically Select the desired type of heating using the function selector. Use the temperature selector to set the temperature or grill setting. Press the j clock button. - Page 18 Set the cooking time using the + or - button. + button default value = 30 minutes. - button default value = 10 minutes. The oven switches on after a few seconds. The ? symbol lights up in the display. The cooking time has A signal sounds.
-
Page 19: If The Oven Is To Switch On And Off Automatically
If the oven is to switch on and off Please remember that easily spoiled foods must not be automatically allowed to remain in the oven for too long. Example: Imagine - it's 10:45 a.m. The meal will take 45 minutes to cook and must be ready at 12:45 pm. - Page 20 Set the cooking time using the + or - button. + button default value = 30 minutes. - button default value = 10 minutes. Press the j clock button until the ! end symbol flashes. In the display you will see the time when the meal will be ready.
-
Page 21: Time
Time When the oven is first connected, or following a power cut, the j symbol and three zeros flash in the display. Set the time. The function selector must be switched off. Setting procedure Example: 13:00 Press the j clock button. 12.00 appears in the display and the j symbol flashes. -
Page 22: Timer
Timer You can use the timer as a kitchen timer. It operates independently of the oven. The timer has a special signal. This means that you can tell whether the set timer period has elapsed or the cooking time is complete. You can also set the timer if the childproof lock is active. -
Page 23: Rapid Heating
Press the a timer button. Press the - button until the display Cancelling the setting is at zero. The timer and cooking time The symbols light up. The timer period counts down visibly in count down simultaneously the display. To call up the remaining cooking time ?, end time ! or time j: Press the j clock button until the symbol in question flashes. -
Page 24: Childproof Lock
Childproof lock The oven has a childproof lock to prevent children from switching it on accidentally. Locking the oven Press the p key button until the p symbol appears in the display. This will take approximately 4 seconds. Unlocking Press the p key button until the p goes out. Notes You can set the timer and the clock even when the oven is locked. -
Page 25: Care And Cleaning
Care and cleaning Do not use high pressure cleaners or steam jets. There is a danger of short circuiting. Do not use caustic or abrasive cleaning agents. The surface could be damaged. If an abrasive substance comes into contact with the frontage, wash it off immediately with water. Cleaning agents Appliance exterior: Stainless steel surfaces... -
Page 26: Detaching And Attaching The Oven Door
Aluminium baking tray (optional) Do not wash in the dishwasher. On no account use oven cleaner. The surface should not be touched with a knife or other similar sharp objects. Risk of scratching. Wipe the surfaces horizontally and without applying pressure with soapy water and a soft window cloth or a lint free microfibre cloth. - Page 27 Close the oven door up to the limit stop (Fig. B). Grip the door on the left and right hand sides with both hands. Close the door a little more and pull it out. Attaching the door Reattach the oven door in the reverse sequence to removal. When attaching the oven door, ensure that both hinges are inserted straight into the opening (Fig.
-
Page 28: Cleaning The Shelf Frames
Cleaning the shelf The shelf frames can be removed for cleaning. frames To remove the shelf frames: Hold the shelf frames from underneath and pull slightly forward. Pull out the projections at the bottom from the apertures they are inserted in. Then remove the complete frame by first pulling it downward and then forward. - Page 29 Caution. Incorrect assembly: never move the rail before the two hooks are secured fully in the upper holes. The enamel can become damaged and break. 2. Correct assembly: the two hooks must be inserted fully into the upper holes. Now move down the rail slowly and carefully and insert into the lower holes.
-
Page 30: Troubleshooting
Troubleshooting Should a malfunction occur, it is often only due to a minor fault. Please read the following instructions before calling the after-sales service: Problem Possible cause Comments/remedy The oven does not work. Blown fuse. Look in the fuse box and check that the fuse is in working order. -
Page 31: Replacing The Oven Light On The Ceiling Of The Oven
Replacing the oven light on the ceiling If the oven light fails, it must be replaced. 25 watt of the oven heat resistant replacement bulbs can be obtained from the after sales service or specialist shops. Please specify the E number and FD number of your appliance. -
Page 32: After Sales Service
After sales service Our after sales service is there for you if your oven needs repairing.You will find the address and telephone number of your nearest after sales service centre in the phone book. The after sales service centres listed will also be happy to advise you of a service point in your local area. -
Page 33: Tables And Tips
Tables and tips This table contains a selection of dishes and the optimum settings at which to cook them. You can find out which type of heating and temperature is best for your dish, which accessories to use, and at which oven level the dish should be inserted. - Page 34 Cake in a mould Cake mould placed Level Heating Temperature ºC Cooking on a wire shelf mode time, minute Simple cake mixture Rectangular cake...
- Page 35 Cakes on trays Level Type of Temperature Baking heating ºC time, mins Cake mixture or yeast dough with dry Universal pan topping...
- Page 36 Bread and rolls Level Type of Temperature Cooking heating ºC time, mins Small baked products Level Type of Temperature Baking time, heating ºC mins...
-
Page 37: Baking Tips
Baking tips You wish to cook to your own recipe. Refer to the instructions in the tables for similar types of food. How to check that a sponge cake is Approximately 10 minutes before the end of the baking time given in the cooked properly. -
Page 38: Meat, Poultry, Fish
Meat, poultry, fish Ovenware You may use any heat resistant dishes. The universal pan is also suitable for larger roasts. Always place the dishes in the centre of the wire grill. Hot glass dishes should be placed on a dry kitchen towel after being removed from the oven. - Page 39 Meat Weight Ovenware Level Type of Temperature Cooking heating ºC, grill time, mins...
- Page 40 Poultry The values in the table apply to dishes placed in a cold oven. The weights indicated in the table are for unstuffed poultry that is ready for roasting. If you are grilling directly on the wire rack, you should also insert the universal pan at level 1.
-
Page 41: Tips For Roasting And Grilling
Fish The values in the table apply to dishes placed in a cold oven. Fish Weight Ovenware Level Type of Temperature Cooking heating ºC, grill time, mins Tips for roasting and grilling The table does not contain specifications for the weight of the roast. -
Page 42: Bakes, Gratins, Toast
Bakes, gratins, The values in the table apply to dishes placed in a cold oven. toast Dish Ovenware Level Type of Temperature Cooking heating ºC, grill time, setting mins Sweet bake (e.g. quark soufflé with fruit) Ovenproof dish 170 190 50 60 Savoury bakes made from cooked Ovenproof dish... -
Page 43: Frozen Foods
Frozen foods Please observe the instructions on the packaging. The values in the table apply to dishes placed in a cold oven. Meal Level Type of Temperature in Cooking time in heating ºC minutes Fruit strudel* Universal pan 190 210 45 55 French fries* Universal pan... -
Page 44: Drying
Drying Only use perfectly fresh fruit and vegetables, and wash them thoroughly. Allow the food to drain well and dry it yourself. Line the universal pan and wire rack with baking paper or greaseproof paper. Meal Level Type of Temperature in Cooking time in heating ºC... - Page 45 Setting procedure Place the universal pan on level 2. Place the jars inside the pan so that they do not come into contact with each other. Pour ½ litre of hot water (approx. 80 °C) into the universal pan. Close the oven door. Switch the function selector to s.
-
Page 46: Special Dishes
Preserving vegetables Vegetables with cold stock in 1 litre jars After bubbling Reheating 120 140 ºC Cucumbers approx. 35 minutes Beetroot approx. 35 minutes approx. 30 minutes Brussel sprouts approx. 45 minutes approx. 30 minutes Beans, kohlrabi, red cabbage approx. 60 minutes approx. -
Page 47: Energy Saving Tips
Preparation Dish Ovenware Level Type of Temperature in Cooking heating ºC time Yoghurt Place the cups or 6 8 hrs screw lid jars on the wire rack Proving Heat resistant dish Place on the Preheat to 50 ºC, 5 mins dough cooking switch off the... -
Page 48: Acrylamide In Foodstuffs
Acrylamide in foodstuffs Which foods are affected? Acrylamide is mainly produced in grain and potato products heated at high temperatures, such as potato crisps, chips, toast, rolls, bread, baked goods (biscuits, gingerbread, cookies). Tips for keeping acrylamide to a minimum when preparing food General Keep cooking times to a minimum. -
Page 49: Test Dishes
Test dishes Cakes and pastries Dish Accessories and Level Type of Temperature Baking notes heating ºC time, mins 150 170 20 30 140 160 35 45 150 170 25 35 140 160 30 40 160 180 30 40 140 160 40 50 130 150 50 60... - Page 50 The values in the table apply to dishes placed in a cold oven. Grill Dish Accessories Level Type of Grill setting Cooking heating time, mins Toasting bread Wire rack (preheat for 10 minutes) Beefburgers, 12 pieces* Wire rack 25 30 Turn after C of the time.
- Page 52 Constructa GmbH Carl Wery Straße 34 81739 München 9000484345 GERMANY 101189-02...
Need help?
Do you have a question about the CF12550 and is the answer not in the manual?
Questions and answers