Table of Contents
Advertisement
Quick Links
Advertisement
Table of Contents

Subscribe to Our Youtube Channel
Related Manuals for Gefen 4x2 HD-SDI


Summary of Contents for Gefen 4x2 HD-SDI
- Page 1 4x2 HD-SDI Switcher U S E R M A N U A L www.gefen.com...
-
Page 2: Asking For Assistance
Chatsworth, CA 91311 www.gefen.com support@gefen.com Gefen Inc. reserves the right to make changes in the hard ware, packaging and any accompanying doc u men ta tion without prior written notice. 4x2 HD-SDI Switcher is a trademark of Gefen Inc. © 2007 Gefen Inc., All Rights Reserved... -
Page 3: Table Of Contents
Introduction Features Panel Descriptions Connecting and Operating the 4x2 HD-SDI Switcher RMT4-IR Installation Specifi cations Warranty TABLE OF CONTENTS... -
Page 4: Introduction
How it Works Connect your HD-SDI sources and the one or two HD-SDI displays to the 4x2 HD-SDI Switcher. When all the equipment is powered and connected, switching can begin. The ex•tend•it line offers solutions for noise, space and security concerns, data center control, information distribution, conference room presentation, school and corporate training environments. -
Page 5: Features
• Saves money—use one or two displays to access four sources • Saves space—eliminates unnecessary hardware while increasing effi ciency • Saves time—switch between sources in an instant using the RMT-4 IR remote. Installs in seconds • Lifetime support—includes one-year manufacturer’s warranty and free technical... -
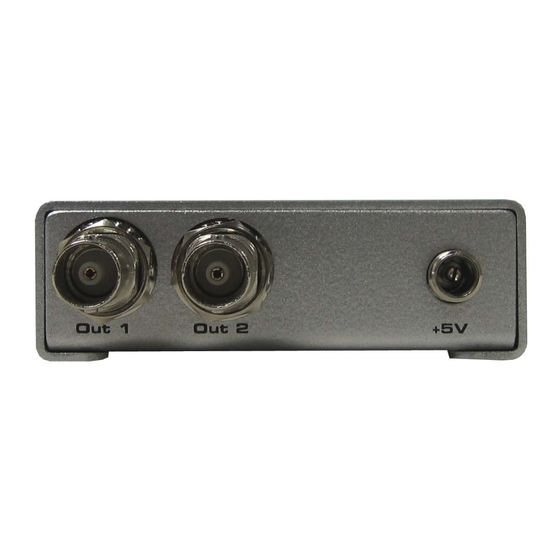
Page 6: Panel Descriptions
PANEL DESCRIPTIONS SDI Out 1 SDI Out 2 Connects to 5VDC power supply SDI In 4 SDI In 1 SDI In 2 SDI In 3... -
Page 7: Connecting And Operating The 4X2 Hd-Sdi Switcher
CONNECTING AND OPERATING THE 4X2 HD-SDI SWITCHER How to Connect the 4x2 HD-SDI Switcher to your devices 1 Connect your HD-SDI inputs into Input 1 thru 4 on the 4x2 HD-SDI Switcher. 2 Connect one or two displays into the outputs. -
Page 8: Rmt4-Ir Installation
RMT4-IR INSTALLATION 1. Remove battery cover from the back of the RMT4-IR remote. 2. Verify that dip switches 1 & 2 are in the down (OFF) position. 3. Insert the battery, hold the battery so that you can see the positive side facing up. The side that is not marked must be facing down. -
Page 9: Specifi Cations
SPECIFICATIONS • Input/Output: SDI - SMPTE 259M-C (270Mbps);HD-SDI - SMPTE 292M (1.485, 1.485/ 1.001 Gbps); NTSC; PAL: 720p @ 60, 59.94, 50Hz 1080p @ 30, 29.97, 25, 24 & 23.98Hz, 1080i @ 60, 59.94, 50, 48 & 47.95Hz • Power Supply: 5VDC •... -
Page 10: Warranty
If equipment fails because of such defects and Gefen Inc. is notifi ed within two (2) year from the date of shipment, Gefen Inc. will, at its option repair or replace the equipment, provided that the equipment has not been subjected to mechanical, electrical, or other abuse or modifi...
Need help?
Do you have a question about the 4x2 HD-SDI and is the answer not in the manual?
Questions and answers