
Subscribe to Our Youtube Channel
Related Manuals for Crestron FlipTop FT-TS600


Summary of Contents for Crestron FlipTop FT-TS600
- Page 1 Crestron FT-TS600 FlipTop™ Touch Screen Operations & Installation Guide...
- Page 2 Microsoft Corporation in the United States and/or other countries. Other trademarks, registered trademarks, and trade names may be used in this document to refer to either the entities claiming the marks and names or their products. Crestron disclaims any proprietary interest in the marks and names of others.
-
Page 3: Table Of Contents
Crestron FT-TS600 FlipTop Touch Screen Contents FlipTop Touch Screen: FT-TS600 Introduction ..........................1 Features and Functions ....................1 Specifications ......................4 Physical Description ....................6 Setup ............................12 Network Wiring ......................12 Identity Code ......................12 Configuring the Touch Screen ................... 12 Supplied Hardware .................... -
Page 5: Fliptop Touch Screen: Ft-Ts600
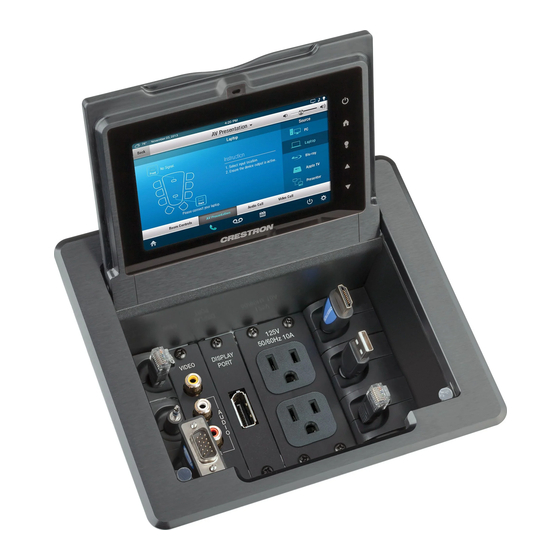
FlipTop Touch Screen: FT-TS600 Introduction ® The FT-TS600 FlipTop™ Touch Screen by Crestron provides a configurable control and connectivity solution in a stylish, flush mount tabletop design. Flipping open the “FlipTop” lid exposes a brilliant 5” (127 mm) color touch screen, gracefully angled for easy operation and viewing. - Page 6 Handsomely finished in a choice of black anodized or brushed aluminum, Crestron FlipTops lend a contemporary metallic accent to conference tables and podiums. The FT-TS600 installs cleanly in virtually any flat, horizontal surface up to 1 3/4” (44 mm) thick. Beveled edges provide for a nearly flush appearance.
-
Page 7: Streaming Video
FT-TS600’s integrated microphone and speaker. Line Output In addition to its onboard speaker, the FT-TS600 includes a balanced line level audio output, allowing the speaker signal to be routed to the room’s audio system. Amplifying the FlipTop’s audio signal through the room speakers enhances its audio conferencing capabilities, allowing a small group of individuals to participate in a conference call using a single FT-TS600. -
Page 8: Specifications
Crestron FT-TS600 Power over Ethernet Using PoE+ technology, the FT-TS600 gets its operating power right through the LAN wiring. PoE eliminates the need for a local power supply or any dedicated power wiring. A PoE+ capable power source (CEN-SWPOE-16, sold separately, or similar) is required to power the FT-TS600. - Page 9 FlipTop Dual AC Power Outlet Module, NEMA 5 ® VMK-WIN TouchPoint Virtual Mouse & Keyboard ® Software for Windows Supports Smart Graphics only. Not compatible with “traditional” UI projects. Operations & Installation Guide – DOC. 7585B FlipTop Touch Screen: FT-TS600 • 5...
-
Page 10: Physical Description
This section provides information on the connections, controls, and indicators available on the FT-TS600. FT-TS600 Overall Dimensions (Top View) 7.98 in (203 mm) 6.22 in (158 mm) 6.77 in (172 mm) 6 • FlipTop Touch Screen: FT-TS600 Operations & Installation Guide – DOC. 7585B... - Page 11 Crestron FT-TS600 FlipTop Touch Screen FT-TS600 Overall Dimensions (Front View) 6.72 in (171 mm) 7.28 in (185 mm) Operations & Installation Guide – DOC. 7585B FlipTop Touch Screen: FT-TS600 • 7...
- Page 12 FT-TS600 Overall Dimensions (Side View) 7.88 in (200 mm) 3.75 in (95 mm) 7.06 in (180 mm) 6.94 in (177 mm) 5.12 in (130 mm) 6.07 in (155 mm) 8 • FlipTop Touch Screen: FT-TS600 Operations & Installation Guide – DOC. 7585B...
- Page 13 Crestron FT-TS600 FlipTop Touch Screen FT-TS600 (Oblique View) Microphone Speaker Operations & Installation Guide – DOC. 7585B FlipTop Touch Screen: FT-TS600 • 9...
- Page 14 (1) Dual color LED; Yellow indicates operating power supplied via PoE; Green indicates device is ready HW-R Button (1) Recessed miniature push button for hardware reset (Continued on following page) 10 • FlipTop Touch Screen: FT-TS600 Operations & Installation Guide – DOC. 7585B...
- Page 15 (1) 6-32 screw, chassis ground lug 1. An interface connector for the AUD OUT port is provided with the unit. 2. PoE+ dc power can also be available on a TX/RX pair. Operations & Installation Guide – DOC. 7585B FlipTop Touch Screen: FT-TS600 • 11...
-
Page 16: Setup
NOTE: The only connection required to configure the touch screen is power. Refer to “Hardware Hookup” on page 28 for details. NOTE: The FT-TS600 can take up to 45 seconds to boot to a display after initial power up. Access the Setup Screens The “Setup”... - Page 17 About button that provides information about the touch screen and a Save & Exit button. The functions of each are detailed in the following pages of this guide. Operations & Installation Guide – DOC. 7585B FlipTop Touch Screen: FT-TS600 • 13...
- Page 18 To edit the Static IP Address, Static Subnet Mask, Static Default Router, Preferred DNS or Alternate Preferred DNS, touch the button directly under the label for the entry to edit. The on-screen numeric keypad opens. 14 • FlipTop Touch Screen: FT-TS600 Operations & Installation Guide – DOC. 7585B...
- Page 19 “Setup” menu. IP Table Setup On the “Setup” menu, touch IP Table Setup to display the “Ethernet Setup – IP Table” menu. “Ethernet Setup –IP Table” Menu Operations & Installation Guide – DOC. 7585B FlipTop Touch Screen: FT-TS600 • 15...
- Page 20 Touch Save to save a new entry to return to the “Ethernet Setup – Edit IP Table Entry” screen. Touch the field below IP Address/Hostname to display the on-screen keyboard. 16 • FlipTop Touch Screen: FT-TS600 Operations & Installation Guide – DOC. 7585B...
- Page 21 Master Volume and Media Volume, as well as a control for playing a test .wav file. The Media Volume controls adjust H.264 streaming media Operations & Installation Guide – DOC. 7585B FlipTop Touch Screen: FT-TS600 • 17...
- Page 22 On the “Setup” menu, touch Standby Timeout to display the “Standby Timeout” screen. “Standby Timeout” Screen The “Standby Timeout” screen provides controls to adjust standby timeout from 0 to 120 minutes. 18 • FlipTop Touch Screen: FT-TS600 Operations & Installation Guide – DOC. 7585B...
- Page 23 When a button is pressed, its corresponding indication on the screen lights. Touch to return to the “Diagnostics” menu. Operations & Installation Guide – DOC. 7585B FlipTop Touch Screen: FT-TS600 • 19...
- Page 24 Touch to return to the “Diagnostics” menu. Calibrate On the “Diagnostics” menu, touch Calibrate to initiate the screen calibration procedure. Refer to “Touch Test” above for details. 20 • FlipTop Touch Screen: FT-TS600 Operations & Installation Guide – DOC. 7585B...
-
Page 25: Test Patterns
The “Diagnostics - Test Patterns” screen contains buttons for selecting the different available test patterns: Display Color Bars, Display Vertical Lines, Display Gray Scale, Display Grid Pattern and Display Test Pattern. Touch to return to the “Diagnostics” menu. Operations & Installation Guide – DOC. 7585B FlipTop Touch Screen: FT-TS600 • 21... - Page 26 The “Diagnostics - Rava” screen provides controls for testing the use of Crestron’s Rava™ SIP Intercom with the FT-TS600. It can be used to test projects and settings. If the intercom works but the project does not, there is an issue with the project; if the intercom does not work, there is an issue with the settings.
- Page 27 “Setup” menu. Save & Exit On the “Setup” menu, touch Save & Exit to save all settings, exit the setup screens and return to the main project. Operations & Installation Guide – DOC. 7585B FlipTop Touch Screen: FT-TS600 • 23...
-
Page 28: Supplied Hardware
A 6 foot (1.8 meter) USB Type A to Type B cable is included for the COMPUTER connection. Cables are looped through the cable management plates. The included bushings must be installed before mounting the FT-TS600 in a surface. For a neat appearance, any unused openings can be filled using the included hole plugs. - Page 29 06-32 x 1/4” Screws (2) Mounting in a Surface The FT-TS600 is designed to mount in a horizontal surface, such as a desktop, lectern, or podium. The following diagram illustrates the required opening size to accommodate the FT-TS600. A cutout template (40143) is included.
- Page 30 FlipTop Touch Screen Crestron FT-TS600 Use the following procedure to mount the FT-TS600. Position the FT-TS600 in the mounting hole. Mounting Plate Stud Locations Studs for Mounting Plate Surface Cutout Install the four #10-32 socket screws (2037109) in the metal mounting plates (2036985) (two screws per plate).
- Page 31 Mounting Plates (2) Screws (4) #10-32 x 2”, Steel, Socket HD Slide the mounting plates over the studs on each side of the FT-TS600. Turn the four #10-32 socket screws equally, until they contact the underside of the mounting surface.
-
Page 32: Hardware Hookup
Hardware Hookup Make the necessary connections as called out in the illustration that follows this paragraph. Apply power after all connections have been made. When making connections to the FT-TS600, note the following: • Use Crestron power supplies for Crestron equipment. -
Page 33: Recommended Cleaning
Therefore, apply cleaning solution to the cloth rather than the surface of the touch screen. Wipe touch screen clean and avoid getting moisture beneath the bezels. Operations & Installation Guide – DOC. 7585B FlipTop Touch Screen: FT-TS600 • 29... -
Page 34: Uploading And Upgrading
NOTE: Required for loading projects and firmware. USB Communication FT-TS600 PC Running Crestron Toolbox The COMPUTER port on the FT-TS600 connects to the USB port on the PC via the included Type A to Type B USB cable: Click Tools | System Info. Click the icon. -
Page 35: Programs, Projects, And Firmware
Crestron Studio help file, SIMPL Windows help file, VT Pro-e help file, or the Crestron Toolbox help file. If a Crestron Studio (or SIMPL Windows) program is provided, it can be uploaded to Crestron Studio / SIMPL Windows the control system using Crestron Studio (or SIMPL Windows) or Crestron Toolbox. -
Page 36: Program Checks
A defined IP table can be saved to a file or sent to the device. Edit the control system’s IP table to include an entry for the FT-TS600. The entry should list the FT-TS600’s IP ID (specified on the FT-TS600’s IP table) and the internal gateway IP address 127.0.0.1. -
Page 37: Problem Solving
Crestron worldwide offices at www.crestron.com/offices. To post a question about Crestron products, log onto Crestron’s Online Help at www.crestron.com/onlinehelp. First-time users must establish a user account to fully benefit from all available features. -
Page 38: Future Updates
FlipTop Touch Screen Crestron FT-TS600 Future Updates As Crestron improves functions, adds new features, and extends the capabilities of the FT-TS600, additional information may be made available as manual updates. These updates are solely electronic and serve as intermediary supplements prior to the release of a complete technical documentation revision. -
Page 39: Return And Warranty Policies
(property or economic damages inclusive) arising from the sale or use of this equipment. Crestron is not liable for any claim made by a third party or made by the purchaser for a third party. - Page 40 Crestron Electronics, Inc. Operations & Installation Guide – DOC. 7585B (2037433) 15 Volvo Drive Rockleigh, NJ 07647 Tel: 888.CRESTRON 11.13 Fax: 201.767.7576 Specifications subject to www.crestron.com change without notice.
Need help?
Do you have a question about the FlipTop FT-TS600 and is the answer not in the manual?
Questions and answers