
Related Manuals for Piazzetta E911


Summary of Contents for Piazzetta E911
- Page 1 Stufa / Stove e911 e912 e915 e917 e918 e920 e922 e923 istruzioni per l’installazione l’uso e la manutenzione installation, use and maintenance instructions...
- Page 2 Questo documento è di proprietà del Gruppo Piazzetta S.p.A.; non può essere divulgato totalmente o in parte a terzi senza autorizzazione scritta del Gruppo Piazzetta S.p.A. Il Gruppo Piazzetta S.p.A. si riserva i diritti a rigore di legge.
-
Page 3: Table Of Contents
DT2010068-00 4.13 Smaltimento delle ceneri DT2010049-01 Principali anomalie DT2010069-00 Dichiarazione di conformità stufa e911 DT2010702-00 Dichiarazione di conformità stufa e915-e917-e918 DT2010703-00 Dichiarazione di conformità stufa e912-e920-e922-e923 DT2010704-00 Questo libretto cod. H07020320 / DT2000212 - Rev. 01-(05/2007) è composto da 60 pagg. -
Page 4: Norme Generali
1.0 NORME GENERALI DT2010444-00 Controllare che tutte le voci qui sotto elencate siano conformi all’installazione con il vostro prodotto. Fig. 1 COMIGNOLO CANNA FUMARIA COLLEGAMENTO ALLA CANNA FUMARIA ISPEZIONE ISPEZIONE PER RACCOLTA FULIGGINE PRESA D'ARIA ESTERNA DISTANZE DI SICUREZZA VERIFICA PORTATA SOLAIO DT2030048-00... -
Page 5: Camino O Canna Fumaria Singola
Se la canna fumaria dovesse essere male dimensionata o installata nella inosservanza di quanto citato sopra il Gruppo Piazzetta S.p.A. declina ogni responsabilità ad un cattivo funzionamento del prodotto o al danneggiamento di cose, persone o animali. -
Page 6: Comignolo
1.3 Comignolo - Fig. 7 ÷ 11 Fig. 7 Fig. 8 La canna fumaria deve essere dotata sulla sommità di un dispositivo, denominato comignolo, atto a facilitare la dispersione in atmosfera dei prodotti della combustione. Il comignolo dovrà rispondere ai seguenti requisiti: - avere sezione e forma interna equivalente a quella della canna fumaria A;... -
Page 7: Presa D'aria Esterna
1.4 Presa d’aria esterna - Fig. 12÷15 Fig. 12 Fig. 13 La stufa deve disporre dell’aria necessaria per garantire il regolare funzionamento della combustione. - Assicurarsi che nel locale dove viene installato il focolare sia installata una presa d’aria di dimensione pari o superiore al dato riportato al paragrafo “Dati tecnici”. -
Page 8: Portata Del Solaio
1.5 Ambiente di installazione L’installazione dell’apparecchio deve avvenire in un luogo che ne consenta un sicuro e facile utilizzo ed una semplice manutenzione. Se il prodotto che installate necessita di una presa di corrente elettrica tale luogo deve inoltre essere dotato di impianto elettrico con messa a terra come richiesto dalle norme vigenti. - Page 9 Per il collegamento alla canna fumaria, si consiglia di usare tubi e Fig. 19 curve del Gruppo Piazzetta S.p.A., in quanto lo scarico fumi del prodotto è dimensionato per l‘innesto di questi, inoltre le curve sono dotate d’ispezione che consentono il controllo, la pulizia, e la manutenzione dell‘impianto.
- Page 10 Fig. 20 Fig. 21 DIAFRAMMA Il collegamento alla canna fumaria deve rispettare la distanza MATERIALE ISOLANTE minima di 40 cm da elementi di costruzione sensibili al calore o da materiali infiammabili (rivestimento, travi o soffitti in legno, ecc,). Vedi figure 17-18-19-25-26 Se il raccordo dovesse attraversare elementi o pareti in materiali 40 cm 20 cm...
- Page 11 DT2030060-00 DT2030256-00 DT2030201-00 DT2030200-01 fu mi po st er io re op zi on al e TABELLA SCARICO FUMI POSTERIORE (Misure in cm) Modello Quota A Quota B e911 non previsto non previsto 29,5 e912 e915 26,5 e917 e918 26,5...
-
Page 12: Distanze Di Sicurezza
1.10 Prevenzione degli incendi domestici L’installazione e l’utilizzo del prodotto deve essere fatta in conformità con le istruzioni del fabbricante, e nel rispetto delle normative europee, nazionali e dei regolamenti locali. Quando un tubo di scarico fumi passa attraverso ad una parete o ad un soffitto è... -
Page 13: Caratteristiche E Dati Tecnici
6 Deflettore fumi inferiore e920 ....1 7 Griglia cottura e911 ......1 8 Termometro forno . - Page 14 No Descrizione ......Q.tà e915 1 Laterale Sx Aluker 200x380 e915 ....1 2 Schienale Aluker 335x355 e915 .
- Page 15 No Descrizione ......Q.tà e920 1 Laterale Sx Aluker 282x430 e920 ....1 2 Schienale Aluker 415x410 e920 .
-
Page 16: Accessori
Scarico fumi ......... . superiore o posteriore (nella stufa e911 solo scarico superiore) 2.4 Dati di identificazione del prodotto - Fig. -
Page 17: Dati Tecnici
2.5 Dati tecnici Unità e911 e912 e915 e917 e918 e920 e922 e923 di misura Potenza termica nominale Consumo alla potenza kg/h termica nominale Rendimento termico 80,2 75,5 82,5 82,5 82,5 75,5 75,5 75,5 Contenuto CO (al 13% O 0,11 0,10... - Page 18 2.6 Dimensioni e911 2.7 Dimensioni e912 126,5 14,5 14,5 Ø15 Ø15 17,5 17,5 DT1020016-00 DT1020017-00 2.8 Dimensioni e915 2.9 Dimensioni e917 92,5 84,2 76,5 Ø Ø15 14,5 DT1020095-00 DT1020232-00...
- Page 19 2.10 Dimensioni e918 2.11 Dimensioni e920 113,5 10 7 14,5 Ø Ø1 5 19,5 DT1020270-00 DT1020015-00 2.12 Dimensioni e922 2.13 Dimensioni e923 10 2 100,5 91, 5 11,5 14, 5 14,5 Ø15 Ø15 18,5 DT1020231-00 DT1020271-00...
-
Page 20: Combustibile
3.0 USO DT2010453-00 • Alcune importanti nozioni possono essere determinanti per la • Durante il funzionamento, alcune parti della stufa (porta, maniglia, buona resa di funzionamento del vostro prodotto, di seguito registri, pezzi in ceramica) possono raggiungere temperature elevate. citiamo alcune nozioni in merito per utilizzarlo al meglio cercando Fate dunque molta attenzione ed usate le dovute precauzioni. -
Page 21: Regolazione Aria Comburente
DT2030755-00 Regolazione e quantità di materiale da bruciare per potenza nominale e911 e915-e917-e918 e912-e920-e922-e923 Materiale da bruciare Legna... -
Page 22: Apertura Della Porta
2. Avviamento del prodotto - Nel primo periodo di funzionamento è consigliato utilizzare il prodotto al minimo della capacità, caricando il focolare almeno per il primo giorno al 50% in meno di legna rispetto alla carica nominale indicata. - Mantenere i registri aria nella posizione di funzionamento (escluso accensione), vedi paragrafo “Regolazione dell’aria comburente” - Questa fase permette un assestamento di tutti i componenti, e l’esalazione delle vernici, grassi, o liquidi oleosi serviti alla fabbricazione. -
Page 23: Funzionamento In Condizioni Atmosferiche Avverse
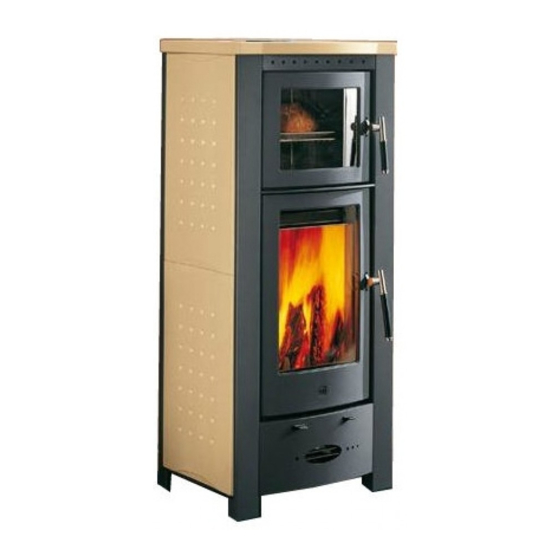
Fare attenzione a non riempire oltre al limite posto sul serbatoio, indicato con il simbolo di “MAX”. 3.10 Uso del forno (solo per stufa e911) Per la cottura dei cibi non Vi viene fornito un manuale, in quanto solo l’ esperienza può farvi da maestra ed unita alla fantasia e alle capacità personali, vi permetterà... -
Page 24: Manutenzione
In caso di rottura sostituire il vetro solo con materiale originale del Gruppo Piazzetta S.p.A. Non usate comunque materiali che possono graffiare o rovinare i vetri, in quanto le graffiature possono diventare crepe o rotture. -
Page 25: Rimozione Deflettori
Per la pulizia del focolare ricordarsi di togliere anche i 2 deflettori fumi Schienale (nel modello e911 è presente un solo deflettore). Per questa operazione si consiglia di essere in due persone, quindi: - sollevare anteriormente i due deflettori facendo perno sullo schienale;... -
Page 26: Pulizia Del Focolare E Del Cassetto Cenere
è obbligatorio rivolgersi ad un Centro Assistenza Tecnica Piazzetta o a personale qualificato. Il kit di ventilazione necessita di una pulizia annuale da eventuali depositi di polvere che si formano nelle fessure della protezione, nelle griglie e nelle pale del ventilatore. -
Page 27: Principali Anomalie
5.0 PRINCIPALI ANOMALIE DT2010069-00 Tutte le operazioni devono essere effettuate esclusivamente in sicurezza, ad apparecchio freddo, in assenza di corrente (staccare la spina), e da personale qualificato. Problema Causa Soluzione Controllare il condotto di scarico Mancanza di tiraggio Il Vetro si sporca eccessivamente fumi Legna umida Utilizzare legna secca... - Page 28 Problema Causa Soluzione Quantità di legna inferiore a quella Usare la quantità di legna indicata necessaria per ottenetre le resa nelle istruzioni (Vedi paragrafo Il focolare non scalda nominale “Regolazione aria comburente”) Focolare sottodimensionato per Integrarlo con un’altra fonte di l’ambiente da riscaldare riscaldamento Isolamento non adeguato dell’ambiente...
- Page 29 (*) In relazione alle norme vigenti sulla sicurezza degli apparecchi elettrici, per tutte le operazioni di installazione, manutenzione o intervento che comportano l’accesso a parti elettriche è obbligatorio rivolgersi ad un Centro Assistenza Tecnica Piazzetta o a personale qualificato.
- Page 30 This document is the property of Gruppo Piazzetta S.p.A.; it may not be divulged in part or in whole to third parties without written permission from Gruppo Piazzetta S.p.A. Gruppo Piazzetta S.p.A. reserves all its statutory rights.
- Page 31 Shutting down DT2010068-00 4.13 Disposal of ashes DT2010049-01 Troubleshooting DT2010069-00 Declaration of conformity stove e911 DT2010702-00 Declaration of conformity stove e915-e917-e918 DT2010703-00 Declaration of conformity stove e912-e920-e922-e923 DT2010704-00 This booklet code H07020320 / DT2000212 - Rev. 01-(05/2007) comprises 60 pages.
- Page 32 1.0 GENERAL RULES DT2010444-00 Ensure that the installation of your product conforms to all the following instructions. Fig. 1 CHIMNEY STACK FLUE CONNECTION TO FLUE INSPECTION HOLE SOOT REMOVAL INSPECTION HOLE FRESH AIR INTAKE SAFETY DISTANCES CHECK OF FLOOR LOAD-BEARING CAPACITY DT2030048-00...
- Page 33 Fig. 4 If the flue pipe is an incorrect size or installed other than in compliance with the above instructions, Gruppo Piazzetta S.p.A. cannot be held liable for malfunctioning of the product, damage to property or injury to persons or animals.
- Page 34 1.3 Chimney stack - Fig. 7 - 11 Fig. 7 Fig. 8 The flue must be fitted at the top with a device called a chimney stack, designed to aid dispersion of the products of combustion in the atmosphere. The chimney stack must comply with the following requirements: - it must have an internal section and shape the same as the flue;...
- Page 35 1.4 Fresh air intake - Fig. 12 - 15 Fig. 12 Fig. 13 The stove/fireplace must have the necessary air available to ensure proper combustion. - Make sure that the room in which the stove/fireplace is to be installed has an air intake of at least the size indicated in the paragraph “Technical data”.
- Page 36 1.5 Installation environment The appliance should be installed in a location which allows safe and convenient use as well as easy maintenance. If the product being installed requires an electrical socket, the room must also be provided with an earthed power supply in accordance with current regulations. The room where the appliance is to be installed or adjoining rooms must comply with the following requirements.
- Page 37 The pipe assembly must be as short as possible, without constrictions and made in material resistant to corrosion by combustion gases and to temperatures of 550-600° C. It is advisable to use Gruppo Piazzetta S.p.A. pipes and elbows for DT2030056-00 DT2030196-00 connection to the flue, since the appliance flue collar is sized for insertion of these.
- Page 38 When connecting to the flue there must be a minimum clearance Fig. 20 Fig. 21 BAFFLE PLATE INSULATING MATERIAL of 40 cm from building elements sensitive to heat or from combustible materials (cladding, wooden beams or ceilings, etc.). See figures 17-18-19-25-26. If the flue assembly passes through elements or walls in heat-sensitive combustible material or through load-bearing walls, create: 40 cm...
- Page 39 24,5 Wall rose Large pipe 24,5 DT2030060-00 DT2030256-00 DT2030201-00 DT2030200-01 Optional connector TABLE REAR FLUE GAS OUTLET (Measurements in cm) Model Measurement A Measurement B e911 Not envisaged Not envisaged 29,5 e912 e915 26,5 e917 e918 26,5 e920 29,5 e922...
- Page 40 1.10 Prevention of domestic fires The product must be installed and used in compliance with the manufacturer’s instructions and European and national standards as well as local regulations. when a flue pipe passes through a wall or a ceiling, special installation methods must be applied (protection, thermal insulation, distances from heat-sensitive materials, etc.) See the paragraph “Connection to the flueway”...
- Page 41 7 Lower smoke deflector e920 .....1 8 Cooking grid e911 ......1 9 Oven thermometer .
- Page 42 Nr. Description ......Cod. e915 1 Aluker left side panel 200x380 e915 ....1 2 Aluker back panel 335x355 e915 .
- Page 43 Nr. Description ......Cod. e920 1 Aluker left side panel 282x430 e920 ....1 2 Aluker back panel 415x410 e920 .
- Page 44 Smoke outlet ........
- Page 45 2.5 Technical data U.M. e911 e912 e915 e917 e918 e920 e922 e923 Rated heat output Consumption at rated kg/h heat output Thermal efficiency 80,2 75,5 82,5 82,5 82,5 75,5 75,5 75,5 CO content (with 13% O 0,11 0,10 0,11 0,11...
- Page 46 2.6 Dimension e911 2.7 Dimension e912 126,5 14,5 14,5 Ø15 Ø15 17,5 17,5 DT1020016-00 DT1020017-00 2.8 Dimension e915 2.9 Dimension e917 92,5 84,2 76,5 Ø Ø15 14,5 DT1020095-00 DT1020232-00...
- Page 47 2.10 Dimension e918 2.11 Dimension e920 113,5 10 7 14,5 Ø Ø1 5 19,5 DT1020270-00 DT1020015-00 2.12 Dimension e922 2.13 Dimension e923 10 2 100,5 91, 5 11,5 14, 5 14,5 Ø15 Ø15 18,5 DT1020231-00 DT1020271-00...
- Page 48 3.0 USE DT2010453-00 • Certain basic facts can be all-important for best performance and • During operation, some parts of the appliance (door, handle, getting the most out of your appliance. Please find below some dampers, surround) can reach high temperatures. Therefore basic information intended to be of use with regard to the choice exercise great care and take all necessary precautions.
- Page 49 DT2030755-00 Adjustment and quantity of material to be burned for nominal output: e911 e915-e917-e918 e912-e920-e922-e923 Material to be burned Wood...
- Page 50 2. Start-up - During this first time of operation it is recommended to use the appliance at minimum capacity, stoking the grate for at least the first day with only 50% of the logs usually indicated as normal. - Keep the air dampers in the operating position (except for lighting), see paragraph “Combustion air regulation”. - This stage allows all the parts to settle down and fumes caused by paints/varnishes, greases or oily liquids used in manufacture to disappear.
- Page 51 Pay careful attention not to fill the reservoir beyond the limit fixed on the reservoir, indicated with the symbol “MAX”, otherwise water overflows from the humidifier. 3.10 Using the oven (only in stove e911) A cooking guide is not provided since experience is the best teacher, which, added to personal imagination and skill, will help you to create excellent dishes.
- Page 52 750°C. This can only be broken by a heavy impact, such as banging the door too hard. In case of breakage replace with original Gruppo Piazzetta S.p.A parts only. Do not use any material that could scratch or spoil the glass, as scratches may develop into cracks or breaks.
- Page 53 4.6 Removal of smoke deflectors When cleaning the stove, remember to remove the two smoke Back panel deflectors as well (in the e911 model a single deflector is present). It is recommended that this operation is carried out by two people, as follows: - lift up the two deflectors at the front, pivoting them on the back panel;...
- Page 54 Proper tightness of the door seal is essential for optimal product performance. It is therefore recommended that the seals be checked periodically or after a long period of use for signs of wear or damage. If necessary replace them using Gruppo Piazzetta S.p.A. original spare parts.
- Page 55 5.0 TROUBLESHOOTING DT2010069-00 Qualified personnel must carry out all operations in safety when the appliance is cold and disconnected from the power supply. Problem Cause Remedy The window becomes Lack of draught Check the smoke/gas discharge pipe excessively dirty Wet wood Use dry wood Change the type of fuel Use of mediocre or poor class fuels...
- Page 56 Replace the fan (*) Pursuant to current regulations on the safety of electrical equipment, you must contact a Piazzetta After-Sales Service Centre or a qualified electrician for all and any work connected with installation, maintenance or servicing that involves access...
- Page 60 Via Montello, 22 I - 31011 Casella d’Asolo (TV) Italia Tel. +39.04235271 - Fax +39.042355178 http://www.piazzetta.it e-mail:infopiazzetta@piazzetta.it...
Need help?
Do you have a question about the E911 and is the answer not in the manual?
Questions and answers