
Subscribe to Our Youtube Channel
Related Manuals for Campbell CR500


Summary of Contents for Campbell CR500
- Page 1 DATALOGGER CRsOO OPERATORIS.MANUAL 11/96 (c) 1996 CAMPBELL SCIENTIFIC, lNC. COPYRTGHT...
- Page 3 You may copy onto computer the sole purpose of backing-up CAMPBELL SCIENTIFIC, lNC. software and of the software for loss. All copyright notices and labeling must be left intact.
-
Page 4: Limited Warranty
SIMILAR DAMAGES EVEN SUCH DAMAGES. POSSIBILITY OF CAMPBELL SCIENTIFIC, lNC. is not responsible for any costs incurred as result of lost profits or revenue, loss of use the software, loss of data, cost of re-creating lost data, the cost of any substitute program, claims by any party other than licensee, for other similar costs. - Page 5 Using eith€r of the 2 Voltago WPES: MEASUREMENT lnpn Range (Hz) Mininun uodmanshiD. excitation channela, the CR500 can switcied (sine mV BMS)' wave rneasuro rosiatanc€ and conduclivily by means to 1000 of ratiometdc btidg€ moasuremenls. Standard 10,000...
-
Page 7: Selected Operating Details
Erase Final Storage Data *A Mode, enter ln the third window of the A (see Sec. 7.5.1). any number and Complete CR500 Reset, lnctuding the Real Time Clock the *A Mode, enter window ln the fifth 98765 and Stop Logging... -
Page 9: Cautionary Notes
5.6 VDC, the channels. to rise, upsetting VDC supply will start analog measurements. When using the CR500 with the PS12LA, sealed lead acid remember that the whose positive voltage portion can be permanently damaged Pulses... -
Page 11: Complete System
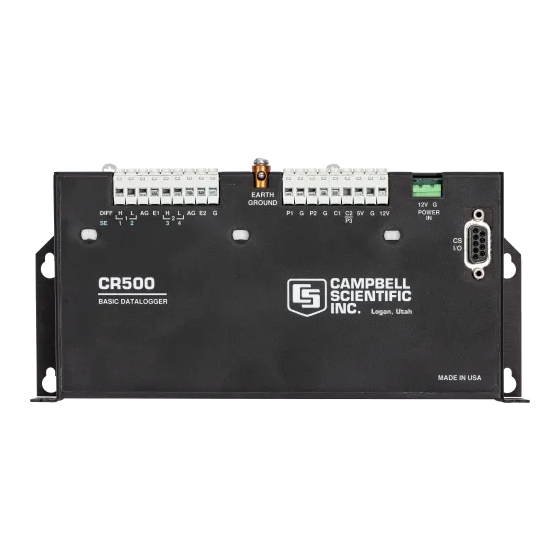
1.1 Configuration Required ltems for CRSoo System Complete pC50O CRsoo Support Software (includes Short Cut, a "point clicK program builder) Operato/s Manual VDC power supply options: BPALK or PS12LA sealed enclosure ENC 10/12 or CSI part number (P.N.) 6447... - Page 12 Earth Ground Each CR500 should Hardware tied to a good earth ground. CR500 Counters, Pulse Digitallnputs and Control Analog Inputs Output and Excitation (See Sec.2.3) Circuit (See Sec.2.2) polarity (See 2.s) Cable Downs Campbell 9 Pin (See Mounting Flanges (See Mounting Options, Sec.6.2)
- Page 13 When configured as condition. Typically this port can VDC) according to time or be used to activate an external device (e.9., a sampler) through relay. controlled by CR500 program. Port C2lP3: Dualfunction Input only.-SDl-1'2'communieation line or monitoring C2:- the status of a line.
- Page 14 Short Cut (Sec. The program then downloaded CR500 through to CR500 link as shown below. is powered CR1OKD the CR500 and connects directly 9-pin serial l/O port via the SC12 cable (supplied with the No interfacing software is required.
-
Page 15: Power Requirement
Then new data data is completely sector with the oldest that sector. is stored Data the CR500 will have over 32,000 allthree sectors are full, When Maximum readings' Storage the next reading must be stored, the oldest 16K sector... - Page 16 Software and Programming Support Mouse' driven, supports basic PC500 D@S.prog that CRSOO-Io-PC operations including program generation, monitoring of real-ti Software measurements, data retrieval over direct link, and simple table generation. For operation without a mouse, use the ALT bar. Telecommunications...
-
Page 17: Creating The Program
(Sec. 4.3) contains Cut. The other, the station created by Short the information PC500 requires to communicate with an individual site. the same name (ideally the site name) CR500 at a specific for both the program and the station file. - Page 18 Select the CR500 as the datalogger type, and click OK to go the main screen click on <Go to Window> in Step to see Step screen: Illilinrljii$iiii: llllilllilill: llliii: 1111:1:1::::ljij:::i:l:!i lllillil:1:111: lj:i:: Select the scan rate and click Next, the sensor type: Water Quality or Custom.
- Page 19 cRs00 the 1078 has been selected from the group of water this example, quality sensors. A sensor information screen appears. you must furnish some configuration information. For most sensors information. will prompt you for the required ln this case, Short Cut Celsius.
- Page 20 After selecting all of your sensors, click Close. Step Then screen select <Go to Window> in Step to see the following Data. the processing and Select Intervals and Output Select output for your application. You may specify to three output reports and output intervals.
- Page 21 Ground Connections Analog Channels and Wiring Connections Wiring Connections Excitation Channels and When done, select Close then Exit.
- Page 22 After creating a CR500 program, the next step Greate a Station to create file. (e.9., A station file contains the information PC500 requires File your PC, the communications station name, COM port on CR500. When and baud rate) to communicate with a specific...
- Page 23 Using PC500, create a station Create a Station the same name you used for the program (Sec' 4.3). CRSOO. Use File the sensors to the CR500 using the wiring diagram created by Short Wire Wire the Sensors Cut (Sec. 6.4.2). and Make...
- Page 24 Then select OK. correct .DLD file selected then select OK to Make sure the download. The program will be sent to the CR500 and begin and you will receive a message the download was successful. Monitor the the PC500 menu. select...
- Page 25 Retrieve From Data the number of locations collected. Window will show CR500 you have retrieved from the CR500, select To view the data that View Data ViewlData to see this screen: data (.DAT) file you wish to view. the name Select or type Select OK.
-
Page 26: Installation And Maintenance
'11, 222, and 333. Sec.7.4. For more information see Installation Maintenance lnstallation Check List the office: Create a CR500 program (.DLD) and a station file (.STN). Sections and 4.3. 'Load the program (.DLD file) into the CR500. (This can laptop.) -
Page 27: Protection From The Environment
Verify reasonable measurements are being made and data are stored. See Sections 5.8 and 5.9. being the enclosure and close and latch the door. lnstallfresh desiccant To protect the CR500 from moisture, dirt, insects, etc., use a Protection From the Examples show CSI weatherproof enclosure with desiccant. Environment l2"... - Page 28 Allcomponents of a system (datalogger, external power mounts; housings;,etc.) should be referenced to ONE common ground. grounding lug: Main tied to earth ground. Must Example open enclosure, CR500, power supply and wiring Drawing ground. A good earth AWG (or larger) wire should be used.
- Page 29 6.4 Wiring the bottom of the enclosure by 6.4.1 Inserting cables Open the cable entry seal on squeeze nut (1) counter turning the cloclaruise. into the enclosure the plug (2) further use. Remove and save wire (3) the enclosure the required length and then...
- Page 30 CR500. on the terminal strip CAUTION: Connect the white connector ONLY when power the CR500, usually after the sensors have been the CR500. 6.5.2 PS12LA Be sure the PS12LA being float charged by either the AC OFF.
- Page 31 Setting the Clock in CR500 LaptOp ToolslClock SetlChk. PC500 From the main menu in PC500 select Using a or laptop. will set the CR500 clock to that cR1oKD cR500 terminated must usins the 3J,T#Hi;tl*?:H:TJi:S;ff* lD:Data Exolanation :HH:MM:SS Displays current time O5)<xxx...
-
Page 32: View Stored Data
PC500 main menu. ViewlData. RealTimelHang Up Link. When finished, select The *4 Table The "4 table provides an easy method to change certain values your CR500 program (DLD file). An example this when olfset field at a stream gauging... - Page 33 45 seconds the backup power before disconnecting the main power Connect 6.11 Ghanging Batteries the CR500 clock continues with the correct supply. This will ensure thE BPALK data and the program ARE the event of a power failure the time.
-
Page 34: Troubleshooting
6.12 Troubleshooting No Response From the battery has been installed, and the power Make sure "oN". Datalogger Using voltmeter to measure the voltage on the V and terminals on the datalogger; the voltage must be between VDC. Disconnect any sensor or peripheral wires connected to the terminals. - Page 35 4.3.)' Make sure the Station File modem. lf cable(s) between the serial port and the Check the cables have not been purchased through Campbell Scientific, configuration using an ohm meter: check for the following 25-pin serial port: modetnqd computer 9-pin...
- Page 36 Unreasonable Results lnspect the sensor for damage and/or contamination. Displayed in an Input the sensor is properly wired to the datalogger. Make sure Location Check the multiplier and offset parameters the measu instruction. or 99999 Stored in format limitations exceeded (any number...
-
Page 37: Additional Information
The SC12 the exact action of a key depends some cases, used to connect the Keyboard/Display to the the mode the CR500 is in and is described' CS l/O port on the CR500. the mode in the manual. with the Keyboard/Display connected to 7.1-2. - Page 38 Two Peripheral cable which comes data, The user cannot access this with the SC32A is used to connect the CS l/O memory. port the CR500 to the 9 pin port the SC32A labeled "Datalogger". Connect the Program Memory for user available "Terminal/Printer"...
- Page 39 CR500, Active SRAM and stored Memory. Program area in Flash ;,",:i-;;;;;;r'iiili':::-,,,,,,i,,,1 a 1,; -,,,,, CR500 is powered off and then on, ii,,,ii.ii:i,i:.:, .ltpy.t',9.''l..9'I9.ge'i:,. Active Program is loaded from Flash efa,ultjizS .bdations;:: ;ii:iii;i;,.i t,l?:bttes)..' run. .''.', :;,,,,,r,1,.,'r,:,,r.f l.llli,,,:,,:::t:;:,;i...
-
Page 40: Internal Data Storage
DATA OUTPUT FORMAT AND number may be determined by representing number as a mantissa between .5 RANGE LIMITS 2 raised to some integer power. multiplied by Data are stored internally in Campbell the product that power resolution Scientific's Binary FinalStorage Format. -
Page 41: Functional Modes
"B'key the DPTR while use of the backs FUNCTIONAL MODES through memory. 7.5.1 *A MODE The memory location of the data point view determine or Mode is used key. this point, displayed by pressing the "#" Input the number of locations allocated... - Page 42 OS is including any stored programs and memory datalogger. As ditferent versions are released, checked. Memory allocation returns to there may be operational differences. When default. datalogger calling Campbell Scientific for assistance, please have these numbers available.
- Page 43 7.5-2. Description of *B Mode Data TABLE Display Keyboard Description of Data Entrv Data trtr dependent upon the Signature. The value Program memory XXXXX allotment. the program has programming entered and memory not been previously will compiled; compiled run.
-
Page 44: Command Description
When "*D" is keyed the CR500 will display CR500 powers-up, the Storage Module progra "13100". A command (Table 7.5-41is entered will be loaded into the CR500 and become by keying the command number and "A". active program.) The active program... - Page 45 Storage Module any Storage Module address; the work with 7.5-7. Retrieving Program from TABLE the lowest address CR500 will search for lnternal Flash Storage Module that is.connected. The entry save, load, or clear a program and command to Display the program number (Table 7.5-8) is entered.
- Page 46 13:00 CS I/O PORT PIN DESCRIPTION 09:0x All external communication peripherals finished.0 When to the CR500 through the 9-pin subminiature lf x=0 the CR500 is set for full duplex. front type socket connector located lf x=1 the CR500 is set for half duplex.
- Page 47 Description TABLE 7.6-1. Description function name. Abbreviation for the Pin number. Synchronous Device the CR500 to a Signal Out of Enable: Used to peripheral. address Synchronous Signal the CR500 from Into Devices (SDs), and can Pe{Pheral' be used as an enable for printers.
Need help?
Do you have a question about the CR500 and is the answer not in the manual?
Questions and answers