Table of Contents
Advertisement
Available languages
Available languages
Quick Links
Download this manual
See also:
Use and Care Manual
Use & Care Guide
Model
MMV6178AA
..................
1-3
........................................................
4-7
...................................................
8-23
.... 8-10
.......... 11-12
................................................
12
..............................................
13
Cook ....................................................
13
............................
14-18
............ 19-22
Broiling .........................................................
23
..........................
24
Guide ...............................
25
..........................................
26-27
Utensils .............................
28
.....................................
29-30
........................................................
31
Combination
Oven
Keep instructions
for future
reference.
Be sure manual
stays with oven.
Form No. A/05/04
c2004
Maytag Appliances
Guide d'utUisation et d'entretien .............. 32
Guia de Uso y Cuidado ...............................
64
3828WSA4207
Part No. 8112P265-60
Printed in Korea
Advertisement
Chapters
Table of Contents
Troubleshooting

Related Manuals for Maytag MMV6178AA


Summary of Contents for Maytag MMV6178AA
-
Page 1: Table Of Contents
Warranty ............Guide d'utUisation et d'entretien ....32 Combination Oven Guia de Uso y Cuidado ....... Keep instructions for future reference. Be sure manual stays with oven. 3828WSA4207 Part No. 8112P265-60 Printed in Korea Form No. A/05/04 c2004 Maytag Appliances... -
Page 2: Important Safety Instructions
Importnn! SnfetyInstructions What You Need to Know About Safety Instructions Warning and Important Safety Instructions appearing in this manual are not meant to cover all possible conditions and situations that may occur. Common sense, caution, and care must be exercised when maintaining, or operating microwave. - Page 3 Importnn! Snfet¥ Instructions • Relocate the microwave oven with respect to the receiver. • Move the microwave oven away from the receiver. • Plug the microwave oven into a different outlet so that the microwave oven and the receiver are on different branch Grounding Instructions circuits.
- Page 4 Importnnt Snfet¥ I nstructions SAVE THESE INSTRUCTIONS...
-
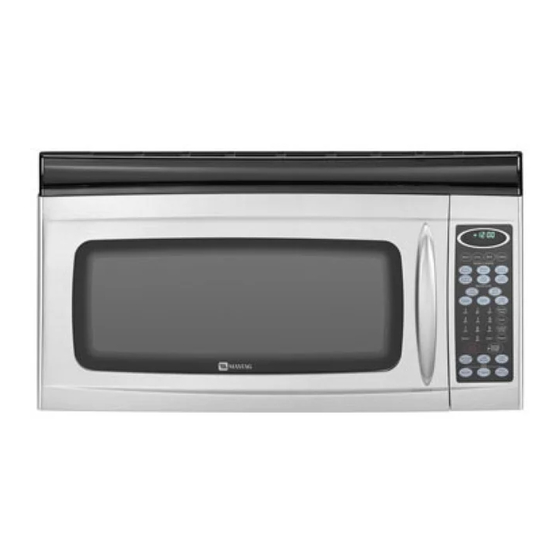
Page 5: Features
Features Vent Grille Door Handle Rack Glass Turntable Window with Cooking Guide Metal Shield Broiling Rack Oven Control -Panel Convection Model and Serial Number Plate Door Safety Lock System etal Tray/Drip Cooktop/Countertop Light Turntable Grease Filter _Rotate Ri°g Oven Specifications ©... - Page 6 Fentures FEATURES 15. MELT: Touch this pad to melt Butter, Chocolate, NOTE: Cheese, Marshmallow. • Styling and features vary by model. 16. ADD 30 SEC.: Touch this pad to set and start quickly at 100% power level. 1. DISPLAY: The Display includes a clock and 17.
- Page 7 Features LEARN ABOUT YOUR CONTROL SETU P M ICROWAVE OVEN You can change the default values for beep sound, clock, display speed and defrost weight mode. See following chart for more information. Sound ON/OFF Sound ON control Sound OFF Clock ON/OFF Clock ON control Clock OFF...
-
Page 8: Features
Fentures AUTO TIME SET LIGHT HI/LO/OFF Example: To turn off fan after 30 minutes for level 4. Touch LIGHT HI/LO/OFF pad once for bright light, twice for night light, or 1. Touch ON/OFF pad. three times to turn the light off. 2. -
Page 9: Operation
Operution M ICROWAVE OPERATI NG COOKING AT HIGH POWER INSTRUCTIONS Example: To cook food for 8 minutes 30 seconds at 100% power. ADD 3O SEC. 1. Enter the cook time. 400_ 27S"F _0°F A time-saving pad, this simplified control lets you 2. - Page 10 Operation COOKING WITH MORE THAN MELT CHART ONE COOK CYCLE Butter, 1 - 3 sticks For best results, some recipes call for one Power Level Margarine for a certain length of time, and another Power Level Chocolate /4or 8 oz. for another length of time.
- Page 11 Operation COOKING GUIDE FOR POWER LEVELS The 10 power levels in addition to HIGH allow you to choose the best power level for the food you are cooking. Below are listed all the power levels, examples of foods best cooked at each level, and the amount of microwave power you are using.
-
Page 12: Sensor Operating Instructions
Operution SENSOR OPERATI NG ADDI NG OR SU BTRACTI NG INSTRUCTIONS COOK TIME Sensor Cook allows you to cook most of your favorite If the SENSOR function is too long or too short, you foods without selecting cooking times and power can increase or decrease the cook time. -
Page 13: Auto Defrost
Operation SENSOR COOK AUTO DEFROST Using SENSOR COOK lets you heat common Five defrost choices are preset in the oven. The defrost microwave-prepared foods without needing to program feature provides you with the best defrosting method times and Cook Powers. SENSOR COOK has preset for frozen foods, because the oven automatically sets Cook Power for 6 food categories. -
Page 14: Rapid Defrost
Operution For best results: RAPID DEFROST lib. • Leave fish, shellfish, meat, and poultry in its original The RAPID DEFROST lib. feature provides a closed paper or plastic package (wrapper). rapid defrost for 1.0 pound frozen food. The oven • Form the meat into the shape of a doughnut before automatically sets the defrosting... -
Page 15: Convection Cooking
Operution CONVECTION COOKING CONVECTION RACK Use the convection rack for convection combination cooking only. Do not use rack in microwave-only mode unless recommended in this guide. For best results, place food on the Convection Rack. M ETAL TRAY/DRI P PAN A metal drip pan has been included with your oven. - Page 16 Operation CONVECTION BAKING CONVECTION BAKING WITH WITHOUT PREHEATI NG PREHEATING (Meats, Casseroles and Poultry) Example: To set Convection Baking at 325°E Example: To set Convection Baking at 325°F for 1. Touch STOP/CLEAR pad. 20 minutes, 1. Touch STOP/CLEAR pad. 2. Touch CONY. pad. 2.
- Page 17 Operution CONVECTION BAKING GUIDELINES 1. Always use the convection rack when convection baking. Place food directly on rack or place in metal tray and then place tray on rack. For best results with foods such as french fries or cheese sticks, space items so that they do not touch.
- Page 18 Operotion CONVECTION BAKING GUIDELINES [cont'd) 35 to 40 Bake in cookware with shallow sides. Fruits, Baked Apples or Pears 350°F Other 35 to 40 Bread Pudding 300°F Pudding is done when knife inserted near center Desserts comes out clean. 30 to 35 Cream Puffs 400% Puncture puffs twice with toothpick to release steam...
- Page 19 Operation MEAT ROASTING GUIDELINES FOR CONVECTION COOKING Beef Ribs (2 to 4 Ibs.) 300°F Rare to 50 Medium 300°F to 55 300°F Well to 60 Boneless Ribs, Top Sirloin 300°F Rare to 58 Medium 300°F to 63 300°F Well to 68 Beef Tenderloin Rare 300°F...
-
Page 20: Combination/Speed Cooking
Operation TIPS FOR COMBINATION HELPFUL HINTS FOR COOKING/SPEED COOK COMBINATION COOKING/ SPEED COOK This section gives you instructions to operate each combination cooking function. Please read these 1. Meats may be roasted directly on the metal rack instructions carefully. Sometimes combination provided with your oven. - Page 21 Operution COMBINATION COOKING AUTO COM BI NATION This oven can cook food without entering cooking time or power level on combination mode. AUTO COMBINATION has 4 food categories. Once COMBI-1 Convection 375°F See the AUTO COMBINATION CHART on this page for (Combination the settings available.
- Page 22 Operution COMBINATION ROAST COOKING GUIDE - Touch pad once. Beef Turn over after half of cooking time. Ribs (2 to 4 Ibs.) 375°F Rare 9to 13 Medium 375°F 11 to 15 Well 375°F 13 to 17 Boneless Ribs, Top Sirloin 375°F Rare 9to 13...
- Page 23 Operution COMBINATION ROAST COOKING GUIDE Ccont'd) - Touch pad once. F_a, _ve_ Seafood Fish l-lb. fillets 350°F 7to 10 350°F lOto Lobster Tails (6 to 8-oz. each) 350°F 9to 14 Shrimp (1 to 2 Ibs.) 350°F 8to 13 Scallops (1 to 2 Ibs.) NOTE: •...
-
Page 24: Broiling
Opermion BROIL COOKING 3. Touch numbers for cooking time. You 2O00 can enter a time up to 99 minutes 99 I NTRODUCTION 2_OoF 4SOOF 4SO°F 450_ seconds. This oven cooks the outside of foods much like 4. Touch ENTER/START pad. conventional radiant heat, while also penetrating surface so the inside cooks simultaneously. -
Page 25: Heating/Reheating Guide
Heating / Reheating Guide To heat or reheat successfully in a microwave oven, it is important to follow several guidelines. Measure the amount of food in order to determine the time needed to reheat. Arrange the food in a circular pattern for best results. Room temperature food will heat faster than refrigerated food. -
Page 26: Fresh Vegetable Guide
Fresh V egetoble Guide Artichokes 2 medium 2-3 minutes Trim. Add 2 tsp water. Cover. 4 medium (8 oz. each) 1lb. 2-3 minutes Asparagus, Add 1/2cup water. Cover. Fresh, Spears 1lb. 7-11 2-3 minutes Beans, Green & Add 1/2cup water in 11/2qt. casserole. Stir halfway through cooking. -
Page 27: Maintenance
Maintenance CARE AND CLEANING CLEANING THE GREASE FILTER For best performance and safety, keep the oven clean inside and outside. Take special care to keep the inner door panel and the oven front frame free of food or grease build-up. Never use rough powder or pads. Wipe the microwave oven inside and out, including the hood bottom cover, with a soft cloth and a warm ([nothot) mild The grease filter should be removed and cleaned often, at... -
Page 28: Maintenance
Maintenance 3. Push the right side lower part of the charcoal filter. 3. Replace bulb(s) with 20 watt appliance bulb(s). 4. Replace bulb cover, and mounting screws. 5. Turn the power back on at the main power supply. OVEN LIGHT REPLACEMENT 1. -
Page 29: Recommended Utensils
Recommended Utensils MICROWAVE UTENSIL GUIDE METAL UTENSILS: OVENPROOF GLASS (:treatedfor high intensity heat): Metal shields the food from microwave energy and produces uneven cooking. Also Utility dishes, loaf dishes, pie avoid metal skewers, thermometers or foil trays. Metal utensils can cause arcing, plates, cake plates, liquid which can damage your microwave oven. -
Page 30: Troubleshooting
Troubleshooting BEFORE CALLING FOR SERVICE Check the following list to be sure a service call is necessary. Reviewing additional information on items to check may prevent an unneeded service call. If nothing on the oven operates • check for a blown circuit fuse or a tripped main circuit breaker. •... -
Page 31: Troubleshooting
Troubleshooting QUESTIONS AND ANSWERS iiiiiiiiiiiiiiiiiiiiiiiiiiiiiiiiiiiiiiiiiiiiiiiiiiiiiiiiiiiiiiiiiiiiiiiiiiiiiiiiiiiiiiiiiiiiiiiiiiiiiiiiiiiiiiiiiiiiiiiiiiiiiiiiiiiiiiiiiiiiiiiiiiiiiiiiiiiiiiiiiiiiiiiiiiiiiiiiiiiiiiiii ..Can I use a rack in my microwave Only use the rack that is supplied with your microwave oven. oven so that I may reheat or cook Use of any other rack can result in poor cooking performance and/or in two rack positions at a time? arcing and may damage your oven. -
Page 32: Warranty
Your name, address and telephone number; b. Model number and serial number; IN NO EVENT SHALL MAYTAG BE LIABLE FOR c. Name and address of your dealer or servicer; INCIDENTAL OR CONSEQUENTIAL DAMAGES. d. A clear description of the problem you are having;... -
Page 33: Guia De Uso Y Cuidado
Guide d'utilisotion etd'en etien Modble MMV6178AA Instructions de sbcuritb importantes ..33-35 Caractbristiques ........36-39 Utilisation ............ 40-55 Instructions d'utilisation du four ..40-42 Instructions de cuisson avec capteur .. 43-44 D_cong_lation automatique ....... 44 D_cong61ation rapide ........45 Cuisson automatique ........ -
Page 34: Instructions De Sbcuritb Importantes
Instructions desecurit6 importnntes Ce qu'il faut savoir sur les instructions de s_curit_ Les instructions de s6curit_ importantes et les avertissements paraissant dans ce guide ne sont pas destin6s _ couvrir toutes les situations et conditions 6ventuelles qui peuvent se pr6senter. II faut faire preuve de bon sens et de prudence Iors de I'installation, de I'entretien ou de I'utilisation d'un four _ micro-ondes. - Page 35 Instructions desecurit6 importnntes • Modifier la position du four _ micro-ondes par rapport au recepteur de radio ou de television. • I_loignerle four _ micro-ondes du recepteur. • Brancher le four _ micro-ondes dans une prise differente de sorte que le four _ micro-ondes et le recepteur soient Instructions de liaison b la terre alimentes par des circuits differents.
- Page 36 Instructions desecurit6 i mportnntes CONSERVER CES INSTRUCTIONS...
-
Page 37: Caractbristiques
Cnrncteristiques Grille d'_vent Poign_e Plateau tournant la )orte en verre Guide de Hublot avec cuisson _cran m_tallique _Tr_pied de gril convection -Tableau commande Tr_pied Plaque signal_tique - (num_ro de module Systbme de verrouilla( et num_ro de s_rie)({__ Plateau m_tallique/ de s_curit_ de r_cup_ration Lampe d'_clairage Plateau... - Page 38 l:nrncteristiques CARACTI RISTIOU ES 16. ADD 30 SEC. (ADDITION 30 SECONDES) : Appuyer sur cette touche pour commander le declenchement instantane d'une operation de cuisson au niveau de puissance 100 %. REMARQUE 1Z TOUCHES NUMI_RIO.UES : Utiliser les touches • Style et caracteristiques variables selon le modele.
- Page 39 Cnrnct6ristiques LE FOUR A MICRO-ONDES CONTROL SETUP (SELECTION DES PARAM RES) II est possible de modifier les param6tres par ddaut, utilis6s par le four pour signaux sonores, horloge, vitesse d'affichage et poids de d6congelation. Voir le tableau qui suit. Signal sonore Signal sonore ACTIF - ACTIF/INACTIF Signal sonore INACTIF...
- Page 40 Cnrncterisdques LIGHT HI/LO/OFF AUTO TIME S_ ([DURI:!:E (LAMPE- JOU R/NUIT/ARRET) AUTOlViATIQU E DE VENTILATION) Appuyer une lois sur LIGHT HI/LO/OFF Exemple : Arr_t du ventilateur apr_s 30 minutes niveau 4. pour commander I'allumage avec I'intensit6 maximale; appuyer une seconde fois sur la 1.Appuyer sur la touche ON/OFF touche pour passer _ I'intensit6 d'illumination nocturne;...
-
Page 41: Utilisation
Utilisation I NSTRUCTIONS CUISSON AU NIVEAU DE PUISSANCE ELEVE D'UTILISATION DU FOUR Exemple : P_riode de cuisson de 8 minutes ADD 30 SEC. 30 secondes, au niveau de puissance 100 %. (ADDITION 30 SECONDES) 1. Entrer la dur_e de cuisson. ZlS°F 450_F Cette touche de commande rapide permet de commander... - Page 42 Utillsation PROGRAMME DE CUISSON A TABLEAU DE FUSION PLUSIEURS PHASES Pour I'obtention des meilleurs r6sultats, certaines recettes Beurre 1 _ 3 bStonnets stipulent I'emploi d'un niveau de puissance de chauffage Chocolat 4 ou 8 oz (114 _ 227 g) pendant une certaine p6riode, puis d'un autre niveau de Fromage 8 ou 16 oz (227 _ 454 g) puissance de chauffage durant une autre p6riode.
- Page 43 Utilisation GUIDE DE CUISSON - TOUS NIVEAUX DE PUISSANCE L'appareil offre un choix de 10 niveaux de puissance de chauffage en plus de la puissance HIGH (F'-LEVI'E); o n peut ainsi choisir le niveau de puissance de chauffage le plus appropri6 pour I'aliment a cuire. Le tableau ci-dessous permet de choisir le niveau de puissance de chauffage appropri6 pour divers aliments.
-
Page 44: Instructions De Cuisson Avec Capteur
Utilisation AUG M ENTATION/DI M I NUTION INSTRUCTIONS DE CUISSON DE LA DURI:t:EDE CUISSON AVEC CAPTEU R La fonction de contrOle de la cuisson par le circuit du Si la dur6e de cuisson indiqu6e par la fonction de cuisson capteur permet de commander la cuisson d'un mets favori avec CAPTEUR est trop Iongue ou trop courte, on peut la sans devoir s_lectionner une dur6e de cuisson et une faire varier dans un sens ou dans I'autre, mais seulement... -
Page 45: Automatique
Utilisation SENSOR COOK AUTO DEFROST (DECO N GI'-'_LATIO N (CUISSON AVEC CAPTEU R) AUTOMATIQU E) La touche SENSOR COOK permet de commander une cuisson aux micro-ondes d'aliments courants, sans devoir Cinq choix de d6congelation sont pr6s61ectionn6s dans s61ectionner d'abord la dur6e de cuisson et la puissance le four. -
Page 46: D_Cong61Ation Rapide
Utilisation Pour de meilleurs r_sultats : DI CONGI LATION RAPIDE 1 Ib • Laisser le poisson, les mollusques/crustac6s, la viande et (450 g) la volaille dans leur emballage plastique ou papier ferm6 d'origine. La fonction de DI_CONGCLATION RAPIDE 1 Ib (450 g) •... -
Page 47: Cuisson Avec Convection
Utilisation TRI PIED DE CONVECTION CU ISSON AVEC CONVECTION Utiliser le tr@ied de convection seulement pour la cuisson avec convection et la cuisson combin6e. Ne pas utiliser le tr@ied de convection en mode micro-ondes seulement, moins que cela ne soit recommandd dans ce guide. Pour de meilleurs r_sultats, placer I'aliment sur le tripled de convection. - Page 48 Utilisation CU ISSON COU RANTE CU ISSON COU RANTE AVEC AVEC CONVECTION ET CONVECTION SANS PRI CHAUFFAGE PRECHAUFFAGE (Viande, mets en sauce et volaille) Exemple : Programmation d'une cuisson avec Exemple : Programmation d'une cuisson avec convection b 325 °F (163 °C). convection _] 325 °F (163 °C) pendant 20 minutes.
- Page 49 Utilisation GUIDE DE CUISSON COURANTE AVEC CONVECTION 1. Toujours utiliser le tr@ied de convection pour la cuisson avec convection. Placer I'aliment directement sur le tr@ied ou sur le plateau metallique, que I'on pose ensuite sur le tr@ied. Pour de meilleurs resultats avec des aliments comme frites ou bStonnets au fromage, espacer les differents articles pour eviter qu'ils ne se touchent.
- Page 50 Utilisation GUIDE DE CUISSON COURANTE AVEC CONVECTION (suite) 35 _ 40 Fruits, Poires ou pommes au four 350 °F 077 °C) Cuisson dans des ustensiles peu profonds. autres 300 °F (149 °C) 35 _ 40 Le pudding est termine Iorsqu'un couteau insere pres du centre ressort Pudding desserts...
- Page 51 Utilisation GUIDE DE ROTISSAGE DE VIANDE POUR UNE CUISSON AVEC CONVECTION ;_ii_, Boeuf COtes (2 _ 4 Ib/O,9 _ 1,8 kg) 45 _ 50 300 °F (149 °C] Saignant 50 _ 55 A point 300 °F (149 °C) Bien cuit 55 _ 60 300 °F (149 °C] COtesdOsossOes,haut de surlonge...
-
Page 52: Cuisson Rapide/Cuisson Combin_E
Utilisation CONSEILS UTILES POUR LA CONSEILS POUR LA CUISSON CUISSON RAPIDE/CUISSON RAPIDE/CUISSON COMBINI E COMBINf:E Cette section donne des instructions pour ex_cuter chaque fonction de cuisson combin6e. Lire ces instructions On peut rOtir les viandes directement sur le tr@ied attentivement. Parfois, une cuisson en mode combin6 m6tallique fourni avec le four. - Page 53 Utilisation CUISSON COMBINI E AUTO COMBINATION (CUISSON AUTOMATIQU COMBINEE) Ce four peut cuire des aliments en mode combin6 sans qu'il Une fois COMBI-1 Convection soit n6cessaire d'enregistrer la dur6e de cuisson ou le niveau (ROtissage 375 °F (190 °C] de puissance. La CUISSON AUTOMATIQUE COMBINCE comporte/4 cat6gories d'aliment.
- Page 54 Utilisation ROTISSAGE GUIDE COMBINI - Appuyer une fois sur la touche B0euf Retourner b mi-cuisson. COtes {2 _ 4 Ib/0,9 _ 1,8 kg} 9_113 Saignant 375 °F [190 °C) 11_15 A point 375 °F [190 °C) Bien cult 13 _ 17 375 °F [190 °C} COtes dOsossOes, haut de surlonge 9_113...
- Page 55 Utillsation GUIDE DE ROTISSAGE COMBINI_ (suite) - Appuyer une fois sur la touche Te_fo_ Volaille Retourner b mi-cuisson. 15 _ 17 Poulet entier ([21/2 _ 6 Ib/1,1 _ 2,7 kg) 375 °F (190 °C) 15 _ 18 Morceaux de poulet ([21/2 _ 6 Ib/1,1 _ 2,7 kg] 375 °F (190 °C] Poulet de Cornouailles ([non ficel6) Non farci...
-
Page 56: Cuisson Au Gril
Utillsation INTRODUCTION SUR LA 3. Appuyer sur les touches num6riques correspondant _ la dur6e de cuisson. On 2O00 CUISSON AU GRIL peut enregistrer une dur6e allant jusqu'_ 2_OoF 450OF 4S0°F 450_ 99 minutes, 99 secondes. Ce four permet la cuisson de I'ext6rieur des aliments, comme la chaleur radiante classique, tout en p6n6trant aussi la 4. -
Page 57: Guide De Chauffage/R6Chauffage
Guide d echuuffuge/rGchuuffuge Pour bien chauffer ou r6chauffer un aliment dans un four _ micro-ondes, il est important de suivre plusieurs directives. Mesurer la quantit6 d'aliment de fa(_on_ d6terminer la durSe de r6chauffage n6cessaire. Disposer I'aliment de fa(_oncirculaire pour obtenir les meilleurs r6sultats. Un aliment _ temp6rature ambiante r6chauffera plus rapidement qu'un aliment r6frig6r& Les aliments devraient 6tre sortis des boites de conserve et 6tre plac6s dans un r6cipient pr6vu pour la cuisson aux micro-ondes. -
Page 58: Guide Pour I_Gumes Frais
Guide p our legumes fruis Artichauts 2 moyens 5 - 8 mn Pr@arer. Ajouter 2 cuill6res _ th6 d'eau. Couvrir. 2 - 3 mn (8 oz/227 g chacun} 4 moyens 10 - 13 mn Asperges fraiches I Ib (0,45 kg} 3 - 6 mn Ajouter V2tasse (118 mL} d'eau. -
Page 59: Entretien Et Nettoyage
|ntretien etnettoyoge NETTOYAGE DU FILTRE ,it INSTRUCTIONS GRAISSE Pour optimiser la performance et la s6curit6 de I'appareil, veiller _ la propret6 du four, _ I'int6rieur et _ I'ext6rieur. Veiller particuli6rement _ emp6cher toute accumulation de r6sidus alimentaires ou de graisse sur le cadre avant du four et la surface interne du panneau de porte. - Page 60 |ntretien etnettofoge 3. Appuyer sur le c6t6 droit inf6rieur du filtre _ charbon. 3. Remplacer chaque ampoule grill6e par une ampoule de 20 watts pour appareil m6nager. 4. R6installer le cabochon et les vis de montage. 5. R6tablir I'alimentation 61ectrique de I'appareil. REMPLACEMENT L'AMPOULE DE LA LAMPE DU FOUR...
-
Page 61: Ustensiles Recommandbs
Ustensiles recommundes GUIDE DES USTENSILES POUR FOUR A MICRO-ONDES iiiiiiiiiiiiiiiiiiiiiiiiiiiiiiiiiiiiiiiiiiiiiiiiiiiiiiiiiiiiiiiiiiiiiiii_ _iiiiiiiiiiiiiiiiiiiiiiiiiiiiiiiiiiiiiiiiiiiiiiiiiiiiiiiiiiiiiiiiiiiiiiiiiiiiiiiiiiiiiiiiiiiiiiiiiiiiiiiiiiiiiiiiiiiiiiiiiiiiiiiiiiiiiiiiiiiiiiiiiiiiii_i U STENSI LES MI_TALLIQUES : VERRE SPI_CIAL FOUR I:trait6 pour chaleur tr_s forte:) : Le m6tal emp_.che 1'6nergie des micro-ondes d'atteindre I'aliment, ce Plats courants, moules _ pain, plats qui produit une cuisson in6gale. -
Page 62: Guide De Dbpannage
6uide dedepunnuge AVANT DE CONTACTER UN SERVICE DE DI PANNAGE Verifier la liste suivante pour s'assurer qu'un service de d@annage est vraiment necessaire. Revoir les informations supplementaires sur les differents articles pour empecher tout appel de service qui ne serait pas necessaire. Si rien sur le four ne marche * verifier si un fusible n'est pas grille ou un disjoncteur, declench&... - Page 63 Guide d edepunnuge QUESTIONS ET RI PONSES Puis-je utiliser une autre grille dans N'utiliser que la grille qui est fournie avec le four _ micro-ondes. mon four _ micro-ondes pour que je L'utilisation de toute autre grille pourrait entrainer de m6diocres performances de puisse r6chauffer ou cuire sur deux cuisson et/ou la production d'arcs et endommager le four.
-
Page 64: Garantie
• Les produits situ6s _ I'ext6rieur des I_tats-Unis ou du Canada. EN AUCUN CAS MAYTAG NE SERA TENUE RESPONSABLE DE DOMMAGES DIRECTS OU INDIRECTS. Cette garantie conf6re _ I'acheteur des droits juridiques sp6cifiques. L'acheteur peut 6galement jouir d'autres droits, variables d'un 6tat _ un autre ou d'une province _ une autre. -
Page 65: Guia De Uso Y Cuidado
Guiu deUso y Cuidodo Modelo MMV6178AA Instrucciones Importantes sobre Seguridad ........65-67 Caracteristicas ........68-70 Funcionamiento ........71-87 Instrucciones de Funcionamiento del Homo de Microondas ....71-74 Instrucciones de Funcionamiento del Sensor ............ Descongelaci6n Autom_tica ....76 Descongelaci6n Rapida ......77 7g;;!_!_!!!_jiiiiiijiis_/% Cocci6n Autom_tica ........ - Page 66 Instrucciones Importontes sobre Seguridod Informaci6n Sobre las Instrucciones de Seguridad Las advertencias e instrucciones importantes sobre seguridad que aparecen en este manual no estan destinadas a cubrir todas las posibles circunstancias y situaciones que puedan ocurrir. Se debe ejercer sentido comt_n, precauci6n y cuidado cuando instale, efectt_e mantenimiento o cuando use el microondas.
- Page 67 Instrucciones Importontes sobre Seguridod • Ubique en otro lugar el horno de microondas con respecto al receptor. • Mueva el horno de microondas a un lugar alejado del receptor. • Enchufe el microondas en un tomacorriente diferente de modo que el microondas y el receptor estOn en circuitos Instrucciones para la diferentes.
-
Page 68: Instrucciones Importantes Sobre Seguridad
Instrucciones Importantes sobre Seguridad CONSERVE ESTAS INSTRUCCIONES... - Page 69 Cnrncteristicns Rejilla de Ventilacibn Parrilla para Manija de Bandeja Giratoria Asar la Puerta de Vidrio Ventana Gufa de Protector de Metal Cocci6n Parrilla para Horneado Panel de Control a Conveccibn del Homo Placa del N=3mero de Modelo y de Serie Bloqueo de Seguridad Bandeja de Metal/...
-
Page 70: Caracteristicas
Caracteristicas CARACTERISTICAS 16. 'ADD 30 SEC: (Agregar 30 segundos): Optima esta tecla para ajustar y comenzar rapidamente en el nivel de potencia de 1000/0. NOTA: 17 'NUMBER' (Ndmero): Optima las teclas num_ricas • El estilo y las caracterfsticas varfan segt_n el modelo. para indicar el tiempo de cocciCn, el nivel de potencia, las cantidades, los pesos o las temperaturas de cocciCn. - Page 71 Cnrncteristicns CONOZCA SU HORNO DE 'CONTROL SETU P' M ICROON DAS (Ajuste del Control) Usted puede cambiar los valores implfcitos de las se_ales sonoras, del reloj, de la velocidad de despliegue de la pantalla y del modo de peso de descongelaciOn. Vea la tabla siguiente para mayor informaciOn.
-
Page 72: Del Homo De Microondas
Funcionnmiento 'LIGHT HI/LO/OFF' 'AUTO TIME SET' (Luz Alta/Baja/Apagada) I:Ajuste Autom_itico de Tiempo) Ejemplo: Para apagar el ventilador despu_s de Oprima la tecla 'LIGHT HI/LO/OFF' una 30 minutos en el nivel 4. vez para luz brillante, dos veces para luz nocturna o tres veces para apagar la luz. 1. -
Page 73: Funcionamiento
iunclonnmiento COCCION CON NIVELES DE INSTRUCCIONES POTEN CIA ALTOS FUNCIONAMIENTO HORNO DE MICROONDAS Ejemplo: Para cocinar alimento durante 8 minutos, 30 segundos a un nivel de potencia de 1000/o. 'ADD 30 SEC.' 1. Indique el tiempo de cocci6n. 4_3°F _7S_F _0°F (Agregar 30 Segundos) 2. - Page 74 I:uncionnmiento PARA COCINAR USANDO 'SOFTEN' (Suavizar) VARIOS NIVELES DIFERENTES (Mantequilla, Helado, Queso Crema y Jugos Congelados). DE POTENCIA El horno utiliza un ajuste de potencia bajo para suavizar Para obtener los mejores resultados, algunas recetas alimentos. Seleccione la categorfa del alimento que est_ recomiendan un nivel de potencia durante un periodo de preparando e introduzca la cantidad.
- Page 75 Funcionnmiento GUIA DE COCCION PARA LOS DISTINTOS NIVELES DE POTENCIA Los 10 niveles de potencia, ademas del nivel 'HIGH' (Alto), le permiten seleccionar el mejor nivel de potencia para el alimento que esta cocinando. A continuaciOn se indican todos los niveles de potencia, ejemplos de alimentos que se cocinan mejor en cada nivel.
-
Page 76: Instrucciones De Funcionamiento
Funclonnmiento INSTRUCCIONES AUMENTO O REDUCCION FUNCIONAMIENTO TIEMPO DE COCCION SENSOR Si la funciOn del SENSOR es demasiado larga o demasiado corta, usted puede aumentar o disminuir el tiempo de La cocciOn por sensor le permite cocinar la mayorfa de sus cocciOn. - Page 77 |unclonnmiento 'SENSOR COOK' 'AUTO DEFROST' [CocciOn con Sensor) [DescongelaciOn Autom tica) La tecla 'SENSOR COOK' le permite calentar alimentos Su horno microondas ha sido programado con cinco preparados en el microondas sin necesidad de programar secuencias de descongelaciOn. 'AUTO DEFROST' es la los tiempos de cocciOn ni los niveles de potencia.
-
Page 78: Descongelaci6N Rapida
|unclonnmiento DESCONGELACION RAPIDA- Para obtener mejores resultados: • Deje el pescado, los mariscos y las carnes en su empaque lb. (450 g] original de plastico o papel (envoltura}. • Moldee la came en forma de rosquilla antes de congelarla. La caracterfstica de descongelaciOn rapida - 1 Ib (450 g) Durante la descongelaci6n, retire la came descongelada ofrece descongelaciOn rapida para una libra de alimento cuando escuche la sepal sonora y contint_e descongelando... -
Page 79: Cocci6N Pot Convecci6N
Funcionnmiento COCCION POR CONVECCION PARRILLA DE CONVECCION Use la parrilla de convecci0n solamente para cocinar por convecci0n o en modo combinado. No utilice la rejilla cuando cocine en la funci0n de microondas solamente, a menos que se indique en esta gufa. Para obtener los mejores resultados, coloque el alirnento en la parrilla de convecciOn. - Page 80 iunclonnmiento COCCION POR CONVECCION HORNEADO POR CONVECCION CON PRECALENTAM I ENTO S I N PRECALENTAM IENTO {Carnes, Cacerolas y Carne de Ave) Ejemplo: Para hornear por convecci6n a 325°F (163°C). Ejemplo: Para hornear por convecci6n a 325°F (163°C) 1. Optima la tecla 'STOP/CLEAR'. durante 20 minutos.
- Page 81 iunclonnmiento GU|A DE HORNEADO POR CONVECCION 1. Use siempre la parrilla de convecci0n para hornear por convecci0n. Coloque el alimento directamente sobre la parrilla o colOquelo en una bandeja de metal y luego coloque esa bandeja sobre la parrilla. Para obtener los mejores resultados con alimentos tales como las papas a la francesa o los palitos de queso, deje suficiente espacio entre los artfculos de modo que no se toquen entre ellos.
- Page 82 |unclonnmiento GUIA DE HORNEADO POR CONVECCION (cont.) Frutas y otros Manzanas operas horneadas 350°F/177°C 35 a 40 Hornee en un utensilio con lados llanos. postres Pudin de pan 300°F/149°C 35 a 40 El pudin est_ listo cuando se puede insertar un cuchillo el medio y el mismo sale limpio.
- Page 83 Funcionnmiento GUIA DE ASADO DE CARNE PARA COCCION POR CONVECCION Carne de res Costillas (2 a 4 Ibs/0,9 a 1,8 kg) Semicrudas 300°F/149°C 45 a 50 A medio cocer 300°F/149°C 50 a 55 Bien cocidas 300°F/149°C 55 a 60 Costillas deshuesadas, Iomo superior Semicrudas 300°F/149°C 53 a 58...
- Page 84 |unclonnmiento SUGERENCIAS PARA LA CONSEJOS PARA LA COCCION COCCION COMBINADA/ CO M BI NADA/RAPI RAPI DA Esta secciOn le proporciona instrucciones para usar la funci6n de cocci6n combinada. Por favor lea estas Las carnes se pueden asar directamente sobre la parrilla instrucciones con cuidado.
- Page 85 Funcionnmiento AUTO COM BI NATION COCCION COM BI NADA [COM BINACION AUTOMATICA] Este horno puede cocinar alimentos sin que usted Una vez COMBI-1 Convecci6n- introduzca el tiempo de cocci0n o el nivel de potencia. La (Asado 375% (190°C) COMBINACION AUTOMATICA cuenta con 4 categorfas de combinado) alimento.
- Page 86 iunclonnmiento GUIA DE COCCION DE ASADO COMBINADO - Oprima la tecla tlrla vez. Came de res Voltee despu_s de que la mitad del tiempo de cocci6n haya transcurrido. Costillas (2 a 4 Ibs/0,9 a 1,8 kg) Semicrudas 375°F/190°C 9a13 A medio cocer 375°F/190°C 11 a 15 Bien cocidas...
- Page 87 Funcionnmiento GUIA DE COCCION DE ASADO COMBINADO [cont.) - Oprima la tecla _ una vez. Carne de ave Voltee despu_s de que la mitad del tiempo de cocci6n haya transcurrido. 375°F/190°C Polio entero (:21/2 a 6 Ibs/1,1 a 2,7 kg_ 15 a 17 375°F/190°C Piezas de polio (:2V2a 6 Ibs/1,1 a 2,7 kg]...
-
Page 88: Cocci6N Con Asador
Funcionnmiento COCCION CON ASADOR 3. Oprima las teclas num6ricas correspondientes para introducir el tiempo INTRODUCCION 2OOO de cocci6n. Usted puede programar el 29#°F 4_O_F 4_°F 450_r horno para funcionar durante 99 minutes, Este horno cocina la parte exterior de los alimentos 99 segundos. -
Page 89: Guia De Calentamiento/Recalentamiento
Guia deCalentamiento/Re©alentamiento Para calentar o recalentar alimentos exitosamente en un horno microondas, es importante seguir ciertas normas. Mida la cantidad de alimento para poder determinar el tiempo necesario para el recalentamiento. Organice los alimentos en un patron especffico para obtener los mejores resultados. El alimento a temperatura ambiente se calentara m_s rapido que el alimento refrigerado. -
Page 90: Guia De Verduras Frescas
Guiu deVerdurus Frescus Alcachofas 2 medianas 5 a 8 Recorte. A_ada 2 cucharaditas de agua. Cubra. 2 a 3 min. (8 oz/226 g cada una) 4 medianas 10 a 13 Esp_rragos, frescos, tallos I Ib/0,45 kg 3 a 6 A_ada V2taza de agua. -
Page 91: Mantenimiento
Mantenimiento LIMPIEZA DEL FILTRO DE CU I DADO Y LI M PI EZA GRASA Para un mejor rendimiento y seguridad, mantenga el interior y el exterior del horno limpios. Preste especial cuidado para que el panel interior de la puerta y el marco delantero del horno se mantengan limpios y sin acumulaciOn de restos de alimentos o grasa. - Page 92 Mantenimiento 3. Oprima el lado inferior derecho del filtro de carbon. 3. Reemplace el(los] foco(s] con foco(s] para electrodomOsticos de 20 watts. 4. Vuelva a colocar la cubierta del foco y los tornillos de montaje. 5. Enchufe el homo o conecte la corriente desde el interruptor principal.
-
Page 93: Utensilios Recomendados
Utensilios Recomendudos GUIA DE UTENSILIOS PARA EL HORNO DE MICROONDAS VIDRIO RESISTENTE A HORNOS DE UTENSILIOS DE METAL: MICROONDAS (tratado para calor de El metal protege el alimento de la energfa del microondas y produce cocciOn alta intensidad): no uniforme. Evite usar tambi6n palillos de metal, termOmetros o bandejas Platos de uso general, platos para de aluminio. -
Page 94: Localizaci6N Y Soluci6N De Averias
Locolizoci6n y $olucio.de Averios ANTES DE SOLICITAR SERVICIO Verifique Io siguiente para comprobar si es necesario hacer una Ilamada de servicio. Posiblemente si revisa la informaciOn adicional incluida a continuaciOn, se puede evitar una Ilamada de servicio innecesaria. iiiiiiiiiiiiiiiiiiiiiiiiiiiiiiiiiiiiiiiiiiiii _'iiiiiiiiiiiiiiiiiiiiiiiiiiiiiiiiiiiiiiiiiiiiiiiiiiiiiiiiiiiiiiiiiiiiiiiiiiiiiiiiiiiiiiiiiiiiiiiiiiiiiiiiiiiiiiiiiiiiiiiiiiiiiiiiiiiiiiiiiiiiiiiiiiiiiiiiiiiiiiiiiiiiiiiiiiiiiiiiiiiiiiiiiiiiiiii Si nada funciona en el •... - Page 95 Localizaci6n y$oluci6n deAverias PREG U NTAS Y RESPU ESTAS _,Puedousar una parrilla en mi horno Solamente use la parrilla suministrada con su horno de microondas. de microondas de modo que pueda El uso de cualquier otra parrilla puede resultar en rendimiento deficiente de la recalentar o cocinar en dos posiciones cocci6n y/o arco el6ctrico y puede da_ar su horno.
-
Page 96: Garantia
• Si el distribuidor o la compa_fa de servicio no pueden resolver el problema, escriba a Maytag ServicessM, Attn: CAIR R; C enter, P.O. Box 2370, Cleveland, TN 37320-2370 o Ilame al 1-800-688-9900 en EE.UU.
Need help?
Do you have a question about the MMV6178AA and is the answer not in the manual?
Questions and answers