
Related Manuals for Extron electronics HSA 200SE


Summary of Contents for Extron electronics HSA 200SE
- Page 1 User’s Manual HSA 200S & HSA 200SE HSA 200C & HSA 200CE HSA 222S & HSA 222C Hideaway Surface Access Products 68-695-01 Rev. H 08 08 © 2008 Extron Electronics. All rights reserved.
-
Page 2: Fcc Class A Notice
Precautions Safety Instructions • English Warning This symbol is intended to alert the user of important Power sources • This equipment should be operated only from the power source indicated on the product. This equipment is intended to be used with a main operating and maintenance (servicing) instructions power system with a grounded (neutral) conductor. -
Page 4: Table Of Contents
Underside Features and Cabling Connections All HSA 200 models only ... 2-9 HSA 200C and HSA 200S (no Extender board) only ... 2-9 All HSA 200 and HSA 222 models ... 2-10 HSA 200CE and HSA 200SE (Extender board) only ... 2-11 ... -
Page 5: Chapter 1 • Introduction
Table of Contents, cont’d Appendix A • Reference Information Specifications ... A-2 HSA Part Numbers ... A-7 Included Parts ... A-8 Routing Templates ... A-8 Replacement Parts ... A-8 Accessories ... A-8 Top Plate Dimensions ... A-8 Appendix B • Packaging for Shipment All trademarks mentioned in this manual are the properties of their respective owners. -
Page 6: About The Hideaway Surface Access Products
For the HSA 200 model, the computer video signal is routed to 5 BNC connectors on pigtails. On HSA 200S and HSA 200C units, the audio signal is sent to a 3-pole, 3.5 mm captive screw connector on a pigtail. -
Page 7: About The Extender Board Line Driver
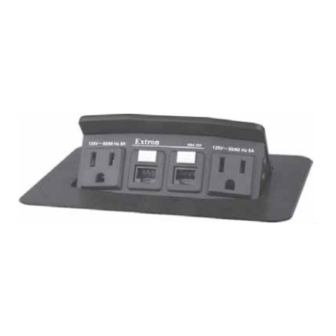
Introduction The installed enclosures fit nearly flush within a table or podium top (figure 1-4), storing the connectors out of the way and out of sight. To access the connectors, the user presses down on the top of the enclosure, releasing a mechanical latch. A gas lift tips the connectors into view. -
Page 8: Chapter 2 • Installation
Introduction HSA 200/222 Series Surface Access Products Chapter Two Installation Installation Overview Preparing the Routing Template Preparing the Table and Mounting the Enclosure Underside Features and Cabling Connections Front Panel Connectors Pre-installation Testing and Troubleshooting (HSA 200CE and HSA 200SE Models Only) HSA 200/222 Series •... -
Page 9: Installation Overview
Installation Installation Overview Install and set up the HSA surface access enclosures as follows: If you have an unprepared mounting template, prepare the template. See “Preparing the Routing Template” in this chapter. If desired, install the optional RJ-45 to RJ-11 conversion kit(s) to replace one or more RJ-45 connectors with RJ-11 connectors. -
Page 10: Preparing The Table And Mounting The Enclosure
Installation, cont’d Preparing the Table and Mounting the Enclosure The preferred and recommended method for preparing the table is to use the appropriate Extron routing template and a router. The templates are available at no cost; see the part numbers for the templates in appendix A, “Reference Information”. -
Page 11: Preparing The Table With A Hole Saw (Hsa 200C, Hsa 200Ce, Or Hsa 222C-Us Version Only)
Installation, cont’d Preparing the table with a hole saw (HSA 200C, HSA 200CE, or HSA 222C—US version only) Locate the desired mounting location on the tabletop or other installation surface. Mark the 6" circle, then find the center and mark it as well. Wear safety glasses when operating the hole saw. -
Page 12: Underside Features And Cabling Connections
RGBHV video output — Connect the BNC cable from the projector, plasma screen, or other display device to these female BNC connectors. HSA 200C and HSA 200S (no Extender board) — The output from these connectors is an unbuffered pass-through from the front panel VGA input. -
Page 13: All Hsa 200 And Hsa 222 Models
Installation, cont’d All HSA 200 and HSA 222 models Screw clamp bracket/screw clamp — These two brackets/ clamps hold the enclosure firmly in place in the mounting hole. AC power input connection — Connect this cord to the power source. For US-domestic versions, this power cord is permanently connected to the HSA. -
Page 14: Power Connector Wiring
Installation, cont’d Power connector wiring See figure 2-10. Plug the input connector of the included 100-240 VAC, 50/60Hz, 12 VDC power supply into the AC power outlet on the underside of the enclosure ( figure 2-5). MEDIUM NORMAL MAXIMUM peaking & gain POWER unity gain peaking &... - Page 15 Installation, cont’d The Universal AC outlet is fully compatible with Europlug, British, Indian, Danish, and Italian plug types. See the universal AC outlet guide on the Extron Web site, www.extron.com, for compatibility details on all plug types. Computer video input (HSA 200 models only) — Plug the VGA-UXGA output from a computer into this 15-pin HD female connector.
-
Page 16: Pre-Installation Testing And Troubleshooting (Hsa 200Ce And Hsa 200Se Models Only)
Installation, cont’d Pre-installation Testing and Troubleshooting (HSA 200CE and HSA 200SE Models Only) Before installing an HSA 200 with an Extender line driver into furniture, test the system to make sure that the connections and settings are correct. Apply power to the line driver. The power/signal LED on the line driver will light to indicate that the line driver is receiving power. -
Page 17: Replacing The Bezels
Maintenance and Modifications The most probable corrective maintenance procedures for your HSA 200 or HSA 222 are leveling the top surface and replacing the gas lifts. Most of the maintenance procedures require removing the surface mount enclosure from the table. Removing and Replacing the Enclosure •... - Page 18 Maintenance and Modifications, cont’d (HSA 222 models only) Remove the four Philips head screws from the front access panel (figure 3-1). Retain the screws. Lift the panel away from the enclosure. Remove front access panel. Figure 3-1 — Removing the front access panel (HSA 222 models) HSA 200/222 Series •...
- Page 19 Maintenance and Modifications, cont’d Remove the four 1/16" hex head screws on the right and left sides of the front panel (figure 3-3). Retain the screws. Lift the panel away from the enclosure. Figure 3-3 shows an HSA 200 model. Removing the front panel from an HSA 222 is an identical procedure.
-
Page 20: Replacing The Gas Lift
Maintenance and Modifications, cont’d Replacing the Gas Lift The gas lift that raises the HSA surface is rated for 100,000 opening and closing cycles. Replace the gas lift as follows: Ensure that AC power is disconnected before servicing the HSA unit. When the HSA 200 is upside-down, the latch may CAUTION be ineffective. - Page 21 Maintenance and Modifications, cont’d (HSA 222 models only) Remove the four Philips head screws from the front access panel (figure 3-7). Retain the screws. Lift the panel away from the enclosure. Remove front access panel. Figure 3-7 — Front access panel removal (HSA 222 models) HSA 200/222 Series •...
-
Page 22: Adjusting The Top Panel
Maintenance and Modifications, cont’d Remove pivot nut. Remove gas lift. Figure 3-9 — Replacing the gas lift, HSA 222 model Insert the piston end of the replacement gas lift through the hole in the bottom of the enclosure adjacent to the latch and secure the lift in the clevis on the top panel with the nut and bolt that were removed in step 8. -
Page 23: Appendix A • Reference Information
Maintenance and Modifications, cont’d HSA 200/222 Series Surface Access Products A ppendix A Reference Information Specifications HSA Part Numbers Included Parts Routing Templates Replacement Parts Accessories Top Plate Dimensions HSA 200/222 Series • Maintenance and Modifications 3-14... -
Page 24: Specifications
Gain ... Selectable: unity (0.7 V), (0.75 V) 50%, (0.8 V) 100% Bandwidth ... 300 MHz (-3 dB) ID bits are terminated on pins 4 and 11. Video input — HSA 200S, HSA 200C Number/signal type ... 1 VGA–UXGA RGBHV, RGBS, RGsB, RsGsBs Connectors ... (1) 15-pin HD female Video input —... - Page 25 Top plate (inside tilt plate) ... 4.660" W x 2.875" D (11.84 cm W x 7.30 cm D) HSA 200S, HSA 200SE, HSA 200C, HSA 200CE — USA models Box (under surface) ... 4.0" H x 4.6" W (front of unit) x 4.4" D (10.2 cm H x 11.7 cm W x 11.2 cm D)
-
Page 26: Hsa Part Numbers
(11.4 cm H x 26.2 cm W x 12.4 cm D) with clamps Product weight HSA 200S, HSA 200C ... 4.0 lbs (1.8 kg) HSA 222S, HSA 222C ... 3.5 lbs (1.6 kg) HSA 200SE, HSA 200CE ... 5.0 lbs (2.3 kg) -
Page 27: Included Parts
HSA 200S/HSA 200SE International Models Part number 70-231-01 70-231-02 70-229-01 Sales & Technical Figure A-1 — HSA 200S/HSA 200SE/ HSA 222S cutout dimensions 6.470" (16.43 cm) 5.970 0.0325" (15.16 0.083 cm) SURFACE CUT-OUT AREA = 5.970 0.0325" (15.16 0.083 cm) x 4.625 0.0325"... -
Page 28: Appendix B • Packaging For Shipment
Reference Information, cont’d HSA 200C/HSA200CE/HSA222C US Models 6.5" (16.5 cm) 6.000 0.0325" (15.24 0.083 cm) SURFACE CUT-OUT AREA = 6.000 0.0325" (15.24 0.083 cm) diameter Cut surface material out along this line. Top Panel User Access (Connectors and AAP Openings) TEMPLATE IS NOT FULL SIZE. - Page 29 Packaging for Shipment The HSA 200’s and HSA 222’s ultra-fine machined surfaces and moving parts make them vulnerable to damage caused by mishandling during shipment, if they are improperly packaged. If, for any reason, you need to return an HSA to Extron, first contact Extron to obtain a return kit.
- Page 30 Packaging for Shipment, cont’d Place the remaining foam shell on the other side of the HSA (figure B-4). Firmly push the foam shells together as far as they will go to completely suspend the HSA unit. Figure B-4 — HSA unit suspended in the foam Place the foam-protected HSA 200 or HSA 222 into the shipping carton (figure B-5).
Need help?
Do you have a question about the HSA 200SE and is the answer not in the manual?
Questions and answers