Table of Contents
Advertisement
///
Thunder K7X Pro
S2469
Revision 1.50
Copyright © TYAN Computer Corporation, 2001-2002. All rights reserved. No part of this manual
may be reproduced or translated without prior written consent from TYAN Computer Corp.
All registered and unregistered trademarks and company names contained in this manual are
property of their respective owners including, but not limited to the following.
TYAN, Thunder K7X Pro S2469 are trademarks of TYAN Computer Corporation.
AMD, Athlon, and combinations thereof are trademarks of AMD Corporation.
Phoenix, PhoenixBIOS are trademarks of Phoenix Software Inc.
Microsoft, Windows are trademarks of Microsoft Corporation.
IBM, PC, AT, PS/2 are trademarks of IBM Corporation.
Winbond is a trademark of Winbond Electronics Corporation.
Information contained in this document is furnished by TYAN Computer Corporation and has been
reviewed for accuracy and reliability prior to printing. TYAN assumes no liability whatsoever, and
disclaims any express or implied warranty, relating to sale and/or use of TYAN products including
liability or warranties relating to fitness for a particular purpose or merchantability. TYAN retains the
right to make changes to product descriptions and/or specifications at any time, without notice. In
no event will TYAN be held liable for any direct or indirect, incidental or consequential damage,
loss of use, loss of data or other malady resulting from errors or inaccuracies of information
contained in this document.
1
http://www.TYAN.com
Advertisement
Table of Contents

Related Manuals for TYAN Thunder K7X Pro (S2469


Summary of Contents for TYAN Thunder K7X Pro (S2469
- Page 1 In no event will TYAN be held liable for any direct or indirect, incidental or consequential damage, loss of use, loss of data or other malady resulting from errors or inaccuracies of information contained in this document.
-
Page 2: Table Of Contents
..…………………………………………..Page 28 3.7 Power Setup ..…………………………………………..Page 28 3.8 Boot Setup ..…………………………………………..Page 29 3.9 Exit ..…………………………………………..Page 29 Chapter 4: Diagnostics ..…………………………………………..Page 30 4.0 Beep Codes ..…………………………………………..Page 30 4.1 Flash Utility ..…………………………………………..Page 30 Appendix: Glossary ..…………………………………………..Page 31 Technical Support ..…………………………………………..Page 36 http://www.TYAN.com... -
Page 3: Before You Begin
1x Cable set: 9-pin Serial 1x Thunder K7X Pro user’s manual 1x Thunder K7X Pro Quick Reference guide 1x TYAN driver CD 1x Adaptec SCSI driver diskette (if optional SCSI included) 1x I/O shield with 2 LAN ports If any of these items are missing, please contact your vendor/dealer for replacement before continuing with the installation process. -
Page 4: Chapter 1: Introduction
Chapter 1: Introduction 1.0 – Congratulations You are now the owner of one of the most flexible TYAN dual AMD Athlon motherboards available. Utilizing the latest chipset technology for dual AMD multi-processing, the Thunder K7X Pro is fully capable of handling all your heaviest software demands. If networking is what you need, then the Thunder K7X Pro has enough bandwidth through the use of one Gigabit Ethernet and10/100Mbit Ethernet ports. -
Page 5: Software Specifications
Microsoft Windows 2000 BIOS Microsoft Windows XP • Phoenix BIOS 4.0 revision 6.0 on 4Mbit TYAN reserves the right to add support or Flash ROM discontinue support for any OS with or • PXE boot and SMBIOS v2.3.1 support without notice. -
Page 6: Chapter 2: Board Installation
(1) Ground yourself properly before removing your motherboard from the antistatic bag. Unplug the power from your computer power supply and then touch a safely grounded object to release static charge (i.e. power supply case). For the safest conditions, TYAN recommends wearing a static safety wrist strap. -
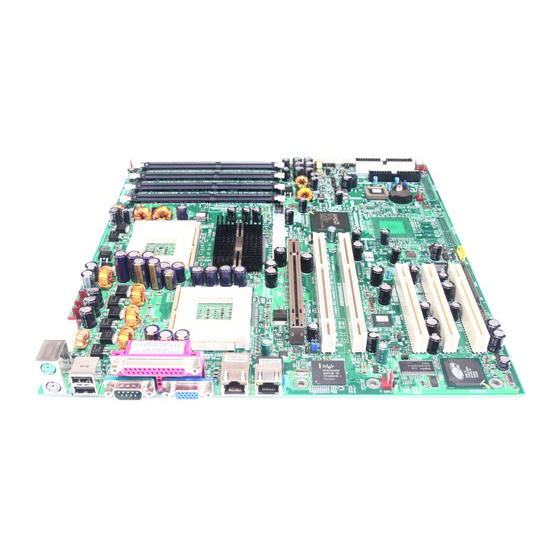
Page 7: Board
The picture above may or may not look exactly like the board you received. The following page will detail vital components of this board. http://www.TYAN.com... -
Page 8: Board Jumpers
The above jumper schematic diagram is representative of the latest board revision available at the time of this manual’s publishing. The board you have received may or may not be like the above schematic. Jumper Legend Jumper OFF (disconnected) Jumper ON (connected) http://www.TYAN.com... -
Page 9: Jumper Summary
Certain chasses have a switch that detects whether or not they are being opened. This switch connects to the Chassis Intrusion Header to sound an alarm when the chassis is being opened without authorization. Simply connect the two-pin switch to the J15 header to enable. http://www.TYAN.com... -
Page 10: Cmos Reset (J21)
USB device and/or the motherboard. The Front-side USB header is designed for chassis are support front-side USB. TYAN does not provide these cables. 2.8 – Front-side Bus Select 133MHz (DEFAULT) Depending on the processor you have, you may need to adjust the processor Front Side Bus speed in order to have the processors operate correctly. -
Page 11: Front Side Bus 100Mhz Select
Use J86 to enable or disable LAN2. 2.13 – Primary PCI Speed (J92) OPEN (default) the jumper to have the primary PCI bus operate at Enabled 66MHz (default). Disabled CLOSE the jumper to force the primary PCI bus to operate at 33MHz. http://www.TYAN.com... -
Page 12: Gbe Front Panel Led (J102)
When both LEDs are on, this indicates Gigabit connection/activity. 2.15 – FAN connectors Use these headers to connect cooling fans, both chassis and processor fans, to your motherboard. Cooling fans help keep the system more stable and operating reliably for its product life. +12v (1.2A) fans supported http://www.TYAN.com... -
Page 13: Mounting The Motherboard
If there are any studs missing, you will know right away since the motherboard will not be able to be securely installed. Some chassis’ include plastic studs instead of metal. Although the plastic studs are usable, TYAN recommends using metal studs with screws that will fasten the motherboard more securely in place. -
Page 14: Installing The Memory
Front Side Bus at 133MHz. For this, PC2100 DDR modules are required. Critically important is whether you’re using the recommended memory for the current board you have. For this information, please check TYAN’s web site at: www.TYAN.com The following diagram shows the types of RAM modules you may encounter depending on your... - Page 15 To remove the memory module, simply push the latches outwards until the memory module pops up. Then simply remove the module. YOU MUST unplug the power connector to the motherboard before performing NOTE system hardware changes, to avoid damaging the board or expansion device. http://www.TYAN.com...
- Page 16 Also, mixing different types of processors together is not supported as damage to your processors, motherboard or both may occur. TYAN is not liable for damage as a result of operating an unsupported configuration.
- Page 17 This is will probably be the most difficult portion of setting up your computer so please exercise caution. TYAN will not accept responsibility and no warranty will be given for damage due to improperly installed heatsinsks.
-
Page 18: Attaching Drive Cables
Attaching the IDE drive cable is simple. These cables are “keyed” to only allow them to be connected in the correct manner. TYAN motherboards have two on-board IDE channels, each supporting two drives. The black connector designates the Primary channel, while the white connector designates the Secondary channel. - Page 19 Usually signifies that the cable on the drive is on backwards, which is a common issue. Drive activity light is constantly on Reverse the cable at the floppy drive end and try again. http://www.TYAN.com...
-
Page 20: Installing Add-In Cards
Due to the tight PCI 66MHz timing of the AMD-760 MPX chipset, it may be necessary to set the bus to 33MHZ when using multiple PCI cards. For more information, refer to the AMD 760 System Controller Datasheet (PID# 24416) on the AMD website: www.amd.com. http://www.TYAN.com... -
Page 21: Connecting External Devices
Connect the EPS12V 8-pin or the ATX12V 4-pin the power connector Connect the EPS12V 24-pin or the ATX12V 20-pin power connector Connect power cable to power supply to power outlet Make sure you have connected both connectors before attempting to apply power to the board. http://www.TYAN.com... -
Page 22: Finishing Up
In the rare circumstance that you have experienced difficulty, you can find help by asking your vendor for assistance. If they are not available for assistance, please find setup information and documentation online at our website or by calling your vendor’s support line. http://www.TYAN.com... -
Page 23: Chapter 3: Bios Setup
(hard drive, CD-ROM, etc) which you can define. If one is found, the BIOS will launch that operating system and hand control over to it. You can enter the BIOS setup by pressing the [F2] key when the machine first starts and shows the memory count. http://www.TYAN.com... - Page 24 Chipset section unless you are absolutely sure you need to. The Chipset defaults were carefully chosen by TYAN or your system manufacturer for the best performance and reliability. Even a seemingly small change to the Chipset setup options may cause the system to become unstable or unusable.
-
Page 25: Main Bios Setup
Toggles the use of the PS/2 mouse port. Enabled Enables/Disables USB controller. USB Host Controller Disabled USB BIOS Legacy Enabled Enables/Disables support for USB KB/mice in a Support Disabled non-USB aware OS. Advanced Chipset Press [Enter] Configuration PCI Configuration Press [Enter] I/O Device Configuration Press [Enter] http://www.TYAN.com... -
Page 26: Chipset Configuration
Defines the delay when holding down a key Keyboard auto-repeat 1/2 sec before characters begin to repeat. delay 3/4 sec 1 sec This option toggles whether the system will pause if a keyboard error KB error is detected or continue to boot. http://www.TYAN.com... -
Page 27: I/O Configuration
Latency Timer Defines the PCI response time delay. Certain PCI Device, Slot 1 (..2, 3, devices such as sound cards, which require the 4, 5) most PCI access time, may benefit from a higher latency time. http://www.TYAN.com... -
Page 28: Security Setup
Toggles and defines the amount of 5, 10, 15, 20, 30, 40, 60 min time given before the system goes Auto Suspend Timeout into Suspend mode after going into Standby mode. This option can saves the most energy. http://www.TYAN.com... -
Page 29: Boot Setup
Options related exiting and saving can be done using the following. Exit Saving Changes Exit and save options. Exist Discarding Exit but don’t save options. Changes Loads the factory-set default Load Setup Defaults options. Discard Changes Discard any changes made. Save Changes Save changes. http://www.TYAN.com... -
Page 30: Chapter 4: Diagnostics
BIOS Post Code. Before calling your vendor or calling TYAN Tech Support, be sure that you know how many beeps your board made, and how long the beeps were. Also have other information such as your attached add-in cards, drives and OS to help speed up the support process and come to a possible solution faster. -
Page 31: Appendix: Glossary
SRAM instead of in the slow DRAM. Note that the cache is also much smaller than your regular memory: a typical cache size is 512KB, while you may have as much as 4GB of regular memory. http://www.TYAN.com... - Page 32 EEPROM (Electrically Erasable Programmable ROM): also called Flash BIOS, is a ROM chip which can, unlike normal ROM, be updated. This allows you to keep up with changes in the BIOS programs without having to buy a new chip. TYAN’s BIOS updates can be found at http://www.TYAN.com ESCD (Extended System Configuration Data): a format for storing information about Plug-n- Play devices in the system BIOS.
- Page 33 Form factor: an industry term for the size, shape, power supply type, and external connector type of the Personal Computer Board (PCB) or motherboard. The standard form factors are the AT and ATX, although TYAN also makes some Baby-AT and ATX Footprint boards. Global timer: onboard hardware timer, such as the Real-Time Clock (RTC).
- Page 34 Serial port: called as such because it transmits the eight bits of a byte of data along one wire, and receives data on another single wire (that is, the data is transmitted in serial form, one bit after another). http://www.TYAN.com...
- Page 35 ZIF Socket (Zero Insertion Force socket): these sockets make it possible to insert CPUs without damaging the sensitive CPU pins. The CPU is lightly placed in an open ZIF socket, and a lever is pulled down. This shifts the processor over and down, guiding into the board and locking it into place. http://www.TYAN.com...
-
Page 36: Technical Support
Return Merchandise Authorization (RMA) number. The RMA number should be prominently displayed on the outside of the shipping carton and the package should be mailed prepaid. TYAN will pay to have the board shipped back to you. http://www.TYAN.com... - Page 37 Danger of explosion if battery is incorrectly replaced. Replace only with the same or equivalent type recommended by manufacturer. Dispose of used battery according to manufacturer instructions and in accordance with your local regulations. Document #: D1487 - 150 http://www.TYAN.com...
Need help?
Do you have a question about the Thunder K7X Pro (S2469 and is the answer not in the manual?
Questions and answers