Table of Contents
Advertisement
Available languages
Available languages
®
FI
Top-Freezer
Fa
FS
GEAppliances.com
Top-Freezer
Refrigerators
Modal
18
Safety Instructions
............
2-3
Operating
Instructions
Additional
Features
.................
6
Automatic
Icemaker
. ...............
7
Controls
..........................
4
Crispers and Pans ..................
6
Dispenser
. ........................
7
Shelves and Bins ...................
5
Water Filter
. ......................
4
Care and Cleaning
Care and Cleaning
...............
8, 9
Replacing
the i,ight Bulbs ...........
9
Installation
Instrud:ions
Preparing
to Install
the Refligerator
. ..................
10
Reversing the Door Swing
.......
14-18
Water Line Installation
..........
11-14
Troub leshooting Tips .......
19-21
Normal Operating
Sounds
..........
19
Consumer
Support
Consumer
Support
.........
Back Cover
Performance
Data Sheet
...........
27
Product Registration
for Canadian
Customers
.........
23, 24
State of California
Water
Treatment
Device Certificate
........
28
_!arranty
for
Canadian
Customers
...............
25
Warranty
for
U.S.
Customers
........
26
Note to Installer
-
Be sure
to leave
these instructions with the Consumer
Note to Consumer
- Keep
these
instructions for furore refe.rence.
Write the model and serial numbers hero:
Model #
Serial #
Find these numbers
on the gray label
on the lef_ side, near the top of the
refligerator
compartment.
Congdlateur
suudrieur
Rdfrigdratdurs
ta section franFaise commencea la page 29
Instructions
de s&_rit_
....
29-30
Instructions
de fonetionnement
Bacs _ l_gumes
.................
33
Caract&isfiques
addifionnelles
....
33
Clayettes et bacs ................
32
Disuibuteur
. ...................
34
Filtre {_ eau
....................
31
Machine
_ glacons automafique
. . .34
R_glages
......................
31
Soins et nettoyage
Remplacement
des
ampoules
_lectriques
............
36
Soins et nettoyage
............
35, 36
Instructions
d 'installation
Installation
de la
conduite
d'eau
..............
38-41
Inversion du sens
d'ouvertme
des portes
........
41-45
Preparation
5. l'installafion
du r_flig_rateur
. ...............
37
En eas de panne
.........
46-49
Bruits normaux
de fbncfionnement
..............
46
Soutien
au eonsommateur
Feuillet de donn_es relatives {_la
performance
de la cartouche
.......
51
Garanfie
.......................
50
Soutien
au
consommateur
. .......
52
Note h l'installateur - A_surez-_<,us
de
laisser ces instructions au consommatem:
Note au consommateur
- Conservez
ices instructions pour rdf_mnce tim/re.
EcrivezM le numerode modble et le numerode
sorie :
Modble #
$orie #
\.%ustrom_rez ces num&os sur l'_fiquette gfise
sim_e _tgauche, pros du haut du comparfiment
r(_flig@amm;
• Congelador
superior
Refngeradores
ta seccihn en espaKolempieza en la pagina 53
Informaci6n
de seguridad
...53-54
Instrucdones
de operad6n
Caracterfstic_s adiciona/es
...........
57
Controles
.........................
55
Dispensador
. ......................
58
Esmntes y comparfimientos
.......
5€_57
Filuo de agua ......................
55
(;avetas de a/macenamiento
.........
57
Mfiquina de hielos automfifica
.......
58
Cuidado
y limpieza
Cdmo reemplazar las bombillas
......
60
Cuidado y limpieza ..............
59-60
Instruceiones
para la instalac_n
Cdmo inverfir el vaiv_.n de
la puerto .......................
65-69
Insm/acidn de la mberfa
del agua .......................
62-65
Preparacidn
para insta/ar
el refligerador
. ....................
61
Consejos para la solud6n
de problemas
...............
70-74
Sonidos nomm/es de operacidn
......
70
Soporte al consumidor
Hoja de dates de flmcionamiento
.... 78
(;amntfa
..........................
77
Soporm a/consumidor.
.............
79
Nora al instalador - A_egdrese de
dejar es/>ts instrucciones con el consmnkto_:
Nora al consumidor - Conser_
es/as instrucciones pare reDrencia timbre.
Escriba a quiel modo/o iteln(tmem
desorie:
Modo/o#
Sorie #
Encuentre
estos nfimeros en la etiqueta griN en
el lade izquierdo, cerca de la parte superior
del compartimiento
del refligemdo_:
19703354PO13
49-6051 l- I
05-09 JR
Advertisement
Table of Contents

Related Manuals for GE GTH18DCXALWW


Summary of Contents for GE GTH18DCXALWW
- Page 1 Top-Freezer ® GEAppliances.com Top-Freezer Congdlateur suudrieur • Congelador superior Refngeradores Rdfrigdratdurs Refrigerators ta section franFaise commencea la page 29 ta seccihn en espaKolempieza en la pagina 53 Modal Instructions de s&_rit_ ..29-30 Informaci6n de seguridad ...53-54 Safety Instructions .... Instrucdones de operad6n Operating...
-
Page 2: Important Safety Information
iMPORTANT SAFETY iNFORMATiON. READALL iNSTRUCTiONS BEFORE USING. A WA Use this appliance only for its intended purpose as described in this Owner's Manual SAFETY PRECAUTIONS When using electrical appliances, basic safety precautions should be followed, including the foflowing: }}_ This refligerator must be properly installed ,,_ Keep fingers... -
Page 3: How To Connect Electricity
GEAppliances.com HOWTOCONNECT ELECTRICITY Do not, under any circumstances, cut or remove the third (ground) prong from the power cord. For personal safety, this appliance must be properly grounded. The power cord of dlis appliance is equipped widl This proxides the best performance and also a 3-prong (grounding) -
Page 4: Control Settings
About the controls on the refrigerator. ControlSettings Initially, set the control(s) at 5 (some models have only one control). Aflow 24 hours for the temperature to stabilize. Several adjustments may be required. Adjust the control(s) one increment at a time and allow 12hours after each adjustment for the refrigerator to reach the temperature you have set. -
Page 5: About The Shelves And Bins
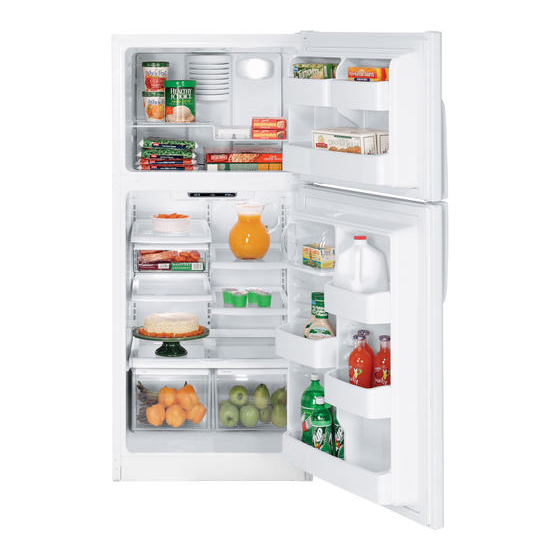
About the shelves and bins. OEAppliances Not all features are on all models. Rearranging the Shelves Refrigerator Compartment Toremove: Toreplace: Tilt t he sbelf.p at t he ont. the top book at the back of the shelf in a slot on the track. Lift the shelf up at the back and bring the shelf out. - Page 6 Aboutthe crispersandpans. Not all features are on all models. Fru# and Vegetable Crispers Snack Pan (onsomemodels) Excess water that This can be moved acctlmulate in the bottom most useflll location of file drawers or under your fhmily's needs. drawers shoukt be wiped dry.
- Page 7 Abouttheautomaticicemaker. CEApp,ances.cem A newly-installed refrigerator may take 12-24 hours to begin making ice. Automatic lcemaker (onsomemodels) When the bin fills to file level of file feeler The icemaker will produce approximately There are 2 types of icemakers: 3 to 3½ lbs. of ice in a 24-hour period, arm, the icemaker will stop producing ice.
-
Page 8: Careandcleaning Oftherefrigerator
Careandcleaning oftherefrigerator. Cleaning the Outside The door handles and trim. Clean with For best results, (;E recommends using stainless smel cleaner PM10X311 with a clod1 dampened widl soapy watex: Dry with a soR cloth. tile WX10X307 polishing cloth, or for convenience the SS cleaning wipes, part... - Page 9 GEAppliances.com Preparing for Vacation Set the icemaker power switch to file 0 (off) For long V_tCatioIIS #_bsences_ I'eIIlOVe position or move the feeler am1 to the STOP food mlplug refligerator Move (up) position (depending on model) and file refrigerator control to file 0 (Of[) position and clean file interior wifll a baMng soda shut off the water supply to the refligerator...
-
Page 10: Before You Begin
Mode/18 ff you have questions,call 1.800.GE.CARES GEAppliances.com o r vMt our Webske at: in Canada, call 1.800.561.3344 or visit oui-Website ,t: www.GEAppliances.ca BEFORE YOU BEGIN CLEARANCES Allow file following clearances for ease of installation, Read these instructions completely and carefully. -
Page 11: Installation Instructions
20 and 120 p.s.i. (1.4-8.1 bar). Wamr S}:smm, t he only approxvd installation is with a GE RVKit. For other rex_e osmosis _tmr s_:smms, t ollow the manuf_mmrer's recommendations. This ,_ater line installation is not ,_vtn'antedby the refl-igecator or icemaker manuf{tcmrer Follow these instructions careflflly' to minimize the risk of expensive ,_amrdamage. - Page 12 Take care not to allow water to drain into the drill. Failure to drill a 1/4" hole may result in reduced For plastic tubing flom a GE SmartConnect ice production or smaller cubes. Refiigerator Tubing kit, insert the molded of the robing into the shutoff...
- Page 13 While holding tubing, tighten the fitting. For plastic robing flom a GE SmartConnect'" Refligerator Tubing kit, insert the molded [_] TURN THE WATER ON AT THE of the robing into the water valve connection SHUTOFF VALVE...
-
Page 14: Reversing The Door Swing
Installation instructions iNSTALLiNG THE WATER LiNE (CONT.) START THE ICEMAKER [-gqPLUG iN THE REFRIGERATOR On power switch models, set the icemaker power Arrange the coil of tubing so that it does not vibrate switch to the ! (on} position. On feeler arm models, against the back of the ref_igerator or against the wall. - Page 15 Installation instructions [_ REMOVE FREEZER DOOR [_ TRANSFER TOP HINGE TO THE LEFT Tape the door shut with masking tape. Interchange binge and screws at top right with screws at the top left of cabinet. Do not tighten screws on hinge side at this time. [_ TRANSFER BOTTOM HINGE...
- Page 16 Installation instructions REVERSING THE DOOR SWING ICONT.I [g] TRANSFER CENTER HINGE TRANSFER REFRIGERATOR DOOR HANDLE TO THE RIGHT BRACKET TO THE LEFT Remove center binge bracket by remoxqng Plastic handle: three mo_x ® screws. Remove the plug button by carefiflly NOTE: Keep these screws with the binge bracket.
- Page 17 Installation instructions TRANSFER FREEZER DOOR TRANSFER REFRIGERATOR DOOR HANDLE TO THE RIGHT HANDLE TO THE RIGHT (CONT.) O Transfer the door plug Remove the screws Plastic handle: 0_..,_ button to the opposite side. hokling the handle to _r"_,.7 the top and bottom of Reinstalling the handle: door...
- Page 18 Installation instructions REVERSING THE DOOR SWING ICONT.I ® TRANSFER FREEZER DOOR RE-HANG THE FREEZER DOOR HANDLE TO THE RIGHT (CONT.) i,ower the fleezer door onto the center hinge pin. Stairdess steel handle Be sure the washer is in place. (on some models): Attach handle...
-
Page 19: Normal Operating Sounds
Normal operating sounds. CeApplia.ces.com Newer refrigerators sound different from older refrigerators. Modern refrigerators have more features and use newer technology. Be you hear what / hear? These sounds are normal. HUMMM,, WHIR! WHOOSH,.. [] The new high efficiency' compressor may' run f_ster and longer than }_mr old refiJgemtor and you may hear a high-pitched Ym may hear the f_msspinning at high speeds. - Page 20 Before you call for service... PossibleCauses WhatToOo Motoroperates for * _hit 24 hou_ for the refl_ige_tor to completely Normal when refrigerator longperiodsor cycles is first plugged in. cool (lo_. on and offfrequently * This is nom_al. Often occurs when large (Modernrefrigerators amounts of food are with morestorage...
- Page 21 GEAppliances.com Possib/eCauses WhatToDo Moisture co/loots inside Too frequentor too (inhumid weather, a ir long door openings. carriesmoisture i nto Open containersof water or * Coveror sealopen containers.During;t deftas/cycle, refrigeratorwhen doors warm food in the refrigerator, moisture will be removed the reflJgel>ltoi, hut n_vly opened) return...
- Page 22 Notes.
- Page 23 Cut here Please place in envelope and mail to: Veuillez mettre dans une enveloppe et envoyez _ : OWNERSHIPREGJSTRATJOH P.O. BOX1780 MISSJSSAUGA, O HTARJO L4Y 4G1 (FORCAHADJAH COHSUMERS OHLY)
- Page 24 ._&u,,,- Cut here Please register your produnt to enable us to contactyou VeuiUez enregistrer votre produit afio de nous permettre inthe remote event a safetyno_ce isissued forthisproduct communiquer avecvoussijamais unavisdes_cudt6 concemant produit communiquer facilement and to allowfor efficient communication under_e terms #fair 6mis etde avec vous en...
- Page 25 CUSTOMr:R WARRANTY (forcustomers in Canada) Yourrefrigerator is warranted to be free of defects in material and workmanship. What is covered HowLongWarranted Parts Labour (FromDate of Sale) Repairor Replace at Mabe'sOption Compressor GEProfile:Ten(10)Years GEProfile:Ten(10) Years GEProfile: Five(5)Years GEand All Other GEandAll Other GEand All Other Brands:One(1) Year Brands:One(1)Year...
-
Page 26: Refrigerator Warranty
This warranty is extended to the original purchaser and any succeeding owner for products purchased for home use within the USA. If the product is located in an area where service by a GE Authofized Servicer is not available, you may be responsible for a trip charge or you may be required to bring the product to an Authorized GE Service location for service. -
Page 27: Special Notices
Performance Data Sheet SmartWater FiltrationSystem GSWFCartridge This system has been testedaccording to NSF/ANS142/53for reductionof the substances listed below. The concentrationof the indicated substances in water enteringthe system was reduced to a concentration less than or equal to the permissiblelimit for water leaving the system, as specified in NSF/ANS/ 42/53.* (100% safety factors built in for unmetered usage) Standard 42: Aesthetic... - Page 28 Health Services Water Treatment Device Certificate Number 03- 1559 Date Issued: April 28, 2003 Trademark/Model Designation ....:: :':: Replacement Elements GE GSWF ....................Manufacturer: 'elnent_ mrsuant to Section linants Cysts Turbidity Organic Contaminants Atrazine Lindane 2.4-D...
-
Page 29: Mesures De Securite
INSTRUCTIONS/MPORTANTES BE SECUR/TE. USEZ TOUTES LESINSTRUCTIONS AVANT B'UT/USER VO TRERt:FR/GE:RA TEUR. N'utilisez cet appareil qu'aux fins pr6vues dans le pr6sent Manuel du propfi6taire. MESURES DESE-CURITE Pour utiliser un apparei161ectromOnager 61ectrique, vous devez prendre des mesures de sOcufit6, en particufier: Xims dexez bien insmllei et places xotre rdfligdratem,... - Page 30 INSTRUCTIONS/MPORTANTES BE SECUR/TE. USEZ TOUTESLESINSTRUCTIONS AVANT B'UTIUSER VOTREREFRIGERA T EUR. A AVER' BRANCHEMEN TEL EC TRIO UE Ne coupez ou n'enlevez jamais, en n'importe queries conditions, la troisibme broche (mise _ la terre) de votre cordon d'alimentation. Pour votre s_curit_ personnel& vous devez bien mettre _ la terre cet appare# #lectrom#nager.
- Page 31 R glagesde votrer frig rateur Initialement, mettez le(s)r@lage(s) e nposition5 (certains mad#los n 'ont qu'unr@lage), A ttendez 24heuresquela tempdroture sestabilise, Plusieurs ajustements peuvent g trerequis, A justezle(s)r@lage(s) uneunit#_la fois,et attendez 12heuresapr#schaqueajustement queler#frigdrateur a tteignelatemp#rature quevousavez r@lde, Enajustont l er@lagedecompartiment r#frigdration enpositionO, vousarr#tez lerefroidissement du compartiment rdfrigdration etdu compartiment cong#lation, maisvousne coupez pasI'alimentation #lectrique de votrer#frig#rateur, Ler@lagede compartiment...
- Page 32 Lesc/ayettes et /es bats. Tous les mod_les n'ont pas toutes ces caract_ristiques. Disposition des clayettes Compartimentr#frig#ration EnlOvement : gemise en place: En thisant basculer la claxette xers S,,,le, ez lacla, ettera, a nt. le haut, ins_rez le crochet sup_riem _tl'arri_re de la cla_'ette dans une f_'nte Soulevez la cla_ette _tl'an i_re du rail.
- Page 33 B_CS a/#gumes, www.e/ectromenagersge.ca Tous les modules n'ont pas toutes ces caract_ristiques. Baca casse-cm#te Bacs a fruits et I#gumes (sur certains mod#les) Vous devez bien essuyer route Vous pouvez mettre ce bac _t eau en excOs qtd peut s'accumuler au fund des bacs 1 endmit qui convient...
- Page 34 Certaines c at@orbsde tuyauxen matiere plastique cuivre ou en mad_.re plasfique de 1/4 po de peuvent d evenir c assants avecI#ge et peuvent s e fendre, diam,.Ire ex/Srieur qui est compels dans la r_fiig&'amur GE...
- Page 35 Soins et nettoyage de votm r6frigerateur. Nettoyage de I'exterieur Pour de meilleurs rdsultats, GE recommande Lespoigneesde porte et /es garnitures. Net]oyez avec tin l'utilisation du nettoyant pour aciei inoxxdable linge tremp_ dans de l'ean smonneuse. S_chez avec PM] 0X311 avec le chiflbn fi lustrei _iX] i)X307 tin linge doux.
-
Page 36: Remplacement D Esampouleselectriques
Soins et nettoyage de votre refrigerateur. Preparation de d#part en vacances Mettez le commumteur de marche de la Pour de long!les vacances absences, enlevez tous vos a/imems et dSbranchez machine Z_ glacons en position 0 (argOt} ou STOP mnenez le bras pNpeur en posidon voUe r_flJg&aWm;... -
Page 37: Avant De Commencer
_ t,ne conduim d'eau fioide. Vous pouvez r_flJg&amur suit enfi&rement tmnsf_,6 aux rouletms achemr une trousse d'Nimenmfion d'eau GE (conmnant }tVitlI[. la a,yaumfie, le robinet d'arr&, lesjoints et les " Le r_flig_mmur ne sere pas de niveau de l'avant A... -
Page 38: Installation De La Conduite D'eau
_N08X10025). locM ou en le commandam au se_wice de pi_ces et g xx_usinstallez tin s_st_me d'emi GE Reverse Osmosis clans votre accessoires, au 1.800.661.1616. rdfl ig&ateul; la seule installation appiouvde est celle de la trousse "... - Page 39 &,imr de recevoir des s&thnents myau d'Nimenmtion d'eau. Pour le myau en mati6re plasdque d'une trousse Percez un uou de GE SmartConnect'" ReflJgerator Tubing, ins&ez 0,63 cm (1/4") dans l'exu&nit_ moul_e du myau dans le robinet d'arr&...
- Page 40 Ecrou de compressior de 0,63cm(1/4")__ la bague (manchon) fi l'exu6mit_ du myau comme l'indique l'illustradon. Si vous ufilisez une trousse GE SmartConnecg '_Refiigerator Tubing, Branchement les _crous sont d6jfi assembl& au myau. au r6frig_rateur I-uyauSmartConnect T u Ins&ez l'extr&nit_ du myau darts le branchement du robinet d'arr&...
-
Page 41: Inversion Du Sens D'ouverture
instructions d'installation _-q BRANCHEZ VOTRE METTEZ EN MARCHE RI_FRIGERATEUR MACHINE A GLA(_ONS Sur les modSles 5_commutateur de marche, mettez Disposez la spira/e de myau en cuivre de mani_re _ ce qu'elle ne vibre conue l'arri_.re de votre commumteur de la machine _ glacons en position I (marche}. -
Page 42: Inversion Du Sens D'ouverture Des Portes
instructions d'installation iNVERSiON DU SENS D'OUVERTURE DES PORTES (SUITE) FAITES PASSER LA CHARNII_RE [_ ENLEVEZ LA PORTE DU COMPARTIMENT CONGELATION SUPERIEURE A GAUCHE ]_changez la charni&re et les vis se uouvant en haut Attachez la porte _t l'aide de ruban-cache. _ droite avec les visen haut _ gauche de l'armoire... - Page 43 instructions d'installation FAITES PASSER LA POIGN#:E F_ FAITES PASSER LE SUPPORT DE CHARNll-RE CENTRALE A DE PORTE DU COIVIPARTiNIENT GAUCHE R(=FRIG(=RATION A DROITE Enlevez le support de charni_re centrale en d_.vissant Poign6e les trois vis dynamom_t_Jques. mati&re plastique O Enlevez le bouchon _:_-_ NOTE : Conservez ces vis avec le support...
- Page 44 instructions d'installation iNVERSiON DU SENS D'OUVERTURE DES PORTES (SUITE) FAITES PASSER LA POIGNF:E FAITES PASSER LA POIGNEE DE PORTE DU COMPARTIMENT DE PORTE DU COMPARTIMENT Ri'==FRIGI_RATION A DROITE (SUITE) CONGELATION ._, DROITE O Fakes passer le bouton Poign6e en mati6re de porte darts le trou du plasfique...
- Page 45 instructions d'installation ® FAITES PASSER LA POIGNC:E F_ ACCROCHEZ A NOUVEAU LA PORTE DU COMPARTIMENT DE PORTE DU COMPARTIMENT CONGELATION CONG[_LATION A DROITE (SUITE) Poign6e en aeier Faites descendre la porte du comparfiment inoxydable (sur congdladon sur l'axe de la charni6re cenuale. eertains modules) Assurez-vous que la rondelle soit en place.
-
Page 46: Bruits Normaux De Fonctionnement
Bruitsnormauxde fonctionnement. Los r#frig#rateurs plus r#cents font des bruits diff#rents de ceux des anciens. Los r#frig#rateurs modemes pr#sentent plus de fonctions et soot plus a vanc#s sur le plan technologique. Entendez-vous ce que j'entends ? Cosbruits soot normaux. OUIR ! HUMMM,,, __ -OUUCH,,,, i _enouveau compresseur... - Page 47 www.electromenagersge.ca Causes possibles Solutions Vibrations ou bruits Le r6frig&rateur nese pose pas * R_glez los pieds d qncJinais(m ((;()llsu]tez Roulettes et de casse (unepetite hien sur les qua/a'e roulettes, pieds d'inclinaison). vibration est normale) Le moteur fonctionnependant C'est normal quand on met en marche + .&tfcn(tcz 24 ]lctu ci qnc lc r_I] ig_ratctu sc 1cI] oJ(tJsse (omi)l(temcnt.
- Page 48 Avant d'appe/er un reparateur... En cas de panne Causespossibles Solutions Le r6frigdrateursent Les ailments donnent une ® V()us (|e_ez bJen em})aqueter ]esaliments quJ sentent t()rt. odeur au r6fr'lg6rateur. • (_()I_SC_'_reI })Jon'bon_lte (]e sou(le tilde })()_t ()tl_ el're &ms votre r6fiJg6ratem; reml)lacez-la tous]es mils m(fis.
- Page 49 www.electromenagersge.ca PossibleCauses WhatTo Do ta /umi_re dn Certains mod_les ne sent • V&ifivz la prdsvncv d'nn plafiTnnivr transhtcklv sttr ]_lparoi compartiment pas mmfis dkme lumi_re dans sttp_rivnre du c(Tmparthnvnt c(Tng_]ath 7n. Si lv p]afbnnivr vst d' tm coagulation le compartiment cong61ation.
- Page 50 GARANTiE DU CLIENT (pour la clientele au Canada) Votre r6frig6rateur est garanti contre tout defaut de materiau et de fabrication. 0e que cette Dur6e de garantie Pieces Main-d'oeuvre _larantiecouvre (a partir de la R6paration ou date d'achat) remplacement au choix de Mabe 0ompresseur GEProfile : Dix (10) ans GEProfile : Dix (10) ans...
- Page 51 Feuillet de donn#es relatives a la performance CartoucheGSWFdu systeme de Filtrationd'eau GE SmartWater Ce systeme a ere essaye se/on les normesNSF/ANS/ 42/53pour une reduction dessubstances enumerees ci-dessous. La concentration des substances indiqueesdans I'oau qui entre dans le systeme a ete reduite a une concentration inferieuro ou egale g_ la limite permise pour I'eau quittantle systeme, telle que precisee par la normeNSF/ANS/ 42/53.*...
- Page 52 Prolongation de garantie www.electromenagersge.ca Achetez un c(mtrat d'entretien GE avant que votre garantie n'expire et b&_ficiez (t' un rabais substantiel. Ainsi le service apr&s-vente GE sera tot{jours 1_apr&s expiration de la garande. Visitez notre site Web ou appelez-nous au 1.888.261.2133.
- Page 53 /MPORTANTE /NFORMACION BE SEGUR/DAB. tEA TODAS LASINSTRUCCIONES A NTESBESU USO. Use este aparato sSIo con el fin para el cual fue disefiado come se describe en este Manual del propietario, PRECAUCIONES DESEGURIDAD AI usar aparatos el#ctricos, se deben seguir precauciones b#sicas de seguridad, incluyendo las siguientes: iiiii% ,,_ Mantenga...
-
Page 54: Como Conectar Laelectricidad
/MPORTANTE /NFORMAC/ON DESEGURIDAD. LEATODAS /.ASINSTRUCC/ONES A NTESDESU USO. A iABVER COMO CONECTAR LAELECTRICIDAD Bajo ninguna circunstancia, no corte ni retire la tercera pata (conexi6n a fierra) del cable de electricidad. Por seguridad personal, este aparato debe estar correctamente conectado a tierra. El cable el_ctrico de este aparato est_ provisto... - Page 55 Sobre los contro/esde/refrigerador. C Ap,,a,oe,.oom Nive/esde loscontro/es Inicialmente, fije el o los controles del refrigerador en 5 (algunos modelos solamente tienen un control). Permita que transcurran 24 horas para que la temperatura se estabilice. Es posible que sean necesarios varios ajustes. Ajuste el o los controles con un incremento a la vez y permita que transcurran...
- Page 56 Sobrelos estantes y compartimientos. No todas /as caracterfsticas est_n presentes en todos los modelos, Reorganizaci#n de los estantes Compartimiento de/refrigerador Pare rot|ratio: Pare reemplazarlo: Incline el estante en la parte del flente. i .b_la.j..__, Mientr_s indina el estante hacia en la parte posterior del esmnte Levante el estante...
- Page 57 GEPpp/iance&com Compartimiento inclinado de/congelador (en algunosmodelos) Presione el botdn a medida que inclina Para roemp/azarlo: Inserte los exuemos el compartimiento. compartimiento en los soportes m_deados en la puerto y empt0e hacia aNgo. Este se Para retirar/o: Sostcnga los costados del ajusmn_ en su lugar compartimiento y lev_ntelo, luego h_lelo.
- Page 58 Moflelo tel Braze de Ilenaflo Accessorio de filtro de agua E1filtro de agm _ una o[×idn atm cost() ad[dona| y estfi NON: LaE_nica t uberbplbstica aprobade d e GE esla clue viene provista conlos kitsde tuberbparaelrefrigerador SmartConnect _ de (lisp()nible con su pI'()veedor Eslx_dJique d ilfimero X_?,97X0214.
- Page 59 Seqlle Mantenga el exterior limpio, i_fmpielo cos tm pmi{} ligeramente Pal_l obtener los meiores resultados, GE le recomienda el usa del tmmedecido con cera de cocina pa];l electrodom_sticos o detergente t)roducto de limi)ie/;l pars score inoxidable...
- Page 60 Comoreemplazar /as bombi//as. Girar el control a la posici6n 0 (apagado) no elimina la corriente en el circuito de luces. Compartimiento dei refrigerador--tuz superior A PRECAUCiON: Las_o,_i//as @Reempl_cela co...a bo,_,b_lla electrodom_sticos del mismo o de podrfan estarcalientes, inf..riot volt;tie. Desconecte el refligerador.
-
Page 61: Antes De Iniciar
I str Modelo 18 Si tienepreguntas, /lamea1800.GECARES (800.432.2737) o bien visite pSgina \_b: GEApp/iances.com nuesmt AREA ANTES DE INICIAR Pemfim el siguiente espacio para una fiicil insm/acidn, Lea est_ instrucciones completa y cuidadosamente. apropiada circulacidn del aire y conexiones de plomerfa •... - Page 62 A1 conectar su refriger'ador aun Sistema de Agua de ()smosis Invcrsa de GE, la finica instalaciGn aproba&t es con un kit de entre 20 y ] 20 p.s.i. (] .4-8.] bar). ()smosis lmvrsa de GE. Palvl otros sismmas de agua de 6smosis inve>a, siga las instrucciones...
-
Page 63: Instrucciones Para La Instalaci6N
Per%re un orificio de 1/4" en ]a tuberfa el refligerador SmartConnect'" de GE, inserte extremo moldeado de la tuberfa en la v4lvula de cierre de] agua (incluso si esbl usando y apriete... - Page 64 'Tubode SmartConnect _ Para tubeffa de pl_stico de un kit de tubeffa para el refligerador SmartConnect'" de GE, inserte el extremo moldeado de la tuberfa en la %l_lfla de cierre y apriete [] ABRA LA LLAVE DEL AGUA...
- Page 65 Instrucciones para la instalaci6n INICIE LA MAQUINA DE HIELOS [] CONECTE EL REFRIGERADOR En los modelos de interruptor de energfa, Organice el cable de la tuber_a de manera que no vibre fije el interruptor de la m5quina de hielos en contra la parte trasera...
-
Page 66: Instrucciones Para La Instalacion
Instrucciones para la instalacion coMo INVERTIR EL VAIVEN DE LA PUERTA (CONT.) [_ RETIRE LA PUERTA DEL TRASLADE LA BISAGRA CONGELADOR SUPERIOR A LA IZQUIERDA Intercambie la bisagm y los tornillos de la parte superior derecha con los tornillos de la parm superior izquierda del gabinem. - Page 67 Instrucciones para la instalaci6n [] TRASLADE EL SOPORTE DE LA TRASLADE LA iViANIJA DE LA BISAGRA CENTRAL HACIA LA PUERTA DEL REFRIGERADOR IZQUIERDA HACIA LA DERECHA Retire el soporte de la bisagra central retirando Manij a plfistica: tres tornillos Torx®. O Redre el bot6n la tapa apa/ancando...
-
Page 68: Como Invertir El Vaiven De La Puerta
Instrucciones para la instalaci6n COMO INVERTIR EL VAIVEN DE LA PUERTA ® TRASLADE LA MANIJA DE LA TRASLADE LA MANIJA DE LA PUERTA DEL REFRIGERADOR PUERTA DEL CONGELADOR HAClA LA DERECHA (CONT.) LA DERECHA Traslade el bot6n Manij a plfistica: O Retire los tornillos tapa... - Page 69 Instrucciones para la instalacion [] TRASLADE LA MANIJA DE LA [] VUELVA A COLGAR LA PUERTA PUERTA DEL CONGELADOR DEL REFRIGERADOR LA DERECHA (CONT.} g_)e la puerto del refligerador al sqjemdor de la bisagra infb.,Jor Manija plastica: Alinee la manija con el agqjero tornillo en la parte...
- Page 70 Sonidosnorma/es de operaci n. Los refrigeradores m#s nuevos producen sonidos diferentes a los modelos m#s antiguos. Los refrigeradores modemos tienen m#s funciones y usan tecnologfa m#s reciente, tlsted escucha /o que yo escucho? Estos sonidos son normales. HMMMM., • WHIR. WHOOSH,,,, [] E1 nuevo compresor...
- Page 71 Antes de/lamer a so/icitar servicio... CUpp.ances.com Consejos pare la soluci6n de problemas iAhorre fiempo y dinero/ Revise las tables en /as siguientes p@inas primero y quiz#s no necesite Ilamar a soficitar el servicio. Posibles causes Qu# hacer Se abre la puertadei Esto es normal si, despu6s •...
- Page 72 Antes de llamar a so/icitar servicio... Posibles causas Qu# hacer Cubospeque#os o Fdtro de ague tapado. = Reemplace el €attache del filtro con uno m_evo o huecos con el mp6n. ta maquina de hieios E1 interrupter de corriente • En los modelos de interrupter de energia, mueva...
- Page 73 GEPpp/iance&com Posibles causas Que hacer Motor de enfriamiento normal Aim caliente de/a parte de abaio de/refrigerador del flujo del aire. En el proceso de refrigeraci6n, es normal que salga calor de la parte inferior del refrigerador. Algunas cubiertas de piso son sensibles se decolorar__n ante estas temperaturas...
- Page 74 Antesde//amar a so/icitar semicio... Consejos para la soluci6n de problemas Posibles causas Qu# hacer El dispensador de agua * Vea Instalar la linea de agua. Suministro de agua nO fU#CiOBa apagado o no conectado. Ffltro de agua tapado. • Reemplace el cartucho del filtro o remueve el fi|tro...
- Page 75 Nota$. GEPpp/iances.com...
- Page 76 Notas.
- Page 77 Estados Unidos. Si el producto est# situado en un #rea que no dispone de servicio per parte de un proveedor de servicio autorizado de GE,podria tener que hacerse cargo de los costes de envio o bien podrfa soficit#rsele que fleve el producto a una centre de servicio de GE autorizado para realizar la reparaciSn.
- Page 78 Hojade Datosde Funcionamiento SistemadeFi/traci6nGESmartWater Cartucho GSWF Este sistema se ha sometido a/as pmebas NSF/ANS/ 42/53a fin de reducir las sustancias presentadasa continuation. Se redujo la concentraci6nde/as sustancias indicadasen el agua que ingresanen el sistema a tunaconcentrationmenor o igua/al limite permitido para el agua que sale de/sistema, comose especifica on NSF/ANS/42/53._ 'Factores de 100%incorporados para la utilizaciSn no medida) Estmldar No.
- Page 79 Soliciteunareparaci6n aEPppliances.com E1 servicio de expertos GE est_i a mn s61o un paso de su puerto. [Entre en lfnea y solicite su reparacidn cuando le venga bien cualquier dfa del afio[ O llame al 800.GE.CARES (800.432.2737)
-
Page 80: Consumer Support
_. theus: www.Hotpointcom Expert GE repair service is only one step away flom your door Get on4ine and schedule your service at your c( nvemence 24 hours any day of the year! Or call 800.GE.CARES (800.432.2737) during nomml business hom_.
Need help?
Do you have a question about the GTH18DCXALWW and is the answer not in the manual?
Questions and answers