Table of Contents
Advertisement
Available languages
Available languages
Operator's
Manual
M
2-Cycle
Electric Start Capable
BUSHWACKER_
BRUSHCUTTER
Model No. 316.715860
U_F_VABLE
STArTinG
EA $ E _
CAUTION:
Before
using this product,
read this manual
and follow
all its Safety
Rules and Operating
instructions.
,, SAFETY
* ASSEMBLY
* OPERATION
* MAINTENANCE
* PARTS LIST
* ESPANOL, R 19
Sears Brands
Management
Corporation,
Hoffman
Estates,
IL 60179 U.S.A.
Visit our website:
www.craftsman.com
769-07303 P00
12/11
Advertisement
Table of Contents

Related Manuals for Craftsman Speed start 316.715860


Summary of Contents for Craftsman Speed start 316.715860
- Page 1 * MAINTENANCE read this manual and follow all its Safety * PARTS LIST Rules and Operating instructions. * ESPANOL, R 19 Sears Brands Management Corporation, Hoffman Estates, IL 60179 U.S.A. Visit our website: www.craftsman.com 769-07303 P00 12/11...
- Page 2 TABLE OFCONTENTS Safety..........Warranty ..........Know Your U nit........Specifications ......... Assembly ..........OilandFuel ........... Starting a nd Stopping ........Operation ..........Maintenance ......... Cleaning andStorage ........Speed S tart Accessory ....... Troubleshooting ........Repair Protection Agreements ......
- Page 3 • iMPORTANT SAFETY iNSTRUCTiONS READ ALL iNSTRUCTiONS BEFORE OPERATING The blade shield must always be in place while operating the unit. This unit has a clutch. The blade remains stationary when the WARNING: When using the unit, all safety rules must be engine is idling.
- Page 4 OTHER SAFETY WARNINGS ,i, Do not sharpen the blade. Sharpening the blade can cause the blade tip to break off while in use. This can result in severe Never store the unit with fuel in the tank, inside a building where personal injury.
- Page 5 This additional coverage does not apply to inner trimmer shaft components. For warranty coverage details to obtain free repair or replacement, visit the web site: www.craftsman.com This warranty covers ONLY defects in material and workmanship.
-
Page 6: Product View
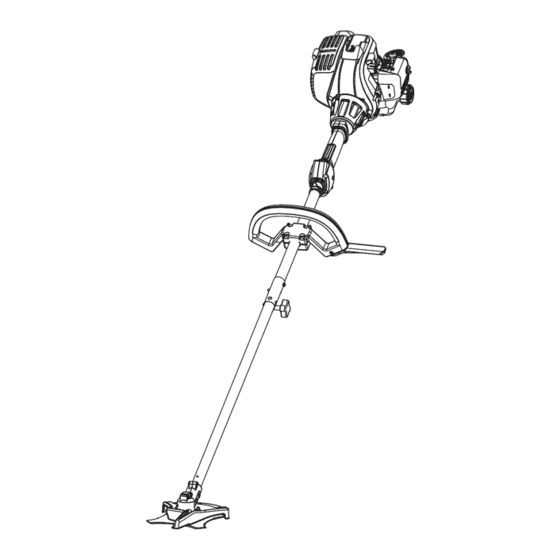
APPLiCATiONS Asabrushcutter: • Cutting w eeds a ndlight b rush upto1/2inchindiameter Other o ptional accessories may beused withthisunit. Spark Plug Choke Lever Throttle Lock-Out Starter Rope Grip ASSEMBLY TOOLS REQUIRED: On/Off Switch • Medium flat-head screwdriver or T-20 Torx® screwdriver Filter Support Fitting Large flat-head screwdriver... -
Page 7: Assembly
iNSTALLiNG AND ADJUSTING THE HANDLE Barrier Bar Screw_ Installing the Barrier Bar Handle 1. Align the two pegs on the barrier bar with the two holes in the handle (Fig. 1). 2. Press the barrier bar into the handle until the barrier bar snaps into place. - Page 8 OPERATING THE CONVERTIBLE COUPLER SYSTEM 90° Edging Hole (Trimmer Only) damage to the unit, shut the unit off before removing or [__J WARNING: To avoid serious personal injury and installing an attachment. NOTE: To make installing or removing the attachment easier, place the unit on the ground or on a work bench.
-
Page 9: Oil And Fuel
FUELING THE UNiT OiL AND FUEL MiXiNG iNSTRUCTiONS The use of old and/or improperly mixed fuel is the most common cause WARNING: Gasoline is extremely flammable. Ignited of performance problems. Use only fresh, clean unleaded gasoline. vapors may explode. Always stop the engine and allow it Follow the instructions carefully for the proper gasoline/oil mixture. -
Page 10: Starting And Stopping
outdoor area. Carbon monoxide exhaust fumes can be I_lib I WARNING: lethal in a confined area. Operate this unit only in a well-ventilated serious injury, the operator and the unit must be in a stable [__J ARNING: Avoid accidentally starting the unit. To avoid I position when pulling the starter rope (Fig. - Page 11 i!lllIi!!!:!!ilii!!!i]i! i i ii!il!!!!i!Ii!i iiiii!t!iiii !!!! iii 11i!i!i!ii!l!iiilll NOTE: This unit can use a Speed Start Accessory! Please refer to the Speed Start accessory operator's manual for the proper use of this feature. (Items Sold Separately! Refer to the Speed Start Accessory section of this manual for more information about these Speed Start accessories.)
- Page 12 HOLDING THE UNiT he io0, haod,'ootaod body protection to reduce the risk of injury when operating this unit. • Stand in the operating position (Fig. 13). • Hold the shaft grip with the right hand. Keep the right arm slightly bent. Hold the handle with the left hand.
- Page 13 WARNING: To prevent serious injury, never perform maintenance or repairs while the unit is running. Always allow the unit to cool before servicing or repairing the unit. Disconnect the spark plug wire to prevent the unit from starting accidentally. MAINTENANCE SCHEDULE Shaft Bushing Hole...
- Page 14 Installing t heBlade 1. Put t heblade ontheoutput s haft b ushing (Fig. 1 5). M ake sure theblade iscentered onthepilotstep (Fig. 1 6). Theblade should sitflatagainst theoutput s haft b ushing. Blade and the blade may fly off, possibly causing serious ARNING"...
- Page 15 ADJUSTING THE iDLE SPEED [die Speed Screw adjustments. Wear protective clothing and observe all WARNIN6: The cutting head may spin during idle speed[ safety nstruct ons to prevent ser ous persona njury, NOTE: Careless adjustments can seriously damage the unit. A Sears or other qualified service dealer should make carburetor adjustments.
- Page 16 NOTE: Do not use fuel that has been stored for more than 30 days. Dispose of old fuel according to federal, state and local regulations. This unit can be started with an optional Speed Start accessory (items sold separately). Please contact your local Craftsman retailer, call 1-800-4-MY-HOME® or visit www.craftsman.com for more information.
-
Page 17: Troubleshooting
PROBLEM SOLUTION The primer bulb was not pressed enough Press the primer bulb 10 times or until fuel is visible The fuel is old (over 30 days) and/or improperly mixed Drain the fuel tank and add fresh, properly mixed fuel The fuel is old (over 30 days) and/or improperly mixed Drain the fuel tank and add fresh, properly mixed fuel The fuel is old (over 30 days) and/or improperly mixed... - Page 18 Congratulations on making a smart purchase. Your new Craftsman@ product is designed and manufactured for years of dependable operation. But like all products, it may require repair from time to time. That's when having a Repair Protection Agreement can save you money and aggravation.
- Page 19 OPERACION producto lea este manual y siga todas o MANTENIMIENTO las reglas de seguridad e instrucciones LISTA DE PIEZAS de operaci6n. Sears Brands Management Corporation, Hoffman Estates, IL 60179 U.S.A. Visite nuestro sitio web: www.craftsman.com 769-07303 P00 12/11...
- Page 20 TABLA DE CONTENIDO Seguridad ........... Garantia ..........Conozca su unidad ........Especificaciones ........Ensamblaje .......... Aceite y combustible ........Arranque y parada ........Operaci6n ........... Mantenimiento ........Limpieza y almacenamiento ......Accesorio Speed Start ........ Localizaci6n y soluci6n de problemas .....
- Page 21 • INSTRUCCIONES DE SEGURIDAD IMPORTANTES • LEA TODAS LAS INSTRUCCIONES ANTES DE OPERAR AL OPERAR LA UNIDAD LA UNIDAD Lleve puestas gafas o lentes de seguridad que cumplan las normas actuales ANSI y esten marcados como tales. Use siempre protecci6n para los oidos al operar esta unidad. Si la operaci6n las normas de seguridad.
- Page 22 • NUNCA c orte cuando l acuchilla e ste a30pulgadas (76cm)o OTRAS ADVERTENCIAS DE SEGURIDAD mas porencima d elnivel d elatierra. No guarde nunca la unidad con combustible en el tanque ni Sepuede producir unempuje d elacuchilla c uando e ntra en dentro de una edificaci6n en la que los gases puedan ponerse contacto conunobjeto sinoIocorta deinmediato.
- Page 23 Para conocer los detaHes de la cobertura de garantia para la reparaci6n o reemplazo gratuitos, visite el sitio web: www.craftsman.com Esta garantia cubre SOLAMENTE defectos de materiales o mano de obra. La cobertura de garantia NO incluye: •...
- Page 24 usos Como desbrozadora: Cortar malezas y arbustos peque_os de hasta V2pulgada de Bujia de encendido diametro Palanca Silenciador obturador Con esta unidad se pueden utilizar otros accesorios opcionales, Traba del regulador Agarre de la cuerda arranque Interruptor de HERRAMIENTAS NECESARIAS PARA Encendido / Apagado EL ENSAMBLAJE:...
- Page 25 INSTALACION Y AJUSTE DEL MANGO Tornillode la barra de_ C6mo instalar la barra de barrera Handle 1. Alinee los dos agujeros en la barra de barrera con los dosorificios en el mango (Fig. 1). 2. Presione la barra de barrera en el mango hasta que la barra de barrera caiga en su lugar.
- Page 26 OPERAR EL SISTEMA DE ACOPLADOR CONVERTIBLE Orificio de 90 ° para bordeadora (solo recortadora) y dados a la unidad, apague la unidad antes de quitar o [__J DVERTENClA: Para evitar lesiones personales grave 1 instalar cualquier accesorio. NOTA: Para facilitar la instalaci6n o remoci6n de un accesorio, coloque la unidad sobre el suelo o sobre un banco de trabajo.
- Page 27 Mezclar el combustible INSTRUCCIONES PARA MEZCLAR EL ACEITE Y EL COMBUSTIBLE NOTA: Esta unidad trae un frasco de 3.2 onzas de aceite para motor de 2 tiempos. Para que la mezcla de combustible descrita El uso de un combustible viejo y/o mal mezclado es la causa mas anteriormente sea la correcta, echele la botella completa a un comQn de problemas de funcionamiento.
- Page 28 Apagado (O) / Parada Encendido ( I ) / Arranque a.rea exterior bien ventilada. El mon6xido de carbono de _ADVERTENClA: Opere esta unidad solamente en un los gases de escape puede ser letal en un Area confinada. accidente. A fin de evitar lesiones graves, el operador y la unidad deben estar en una posici6n estable al tirar de la I ADVERTENOIA: Evite arrancar la unidad por...
- Page 29 NOTA: En esta unidad se puede usar un accesorio Speed Start Para utilizar correctamente este dispositivo, consulte el manual del operador del accesorio Speed Start (iLos accesorios se venden por separado! Para informarse mas sobre los accesorios Speed Start vaya a la secci6n Accesorio Speed Start este manual.) INSTRUCCIONES DE ARRANQUE...
- Page 30 SUJETAR LA UNIDAD e ta uoidad."eve sie 0re puesta protecci6n para los ojos, oidos, pies y cuerpo a fin de reducir el riesgo de lesiones. • Parese en la posici6n de operaci6n (Fig. 13). Sostenga la empu_adura del eje con la mano derecha. Mantenga el brazo derecho ligeramente flexionado.
- Page 31 ADVERTENClA: Para evitar lesiones graves, no haga nunca ningQn mantenimiento ni reparaci6n con la unidad funcionando. Siempre deje que la unidad se enfrie antes de darle mantenimiento o repararla. Desconecte el cable de la bujia para evitar que la unidad arranque por accidente. PLAN DE MANTENIMIENTO Orificio del buje del eje...
- Page 32 C6mo instalar la cuchilla RetCh de la cuchiUa Coloque la cuchilla en el buje del eje de salida (Fig. 15). AsegQrese de que la cuchilla este centrada en el paso del piloto (Fig. 16). La cuchilla debe asentarse de forma plana contra el Cuchilla buje del eje de salida.
- Page 33 AJUSTAR LA VELOCIDAD DE MARCHA EN VACiO Tornillo de rnarcha en vacfo ADVERTENClA: El cabezal de corte puede girar durante los ajustes de marcha en vacio. Use ropa de protecci6n y observe todas las instrucciones de seguridad para evitar lesiones personales graves. NOTA: Los ajustes negligentes pueden dafiar seriamente la unidad.
- Page 34 Esta unidad se puede arrancar con un accesorio opcional Speed Start (los accesorios se venden por separado). Para mas informaci6n, comuniquese con su distribuidor local Craftsman Ilamando al 1-800-4-MY-HOME® o visite www.craftsman.com. NQmero del articulo Descripci6n 316.85951 ....Arrancador de potencia electrico 316.85952 ....Arrancador...
- Page 35 PROBLEMA SOLUCION La pera del cebador no se oprimi6 Io suficiente Oprima la pera del cebador 10 veces o hasta que se vea el combustible El combustible esta viejo (tiene mas de 30 dias) y/o mal mezclado Vacie el tanque de combustible y eche combustible nuevo bien mezclado El combustible esta viejo (tiene mas de 30 dias) y/o mal mezclado Vacie el tanque de combustible y eche combustible nuevo bien mezclado...
- Page 36 Felicitaciones por haber hecho una compra inteligente. Su nuevo producto Craftsman@ fue dise_ado y fabricado con vistas a una operaci6n confiable por a_os. Pero como todos los productos, es posible que sea necesario repararlo alguna vez. Ahi es cuando tener un Convenio de Protecci6n de Reparacidn puede ahorrarle dinero y problemas.
- Page 38 REPLACEMENT PARTS - MODEL 316.715860 ELECTRIC START CAPABLE 2-CYCLE GAS TRIMMER Item Part No. Item Part No. Description Description 753-06829 791-181930 Tank Screw Rear Cover Assembly (includes 2 & 3) 791-181862 Starter Screw 753-06857 Fuel Cap 753-06244 791-182366 Starter Assembly Guard (includes 2) U-Shaped Nut 753-06854 753-05877...
- Page 39 REPLACEMENT PARTS - MODEL 316.715860 ELECTRIC START CAPABLE 2-CYCLE GAS TRIMMER item Part No. Description 753-06860 Throttle Housing Assembly (includes 2-5) 753-06861 Throttle Trigger 753-05007 Spring 753-06862 Throttle Lock-out 791-182405 Switch 791-610327 Shoulder Strap Clip 753-04236 Upper Drive Shaft Housing Assembly 753-05008 D-Handle Assembly (includes 9 &...
- Page 40 Your Home For troubleshooting, product manuals and expert advice: managemylife www.managernylife.com For repair - in your home - of all major brand appliances, lawn and garden equipment, or heating and cooling systems, no matter who made it, no matter who sold it! For the replacement parts, accessories owner's...
Need help?
Do you have a question about the Speed start 316.715860 and is the answer not in the manual?
Questions and answers