Table of Contents
Advertisement
Operator's Manuan
_;_,
: _Z_:_o_v
_
20.0.-VOLT LITHIUM=aON CORDLESS
7 l/4°ino CmRCULAR SAW
with LASER TRAC
TM
Model No.
320.28102
WARNING:
To reduce
the risk of injury, the user
must read and understand
the operator's manual before
using this product.
"WARRANTY
o SAFETY
° ASSEMBLY
o DESCRIPTION
° OPERATION
o MAINTENANCE
CHARGE
BATTERY
BEFORE
FIRST
USE
Sears, Roebuck and Co., Hoffman Estates, IL 60179 USA
Visit the Craftsman web page: www_sears.com/craftsman
Save this rnanuaa for future
reference
US
Advertisement
Table of Contents

Related Manuals for Craftsman 320.28102


Summary of Contents for Craftsman 320.28102
- Page 1 CHARGE BATTERY the operator's manual before BEFORE FIRST using this product. Sears, Roebuck and Co., Hoffman Estates, IL 60179 USA Visit the Craftsman web page: www_sears.com/craftsman Save this rnanuaa for future reference...
- Page 2 RETURN IT TO THE NEAREST SEARS STORE OR OTHER CRAFTSMAN OUTLET IN THE UNITED STATES for free replacement during the first year from the date of purchase, and for free repair...
- Page 3 Thepurpose ofsafetysymbols is toattract y ourattention topossible dangers. T hesafety symbols andthe explanations withthemdeserve yourcareful a ttention andunderstanding.. symbol w arnings DONOTby themselves e liminate any danger. The instructions and warnings they give are no substitutes for proper accident prevention measures. _WARNH_G: BE SURE to read and understand all safety alert symbols such as "DANGER",...
- Page 4 Some of these following symbols may be used on this tool. Please study them and learn their meaning, Proper interpretation of these symbols wilt allow you to operate the tool better and safer, DESEGNATION/EXPLANA'FBOH SYMBOL NAME Volts Voltage Current Amperes Hertz Frequency (cycles per second) Power...
- Page 5 ,_WARNIING: READ AND UNDERSTAND ALL INSTRUCTIONS. Failure to follow all instructions listed below may result in electric shock, fire andlor serious personal injury. The term "power tool" in all of the warnings listed below refer to mains-operated (corded) power tools or battery-operated (cordless) power tools.
- Page 6 _WARNaNG: READ AND UNDERSTAND ALL INSTRUCTIONS. Failure to follow all instructions listed below may result in electric shock, fire and/or serious personal injury. The term "power tool" in all of the warnings listed below refer to mains-operated (corded) power tools or battery-operated (cordless) power tools.
- Page 7 Dress properly. Do not wear loose clothing or jewelry. Keep your hair, clothing and gloves away from moving parts. Loose clothes, jewelry or long hair can be caught in moving parts [] if devices are provided for the connection of dust extraction and collection facilities, ensure these are connected...
- Page 8 SERVICE [] Have your power tool serviced by a qualified repair person using only identical replacement parts. This will ensure that the safety of the power tool is maintained_ [] When servicing a power tool, use only identical replacement parts. Follow instructions in the Maintenance section of this manual.
- Page 9 DANGER! Keep hands away from cutting area and the blade. Keep your second hand on auxiliary handle or motor housing. If both hands are holding the saw, they cannot be cut by the blade° I_ Do not reach underneath the workpiece. The guard cannot protect you from the blade below the workpiece.
- Page 10 Use extra caution when making a "plunge cut" into existing walls or other blind areas. The protruding blade may cut objects that can cause kickback_ [] Check lower guard for proper closing before each use. Do not operate saw if lower guard does not move freely and close instantly.
- Page 11 [] Donot abusecord or charger.Neverusethecordto carrythecharger. D onotpullthe charger c ordratherthanthe plugwhendisconnecting f romreceptacle,, Damage'to t he cord or charger could occur and create an electnc shock hazard Replace damaged cords immediately, [] Make sure cord is located so that it will not be stepped on, tripped over, come in contact with sharp edges or moving parts or otherwise subjected to damage or stress.
- Page 12 [] SAVE THESEINSTRUCTIONS. Thismanual c ontains important s afetyandoperating instructions f orbatterycharger 3 20..25709 andbattery pack32025708. [] Beforeusing batterycharger,readallinstructions a ndcautionary markings onbattery charger, b atteryandproduct u singbattery_ [] CAUTION_ Toreduce theriskofinjury,charge onlylithium-ion rechargeable b atter[eso Other typesofbatteries mayburst,causingpersonal injuryor damage_ _WARN ! N G: Use of this product can generate dust containing...
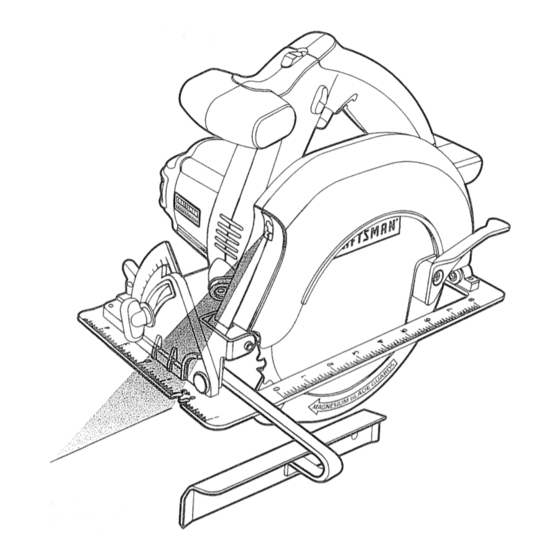
- Page 13 Fig. t Lock-Off LED Worklight/ Trigger Laser Switch Button Switch Rear Handle Front Handle Upper Laser Blade Guard Battery LEDAperture "\\.\\\ Worklight Lower Blade Guard Lever Bevel Scale _\\ Edge Guide Lock Knob Blade Bevel Adjustment Knob Base Crosscut Rip Ruler Ruler Blade Screw 45 °...
- Page 14 7 1/4-in.. BladeDiameter 20VoltDC Motor 2 3/8-in. Cutting Depth at 90° (0°) 1 5!8-in. Cutting Depth at 45° Bevel Adjustable 00-50 ° 25OO RPM NoLoadSpeed Laser ClassIlia650nmMax_ output: _ <25 mW 7.76Ib& SawWeight ( without b attery) Lithiumqon Battery T ype 20,0VoltDC Battery Voltage Charger i nput...
- Page 15 SPINDLE LOCK BUTTON The spindle lock button allows you to secure the blade when turning the blade screw,, LOCK-OFF BUTTON The lock-off button reduces the possibility of accidental starting The button can be used on either the left or right of the trigger switch, DEPTH OF CUT ADJUSTMENT LEVER The depth of cut adjustment lever adjusts the depth of cut a maximum of 0 to 2 3/8-ino at 90 °...
- Page 16 POWER BAR [] This Lithium-Ion battery pack is equipped with a POWER BAR which is used to display the battery pack's remaining run time_ Press the POWER BAR button to display the LED lights. The LED lights will stay lit for approximately 4 seconds.
- Page 17 that the batteries are near the end of their usable life and must be replaced. OTE: A significantly reduced run time after fully charging the battery pack indicates COLD WEATHER OPERATION [] This Lithium-Ion battery pack will provide optimal performance in temperatures between 32°F (0°C) and 104°F (40°C)., When the battery pack is very cold, it may "pulse"...
- Page 18 LED FUNCTIONS OF CHARGER (Fig. 4) F_g. 4 BATTERY GREEN LED INDICATOR ACTIC PACK Charging will begin when Hot/Cold battery returns to (SEE MANUAL) HI/LO TEMP. battery 32°F (0°C).t0 , (40°0) Battery pack ol charger is Defective Flashing BATTERY DEFECTIVE defective Charging Flashing...
- Page 19 WALL-MOUNT CAPABLE (Fig,, 5) Fig. 5 The charger has a key-hole hanging feature for convenient storage. Screws should 3-5/32-in. be installed so that the center distance is 3-5/32-in. Use appropriate wail fasteners to accommodate the combined weight of the charger and battery pack. (approximately 3.5 lbs_ combined) c::=®r -•...
- Page 20 BLADE GUARD SYSTEM (Fig 7) Fig. 7 Lower blade guard is in up The lower blade guard attached to your saw position when making a cut is there for your protection and safety, it should never be altered for any reason,, If it becomes damaged or begins to return slow or sluggish, do not operate the saw until the damage has been repaired or replaced.
- Page 21 To guard against kickback, avoid Fig, 9 WRONG! dangerous practices such as the following: Setting blade depth incorrectly° [] Sawing into knots or nails in the workpiece,, [] Twisting the blade white making a cut. [] Making a cut with a dull, gummed up or improperly set blade, [] Supporting the workpiece incorrectly, [] Forcing a cut,...
- Page 22 LOCK-OFF BUTTON (Fig_ 12) Fig. t2 Trigger The lock-off button reduces the possibility switch of accidental starting The Iock-qff button Lock-off is located on the handle above the trigger button switch, The lock-off button must be depressed before you pull the trigger switch. from either the left or right side.
- Page 23 _WAR_IIING: LASER LIGHT. LASER RADIATION° Avoid Direct Eye Exposure, DO NOT stare into beam. Only turn laser beam on when the saw is on the workpiece. The laser is factory installed and aligned. Class Ilia laser. NOTE: Make a trial cut on a piece of scrap material to ensure the laser is aligned properly. USING THE LASER TRAC LASER GUIDE Fig, t4...
- Page 24 OPERATING THE SAW (Fig. 17-18) It is important to understand the correct method for operating the saw. Refer to the figures in this section to learn the correct and incorrect ways for handling the saw. A_.DANGER: When lifting the saw from the workpiece, the blade is exposed on the underside of the saw until the lower...
- Page 25 NOTE: The distance from the line of cut to the guideline is the amount you should offset the guide. MAKING CROSS CUTS AND RIP CUTS (Fig, 19-t9a) When making a cross cut or rip cut, align your line of cut with the left side of the notch by the 0 ° indicator°...
- Page 26 USING THE EDGE GUIDE (Fig_ 20-21) F_g, 20 i_'":i Always use a guide when making long or wide rip cuts with your saw. You can use either a straight edge or use the edge guide that was Edge guide !Edge guide included with the saw°...
- Page 27 TO ADJUST BEVEL SETTING (Fig° 22) Bevel [] Remove the battery pack from the saw. indicator _!N,O, RNII_G: Always remove the battery Bevel pack from the tool when assembling parts, adjustment changing blade and making adjustments. knob Failure to obey this warning could cause serious personal injury.
- Page 28 0 ° BEVEL STOP Fig= 24 The saw has a 0 ° bevel stop that has been factory adjusted to assure 0 ° angle of the saw Carpenter's square blade when making 90 ° cuts., TO CHECK 0 ° BEVEL STOP (Fig° 24) [] Remove battery pack from the saw, Blade _WARN,NG=...
- Page 29 [] Hold the lower blade guard by the lever_ [] Rest the front of the base flat against the workpiece with the rear of the handle raised so the blade does not touch the workpiece [] Start the saw and let the blade reach full speed [] Guide the saw into the workpiece and make the cut.
- Page 30 LUBRICATION All of the bearings in this tool are lubricated with a sufficient amount of high-grade lubricant for the life of the tool under normal operating conditions+. Therefore, no further lubrication is required. CHANGING THE BLADE (Fig,. 27) _WARNgNG- A 7 114-in. blade is the maximum blade capacity of the saw.
- Page 31 I_ Put a drop of good-quality machine oil onto the inner bushing washer and outer blade washer where they will contact the blade (see Fig, 27),. [] Place a new saw blade inside the lower blade guard, onto the spindle shaft and against the inner bushing washer., NOTE: The teeth of the blade should point upward at the front of the saw [] Replace outer blade washer,...
- Page 32 20.0 VOLT LiTHIUM-ION CORDLESS 7 1/4-in. CIRCULAR MODEL NUMBER 320.28102...
- Page 33 20.0 VOLT LtTHIUM.-ION CORDLESS 7 1/4-in. CmRCULAR SAW MODEL NUMBER 320.28102 The Model Number wilt be found on the Nameplate attached to the motor housing on saw, Always mention the Model Number in alt correspondence regarding your tool .SSCR,PT,O. QTy. 5610040000 Tapping Screw 3320420000...
- Page 34 20.0 VOLT LITHIUM-ION CORDLESS 7 1/4-in. CIRCULAR MODEL NUMBER 320.28102 The Model Number wil! be found on the Nameplate attached to the motor housing on saw Always mention the Model Number in all correspondence regarding your tool "T M"O" I pARTs N o.
- Page 36 Your Home For repair-in your home-of all major brand appliances, lawn and garden equipment, or heating and cooling systems, no matter who made it, no matter who sold it! For the replacement parts, accessories owner's manuals that you need to do-it-yourself. ii_ _;?,i}i _i For Sears professional installation of home appliances...
Need help?
Do you have a question about the 320.28102 and is the answer not in the manual?
Questions and answers