Table of Contents
Advertisement
Operator's Manual
ItenFT- .nN°l
9.5 Amp 13/4 Peak HP
Plunge Base Router
Model No.
320.17540
DOUBLE
tNSULATED
Z_ CAUTION
Read, understand and follow
all Safety Rules and Operating Instructions
In this Manual before using this product,
Sears, Roebuck and Co_
Hoffman
Estates, IL 60179 U°S°A.
Visit our Craftsman
webslta: www.craftsman.com
• WARRANTY
• SAFETY
* UNPACKING
* DESCRIPTION
• ASSEMBLY
• OPERATION
= ADJUSTMENTS
= MAINTENANCE
9/11/06
4pm
Advertisement
Table of Contents

Related Manuals for Craftsman 17540 - 9.5 Amp 1-3/4 HP Plunge Base Router


Summary of Contents for Craftsman 17540 - 9.5 Amp 1-3/4 HP Plunge Base Router
- Page 1 * UNPACKING all Safety Rules and Operating Instructions * DESCRIPTION In this Manual before using this product, • ASSEMBLY Sears, Roebuck and Co_ • OPERATION Hoffman Estates, IL 60179 U°S°A. = ADJUSTMENTS Visit our Craftsman webslta: www.craftsman.com = MAINTENANCE 9/11/06...
- Page 2 Sears Repair Parts Phone Numbers..............Back Cover ONE YEAR FULL WARRANTY ON CRAFTSMAN e PRODUCT Ill th+s Craftsman productfartsdue to a defect In matedar or workmanshipwithinone year from the date of purchase, RETURN IT TO THE NEAREST SEARS STORE OR PARTS...
- Page 3 ALWAYSwear safety goggles or safety glasses with side shield and a full-face shield when needed. We recommend a Wlde Vision Safety Mask for use over eyeglasses or standard safety glasses with side shletd, available at Sears Stores or other Craftsman Outlets,...
- Page 4 lL'i_tr;l i4--i,I lI r.-i-i;- ti 1-_ Z_ WARNING: BE SURE to read and understand etl Instruotlons In this meneel before using this router. Failure to follow all Instructions may result electric shock, fire and/or sertoua personal lnlury. WORK AREA SAFETY 1.
- Page 5 TOOL USE AND CARE SAFETY /_ WARNING: BE SURE to read and understand all Instructions before operating this muter. Failure to foliow all Instructions nsted below may result In electric shook, tire and/or serious personal Injury, !o ALWAYS use clamps or other practical ways to secure and support the workplace to a stable platform°...
- Page 6 ELECTRICAL SAFETY cont. 3. BEFORE plugg{ngIn the tool,BE SURE that the out]etvoltage supplied ts within the voltage marked on the tool'sdata plate DO NOT use "AC onI_ rated tools with a DC power supply. 4. AVOID body contact with grounded surfaces, such as pipes, redfr_tors,ranges and refrigerators.
- Page 7 SERVICE SAFETY 1,ifany pert ofthis router Is missing or should break, bend, or fall tn any way; or should any electrical component fall to perform properly: SHUT OFF the power switchand remove the router plug fromthe powersource and have the missing, damaged or felled pads replaced BEFORE resumingeperaUon_ 2, Tool service must be performed only at e Seers Parts and Repair Center.
- Page 8 SAFETY RULES FOR ROUTERS conL 13MAKE SURE the cutter bitIsnot I n oontsct with the workplace before the switch Is turned on.The bit must ALWAYS be running st fuU speed before contacting the workplace, 14_ KEEP HANDS CLEAR OF CUTTER BIT when motor Is running to prevent personal InIury, 15 PROVIDE CLEARANCE under workplece for router cutter bit when through-cuttieg_ 16., KEEP CUTTING PRESSURE CONSTANT_Do not ovsrIoed the motor.
- Page 9 L_ WARNING: Use of this tool can generate duet contBlnlng chemicals known to cause cancer, birth defects or other reproductive harm° Some examples of these chemicals are: . Lead from lead-based points, • Crystalline stiles from bricks end cement and other masonry producle. •Arsen{c and chromlumo from chemtca!lytreated lumber.
- Page 10 & Inspect the Items carefutFy to make sure that no breakage or damage has occurred during ahlpplng If any of the llama mentioned are missing, (refer to "PARTS LIST" IlIuslratlon on page 11), return the router to your nearest Sears store or Craftsman outlet to have the muter replaced.
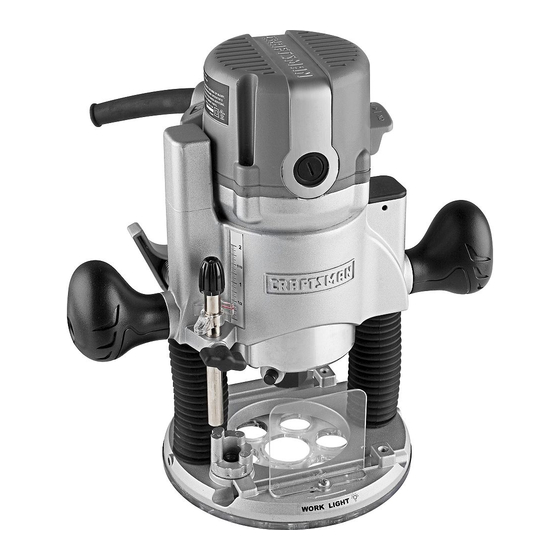
- Page 11 PARTS LIST ( Fig. 1) t. Router Motor InPlunge Base and v_V2._r_.Co_l_Nut Exttsctton Hood 2_ Sawdust 3, 2 Screws (for attaching Hood) 4_ 1/4-1n. Collar/Nut 5. Conet/Nut Wrench KNOWYOUR PLUNGE ROUTER (Fig. 2) I NOTE: Before effemptlng to use your router, familiarize yourself with all of the operating features and safety requirements, Your plungemuter haBa precrslon-bulft electricmotor and It shouldonEy be connected to e 120-volt,60-Hz AC ONLY power supply (normal householdcurrant),DO NOT operate...
- Page 12 I] :::b-_;11 _ II[e)_l';T_i KNOWYOUR PLUNGE ROUTER conL (Figo2) This Plunge Router has the following features: 1. Powerful,9.5 Amp Soft Start Motor develops 13/4Peak HP to handle most routing Jobs Single speed 2S 000 RPM (no-lsed speed) helps provide a quality finish in mostmatarlals 3.
- Page 13 " KNOWYOUR PLUNGE ROUTER conL (Fig, 2) Motor housingpmcIs_oo mlltedcast aluminum for exa_ fit Super-fine edJustrnsnt knob Plunge eub.b_e...
- Page 14 NOTE=The sub-base Installed on this router has an opening of t_14.lnches, To use cutting bits with a larger dlsmetsr, use s subbase with a larger opening, sold separately at Sears stores or other Craftsman outlets. Z_ WARNING: ALWAYS tum motor off and unplug router before maldng any adjustments or Installing sccessorfes.
- Page 15 INSTALLING AND REMOVING THE CUTTING BIT (Figs. 3, 4 and 4a) Fig° 4 --Bit Shank INSTALLING THE CUTTER BIT 1, Turn motoroff and unplugfrom power source. 2. Remove motor housingfrom plunge base. NOTE: See Instructions on removing and Installing the motor housing from the plunge base on page 17.
- Page 16 REMOVING THE CUTTER BIT (Figs. 3 end 4 see page 15) 1+ Turnmotor off and unp|ugfrom power source 2 Remove motor from plunge base 3+ Set the motorupsidedown on _tetop cap, with co!let/nutpolnl+ng up+ 4+ Press spindle+ockbutton to engage and lock the spindle shaft end colteVnut,(Rg, 3),, 5+ Place the wrench on thecotlet!nutand turn counter-clockwiseand loosen co_laVnut s[IghUy and remove cutterbit shank COL.LET/NUT...
- Page 17 Fig. 5 INSTALLING ROUTER MOTOR tN BASE (Rg, 5) 1, Turnmotoroffandunplug from power s ource, 2. Place plunge bass on fiat surface. 3_ With back ofplunge base facing you,open motor clamp (A) and make sure plunge action Is In "UP" poslt[on, w ith theplunge lock laver (B) locked down.
- Page 18 ADJUSTING DEPTH OF CUT the power source when you are assembling parts, making adjustments, Installing or removing toilets / nuts, cutter bite, cleaning or when it is not I _ WARNING: in use. Disconnecting the router will prevent occidental ",'our router should NEVER turned ON or be connected to starting, which could cause serlous personal lnjury_ PLUNGING ACTION (Fig.
- Page 19 DEPTH-STOP ROD A ND DEPTH-STOP TURRET (Figs,, 7and S) The Depth-Stop Rod and theDepth-Stop Turret are used t ocontrol the cutting depth a sfollows: Turn motor off and unplug from power source With the cutting bit already installed,Iowar the plunge action until the cutter bit makes contact with the f_at,level surface the router is sitting on, Lock the plunge depth locking lever (F}o This position is ZERO - "0"...
- Page 20 Making D eep C uts w iththe Depth-StopTurret (Fig, 8) ere eastly broken by too much side thrust and torque. Larger cutter bits will cause a rough cut and be difficult to guide and conlrot For these reasons, DO NOT EXCEED 118-1N. D EPTH OF CUT in a single pass. To produce deep cuts, always make severai progressively deeper cuts by starting...
- Page 21 TOGGLE "ON/OFF" SWITCH (FIg_ 9) Your router motor is turned "ON _ end "OFF by the toggle switch located on the lop cap of the motor housing The taft side of the toggle switch hood (as you face it) is marked 'T' for "On"...
- Page 22 PLACING THE ROUTER ONTO T HE WORKPIECE AND STARTING THE CUT Z_ WARNING: Before operating your router follow all safety Instructions tn this manual, pages 17 through 2B, Failure to do so could result in serious personal !'nturyo NOTE: Making test cuts ts essential with most routing appllceLtlonso Even with careful set-ups you won't know exactly how the cut wIlf go until you try it out.
- Page 23 EDGE R OUTING OR INTERNAL ROUTING cont. /_ WARNING: Re=movingcutter bit from workplace while= It ta stlll rotating could de=me=g+= workplace end result In loss of eonlrol, c+=uelng serious personal Inlury_ NOTE: Making teat cuts In scrap m+=tertalthat I+= +=lmll+=r to your workpl+=ce I+= essential.
- Page 24 EDGING WITH A PILOT BIT (Figs. 14 and 14a) The arbor-type bits with pilotsare excellent for edge shaping of any workplace edge that Is either straight,or curved at e curvatureas great or greater than the radiusof thebit to be used, The ptlotprevents the bit frommaking too deep s cut; and holdtngthe pilot firmly In contactwith theworkpfecaedge throughout prevents the cut frombecoming too shallow, Whenever the workptscathickness, togetherwith the deslrad depth ofcut (as adjusted by router depth setting)are suchthat only the top part of the Edge is to be shaped (leavingat...
- Page 25 FEEDING THE ROUTER (Fig. 1 5) The s ecret to professional routtng is In making a carefulest..upforthe cut, selectingthe proper depth of cut, know{nghow the cutterbit reacts fn your workp_ece, a nd the rate end directionof feed of the muter. ROUTER FEED Fig.
- Page 26 DIRECTION OF FEED - INTERNAL CUTS (Figs. 16 and 16a) When making an internalcut, such as a groove, dado or slot, eiways have Ihe guide you ere using with the router (edge guide, straight edge. beard guide), on the dghFhendside of the router se you make your cut, see Fig 16).
- Page 27 RATE O F FEED ( Figs. 17and 17a) The p roper rate of teed depends on several factors:the hardnessand moisture content of theworkplace, the depth of cut, and the cutting dEameterof the bit, When you are cuttingshaliow groovesIn soft woods suchas pine, you may use a faster rate of feed, When making deep cutstn hardwoodssuch as oak, you should use a slower rate of feed_ FEEDINGTOO FAST (Fig.
- Page 28 ..CHIP SHIELD DEFLECTOR (Fig. 18) L_ WARNING: ALWAYS wear eye protection. The chip ehtald deflector Is not Intandad as a safety guard. The chip shield deflectors heip keep dust and chips away lroro the operator;, they w_t not stop objects larger than woodchips thrown fmro the bit The chip shield deflector on lhe plunge base is held in postlton by a screw To remove the...
- Page 29 WARNING: To ensure safety and reliability, ell repairs should be performed by a qualified service technician at s Seers Service Centor_ GENERAL Only the parts shown on the parts list are Intendedfor repairor reptacementby the customer. AJfotherpan represent an Impodant part of the double _'nsuisUon system end should be sarvfced only be a qualtlledSesrs®ssrvlce technletan_ I Z_ WARNING: motor from the power source before performing any maintenance or cleaning,...
- Page 30 REPLACEMENT OF CARBON BRUSHES (Flgo 20) Replacement brash sets am available throughSears Partsand Repair Centers. !. Unpiug the mulet motor before Inspecting or replacing brushes. 2. Replace both carbon brushes when either has less than 1/4-In. Iengthof carbon remaining,or If the springor wtra Is damaged or burned, 3.
- Page 31 The use of ett_,chmente or aoceeeorlea that am not recommended for this tool might be dangerous end could result In serious Injury. Sears and other Craftsman ®outlets offera large setsetlon of Craftsmantouter accessories designed for epeefflcmutingapplications, There is e iarge selectionof...
- Page 32 Inaddition to a wide variety of muterblts, Sears afsooffers accessories such e,s: Rouler tables, various template sets_universaltauter fence with lock knobs (64181), tl pc. bushing set (64180) end clear sUr_bBsBsets; 6pc. fixed babe (64182) 6 pooplunge babe (6418,.'3), bead cove [_la_t¢...
- Page 33 ..9.5 Amp/13/4 Peak HP - MODEL NUMBER 320.17540 Th_ Model Number witi be found on the Nameplate, Always mention the Model Number in 811 correspondence regarding your tool,...
- Page 34 9.5 Amp/13/4 Peak HP - MODEL NUMBER 320.17540 The Modal Number will be found on the Nameplate, Always mention the Model Number in all correspondence regarding your tool. Plunge Base...
- Page 35 9.5 Amp/13/4 Peak HP - MODEL NUMBER 320,17540 The Model Number willbe found on the Nameplate, Always mention the Model Number En air correspondence regarding your tool. (tem No, Parts No, Part Desarlplton ... 3700798000 Decorz=te Cover 1 ... 5610059000 Screw 3121688000 Roar Cover...
- Page 36 9.5 Amp/13/4 Peak HP - MODEL NUMBER 320.17540 The Modal Number witl be found on the NamepratB Always mention the Model Number In atl correspondence regarding your toot, Item No. Parts No. Parl Description Qty. 2622038000 tnlema{ Wire 'S_mw 5520032000 3120200600 Depth AdjustingCap 5690002000...
- Page 40 le or ours! Your Home For repair - In your home - of all major brand appliances, Iawn and garden equipment, or heatire:j and oooling systems. no matter who made it, no matter who sotd it[ For the replacement parts, accessories and owner's manuals that you need to do it.yoursell For Sears professional Installation o[ home appliances...
Need help?
Do you have a question about the 17540 - 9.5 Amp 1-3/4 HP Plunge Base Router and is the answer not in the manual?
Questions and answers