
Related Manuals for EverFocus EZ180


Summary of Contents for EverFocus EZ180
- Page 1 User’s Manual Operation Instructions...
- Page 2 Notice This manual is presented to the users of EZ180 by EverFocus Electronics Corp. With years of engineering researches, EverFocus has spared no effort to provide the high quality products to the worldwide users. For the policy of continual product improvement, EverFocus reserves the right to make changes to the product specifications and documentation without notice.
-
Page 3: Table Of Contents
Table of Contents Safety Warning …………………………………………1 Introduction……………………………………………..2 Specification…………………………………………….3 Major Parts Names…..…………………………….…..4 Installation Instructions………………………….….…5 Settings………………………………………………….7... -
Page 4: Safety Warning
Safety Warning 1. Handle the camera with care. Be careful when handling the camera, do not drop it or subject it to strong shock or vibration to prevent any damages to it. Do not disassemble it or place it on an unstable base. 2. -
Page 5: Introduction
Introduction The EZ180 series offers great performance in 1/3”image format B/W CCD camera. The EZ180 is ideal for outdoor applications such as parking lots, gas stations or shopping malls. The sophisticated circuit design provides a heater that turns on at 10℃ for cold weather. The EZ180 will provide protection against the elements and provide an excellent quality picture. -
Page 6: Specification
Specification EZ180 Pickup Device 1/3” SONY B/W CCD Picture Elements 768 x 494 (EIA) 752 x 582 (CCIR) Horizontal Resolution 560 TV lines Video Output BNC 1.0Vp-p, 75 ohm Lens Focal Length Vari-focal lens f=3.5~8mm Vari-focal lens f=9~22mm *Lens models and availability vary in different regions Sensitivity 0.1 lux/F=1.6 Gamma Correction... -
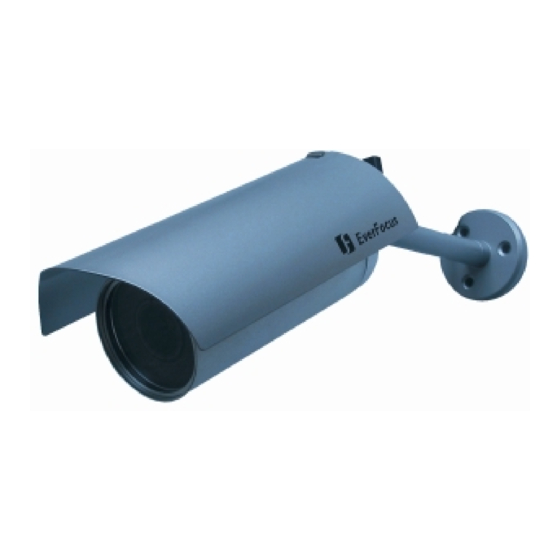
Page 7: Major Parts Names
Major Parts Names and Their Functions Back Fixing Plate Back Fixing Plate Swivel Swivel Screw Screw Mounting Mounting Set-Screw Base Base Sun Shield Sun Shield Assembly Assembly Cover Cover Screw Screw Fixing Screw Fixing Screw Front Front Fixing Plate Fixing Plate IRIS ALC/Level Adjustment IRIS ALC/Level Adjustment O-ring Seal... -
Page 8: Installation Instructions
Installation Instructions 1. Using the supplied screws, mount the bracket base on the desired location. 2. Connect the BNC connector of the camera to a monitor or other video device through a 75 ohm type coaxial cable with BNC female connector at cable extension. - Page 9 g. When all the adjustments and settings are completed, overlaying the cover gently. Be careful not to damage to the “O”-Ring and camera components. h. To reassemble the sun shield, match the hole on the sun shield to the back fixing plate of camera, Fix the screw on the front fixing plate.
-
Page 10: Settings
Settings The camera is set up at factory and normally requires no adjustments. Sometimes, however, adjustments may be necessary. Please refer to the following description for the function details. The IRIS ALC and IRIS Level adjustments are located on the side circuit board, use a screwdriver to adjust if it’s necessary. - Page 11 The 4 control switches are also located on the side circuit board, the switches in orders are for Flickerless, Back Light Comp, Auto Gain Control and Line Lock. Normal Normal Control Switches FL(Flickerless) Normal/On When picture flicker fiercely, turn FL on, then the camera will stabilize the speed of electronic shutter at 1/100(NTSC) or 1/120(PAL) automatically, and reduce the flicker immediately.
- Page 12 AGC (Automatic Gain Control) Off/On AGC ON: The sensitivity increases automatically when light is low. AGC OFF: A-low-noise picture is obtained under a low light condition. The default setting is On. LL (Line-Lock) Off/On To select the sync mode between Internal Sync.(LL off) and Line-Lock (LL on).
- Page 13 FAX: +1-631-436-5027 TEL: +81-43-212-8188 www.everfocus.com FAX: +81-43-297-0081 www.everfocus.co.jp Your EverFocus product is designed and Ihr EverFocus Produkt wurde entwickelt und manufactured with high quality materials and hergestellt mit qualitativ hochwertigen components which can be recycled and Materialien und Komponenten, die recycelt reused.
Need help?
Do you have a question about the EZ180 and is the answer not in the manual?
Questions and answers