Table of Contents
Advertisement
Quick Links
Introducing the SoundWave 7.1 PCI
The SoundWave 7.1 PCI transforms your PC into a home
theater system with multi-channel surround sound.
Features
•
Compliant with PCI revision 2.2 and PC99
specification
•
Supports 24-bit/96KHz playback, 16-bit/48KHz
recording
•
S/PDIF transmitter supports 44.1/48/96KHz
sampling rate and 16-/24-bit resolution
•
HRTF-based 3D positional audio supporting
DirectSound 3D, EAX and A3D interfaces
•
Supports multi-channel output to 2, 4, 6 (5.1), 8
(7.1) speakers
•
Supports most industrial standards of PC 3D sound
for gaming
System Requirements
•
Pentium
or equivalent PC with an available PCI slot
•
Windows
(32-/64-bit) / Vista (32-/64-bit)
•
64 MB system memory
•
CD-ROM or DVD-ROM drive
04-0501A
SoundWave 7.1 PCI
Quick Installation Guide
II 266 MHz (PIII 800 MHz recommended)
®
2000 / XP (32-/64-bit) / Server 2003
®
1
Advertisement
Table of Contents

Subscribe to Our Youtube Channel
Related Manuals for SIIG SoundWave 7.1 PCI


Summary of Contents for SIIG SoundWave 7.1 PCI
-
Page 1: Quick Installation Guide
SoundWave 7.1 PCI Quick Installation Guide Introducing the SoundWave 7.1 PCI The SoundWave 7.1 PCI transforms your PC into a home theater system with multi-channel surround sound. Features • Compliant with PCI revision 2.2 and PC99 specification • Supports 24-bit/96KHz playback, 16-bit/48KHz recording •... -
Page 2: Package Contents
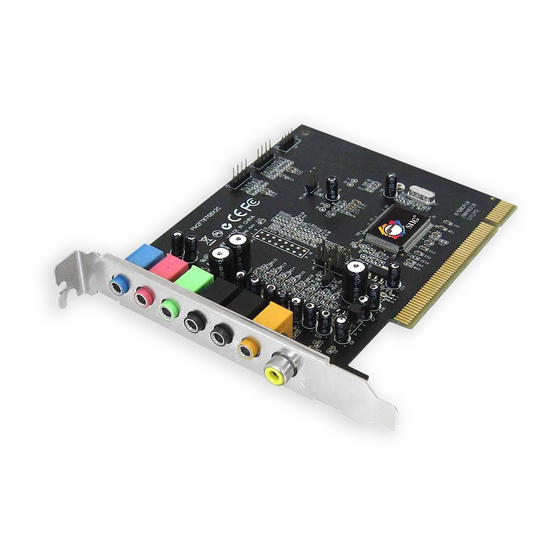
Package Contents • SoundWave 7.1 PCI • Software CD (Xear 3D) • Quick Installation Guide Layout Aux-in CD-in PC speaker-in Optical In/Out CD-S/PDIF-in Figure 1: Layout... - Page 3 Line In Mic In Front Out Rear Out Surround Out Center/Subwoofer S/PDIF Out Figure 2: External Connectors *Note: Must use all four connectors to get the full 7.1 surround sound. External Connectors Line In (Blue): This is a stereo line-level input that can be used to record into an audio recording program.
- Page 4 Front Out (green): This jack should connect to powered left and right speakers located to the left and right of your computer monitor. If you have a two speakers stereo setup, this is the jack to use. You can also plug a pair of stereo headphones into this jack.
-
Page 5: Hardware Installation
Hardware Installation General instructions for installing the card are provided below. Since the design of computer cases and motherboards vary, refer to your computer reference manual for further information, if needed. Static Electricity Discharge may permanently damage your system. Discharge any static electricity build up in your body by touching your computer case for a few seconds. - Page 6 Insert the software CD, Autorun should start the installation automatically. If Autorun does not start, click Start, Run. Type X:\Setup.exe, then click OK. (Replace X: with the drive letter of your CD-ROM) Click Next, Next, Next. Choose Yes, I want to restart my computer now, then click Finish.
- Page 7 Uninstalling the Sound Card Driver Windows 2000/XP/Server 2003 Click Start. Select Settings (skip for XP/Server 2003). Click Control Panel, double click Add/Remove Programs. Select C-Media PCI Audio, then click Change/Remove or Add/Remove. Follow the on screen instructions to complete the uninstall, then restart your system.
-
Page 8: Speaker Configuration
Speaker Configuration Windows 2000 From the main desktop, click Start, Settings, Control Panel. Double click Sounds and Multimedia, click Audio tab. Click Advanced under Sound Playback, then click the Speakers tab. Click the drop down list and select your speaker type. -
Page 9: Troubleshooting
When Windows resumes, repeat steps 1-2, then continue with step 5. Select the Audio tab. Click Advanced under Sound Playback, then click the Speakers tab. Click the drop down box and select your speaker type. Click OK to save the settings. Troubleshooting Q1: I have a 7.1 speaker system connected, only two speakers are working? - Page 10 Blank Page...
-
Page 11: Technical Support And Warranty
Step 1: Submit your RMA request. Go to www.siig.com, click Support, then RMA to submit a request to SIIG RMA. If the product is determined to be defective, an RMA number will be issued. Step 2: After obtaining an RMA number, ship the product. - Page 12 6078 Stewart Avenue Fremont, CA 94538-3152, USA SoundWave 7.1 PCI is a trademark of SIIG, Inc. SIIG and the SIIG logo are registered trademarks of SIIG, Inc. Microsoft, Windows and Windows Vista are either registered trademarks or trademarks of Microsoft Corporation in the United States and/or other countries. Pentium is a registered trademark of Intel Corporation.
Need help?
Do you have a question about the SoundWave 7.1 PCI and is the answer not in the manual?
Questions and answers