
Related Manuals for Cuisinart Smart Stick CSB-77


Summary of Contents for Cuisinart Smart Stick CSB-77
- Page 1 INSTRUCTION AND RECIPE BOOKLET Smart Stick Hand Blender CSB-77 ® For your safety and continued enjoyment of this product, always read the instruction book carefully before using.
-
Page 2: Important Safeguards
Do not attempt to remove cover until blade has stopped rotating. 13. Check prep bowl for presence of foreign objects before using. 14. The use of attachments or accessories not recommended by Cuisinart may cause fire, electrical shock, or risk of injury. -
Page 3: Table Of Contents
15. Do not use outdoors, or use for other than intended use. 16. Do not let any cord hang over the edge of the table or counter. Do not let cord contact hot surfaces, including stovetop. 17. Make sure the appliance is off, the motor has stopped completely, and the appliance is unplugged from outlet before putting on or taking off attachments, and before cleaning. -
Page 4: Unpacking Instructions
UNPACKINg INSTRUCTIONS Place the package containing the Cuisinart Smart Stick Hand ® ® Blender on a sturdy surface. Unpack the Smart Stick Hand Blender ® from its box by removing the upper protective insert. Gently slide the unit from the box. Remove all support materials from the box and replace the upper insert. -
Page 5: Whisk Tips
WHISK TIPS Use the whisk attachment for beating heavy cream or egg whites. It may also be used for whisking eggs for scrambled eggs or fluffy omelets. BEATINg Egg WHITES When beating egg whites use a very clean metal or glass bowl, never plastic. -
Page 6: Diagram
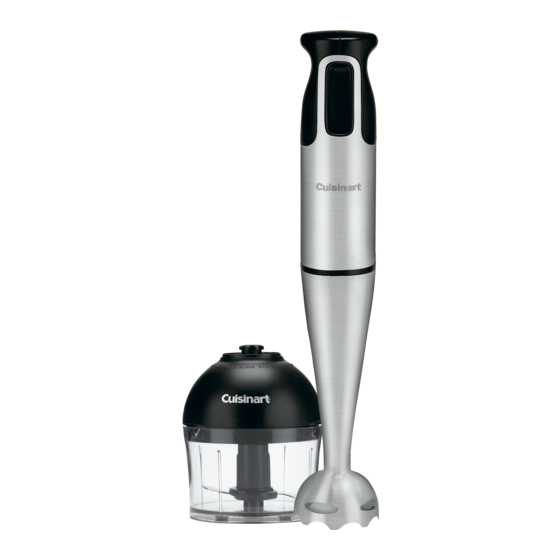
Whisk Attachment Comfort Handle Cord Wrap Detachable On/Off gearbox Button Motor Body Housing Chopper/grinder Attachment Detachable Blending Shaft Reversible Blade Blade guard Stainless Steel Blending Blade... -
Page 7: Assembly
ASSEMBLy BLENDINg ATTACHMENT 1. Align the motor body with the blending attachment and slide the pieces together until you hear and feel the pieces click together. It may be helpful to press the release button when assembling. CHOPPER/gRINDER ATTACHMENT A. Chopper/grinder Prep Bowl B. -
Page 8: Reversible Blade
REvERSIBLE BLADE The Cuisinart Smart Stick Hand Blender chopper/grinder attachment ® ® is equipped with a reversible blade. This blade is sharp on one side and blunt on the other. The blade is attached to a plastic ring which slides over the plastic blade sheath, so it can be easily turned over to select the appropriate blade. - Page 9 Pick up the blade ring by its hub holding ribs (grips) and turn it very slightly clockwise. This locks it in place on the plastic blade sheath and prevents it from sliding up during processing. 3. Connect the Smart Stick Hand Blender motor body to the top of ®...
-
Page 10: Whisk Attachment
5. Plug the power cord of the Smart Stick Hand Blender into an ® electrical outlet. 6. Put one hand on the cover of the chopper/grinder attachment, while gripping the Smart Stick Hand Blender motor body handle ® with the other. Press the High or Low button with your fingers to start the motor and run the chopper/grinder. -
Page 11: Operation
This blade mixes and stirs while adding only a minimum of air to your mixture. A gentle up-and-down motion is all you need to make the most flavorful, full-bodied liquid recipes. Be careful never to remove the Cuisinart Smart Stick Hand Blender from the liquid ®... -
Page 12: Chopping/Grinding
When the appliance has malfunctioned or has been dropped or damaged in any way or is not operating properly, return the appliance to the nearest Cuisinart Repair Center for examination, repair or mechanical or electrical adjustment. Any other servicing should be performed by an authorized service... - Page 13 The Smart Stick chopper/grinder attachment is intended for ® HOUSEHOLD USE ONLY. Any service, other than cleaning and normal user maintenance, should be performed by an authorized Cuisinart Service Representative. WHISK ATTACHMENT To clean your whisk attachment, simply release the attachment from the motor body housing.
-
Page 14: Tips And Hints
TIPS AND HINTS 1. Liquid should come within an inch of where the shaft attaches to the motor housing. 2. Some spices may scratch the chopper/grinder attachment. 3. When using with a nonstick cooking surface, be ca ul not to scratch the coating with the hand blender. -
Page 15: Frequent Uses For Chopper/Grinder Chart
FREQUENT USES FOR CHOPPER/gRINDER Ingredient Suggested Blade Comments Baby foods (always consult a Place small amounts of cooked foods into pediatrician or family chopper/grinder bowl. Add small amount Sharp Blade physician for appropriate of appropriate liquid. Pulse to chop, food recommendations then hold to blend Bread Crumbs - Pulse to chop, then process until... -
Page 16: Recipes
SMOOTHIES AND DRINKS Blueberry Banana Anti-Oxidant Smoothie Makes 2 cups ¾ cup soy milk or fat-free milk grams soy protein powder (or soy protein isolate) cup frozen blueberries small (4½ ounces) banana, sliced teaspoon flaxseed oil 1–2 teaspoons honey (optional) Put soy milk, protein powder, blueberries, banana, flaxseed oil and honey if using into mixing bowl. -
Page 17: Peach Margarita
Frozen Coffee Frappé Makes one 12-ounce shake 1¾ cups coffee ice cream or ice milk ½ cup strong brewed coffee (may use espresso) tablespoons fat-free milk Put ingredients into mixing bowl. Insert blender, making sure the protective guard is submerged. Blend, using an up-and-down motion until ingredients are well combined, about 20–30 seconds. -
Page 18: Asparagus Soup
3-inch cinnamon sticks ounces bittersweet chocolate (your favorite), broken into chunks tablespoon pure vanilla extract Combine the milk and cinnamon sticks in a 3¾ quart Cuisinart saucepan. Cook ® over medium heat, stirring constantly to heat until steamy and just beginning to bubble around the edges. - Page 19 Melt butter in a 3-quart saucepan over medium low heat. Sweat the shallots and crushed garlic over medium-low heat for about 5 minutes. Do not allow the shallots and garlic to brown. While shallots are cooking, cut the asparagus into ½-inch pieces and reserve the tips.
-
Page 20: Sweet Red Pepper Coulis
Nutritional information per ½ - cup serving: Calories 71 (22% from fat) • carb. 10g • pro. 4g • fat 2g • sat. fat 0g • chol. 0mg • sod. 350mg • calc. 39mg • fiber 3g Sweet Red Pepper Coulis This multipurpose sauce is great for chicken, fish, crab cakes, and pastas. - Page 21 Preheat oven to 450°F. Put peppers on a baking sheet and roast until very dark and skin is coming away from the pepper, about 30 minutes. Put roasted peppers into a mixing bowl and cover with plastic wrap in order for the skins to loosen, about 15 minutes.
-
Page 22: Basic Vinaigrette
Insert the blender into the saucepan, making sure the protective guard is submerged. Blend, using an up-and-down motion until ingredients are well combined, about 50–60 seconds. Nutritional information per ¼ - cup serving: Calories 60 (25% from fat) • carb. 9g • pro. 2g • fat 2g •... - Page 23 Insert the blade assembly in the prep bowl. Put the cheese cubes into the prep bowl. Pulse to chop, 10 times, then process to chop finely, about 15–20 seconds. Add remaining ingredients to prep bowl. Process for about 30–40 seconds, until creamy and totally emulsified.
- Page 24 teaspoons fresh lime juice 1½ teaspoons rice vinegar (may use raspberry or white balsamic vinegar) ½ teaspoon honey Insert the blade assembly in the prep bowl. Put the red bell pepper pieces into the prep bowl and use the pulse to coarsely chop, 6–8 pulses. Transfer to a 1-quart bowl and reserve.
-
Page 25: Roasted Pepper Tapenade
Roasted Pepper Tapenade Makes 1 cup small garlic clove, peeled jar (12-ounces) of roasted peppers, drained, cut into 1-inch pieces ½ sun-dried tomato (oil packed) tablespoons green pimento-stuffed olives, drained ½ teaspoon fresh thyme ½ teaspoon extra virgin olive oil pinch salt pinch pepper Insert the blade assembly in the prep bowl. - Page 26 Tomato and Basil Topping Makes 1 cup small garlic clove, peeled 1½ tablespoons fresh basil leaves pint grape tomatoes teaspoons extra virgin olive oil ½ teaspoon salt Insert the blade assembly in the prep bowl. Put garlic into the prep bowl and run for 30 seconds.
-
Page 27: Sweet Whipped Cream
Nutritional information per macaroon: Calories 76 (38% from fat) • carb. 11g • pro. 1g • fat 3g • sat. fat 1g • chol. 0mg • sod. 11mg • calc. 4mg • fiber 2g Sweet Whipped Cream Sweetened whipped cream is the perfect finish for just about any dessert, or spoon a dollop over coffee or hot chocolate. -
Page 28: Warranty
(A) to the store where it was purchased or (B) to another retail store that sells Cuisinart products of the same type. The retail store shall then, at its discretion, either repair the product, refer... - Page 29 Cuisinart for repair, or if necessary, replacement, by calling our Consumer Service Center toll-free at 1-800-726-0190. Cuisinart will be responsible for the cost of the repair, replacement, and shipping and handling for such products under warranty. BEFORE RETURNINg yOUR CUISINART® PRODUCT If you are experiencing problems with your Cuisinart®...
- Page 30 NOTES...
- Page 31 NOTES...
- Page 32 Tools and Cookware Juicers Coffeemakers Blenders Gadgets Cuisinart offers an extensive assortment of top quality products to make life in the kitchen easier than ever. Try some of our other countertop appliances and cookware. www.cuisinart.com ©2011 Cuisinart 150 Milford Road...
Need help?
Do you have a question about the Smart Stick CSB-77 and is the answer not in the manual?
Questions and answers