
Related Manuals for Citizen CH607


Summary of Contents for Citizen CH607
- Page 1 INSTRUCTION MANUAL DIGITAL BLOOD PRESSURE MONITOR CH607 MODEL English Español Português Deutsch - Eng 1 -...
-
Page 2: General Remarks
GENERAL REMARKS General remarks on blood pres- • Emotional stress may tend to cause blood pres- sure to rise. sure and blood pressure measure- • This product should not be used to monitor ment cardiac arrhythmia. • If the cuff is to be deflated quickly, depress “Start/ Stop”... -
Page 3: Precaution For Use
• Measure blood pressure where the room tem- • DO NOT measure blood pressure after the cuff perature is about 20 C. DO NOT measure blood has been on for a few minutes, as your arm pressure when it is too cold (below 10 C)or too will have built up higher blood pressure, and hot (above 40 C) in the room . -
Page 4: Nature And Frequency Of Mainte- Nance
Precaution for maintenance Cleaning method of Cuff • Do NOT store the blood pressure meter where After cleaning the cuff with a neutral detergent, it will be exposed to direct sunlight, high tem- lightly rinse it with water and let it air dry. Hard perature (over 60 C), low temperature (below rubbing or washing in a washing machine will - 20 C), high relative humidity (over 95%) or... -
Page 5: Who Blood Pressure Classifica- Tions
WHO blood pressure classifica- Reference European standard: tions This products complies with EN instructions 93/ 42/EEC (Medical Device Directive) and with the Standard for assessment of high or low blood pres- following standards: EN 1060:1995 “Noninvasive sure without regard to age, have been established Sphygmomanometers, Part 1 General Require- by the World Health Organization (WHO), as shown ments”... -
Page 6: Device Description
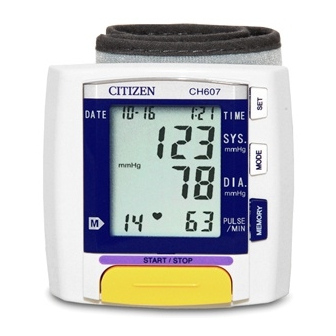
DEVICE DESCRIPTION 1. Name of the parts LCD display Setting button Mode button Recall memory button Wrist cuff Start/Stop button Batteries Carrying case “AAA” 1.5V 2 - Eng 6 -... -
Page 7: Description Of Display Symbols
2. Description of display symbols Month Date Hour Minute Afternoon time Measuring pressure symbol Systolic rate Blood pressure unit Diastolic rate Battery weak displa y Error symbol Memory record Pulse rate Pulse symbol - Eng 7 -... -
Page 8: Battery Replacement
BATTERY REPLACEMENT 1. To use this unit, you must install batteries, If 3. “LR03” batteries or equivalent are suitable for the battery mark “ ” is displayed, you this blood pressure monitor. All batteries used must change both batteries. must be same type. Do not mix alkaline, stan- 2. -
Page 9: Measurement Procedures
by one. The value of minute can be corrected 4) Press the “Mode” switch then “Minute” starts in only the forward direction.) flashing. Press “SET” button to set the cor- 2) Press the “Mode” switch then “Date” starts rect Minute. (Each time the “Set” switch is flashing. - Page 10 • Apply the wrist cuff to the wrist and make sure Measurement Procedures for it is not too loose or too tight. If the wrist cuff People With a Weak Pulse is applied inappropriately, it may display an er- • Apply the middle part of the wrist cuff to the ror or abnormal values.
-
Page 11: Turn Power Off
Do not move or talk while taking the blood pres- 3. Turn Power off sure measurement. 4) When pressurization is completed, the auto- matic air release system will gradually reduce cuff pressure, and measuring mark “Heart- mark” will flash on the display indication that measuring is in progress. -
Page 12: Memory Recall
5. Memory recall 6. Memory clear function You can recall stored data by pressing the To clear memory data, take out the two batteries “Memory” switch, except when performing a at same time and then press the “START/STOP” measurement. switch for a while. All memory is erased. •... - Page 13 ERROR DESCRIPTION OF DISPLAY MARKS DISPLAY MARK CONDITION / CAUSE CORRECTIVE ACTION Mark appears in the measurement Measurement in progress. Remain condition and flashes when pulse is still. detected. Measuring Error Appears when the accurate blood Press “Start/Stop” switch again and pressure could not be obtained ac- re-measure.
-
Page 14: Specifications
SPECIFICATIONS Model Number CH607 Measuring Principle Oscillometric System Measurement Localization Left Wrist Arm Cuff Preformed cuff Arm Circumference Range 13.5 to 19.5 cm Pressure 0 - 300 mmHg Measurement Range Pulse 40 - 199 Pulse / Min. Pressure 3mmHg Accuracy Pulse 5% of reading Systolic Blood Pressure: 3 digits...
Need help?
Do you have a question about the CH607 and is the answer not in the manual?
Questions and answers