
Related Manuals for Honda FG110


Summary of Contents for Honda FG110
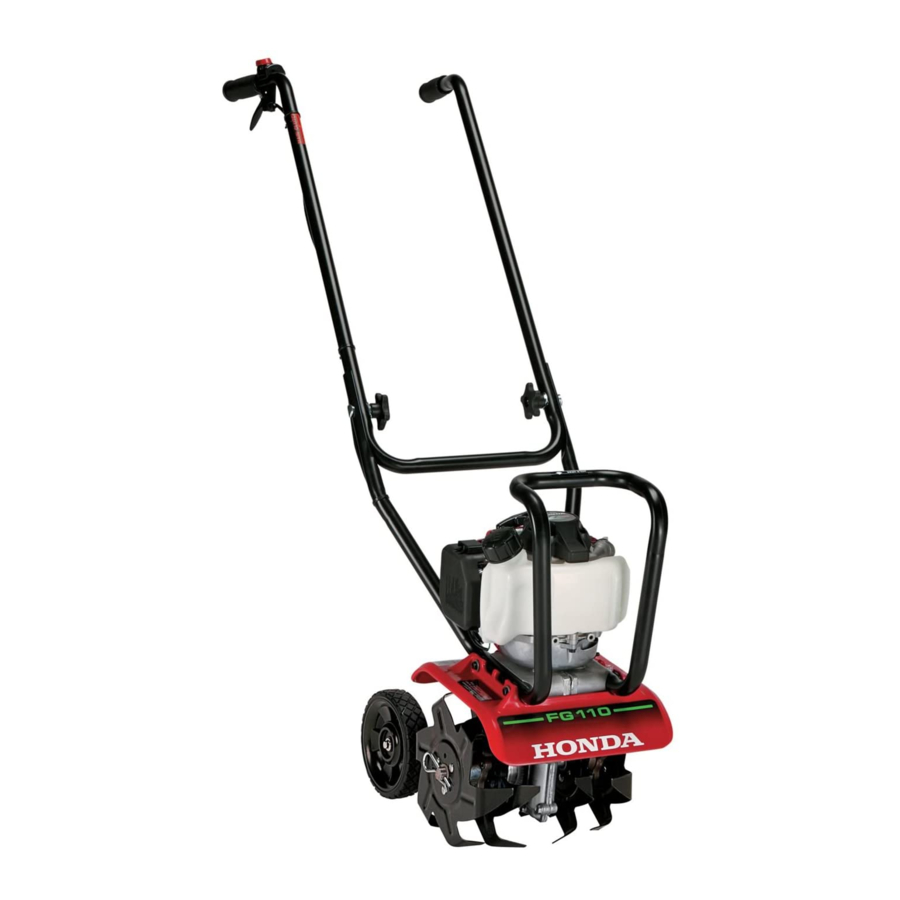
- Page 1 OWNER'S MANUAL Mini-Tiller FG110 See page 29 for instructions on assembling your FG110 Mini-Tiller. © 2004–2007 American Honda Motor Co., Inc. All Rights Reserved...
- Page 2 The information and specifications included in this publication were in effect at the time of approval for printing. American Honda Motor Co., Inc., reserves the right, however, to discontinue or change specifications or design at any time without notice and without incurring any obligation whatever. No part of this publication may be...
- Page 3 INTRODUCTION Congratulations on your selection of a Honda FG110 Mini-Tiller. We are certain you will be pleased with your purchase of one of the finest tillers on the market. We want to help you get the best results from your new tiller and to operate it safely. This manual contains the information on how to do that;...
- Page 4 A FEW WORDS ABOUT SAFETY Your safety, and the safety of others, is very important. And using this tiller is an important responsibility. To help you make informed decisions about safety, we have provided operating procedures and other information on labels in this manual. This information alerts you to potential hazards that could hurt you or others. Of course, it is not practical or possible to warn you about all the hazards associated with operating or maintaining a tiller.
-
Page 5: Table Of Contents
CONTENTS TILLER SAFETY ......4 TECHNICAL & CONSUMER INFORMATION ..33 IMPORTANT SAFETY INFORMATION . -
Page 6: Tiller Safety
Honda tillers are designed to give safe and dependable service if operated according to instructions and intended use. Honda tillers are intended to be used by an experienced, trained operator who is familiar with the use of power equipment. Do not allow a child or an inexperienced, untrained operator to use this tiller. Operating this equipment requires special effort on your part to ensure your safety and the safety of others. -
Page 7: Attachments And Modifications
IMPORTANT MESSAGE TO PARENTS Your child’s safety is very important to Honda. Read this message if you decide to permit your child to operate this tiller. Tillers are tools, not toys. As with any equipment, bad judgements can result in serious injuries. You can prevent accidents by making good decisions about if, when, and how your child operates this equipment. -
Page 8: Safety Label Locations
The labels shown here contain important safety information. Please read them carefully. These labels are considered permanent parts of your Honda tiller. If a label comes off or becomes hard to read, contact an authorized Honda servicing dealer for a replacement. -
Page 9: Controls & Equipment
CONTROLS & EQUIPMENT COMPONENT & CONTROL LOCATIONS ENGINE SWITCH THROTTLE LEVER HANDLEBAR KNOBS CARRYING HANDLE ENGINE OIL FILLER CAP/ ENGINE OIL DRAIN CHOKE LEVER RECOIL STARTER GRIP PRIMING BULB TINE SHIELD AIR CLEANER FUEL CAP TRANSPORT WHEELS OR DRAG BAR (DRAG BAR NOT SHOWN) TILLING TINES... -
Page 10: Description Of Controls
CONTROLS & EQUIPMENT DESCRIPTION OF CONTROLS ENGINE SWITCH Throttle Lever The throttle lever controls engine speed and tiller tine rotation. Pulling the throttle lever towards the grip increases the engine speed which causes the tines to turn. Releasing the throttle lever reduces engine speed and stops the tiller tines from turning. - Page 11 CONTROLS & EQUIPMENT Transport Wheels CARRYING HANDLE The transport wheels are used to move the tiller around. Before tilling, the transport wheels must be removed and the drag bar installed in their place. Carrying Handle TRANSPORT Hold the carrying handle when starting the engine. WHEELS The carrying handle can be used to load/unload the tiller, and to assist in certain engine maintenance...
-
Page 12: Before Operation
BEFORE OPERATION ARE YOU READY TO OPERATE THE TILLER? Your safety is your responsibility. A little time spent in preparation will significantly reduce your risk of injury. Knowledge Read and understand this manual. Know what the controls do and how to operate them. Familiarize yourself with the tiller and its operation before you begin to use it. -
Page 13: Is Your Working Area Ready
BEFORE OPERATION IS YOUR WORKING AREA READY? Objects thrown by the tiller can cause serious injury. Before operating the tiller, carefully inspect the area, and remove all objects that could be thrown by, or entangled in, the tilling attachment, such as rocks, broken glass, nails, wire, or string. -
Page 14: Operation
OPERATION SAFE OPERATING PRECAUTIONS Before operating the tiller for the first time, please review the IMPORTANT SAFETY INFORMATION on page 4 and BEFORE OPERATION chapter starting on page 10. Even if you have operated other tillers, take time to become familiar with the operation of this tiller’s controls and handling. -
Page 15: Starting The Engine
OPERATION Starting The Engine ENGINE SWITCH 1. Move the engine switch to the ON position. ENG. SW. 2. To start a cold engine, move the choke lever up to the CLOSED () position. To restart a warm engine, leave the choke lever down in the OPEN position. -
Page 16: Tiller Operation
OPERATION TILLER OPERATION 1. Install the drag bar (see page 12). Honda recommends using the drag bar when tilling. The tiller can be difficult to control without the drag bar installed. 2. Set the tilling depth by moving the drag bar up or down. - Page 17 OPERATION Narrow Cultivating The two outer tines can be removed to give you a narrower cultivating width. This width is approximately 5 inches. This gives you the ability to get between very closely spaced plants. To remove the two outer tines, pull the lock pins out of the holes in the end of the tine shaft.
-
Page 18: Servicing Your Tiller
Remember that your authorized Honda servicing dealer knows your tiller best and is fully equipped to maintain and repair it. To ensure the best quality and reliability, use only new, genuine Honda parts or their equivalents for repair and replacement. -
Page 19: Maintenance Schedule
(1) Service more frequently when used in dusty areas. (2) These items should be serviced by an authorized Honda servicing dealer, unless you have the proper tools and are mechanically proficient. Refer to the Honda shop manual for service procedures. -
Page 20: Engine
SERVICING YOUR TILLER ENGINE Engine Oil Level Check Check the engine oil level before each use, or every 10 hours if operated continuously. Rest the tiller on a level surface, with the engine stopped and in an upright position. 1. Tip the tiller on its carry handlebar as shown. 2. -
Page 21: Engine Oil Recommendations
The SAE oil viscosity and service classification are in the API label on the oil container. Honda recommends that you use API SERVICE category SJ (or later) oil with the “starburst” certification mark displayed on the container. -
Page 22: Air Filter Cleaning
SERVICING YOUR TILLER Air Filter Cleaning A dirty air filter restricts air flow to the carburetor, reducing engine performance. If you operate the engine in very dusty areas, clean the air filter after each refueling. 1. Clean in warm, soapy water. 1. -
Page 23: Spark Plug Service
SERVICING YOUR TILLER Spark Plug Service FAN COVER Recommended spark plugs: NGK – CM5H or CMR5H 5 mm HEX BOLT NOTICE Incorrect spark plugs can cause engine damage. 1. Loosen the captive 5 mm hex bolt with a 4 mm Allen wrench, then remove the fan cover. - Page 24 SERVICING YOUR TILLER Spark Arrester Service (Optional) 3 X 6 mm SELF- The spark arrester must be serviced every 100 hours TAPPING SCREW to keep it functioning as designed. If the engine has been running, the muffler will be very hot. Allow the muffler to cool before servicing the spark arrester.
-
Page 25: Carburetor/Throttle Cable Adjustment
If there is visible damage, or if the throttle lever does not operate smoothly or release properly, take your tiller to your authorized Honda servicing dealer. Check the freeplay at the end of the throttle lever. 3/16 ~ 5/16 in... -
Page 26: Fuel System
SERVICING YOUR TILLER FUEL SYSTEM FILL Refueling TANK This engine is certified to operate on unleaded gasoline with a pump octane rating of 86 or higher. You may use regular unleaded gasoline containing no more than 10% Ethanol (E10) or 5% Methanol by volume. In addition, Methanol must contain cosolvents and FILLER NECK corrosion inhibitors. - Page 27 Check the fuel supply and return tubes, and replace FUEL RETURN any tube that is damaged, cracked, or leaking. TUBE Refer to the Honda shop manual for tube replacement (clear) instructions, or take the tiller to an authorized Honda servicing dealer. FUEL...
-
Page 28: Transmission Lubrication
SERVICING YOUR TILLER TRANSMISSION LUBRICATION LOCK PIN The transmission is pre-lubricated at the factory. At the beginning of each tilling season, or after every 25 hours of use during the season, the transmission should be filled with grease. Replacement grease should be a high quality RIGHT OUTER petroleum based NLGI #2 general purpose grease GREASE... -
Page 29: Assembly
ASSEMBLY THE IMPORTANCE OF PROPER ASSEMBLY Proper assembly is essential to operator safety and the reliability of the machine. Any error or oversight made by the person assembling and servicing a unit can result in faulty operation, damage to the machine, or injury to the operator. -
Page 30: Unpacking
ASSEMBLY UNPACKING 1. Carefully remove the tiller and loose parts bag from the carton. The loose parts bag contains this owner’s manual, the drag bar, and a bottle of 10W-30 oil. 2. Unfold the tiller upper handle to the operating position as shown. -
Page 31: Storage
STORAGE STORAGE PREPARATION Proper storage preparation is essential for keeping your tiller trouble free and looking good. The following steps will help to keep rust and corrosion from impairing your tiller’s function and appearance, and will make the engine easier to start when you use the tiller again. Cleaning 1. -
Page 32: Storage Precautions
STORAGE Draining the Fuel Tank and Carburetor 1. Drain the fuel from the fuel tank to a suitable container (see page 25). 2. Start the engine (see page 13) and allow it to run until the engine stops. WARNING Gasoline is highly flammable and explosive. -
Page 33: Transporting
TRANSPORTING BEFORE LOADING UPPER THROTTLE HANDLEBARS CABLE & If the engine has been running, allow it to cool for ENGINE at least 15 minutes before loading the tiller on the SWITCH WIRE transport vehicle. A hot engine and exhaust system can burn you and can ignite some materials. -
Page 34: Taking Care Of Unexpected Problems
Spark plug faulty, fouled, or has incorrect gap. Gap or replace the spark plug (page 21). Fuel filter restricted, carburetor malfunction, ignition Have an authorized Honda servicing dealer replace or repair malfunction, valves stuck, etc. faulty components as needed. Low Power or Engine Speed Won’t Increase... -
Page 35: Technical & Consumer Information
TECHNICAL & CONSUMER INFORMATION This chapter contains important information about serial number locations, high altitude operation, and emissions control systems. SERIAL NUMBER LOCATIONS Record the frame serial number, engine serial number, and date of purchase in the spaces below. You will need this information when ordering parts and when making technical or warranty inquiries. -
Page 36: Emissions Control System Information
EPA, California and Canadian regulations require all manufacturers to furnish written instructions describing the operation and maintenance of emissions control systems. The following instructions and procedures must be followed in order to keep the emissions from your Honda engine within the emissions standards. -
Page 37: Specifications
TECHNICAL & CONSUMER INFORMATION Air Index An Air Index Information hang tag/label is applied to engines certified to an emission durability time period in accordance with the requirements of the California Air Resources Board. The bar graph is intended to provide you, our customer, the ability to compare the emissions performance of available engines. -
Page 38: Tuneup
TECHNICAL & CONSUMER INFORMATION TILLER Model FG110 A Description code FAAA Length x width x height 40.9 x 14.5 x 39.4 in (1038 x 368 x 1000 mm) Weight With drag bar 28.6 lb (13 kg) With wheels 30.6 lb (13.9 kg) With drag bar 29.9 lb (13.6 kg) With wheels... -
Page 39: Consumer Information
These publications will give you additional information for maintaining and repairing your tiller. You may order them from your Honda dealer. There is a shop manual, which covers complete maintenance and overhaul procedures. It is intended to be used by a skilled technician. There is also a parts catalog that provides a complete, illustrated... - Page 40 TECHNICAL & CONSUMER INFORMATION Replacement Parts, Optional Equipment, and Service Items Contact an authorized Honda servicing dealer to purchase genuine, original Honda items for your tiller. Replacement Parts Description Part Number Notes Air filter 17211-ZOH-800 Spark plug 31915-ZOH-003 CMR5H (NGK)
-
Page 41: Distributors Limited Warranty
What American Honda will Repair or Replace Under Warranty: American Honda will repair or replace, at its option, any part that is proven to be defective in material or workmanship under normal use during the applicable warranty time period. Warranty repairs and replacements will be made without charge for parts or labor. - Page 42 Accessories and replacement parts, installed by a dealer who is authorized by American Honda to sell them, will be repaired or replaced under warranty without charge for parts or labor. If installed by anyone else, accessories and replacement parts will be repaired or replaced under warranty without charge for parts, but any labor charges will be the responsibility of the purchaser.
-
Page 43: Emission Control System Warranty
Honda recommends that you retain all receipts covering maintenance on your power equipment engine, but Honda cannot deny warranty coverage solely for the lack of receipts or for your failure to ensure the performance of all scheduled maintenance. -
Page 44: Warranty Coverage
If such a replacement part is used in the repair or maintenance of your engine, and an authorized Honda dealer determines it is defective or causes a failure of a warranted part, your claim for repair of your engine may be denied. -
Page 45: Index
INDEX Air Filter Handlebars Cleaning ....... 20 Folding for Transportation ....31 Inspection . - Page 46 INDEX Safety Attachments and Modifications ....5 Important Message to Employers ... . . 5 Important Message to Parents ....5 Important Safety Information.
- Page 47 QUICK REFERENCE Fuel Type Unleaded gasoline with a pump octane rating of See page 24. 86 or higher Engine oil Type SAE 10W-30, API SJ or later See page 19. Transmission lubricant Type Grease (NLGI #2) See page 26. Spark plug Regular (NGK) CM5H See page 21.
- Page 48 POM53749C Printed on 9000.2007.01 31V25020 Recycled Paper 00X31-V25-0200 PRINTED IN U.S.A.
Need help?
Do you have a question about the FG110 and is the answer not in the manual?
Questions and answers