Table of Contents
Advertisement
Advertisement
Table of Contents

Related Manuals for AEG OKO-LAVAMAT 60300


Summary of Contents for AEG OKO-LAVAMAT 60300
- Page 1 ÖKO-LAVAMAT 60300 The environmentally friendly washing machine Instruction book...
- Page 2 Dear customer, Please read these user instructions carefully. Above all, observe the "Safety" section in the first pages. Keep these user instructions in a safe place for future reference. Please pass them along to future owners of the appliance. Important information concerning your safety and proper functioning of the appliance is highlighted with the warning triangle or the signal words (Warning!, Caution!, Attention!).
-
Page 3: Table Of Contents
Contents CONTENTS Operating instructions ........Safety . - Page 4 Contents Program Tables ..........22 Washing .
- Page 5 Contents Power supply ..........39 Water connection .
-
Page 6: Operating Instructions
OPERATING INSTRUCTIONS Safety The safety standards of AEG electric appliances are in keeping with the recognised rules of technology and the law governing the safety of appliances. Nevertheless as a manufacturer we are committed to famil- iarise you with the following safety instructions: Prior to initial start-up •... -
Page 7: General Safety
Operating instructions Safety of children • Packaging materials (e.g. sheet and Styrofoam) can be dangerous for children. Danger of asphyxiation! Keep packaging materials at a safe distance from children. • Children are often unable to recognise the dangers involved with electrical appliances. -
Page 8: Disposal
Operating instructions Disposal Dispose of the packaging! Dispose of washing machine packaging materials properly. All packag- ing materials are environmentally sound and can be safely disposed of, or burned in a refuse incineration plant. The plastic parts can be reused: •... -
Page 9: Description Of The Appliance
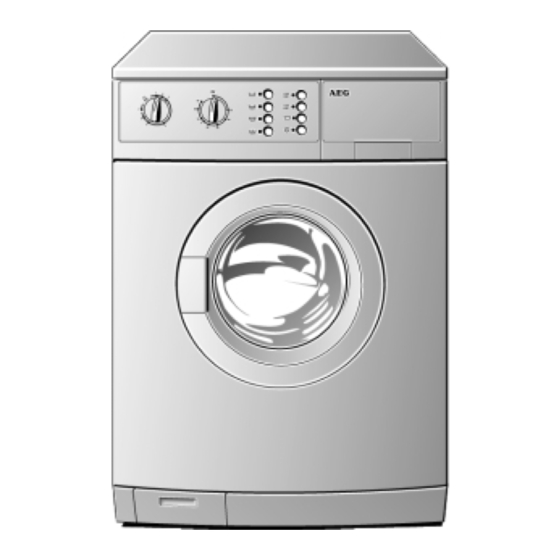
Operating instructions Description of the Appliance Front View Drawer for Control Panel detergent and softener Rating plate (behind door) Door with handle Flap in front of Threaded feet the circulation (height adjustable) pump Drawer for Detergent and Conditioner Suction Cap Pre Wash Detergent/ (must be securely Detergent for... -
Page 10: Control Panel
Operating instructions Control Panel Spin Speed/RINSE HOLD Buttons Temperature Selector Washing Type Buttons Program Selector ON/OFF Button Program Selector You define the type of wash using the program selector. Attention! Program selector may only be rotated clockwise! The various positions have the fol- lowing effect: Position k (PRE WASH) Cold pre wash prior to the main wash, the main wash follows automa-... -
Page 11: Temperature Selector
Operating instructions Rinse hold (o) means: the washing is left in the last rinse water, it is not spun. Position 5 (CONDITIONER) Separate conditioning, separate starching, separate treatment of wet cotton/linen or easy-care washing (1 rinse, liquid conditioner is washed in from the w compartment, spinning in accordance with the selected washing type or rinse hold). -
Page 12: M (On/Off) Button
Operating instructions à (DELICATES) For delicate washing (temperature automatically limited to a maximum of 40°C). s (WOOLLENS) For machine washable woollens and particularly delicate fabrics (tem- perature automatically limited to a maximum of 40°C). M (ON/OFF) Button This button is used to switch on the washing machine and start the selected program, or to switch off the washing machine. -
Page 13: Before Washing For The First Time
Operating instructions Before Washing for the First Time 1.Pull the detergent drawer out from the control panel a little. 2. Pour around 1 litre of water into the washing machine via the deter- gent drawer. This will ensure when the washing machine is started that the water container is closed and that the ECO valve can function cor- rectly. -
Page 14: Prepare Washing Cycle
Operating instructions Prepare washing cycle Sort washing and prepare • Sort washing according to care symbol and type (see "Washing types and care symbols"). • Empty all pockets. • Remove metal objects (paper clips, safety pins etc.). • In order to prevent bunching up of washing and damage to washing, close zippers, button up duvets and pillow cases, and tie up loose ends from, for example, aprons. -
Page 15: Washing Types And Care Symbols
Operating instructions Washing Types and Care Symbols Care symbols assist in the selection of the correct washing program. Washing should be sorted according to type and care symbol. The tem- peratures indicated in the care symbols are maximum temperatures. Cottons ç Cotton and linen fabrics with this care symbol are resistant to the mechanical action of the washing machine and high temperatures. -
Page 16: Detergent And Conditioner
Operating instructions Detergent and conditioner Which detergent and conditioner? Use only detergents and conditioners which are suitable for use in washing machines. Always observe the manufacturer’s instructions. How much detergent and conditioner? The required quantity depends upon: • the amount of washing If the detergent manufacturer does not include dosing instructions for reduced loads, use one third less for half loads and only half of the full load detergent quantity for very small loads. -
Page 17: Performing A Wash
Operating instructions Performing A Wash Brief Instructions A wash is performed in the following steps: 1.Open the door, load the washing. 2. Close the door. 3. Add detergent/conditioner. 4. Set the correct washing program: – Set the program on the program selector; –... -
Page 18: Loading The Washing
Operating instructions Loading the Washing For maximum loads see the "Program Tables". For notes on the correct preparation of the washing, see "Washing Types and Care Symbols". 1.Sort the washing by type and prepare. 2. Open the door: pull the handle on the door. 3. -
Page 19: Setting The Washing Program
Operating instructions Setting the Washing Program For suitable programs and the right temperature for the relevant type of washing, see "Program Tables". Important! Only turn the pro- gram selector clockwise! 1.Set the program selector to the desired washing program. 2. Set the temperature selector to the required temperature. -
Page 20: Changing The Spin Speed/Selecting Rinse Hold
Operating instructions Changing the Spin Speed/Selecting Rinse Hold If desired, reduce the spin speed for the final spin or select rinse hold: – Press the button for the required spin speed – press the o (RINSE HOLD) button. The indicator for the required spin speed (or o ) illuminates. -
Page 21: Wash Complete/Removing The Washing
Operating instructions Wash Complete/Removing the Washing The washing program is finished when the M (ON/OFF) button indicator lamp extinguishes. After a Rinse Hold: After a rinse hold the water must be pumped out first, or the washing spun: Either press one of the buttons to change the final spin speed/ (the indicator lamp for the required spin speed illuminates) turn the program selector clockwise to position 6 (SPIN), (washing is spun in accordance with the program just completed),... -
Page 22: Program Tables
Operating instructions Program Tables Washing Not all possible settings are listed in the following, but only those that are useful and meaningful in everyday use. Max. Load Washing Type, Program Temperature Washing Type Care Symbol Selector Selector Button (weight dry) Position 2 (MAIN WASH) Position k... - Page 23 Operating instructions Max. Load Washing Type, Program Temperature Washing Type Care Symbol Selector Selector Button (weight dry) Position 2 (MAIN WASH) Position k 2.5kg (PRE-WASH) r (COLD) Ã Delicates (or 15-20m ì to 40 (DELICATES) Position 1 net curtains) (STAIN) Position 3 (QUICK WASH) Position 2...
-
Page 24: Separate Soaking
Operating instructions Separate Soaking Type of Max. Load Program Temperature Washing Type Button Washing (weight dry) Selector Selector t (COTTONS/LINEN) Cottons/Linen r (COLD) to Position 7 } (EASY-CARES) Easy-Cares 2.5kg (SOAKING) Ã (DELICATES) Delicates 2.5kg Separate Conditioning/Starching/Treatment Type of Max. Load Program Selector Washing Type Button Washing... -
Page 25: Cleaning And Caring
Operating instructions Cleaning and Caring Control panel Attention! Do not use furniture care products or aggressive cleansers for cleaning control panels and control elements. Wipe control panels with a moist cloth. Use warm water. Detergent drawer The detergent drawer should be cleaned from time to time. 1.Pull the detergent drawer out as far as it will go. -
Page 26: Washing Drum
Operating instructions Washing drum The washing drum is made of rust-free stainless steel. Rusty objects in the washing drum may lead to rust deposits on the drum. Attention! Do not clean the stainless steel drum with acid containing decalcifying agents, abrasives containing chlorine or iron, or steel wool. Appropriate cleansers are available from our customer service depart- ment. -
Page 27: What To Do When
Operating instructions What to do when… The somewhat different, in comparison to older wash- ing machines, whistling noise during spinning is due to the modern drive system. A rattling sound on startup – in particular when using for the first time – is caused by the circulation pump and is due to the design. - Page 28 Operating instructions Malfunction Possible Cause Remedy The height adjustable threa- Adjust threaded feet as per ded feet are not correctly the installation instructions. adjusted. There is only very little washing in the drum (e.g. Function is not impaired. Washing machine only a towelling dressing vibrates during opera- gown).
- Page 29 Operating instructions Malfunction Possible Cause Remedy Drain hose is kinked. Remove kink. Maximum pumping height Please contact customer ser- (drain height 1m above the vice who have a retrofit kit floor on which the machine for pumping to heights of Washing is not spun is standing) exceeded.
-
Page 30: If The Washing Results Are Not Satisfactory
Operating instructions If the washing results are not satisfactory If the washing is grey and there are calcium deposits in the drum • Too little detergent was used. • The wrong detergent was used. • Special soiling was not pre-treated. •... -
Page 31: Perform Emergency Drain
Operating instructions Perform emergency drain • If the washing machine no longer pumps out the water then an emergency drain must be performed. • If the washing machine is located in a room in which below freezing temperatures might occur, emergency draining must be carried out if danger of freezing occurs. -
Page 32: Clean The Circulating Pump
Operating instructions When the water is completely drained: 7. Press the end stop firmly back into the emergency drain hose. 8. Push the emergency drain hose back in a little and allow it to snap into the mounting. 9. Put on the flap and close. The ECO valve does not function when the machine has been fully emptied. -
Page 33: Additional Rinse/Water Cooling
Operating instructions Additional Rinse/Water Cooling The washing machine is set up for extremely low water consumption. • For people who suffer from an allergy to detergents, it can be useful to rinse with more water (additional rinse). • It may be necessary to cool the water before it is pumped out in order to prevent damage to plastic waste pipes (water cooling). -
Page 34: Installation And Connection Instructions
Installation and Connection Instructions INSTALLATION AND CONNECTION INSTRUCTIONS Installation Safety Precautions • Do not tip the washing machine over the front or the left side (seen from the front). Electrical components could become wet! • Check the washing machine for transport damages. You should never connect a damaged appliance. -
Page 35: Dimensions Of The Appliance
Installation and Connection Instructions Dimensions of the appliance Front and Side Views Rear View... -
Page 36: Installation Of The Appliance
Installation and Connection Instructions Installation of the appliance Washing machines with arched covers are not suited for installation beneath countertops. Transporting the appliance • Do not lay the washing machine on the front or on the left side (seen from the front); otherwise the electrical components could become wet! •... -
Page 37: Remove Transportation Protection
Installation and Connection Instructions Remove transportation protection Attention! Be absolutely certain that all shipping braces have been removed before installing the appliance. Store all shipping braces in a safe place in case they are required for future transport (moving). Special spanner H and cover caps E (2 off) and G (1 off) are supplied with the appliance. -
Page 38: Prepare The Installation Place
Installation and Connection Instructions Prepare the installation place • The installation surface must be clean and dry, free of floor wax and other smearing substances, so that the appliance does not slip off. Do not use any lubricant as sliding aid. •... -
Page 39: Levelling On Uneven Floors
Installation and Connection Instructions Levelling on uneven floors Using the four adjustable threaded feet, compensation can be made for unevenness in the floor and the height of the appliance adjusted. The height can be adjusted over the range +10... -5 mm. To adjust the feet use the special spanner supplied for removing the transport braces. -
Page 40: Water Connection
Installation and Connection Instructions Water connection The washing machine is provided with safety devices which prevent reverse pollution of drinking water and conform to the State regula- tions issued by water supply authorities (e.g. in Germany: DVGW Direc- tives). Further protective measures in the installation are hence unnecessary. -
Page 41: Water Feed
Installation and Connection Instructions Water feed A flexible pressure tubing of 1.3m length is supplied. If a longer feed tubing is needed, a complete VDE-approved tubing set with mounted screw connections, supplied by our customer service, should be used exclusively. –... -
Page 42: Water Drain-Off
Every washing machine is provided with a suds pump for draining the washing/rinsing suds, which can deliver liquids via the drain-off tubing up to a height of 1m, measured from the standing level of the machine. For delivery heights above 1m please establish contact with the AEG customer service. -
Page 43: Technical Data
Installation and Connection Instructions Technical data Height x Width x Depth 85x60x60cm Depth with open door 95cm Height adjustment approx. +10/-5mm Weight when empty approx. 85kg Load (depending on the program) max. 5kg Area of use Household Wash cycle drum speed max. -
Page 44: Service Departments
Service Departments SERVICE DEPARTMENTS... -
Page 45: Guarantee Conditions
Guarantee Conditions GUARANTEE CONDITIONS Záruka, servis a náhradní díly Jestli¤e po tìchto kontrolách závada stále existuje, Podmínky záruky – spot – spot – v – ka – tato záruka platí vedle va Výjimky – po – náklady spojené s po –... -
Page 46: Index
Index INDEX Calcium ......30 Rating Plate ..... . 9 Conditioner . -
Page 47: Service
Service SERVICE If a malfunction should occur at the appliance, refer first to the section "What to do when ..." in these user instructions. If you do not find any applicable instructions there, contact your customer service centre. (Addresses and telephone number can be found in the "Service Depart- ments"... - Page 48 AEG Hausgeräte GmbH Postfach 1036 D-90327 Nürnberg http://www.aeg.hausgeraete.de © Copyright by AEG H 243 288 540 - 01 - 1099...
Need help?
Do you have a question about the OKO-LAVAMAT 60300 and is the answer not in the manual?
Questions and answers