Table of Contents
Advertisement
Advertisement
Table of Contents

Related Manuals for AEG LAVAMAT 60900


Summary of Contents for AEG LAVAMAT 60900
- Page 1 LAVAMAT 61900/60900 Washing machine User information...
-
Page 2: Dear Customer
Dear customer, Please read this User Information carefully and keep it to refer to at a later date. Pass this User Information on to any subsequent owner of the appli- ance. The following symbols are used in the text: Safety instructions Warning: Notes that concern your personal safety. -
Page 3: Table Of Contents
Contents Operating Instructions Safety ............Description of the appliance . - Page 4 Installation and connection instructions ....26 Safety information for the installation......26 Installing the appliance .
-
Page 5: Operating Instructions
Operating Instructions Safety Prior to using for the first time • Follow the ”Instructions for installation and connection”. • If the appliance is delivered in the winter months when there are mi- nus temperatures: Store the washing machine at room temperature for 24 hours before using for the first time. -
Page 6: General Safety
General safety • Repairs to the washing machine must only be carried out by qualified service engineers. • Never use the washing machine if the mains cable is damaged; or if the control panel, work top or plinth area is damaged such that the inside of the appliance is freely accessible. -
Page 7: Description Of The Appliance
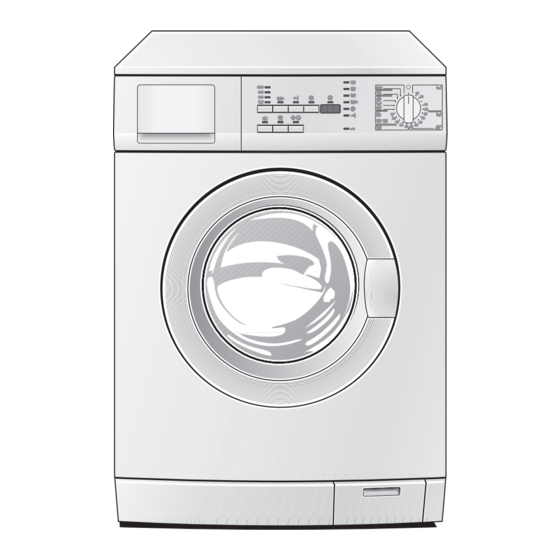
Description of the appliance Detergent dispenser drawer Screw feet (height adjustable) Control panel SPIN/RINSE HOLD button DELAY TIMER button Programme option buttons START/PAUSE button Multidisplay Programme Progress display Programme knob DOOR indicator Control panel Rating plate (behind door) Plinth flap/ Drain pump... -
Page 8: Programme Overview
Programme overview Programme ECO (ENERGY SAVING) (COTTONS/LINEN) 95, 60, 50, 40, 30 (EASY-CARES) 60, 50, 40, 30 l (EASY IRON) 40 (DELICATES) 40, 30 (WOOL/SILK/HANDWASH) 40, 30, X (COLD) (GENTLE RINSE) (DRAIN) (SPIN) a (REFRESH) 1) A 10 litre bucket contains approx. 2.5 kg of dry washing (cotton) 2) Programme settings for tests in accordance with or support of EN 60 456 and IEC 60 456 are described in the section “Consumption values”. - Page 9 Energy-saving programme at 60 °C for lightly to normally soiled whites/ coloureds made of cotton/linen. Programme for normally to heavily soiled whites/coloureds made of cotton/ linen. Programme for easy-care mixed fibres and synthetics. Special programme which washes at 40 °C for easy-care fabrics which after being washed using this programme need to be ironed only lightly or not at all.
-
Page 10: Before The First Wash
Before the first wash 1. Open the detergent dispenser drawer. 2. Pour about 2 litres of water through the detergent dispenser drawer into the washing machine. This closes the water container when the next programme is started and the economy valve can function properly. 3. -
Page 11: Running A Washing Cycle
Running a washing cycle Opening the door/Loading the washing 1. To open the door: gently pull the handle on the door. When the machine is switched on, the lights (START/PAUSE) indicate whether the door can be opened: light (DOOR) lit green lit green lit red or is off... - Page 12 Dosing depends upon: – the washing’s degree of soiling, – the size of the load – the degree of hardness of the water supply. • If the manufacturer does not give instructions for small loads: for a half load, use a third less, for a very small load, use only half of the detergent that is recommended for a full load.
-
Page 13: Switching On The Appliance/Selecting A Programme
Switching on the appliance/selecting a programme Set the programme and tempera- ture using the programme knob. By selecting a programme, you switch the appliance on at the same time. – The programme progress display indicates the programme steps that the selected programme will perform. -
Page 14: Selecting The Programme Options
Selecting the programme options If desired, press the programme op- tion button(s). The corresponding indicator lights up. If “Err” is flashing in the multi- display, the programme option se- lected cannot be combined with the wash programme set. EXTRA RINSE With the programmes ECO (ENERGY SAVING), (DELICATES), tional rinses are carried out (e. -
Page 15: Starting A Programme
If the display is showing 23h and you press the button again, the time delay will be cancelled. 0' will appear followed by the length of the wash programme that has been set. 3. To activate the delay timer, press the time remaining to the start of the programme is continuously displayed (e. -
Page 16: Interrupting A Programme/Adding Washing
Interrupting a programme/Adding washing Interrupting a programme • A washing programme can be interrupted at any time by pressing the button (START/PAUSE) and then re-started by pressing the button (START/PAUSE) again. • To stop the washing machine before the programme has ended, turn the programme knob to water in the appliance! Adding washing... -
Page 17: Child Safety Device
Child safety device When the child safety device is set, the door can no longer be closed. Setting the child safety device: Use a coin to turn the knob (on the inside of the door) in a clockwise di- rection as far as it will go. Warning! The knob must not be sunk-in after being set, otherwise the child safety device is not active. -
Page 18: Detergent Dispenser Drawer
Detergent dispenser drawer The detergent dispenser drawer should be cleaned regularly. 1. Remove the detergent dispenser drawer by pulling it firmly. 2. Remove the conditioner insert from the middle compartment. 3. Clean all parts with water. 4. Put the conditioner insert in as far as it will go, so that it is firmly in place. -
Page 19: What To Do If
What to do if... Remedying small malfunctions If during use of the appliance one of the following error codes is shown in the multi-display: – E10 (Problems with water inflow), – E20 (Problems with water outflow), – E40 (door open), please have a look at the following table. - Page 20 Problem The washing machine vibrates when operating or is not stable. Washing has not been spun. Water is running out from under the washing machine. Washing water is foam- ing excessively. At the end of the washing cy- cle, the spin stops. E20 appears.
-
Page 21: If The Wash Results Are Not Satisfactory
Problem The door cannot be opened when the wash- ing machine is switched Washing is heavily creased. If the wash results are not satisfactory Washing is grey and scale is being deposited in the drum • Too little detergent is being used. •... -
Page 22: Carrying Out An Emergency Drain
Carrying out an emergency drain Warning! Before emergency draining, switch off the washing machine and remove the mains plug from the socket. Warning! The water that comes out of the emergency drain hose may be hot. There is a risk of scalding. Let the water cool before performing an emergency drain. -
Page 23: Drain Pump
Drain pump The drain pump is maintenance-free. It is only necessary to open the pump cover if there is a malfunction and water is no longer being pumped out, e. g. if the pump wheel is blocked. Please make sure before loading the washing that there are no foreign bodies in the pockets or caught between the washing. -
Page 24: Disposal
Disposal Packaging material The packaging materials are environmentally friendly and can be recy- cled. The plastic components are identified by markings, e.g. >PE<, >PS<, etc. Please dispose of the packaging materials in the appropriate container at the community waste disposal facilities. Old appliance The symbol on the product or on its packaging indicates that this... -
Page 25: Technical Data
Technical data This appliance conforms with the following EU Directives: – 73/23/EEC dated 19.02.1973 Low Voltage Directive – 89/336/EEC dated 03.05.1989 EMC Directive inclusive of Amending Directive 92/31/EEC – 93/68/EEC dated 22.07.1993 CE Marking Directive Height x Width x Depth Depth when door is open Height adjustment Load (depending on programme) -
Page 26: Installation And Connection Instructions
Installation and connection instructions Safety information for the installation • This washing machine cannot be built-in. • Before using for the first time, check the appliance for damage sus- tained while it was being transported. Do not under any circumstanc- es connect an appliance that is damaged. -
Page 27: Installing The Appliance
Installing the appliance Transporting the appliance Warning! The washing machine is very heavy. Risk of injury. Be careful when lifting. • Do not lay the appliance on its front nor on its right side (as seen from the front). Electrical components may get wet. •... - Page 28 2. Remove the power supply cable and the draining hose from the hose holders on the rear of the appliance. 3. With a suitable spanner unscrew and remove the central rear bolt A. Slide out the relevant plastic spacer. 4. Unscrew and remove the two large rear bolts B and the six smaller bolts...
- Page 29 5. Remove the bracket D. 6. Refit the six smaller bolts C. 7. Open the porthole and remove the polystyrene block fitted with the ad- hesive tape on the door seal. 8. Fill the smaller upper hole and the two large ones with the correspond- ing plastic plug caps supplied in the bag containing the instruction booklet.
-
Page 30: Where To Install
Connect the water inlet hose as described under the paragraph “Water inlet”. Where to install Important! The appliance must not be used in a room where there is a danger of frost. Frost damage or impaired operation! Frost damage is not covered by the warranty. -
Page 31: Electrical Connection
Electrical connection Details about the voltage, type of supply and the fuses required are to be found on the rating plate. The rating plate is next to the doorway. Connecting to the water supply Permitted water pressure The water pressure must be at least 0.5bar (=5N/cm may be a maximum of 10bar (=100N/cm –... -
Page 32: Aqua Control
4. Connect the hose to a tap with a 3/4” thread. Always use the hose supplied with the appliance. Installation should comply with local water authority and building regula- tions’ requirements. A minimum water pressure of 0.05 MPa (0.5 bar) is required for safe op- eration of the appliance. -
Page 33: Water Drainage
Water drainage The maximum permitted difference between the height of the surface on which the appliance is installed and the water outlet is 1 metre. Only original hoses may be used to extend hoses. (A maximum of 3 m laid on the floor and then 80 cm vertically). The Customer Care Depart- ment stocks outlet hoses of different lengths. -
Page 34: Guarantee/Customer Service
In diesen Ländern gelten die Garantiebedingungen der örtlichen Part- ner. Diese können dort eingesehen werden. Further after-sales service agencies overseas In these countries our AEG-Electrolux agents’ own guarantee conditi- ons are applicable. Please obtain further details direct. Autres agences étrangères assurant le service après-vente Dans ces pays, les conditions de garantie des concessionnaires de la ré-... - Page 35 Utama 7 New Industrial Zone 4600 Petaling Jaya Netanya, 42504 Tel.: 3 795 1084 Israel Fax: 3 795 1082 Namibia AEG NAMIBIA (PTY) LIMITED-Jeppe Street Northern Industrial Area Windhoek Tel.: (061) 21-6082/4 Fax: (061) 217838 New Zealand Monaco Corporation Ltd.
- Page 36 Tel.: 0065 64638484 Fax: 61 1234 238 Fax: 0065 64638488 Slovakia Rep. South Africa Electrolux Slovakia S.R.O. AEG (Pty) Ltd. Seberiniho 1 55, 12th Road 821 03 Bratislava P.O. Box 1 02 64 Tel.: 02 4333 4322, 4355 Kew/Johannesburg 2000 Fax: 02 4333 6976 Tel.: 8069111...
-
Page 37: European Guarantee
European Guarantee This appliance is guaranteed by Electrolux in each of the countries listed at the back of this user manual, for the period specified in the appliance guarantee or otherwise by law. If you move from one of these countries to another of the countries listed below the appliance guarantee will move with you subject to the following qualifications: •... - Page 38 Magyarország Nederland Norge Österreich Polska Portugal Romania Schweiz/Suisse/ Svizzera Slovenija Slovensko Suomi Sverige Türkiye Ðîññèÿ H-1142 Budapest XIV, +36 1 252 1773 Erzsébet királyné útja 87 Vennootsweg 1, 2404 CG - +31 17 24 68 300 Alphen aan den Rijn +47 81 5 30 222 Risløkkvn.
-
Page 39: Service
Service In the event of technical faults, please first check whether you can remedy the problem yourself with the help of the operating instruc- tions (section “What to do if…”). If you were not able to remedy the problem yourself, please contact the Customer Care Department or one of our service partners. - Page 40 www.electrolux.com 132 973 490-00-220207-01 Subject to change without notice...
Need help?
Do you have a question about the LAVAMAT 60900 and is the answer not in the manual?
Questions and answers