Table of Contents
Advertisement
Quick Links
Advertisement
Table of Contents

Subscribe to Our Youtube Channel
Related Manuals for Konica Minolta KIP Color 80


Summary of Contents for Konica Minolta KIP Color 80
- Page 1 Auto Stacker (K-113) USER’S MANUAL Version A.0 March 20, 2007...
- Page 2 Thank you for purchasing the Auto Stacker (K-113). This USER'S MANUAL contains functional and operational explanations for the Auto Stacker (K- 113). Please read this USER'S MANUAL carefully before using the Auto Stacker (K-113). Please keep this USER'S MANUAL for future reference. Installed in USA This device complies with part 15 of the FCC Rules.
-
Page 3: Safety Warnings
Safety Warnings The following warnings are very important in order to safely use this machine. These notes are important in preventing danger to the operator or operation of the product. The following symbols are found throughout the USER’S MANUAL and have the following meaning: WARNING This WARNING mark means that there is a possibility of death or serious... - Page 4 WARNING Ground the machine with a correct ground source or you may be electrically shocked. 1. The power source should be as follows: 100-240VAC, 50/60Hz, 3A or higher 2. Use a circuit with a dedicated breaker. 3. Install the machine as close to the wall outlet as possible. 4.
- Page 5 CAUTION Do not install the machine in a humidified room or a dusty room. Also, do not install the machine on an unstable floor as injuries may occur. 1. Unplug the power cord before moving the equipment. The power cord may damage and it may result in a fire or an electrical shock.
-
Page 6: Table Of Contents
TABLE OF CONTENTS Before Use page 1. 1 Installation Requirements 1. 2 Specifications 1. 3 Appearance Basic Operation page 2. 1 Turning On 2. 2 Turning Off 2. 3 Stacking Support Troubleshooting page 3. 1 Paper Jam... -
Page 7: Before Use
Before Use 1. 1 Installation Requirements The following conditions have to be satisfied when installing the Auto Stacker (K-113). 1. Satisfy the following input power condition. Voltage 100-240VAC Current 3A or higher Frequency 50 / 60Hz. The Auto Stacker (K-113) can be supplied with any voltage within 100V to 240V. If the voltage is within this range, please connect to the outlet simply. -
Page 8: Specifications
(1,436mm in depth for using ST Wire Tray) Weight Approximately 46.8kg (103.2 lbs) NOTE Auto Stacker (K-113) is intended for the exclusive use of the KIP Color 80 Digital Color Printer (K-107). NOTE These specifications are subject to change without notice. -
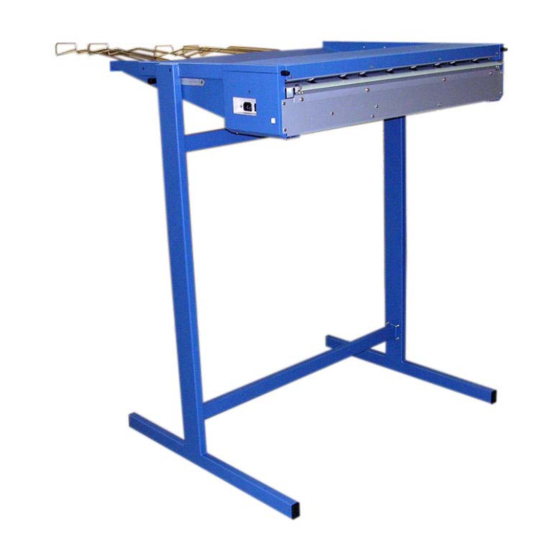
Page 9: Appearance
250VAC / 10A KP-4819D KS-31A 4.8m Modular Connector Connect Modular Cable here Exclusive use for communication with the KIP Color 80 (K-107) (Do not connect a telephone line) (RJ-11 5VDC max, less than 3m) Power Indicator Indicates the machine’s power on... -
Page 10: Basic Operation
Basic Operation 2. 1 Turning On Press “I” side of the Power Switch (1) on the left. LED (2) lights when ready. 2. 2 Turning Off Make sure of completion of the print transportation. Press “O” side of the Power Switch (1) on the left. -
Page 11: Troubleshooting
Troubleshooting 3. 1 Paper Jam NOTE (1) To show removing a jammed print, some parts and equipment are omitted for clarification. (2) Make sure that the printer had the print cut. If undone, do it manually according to the printer’s manual. 1. - Page 12 3. Pulling ST Tray Stopper (3), make a 90 degree turn in either direction to unlock Stacker Unit (4). 3: locked 3: unlocked 4. Pull Upper Panel Assy (1) up again. Keeping Upper Panel Assy (1) open with your hand, draw Stacker Unit (4) to the back side with the other hand until it stops (about 200mm backward to stop).
- Page 13 6. Remove the print from inside the printer. Refer to your printer’s documents for removing a jammed print. CAUTION The print will be remained in Fuser Unit of the printer. Handle the print with great care to avoid burning yourself. 7.
Need help?
Do you have a question about the KIP Color 80 and is the answer not in the manual?
Questions and answers