Advertisement
WARNINGS AND CAUTIONS

If an unstable fracture is suspected or unknown, with or without a sustained trauma, ensure additional spinal precautions are implemented to immobilize the spine.
Use of a cervical collar may increase intracranial pressure (ICP) through jugular venous compression.
Use of a cervical collar may increase complexity of airway management.
Cervical spine immobilization, including use of a cervical collar, has been associated with:
- Impaired respiratory effort and forced expiratory volume
- Pneumonia
- Aspiration
- Worsening of existing cervical spine injury
- Severe neurological deterioration in patients with ankylosing spondylitis
- Triggering of non-compliance or agitation
- Delay to definitive treatment
- Impaired physical examination/secondary survey

Cervical spine immobilization, including use of a cervical collar, has been associated with:
- Increased pain and discomfort, which may lead to increased spinal movement
- Impaired swallowing
Perfumes and harsh cleaning agents should not be used on or under the collar, as they may compromise the integrity of materials.
Use of a cervical collar for cervical spine immobilization is not recommended in situations where patients are awake, alert, not intoxicated, without neck tenderness or pain and without abnormal sensory or motor findings on examination.
Regular cleaning of the collar, pads and the skin beneath along with inspection of the skin for any signs of irritation is required to reduce the risk of skin ulceration. Bedridden patients are at an increased risk for skin ulceration.
Precautions:
- At least two persons are needed for initial collar placement: one to maintain the patient's head and neck in proper alignment, the second to fit the collar.
- Collar removal or any adjustments to the collar should be done with physician permission only and according to the physician's instructions.
- Unless otherwise specified by the physician, the patient should not remove the collar except to wash under it and change the pads.
- The patient will need a second person to help when cleaning the collar.
These instructions do not supersede hospital protocol and/or direct orders of the patient's healthcare professional.
GENERAL SAFETY INSTRUCTIONS
The healthcare professional should inform the patient about everything in this document that is required for safe use of this device.
Any serious incident in relation to the device must be reported to the manufacturer and relevant authorities.
The patient should immediately contact a healthcare professional:
- If there is a change or loss in device functionality, or if the device shows signs of damage or wear hindering its normal functions.
- If any pain, skin irritation, or unusual reaction occurs with the use of the device.
The device is for single patient – multiple use.
SYMBOLS
 | Medical Device |
 | Magnetic Resonance (MR) safe |
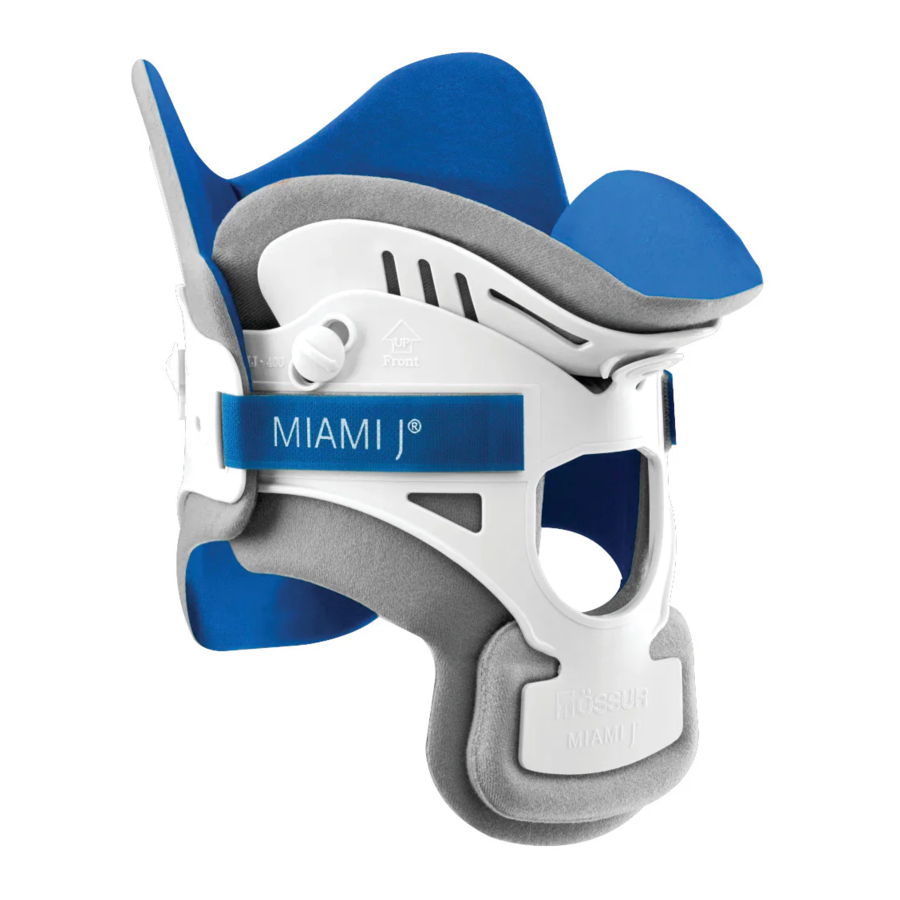
PRODUCT OVERVIEW

(Fig. 1)
- Front
- Chin Support
- Tracheal Opening
- Sternal Pad
- Hook-and-Loop Strap
- Angulation Buttons
- Occipital Support
- Back
INTENDED USE
The device is intended to provide gross immobilization to the cervical spine
The device must be fitted and adjusted by a healthcare professional. X-ray and CT lucent.
Indications for use
Conditions requiring gross immobilization of the cervical spine. This may include:
- C-Spine precaution for trauma patients
- Immobilization for pre and post c-spine surgery
- Other conditions requiring gross immobilization of the mid-cervical spine
Contraindications
- Patients with a compromised airway or known spinal deformities such as ankylosing spondylitis.
- Patients with penetrating trauma injuries.
FITTING INSTRUCTIONS
Size Selection

Miami J collar sizes are phenotype-driven. To determine the appropriate collar size, identify your patient´s phenotype according to the Sizing Silhouettes (Fig. 2) & Simple Sizing Questions.
Specialty sizes < 40% of Population
- 200S - Super Short/Kyphotic: Does your patient have a kyphotic (chinon-chest) neck?
- Kyphotic / Chin-on-chest / Geriatric / Osteoporitic and/or ankylosing spondylitic.
- 200L - Stout: Does your patient have a very large neck circumference?
- Very large circumference / Obese / "No-neck" / Massive shoulders.
- 250 - Xs: Does your patient have a very short, thin neck?
- Very short thin neck / Principally female / More prevalent in the Asian population / Rare.
- 500 - Tall: Does your patient have a long tall neck?
- Long, tall neck / "Swan neck" / Young women / Adolescents.
Standard sizes > 60% of Population
- 400 - Regular: Is your patient female?
- Female / Standard size for mature women / Thin, mature men.
- 300 - Short: All other adults.
- Standard size for adult men / Short-necked women.

Quick Size Check (Optional)
Use your fingers to measure the vertical chin-to trapezius distance (Fig. 3). On the collar, this measurement corresponds to the distance from the bottom of the chin support to the bottom edge of the collar plastic.
Note: Proper sizing is critical to achieving comfort and proper immobilization.
Supine Application
Ensure that correct spinal protocol is followed.
- Slide the Back behind the patient´s neck and center it, noting arrow on panel pointing up (Fig. 4). Ensure the Sorbatex padding extends beyond the edge of the plastic.
Note: Long hair should be placed outside of the plastic.

- Flare the sides of the Front out, slide it up the chest wall and scoop it up under the chin (Fig. 5). Sides of the collar Front should be oriented up, off the trapezius, and toward the ears.

- While holding the Front securely, curl the ends snugly against the patient´s neck (Fig. 6). With the Front of the collar inside the Back, apply the Hook-and-Loop Strap and secure the opposite side of the collar in the same fashion. Tighten straps alternately to an equal length on both sides.

- Hook-and-Loop Straps must be aligned to the Front adhesive sections. Excess may be trimmed (Fig. 7).
Note: Collar application must be secure to ensure proper fit, maintain alignment, and to prevent the chin from slipping inside. If the patient can slip his/her chin inside the collar, it is clear indication that it is not snug enough.


Device Adjustments
Angulation Buttons: May be used to fine-tune the fit of the collar for better anatomical conformity, pressure distribution, and comfort. It is easier to adjust the Angulation Buttons if you first remove the collar (Fig. 8).

Chin Support Positioning Guidelines:
- Slide up to relieve chin tip pressure or discomfort.
- Slide down to relieve jaw mandibular pressure or discomfort
Occiput Support Positioning Guidelines:
- Slide up to relieve occipital pressure or discomfort.
- Slide down to enhance extension control.
Note: For a predominately supine patient keep Occipital Support Buttons set to top position. This will direct the top edge of the collar shell into the bed.
Sternal Pad: The sternal pad may be removed if the anatomy dictates, for comfort during sleep and/or during meals to make chewing and swallowing easier (Fig. 9).

Other Modifications:
Upon a healthcare professional's recommendation, collar corners and edges may be modified or trimmed to relieve discomfort or pressure.
Final Fitting Checklist
A properly applied device will look like Fig. 10.

- Collar extends from mandible to just below sternal notch.
- Chin is centered comfortably in Chin Support. Chin should not extend over edge of Sorbatex pad, nor fall inside collar.
- Straps are aligned to the Hook landing area and are an equal length.
- Sides of Back should overlap sides of Front.
- Front of collar angled up toward ears. Lower plastic edge should not be resting on patient´s clavicles nor digging into trapezius.
- No plastic touching skin. Sorbatex pads extend beyond all plastic edges.
- No slack or gaps in any of the straps.
- Tracheal opening and posterior vent are midline.
- Collar sits away from the neck. There should be a "finger" gap between the tracheal opening and the neck.
If the collar is fit too closely/tightly to the neck, size up to the next taller size.
Accessories and Replacement Parts
Please refer to the Össur catalog for a list of available replacement parts or accessories.
USAGE
Cleaning and care
- Remove the pads from the plastic shells.
- Hand-wash using mild detergent and rinse thoroughly.
- Wring out the excess water and squeeze in a towel. Lay flat to air dry.
Note: Do not machine-wash, tumble dry, iron, bleach, or wash with fabric softener.
Note: Avoid contact with salt water or chlorinated water. In case of contact, rinse with fresh water and air dry.
Device plastic can be washed with a damp cloth and mild soap.
- Replace the pads by attaching the grey/dull side to the hook on the inside of the plastic shells.
Documents / ResourcesDownload manual
Here you can download full pdf version of manual, it may contain additional safety instructions, warranty information, FCC rules, etc.
Advertisement


Need help?
Do you have a question about the MIAMI J and is the answer not in the manual?
Questions and answers