Table of Contents
Advertisement
Quick Links
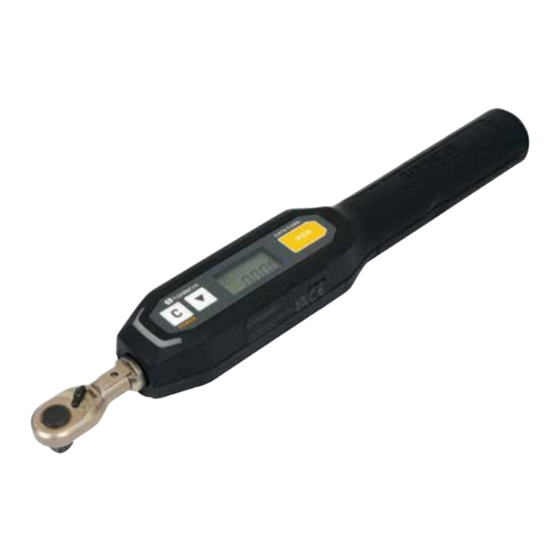
Digital Torque Wrench
for Small Capacity Torque Control
Model CES-G
Operating Instruction
To use this product properly and safely, please read
this operating instruction carefully before use. If you
have any question about the product and its operations,
please contact your nearest distributor or Tohnichi Mfg.
Co., Ltd.
Advertisement
Table of Contents

Related Manuals for Tohnichi CES10NX8D-G


Summary of Contents for Tohnichi CES10NX8D-G
- Page 1 Model CES-G Operating Instruction To use this product properly and safely, please read this operating instruction carefully before use. If you have any question about the product and its operations, please contact your nearest distributor or Tohnichi Mfg. Co., Ltd.
-
Page 2: Table Of Contents
Contents Safety Precautions 3 Operating Precautions 6 1. Outline 7 2. Features 7 3. Compositions 8 3-1. Packing contents 8 3-2. Before use 8 4. Charging 9 5. How to use 10 5-1. Run mode 10 5-2. Peak mode 11 5-3. -
Page 3: Safety Precautions
Safety Precautions へ Read these operating instructions carefully before use. For any questions, contact a Tohnichi authorized distributor or Tohnichi office. Keep these instructions for future use. Safety symbol This symbol indicates attention is required for your safety. When this symbol !... - Page 4 4. Surely use designated accessories and optional articles only. - Please do not use other accessories and optional articles not designated in this manual. - Doing so may cause an accident or injury. 5. Do not put a storage battery into fire. It may burst or a toxic substance may come out.
- Page 5 It may cause electric shock and fire by short. Ask distributors or Tohnichi for damaged case, other parts replacement, and repair. 10. Do not insert a foreign object such as a needle into the buzzer opening on the side of the case.
-
Page 6: Operating Precautions
(12) Connect body and interchangeable head surely. If there is strange smell or fire on usage, stop use. Move this instrument to a safety place, and contact Tohnichi. * For handling of used battery * Nickel metal hydrogen battery is used on this product. -
Page 7: Outline
Outline The CES-G series is a small capacity type digital torque wrench for tightened bolt inspection and bolt tightening work. The angle measurement function enables advanced tightening work based on torque and angle. In addition, by installing an optional wireless module, measurement data and OK/NG judgment results can be transmitted wirelessly. -
Page 8: Compositions
Composition 3-1. Packing contents Interchangeable head QH 1 pc Body : 1pc Operating instruction 1PC 1 pc Quick start manual 1 pc Calibration certificate 1 pc Dummy plug 1 pc * Charger (BC-3-G) is sold separately. 3-2. Before use • Remove the dummy plug of the DC jack attached to the CES main unit before using. •... -
Page 9: Charging
4. If the blue lamp on the charger turns on and red lamp blinks, it indicates an error. Stop charging immediately, and contact Tohnichi or nearest Tohnichi distributor. 5. Temperature must be kept within 0 to 40 Celsius range when charging. -
Page 10: How To Use
How to use 5-1. Run mode (counter value: 0000) [Without angle setting] Wireless connection Torque unit Battery remaining Counter Torque [With angle setting] When the angle function is turned on, it is possible to switch between the torque screen and the angle screen on the run mode screen. -
Page 11: Peak Mode
5-2. Peak mode (The counter : “0001” to “1000”) [Without angle setting & with measurement data memory] Wireless connection Torque unit Battery remaining Counter Torque [With angle setting & with trigger torque and measurement data memory When the angle function is ON, the trigger torque is set and there is measurement data memory, the memorized torque and angle are alternately displayed on the screen. -
Page 12: Key Operation
5-4. Key operation C (Power) Key ● When the power is off, press to turn on the power. If the angle function is set to ON, the angular velocity will be checked when the power is turned on, so keep it stationary for 2 seconds. ●... - Page 13 MEM Key ● Counter up. [RUN mode (counter 0000)] ● Press and hold the MEM key for 2 seconds when the angle function is set to ON. ● Then, the torque display and the angle display are switched. ● Press and hold the MEM key for 5 seconds to enter setting mode. [PEAK mode (counter 0001-1000)] ●...
-
Page 14: Judgment
Judgment 6-1. Judgment You can set the threshold for torque and angle, the tool judges the result by your settings. Double tightening Judgment OK Angle NG Over torque θ θ θ θ ※ Trg : Trigger torque TL : Lower limit torque TH : Higher limit torque ※ θ... - Page 15 NG display screen (Example) Judgment : DN Contents : Tightening direction NG Display : dn-ng (Example) NG display screen Judgment : L- Torque Judgment : LONG Angle Judgment : (No angle setting) Display : L--ng (Example) NG display screen Judgment : OH Torque Judgment : OK Angle Judgment...
-
Page 16: Judgment List
6-2. Judgment list Judgment result Settings Judgment code OK/NG No torque judgment or not reach on minimum peak torque hold (No judgment) With torque judgment settings and if D N used wrong tightening direction (Tightening direction NG) (Torque OK) With torque judgment settings and no angle judgment setting (Torque LO-NG)... - Page 17 Torque Angle Judgment Conditions Judgment Conditions With torque setting TL ≦ T ≦ TH No angle setting LO-NG T < TL No angle setting HI-NG TH < T No angle setting TL ≦ T ≦ TH θ L( θ w) ≦ θ ≦ θ H TL ≦...
-
Page 18: Explanation Of Each Mode
Explanation of each mode CES-G has a Measurement mode and a Display mode, each with different functions. 1. Measurement mode Measurement mode 1 (Inspection mode) • Measurement mode 1 is mainly used together with the higher and lower limit torque display mode (peak mode) for retightening and loosening torque inspections. - Page 19 MEM key will reset the CPU then press the C (POWER) key again. * If the “Err9” display does not disappear, there may be an abnormality in the sensor or circuit board. Please contact your distributor or Tohnichi. 3. Angel speed check/zero adjustment With the angle setting ON, when turning on the power, angle speed check will be automatically conducted to make zero adjustment.
-
Page 20: Operation Examples
8. Residual battery indicator Residual battery amount is indicated on the display as follows: Full Half remaining Time to charge battery No battery. Please charge immediately. In this condition, “LoBATT” appears on LCD screen and all keys, Flashing except for power key will be disabled, and it automatically turns off in 1 minute. - Page 21 1. Set to Peak mode (counter between "0001" to "1000") and start measurement. 2. After releasing the torque load, the tool judges the measured data due to Auto reset timer setting. (If Auto reset timer is off, press "MEM" key to judge the result) [When judgment is OK] When judgment is OK, the blue LED lights for about 0.5 seconds.
- Page 22 9-2. Tightening mode (Measurement mode 2) examples Shows example on the following settings: Angle setting Measurement mode setting Lower limit torque setting Lo_t 3.000 N・m * Set both the angle Higher limit torque setting HI _ t 4.500 N・m setting and trigger Trigger torque setting 0.500 N・m torque setting to...
- Page 23 5. After measuring and releasing the torque load, the tool judges the measured data due to Auto reset timer setting. (If Auto reset timer is off, press "MEM" key to judge the result) [When judgment is OK] When judgment is OK, the measurement data is stored in memory. [When judgment is NG_NG output setting : ng-1] When judgment is NG, the red LED lights.
-
Page 24: External Output Format
2400 / 4800 / 9600 / 19200 / 115200bps Parity None Data length 8 bits Stop bit 1 bit Flow control Hardware (RTS/CTS) ※ When using USB (serial output compatible with USB connector), Use the optional communication cables. CES-G USB C type (No.586) CES-G USB A type (No.587) When using optional USB (USB connector corresponding serial output) cable, catalog #586 or #587, driver software is required to be installed on your PC from Tohnichi Website. (https://www.tohnichi.co.jp/products/detail/280) ※ When outputting data via USB, remove the CES connector cover as shown below. ※ After that, insert the CES USB connector and USB cable terminal all the way. Connector cover USB TypeC cable (Optional) -
Page 25: Communication Format
10-2. Communication format ● When set “dF-1” for communication format setting 1 2 3 4 5 6 7 8 9 10 11 12 13 14 15 16 17 18 19 20 21 0 0 0 1 + 1 0 Memory counter Torque unit Header Torque value... - Page 26 ●When set “dF-3” for communication format setting (CEM3-BTA compatible) 1 2 3 4 5 6 7 8 9 10 11 12 13 14 15 16 17 18 19 20 0 0 1 + 1 0 Header Memory counter Torque unit Torque value 21 22 23 24 25 26 27 28 29 30 31 32 33 34 35 36 37 38 39 40 + 0 9 0...
-
Page 27: Settings From External Device
10-3. Settings from external device By entering a command from an external device, you can change the CES settings. Be sure to change the settings by command communication when there is no torque load. When changing two or more settings in succession, after receiving the response command, wait at least 200ms before sending the next command. - Page 28 Sending Command AT046, * * * , * * *, * * * Register the double tightening judgment angle, lower limit angle, and upper limit angle at the same time. Action/Content Send in the order of double tightening judgment angle, lower limit angle, and upper limit angle.
- Page 29 3. Example ●When setting the higher limit torque to 3.500 and the lower limit torque to 2.500. External CES-G device ● Higher torque setting A T 0 3 7 , 3 5 0 0 , 2 . 5 0 0 CR LF ●Response signal R E 0 0 3 , O K...
-
Page 30: Various Setting
Various settings 11-1. Setting items Setting items Display Default Selectable from Note Angle function oFF / on Measurement 1 / 2 Mode 0 / within the torque Lower limit torque Lo_t range 0 / within the torque More than lower limit torque Higher limit torque HI_t range (0 can be set) -
Page 31: Setting By Key Operation
11-2. Setting by key operation Transition to setting screen (run mode_counter 0000) Press the ▼ key to set the counter to 0000 and enter the run mode. {Display when angle feature is OFF} If pressing the MEM key for 5 seconds or more, "SEt" is displayed. When you release the MEM key, the angle feature setting screen will appear. - Page 32 ● Measurement mode setting (Default : 1) Set measurement mode 1 (inspection mode) or measurement mode 2 (tightening mode). Go back to RUN mode Select Save and go to next * If measurement mode 1 is set while the double tightening detection angle is set, the value of the double tightening detection angle automatically becomes 0. * In the case of measurement mode 1, the setting of the double tightening detection angle is skipped.
- Page 33 ● Higher limit setting (Default : 0) Save and go to next Select digit Select • If the set value is lower than the lower limit torque value or outside the setting range, "S-Err" is displayed. • Use C (POWER) key to select digits, ▼ key to select values and MEM key to save and proceed to the next.
- Page 34 ● Lower angle limit setting (Default : 0) 角度起点からの下限角度を設定します。 Save and go to next Select digit Select value ● If the set value is lower than the double tightening detection angle, "S-Err" is displayed. ● Use C (POWER) key to select digits, ▼ key to select values and MEM key to save and proceed to the next.
- Page 35 ● Auto memory/Reset timer setting (Default: 0.0) Set the Auto memory/Reset timer. If no setting, set it to 0.0. Go back to RUN mode Select Save and go to next • Auto reset timer setting 0.0 (OFF) → 5.0 → 4.0 → 3.0 → 2.0 → 1.0 → 0.5 → 0.4 → 0.3 → 0.2 → 0.1 sec. •...
- Page 36 ● Buzzer setting (Default : on) Sets the buzzer on or off for the key operation, tightening completion signal, and pass/fail alarm sound. However, an over-torque alarm cannot be turned off. Select Go back to RUN mode Save and go to next * Use ▼...
- Page 37 ● External output communication mode setting (Default: USB) Select an external output format. (USb: PC output/bLE: Bluetooth Low/EnergybC: Bluetooth output) Wired communication is not possible when “bC”/”bLE” is set. ( Wireless module sold Go back to RUN mode Select Save and go to next separately) * When bC/bLE is selected, proceed to communication format setting.
- Page 38 ● External output parity setting (Default: NONE) Sets the communication parity for external output. (NONE: None/EVEN: Even number/ODD: Odd number) * When outputting data to a PC, match the software on the PC side. Go back to RUN mode Select Save and go to next * Use ▼...
-
Page 39: Data Output And Clear
Data output and clear 12-1. Batch measurement data output Batch output to the external in the format set in the communication format setting. 4. After setting the lower limit counter, 1. Set the counter to the upper limit of the press the MEM key. -
Page 40: Data Processing Function
12-2. Data processing function Performs statistical processing of the measured values in the specified range. 1. Set the counter to the upper limit of the 4. Set the counter to the lower limit of the data range using the ▼ key and press the data range you want to output with the ▼... -
Page 41: Data Clearance
12-3. Data clearance 11-3-1.1 Delete a single data 1. Set the counter number to be deleted. 2. Press "C" key to delete. Memory counter Memory counter Torque value Torque value 11-3-2. Delete the selected range of data. 1. Set the counter number to the upper end 5. -
Page 42: Error Messages
-If error message disappears, then it operates normally. MEM key is -If error message remains on the display, contact Err3 continuously pressed TOHNICHI or your nearest distributor to ask for repair. Err8 Err81 It needs to be repaired. Please contact TOHNICHI or Memory abnormality Err82 your nearest distributor to ask for repair. - Page 43 Turn off the power, keep it still, and then turn it back on with the C (POWER) key. If the Err display disappears, it can be used normally. If the Err display does not disappear, repair is required. Contact TOHNICHI or your nearest distributor to ask for repair. In case of error When checking the angular velocity, the "-"...
- Page 44 • • Check if the USB cable is connected to the CES unit. If so, remove the USB cable from the CES main unit. • If the "Err11" display does not disappear, contact your dealer or Tohnichi for repair. Example of CES main unit and wireless module connection Wireless module...
-
Page 45: Optional Accessories
Optional accessories 1. Charger (for 100V~240V) BC-3-G 2. Interchangeable heads CES5NX6D-G SH, QH CES10NX8D-G SH, RH, QHRQH, DH, HH, FH 3. Communication code * The interchangeable head PH (pipe wrench head) cannot be used. CES-G USB C type No.586 CES-G USB A type No.587 4. -
Page 46: Dimensions
Dimensions Torque Capacity Model Torque Accuracy [Nm] Min. - Max. 1digit ±2% 0.500-0.995 CES5NX6D-G 0.005 ±1% 1.00-5.00 ±2% 1.00-1.99 CES10NX8D-G 0.01 ±1% 2.00-10.00 Length [mm] Model Hand Force P [N] Weight [kg] Accessories L’ CES5NX6D-G 30.9 194.5 0.17 QH6D CES10NX8D-G 58.1 197.5 0.17... -
Page 47: Battery
Battery Battery life • Rechargeable approx. 500 times depending on using condition. • When the battery ends, replace to a new battery pack, BP-5. • Battery is empty at the time of delivery. Make sure to charge battery before use. How to install battery 1. - Page 48 ■Tohnichi Asia Technical Support Office (TATSO) TEL.+66 33 002307 FAX.+66 33 002337 271/184 Moo 6, Tambon Borwin, Amphur Sriracha, Chonburi 20230 Thailand ● All rights reserved. No reproduction or republication without written permission. ● ©Tohnichi Mfg. Co., Ltd. All Rights Reserved. 10.23.EN...
Need help?
Do you have a question about the CES10NX8D-G and is the answer not in the manual?
Questions and answers