Table of Contents
Advertisement
Quick Links
Advertisement
Table of Contents

Related Manuals for Oilon RE 96 05


Summary of Contents for Oilon RE 96 05
- Page 1 RE 28–48, RE 56–96 Installation and operation manual M8009 2147EN 25 October 2021...
-
Page 3: Table Of Contents
Contents Introduction Heat pumps covered in the manual............3 Product description..................3 Instructions and diagrams................4 Safety notice and warnings................ 4 Transportation and storage.................6 Scope of delivery..................7 Accessories....................8 Installation Installation site..................10 Dimensions, connections, and components..........11 Modbus connection................... 14 Installing temperature sensors Outdoor temperature sensor..............15 DHW tank sensor..................15... - Page 4 LPB bus configuration................37 Shared brine circuit pump................ 39 Separate heat pump for DHW heating............. 40 Technical data Technical data...................41 Compressor units..................45 Performance data..................46 EN 14285 Technical data sheets............. 59 Operating conditions................. 63 Condenser circuit and evaporator pressure loss........65 Pumps.......................
-
Page 5: Introduction
1 Introduction 1.1 Heat pumps covered in the manual Model Item code Refrigerant RE 28 05 RE2805 R-410A RE 33 05 RE3305 R-410A RE 38 05 RE3805 R-410A RE 42 05 RE4205 R-410A RE 48 05 RE4805 R-410A RE 56 05... -
Page 6: Instructions And Diagrams
1.3 Instructions and diagrams Document Designation Installation and operation manual M8009 RE 05 28–33 110415 Electric diagram RE 05 38–48 110414 Electric diagram RE 05 56–66 110412 Electric diagram RE 05 76–96 110413 Electric diagram Quick guide 34793587 1.4 Safety notice and warnings Read these instructions carefully before installation, commissioning, operation, or maintenance of the device. - Page 7 Electrical safety Once powered on, some of the unit’s components carry a hazardous voltage. Always pay attention to electrical safety when working with or near electrical components. Before any maintenance or servicing, switch off electricity using the main switch and ensure that there is no voltage present in the unit’s components.
-
Page 8: Transportation And Storage
1.5 Transportation and storage Storage Store the unit upright in a warm, dry place. Protect the device against water and dust. Do not stack goods on the unit. Transportation Transport the unit upright and protected against water and dust. Do not stack goods on the unit. -
Page 9: Scope Of Delivery
1.6 Scope of delivery Equipment and components Item PCS Designation Outdoor temperature sensor 36217226 Outdoor temperature sensor ver. 1 Delivered with a solar screen panel. NTC 1 k. Condenser pump, RE 05 28–48 34023075 Wilo-Stratos PARA 25/1-12 T16 180 mm 6h Condenser pumps, RE 05 56–96 34023075 Wilo-Stratos PARA 25/1-12 T16 180 mm 6h... -
Page 10: Accessories
Controller Piping diagram pos. HEATING CIRCUIT 3 TE232 Heating circuit 3 flow temperature P231 Heating circuit 3 pump Y11/Y12 FV232 Heating circuit 3 control valve B53/HMI3 TE233 Room temperature 3 REFRIGERANT CIRCUIT COMP1 Compressor Hot gas temperature Low pressure switch High pressure switch ... - Page 11 Accessory Remote connection device OZW672.01 OZW672.04 OZW672.16 Designation 36108094 36108107 36108268 Description Siemens OZW672. Remote connection for one, four, or 16 controllers. For remote connection through the Climatix IC cloud service or a direct IP connection. Local connection with a network cable or a USB cable. Connects to the heat pump controller through an LPB bus (DB+/MB–) and to a LAN or the internet through a network cable.
-
Page 12: Installation
2 Installation 2.1 Installation site Site planning and selection ● Install the unit and the associated equipment in a warm, dry place. ● The installation site’s ambient temperature must be within +5...+40 °C (non- condensing). ● No condensate should accumulate onto the unit’s components from ambient air (non-condensing atmosphere). -
Page 13: Dimensions, Connections, And Components
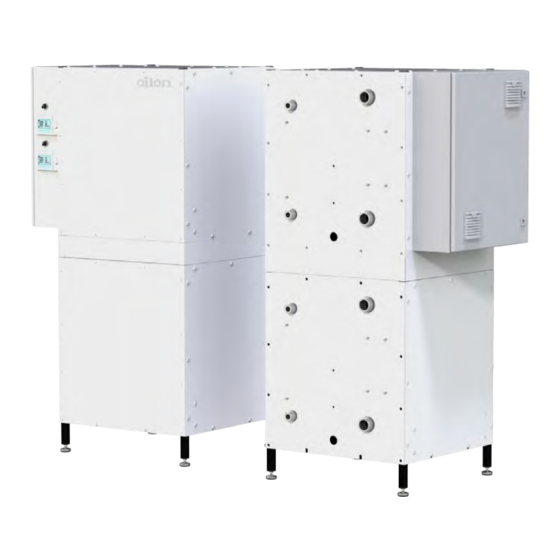
Floor drain The unit’s installation site must have a floor drain. The site’s floor should be inclined so that any runoff from the unit leads towards the drain. 2.2 Dimensions, connections, and components RE 28–48 RE, single compressor unit ver. 4 RE 05 28–48, single-unit configuration. - Page 14 RE 56–96 RE, two compressor units ver. 2 RE 05 56–96, two-unit configuration. 1: master unit, 2: slave unit. Pos. Item Control cabinet User interface HMI1 Upper unit (master) User interface HMI2 Lower unit (slave) Operating switch (ON/OFF) Upper unit (master) Operating switch (ON/OFF) Lower unit (slave) Adjustable feet...
- Page 15 ● Remove the transit bolt by unscrewing the screw from the bottom of the unit’s plate. ● The transit bolt has an M8 thread and a 13 mm hexagonal head. Switches and fuses RE 28–48 Marking Function Default position Operating switch ON/OFF Compressor motor protection Control fuse (automation system’s fuse) Condenser circuit pump Q9’s fuse...
-
Page 16: Modbus Connection
● RE 26–48: circuit breaker 1F1 ● RE 56–96: circuit breakers 1F1 and 2F1 In RE 56–96 models, operating switch S1 halts the upper compressor unit (master), and operating switch S2 halts the lower compressor unit (slave). 2.3 Modbus connection Accessory Modbus module OCI351.01/109... -
Page 17: Installing Temperature Sensors
3 Installing temperature sensors 3.1 Outdoor temperature sensor The heat pump’s outdoor temperature sensor (B9) is delivered with the heat pump. See the necessary sensor connections in the unit’s electric diagram. ● In two-unit RE models, connect the sensor to controller A1.0 (master controller, in the upper unit). -
Page 18: Buffer Tank Sensor
● If a dedicated tank is used, install the sensor in the lower section of the tank. ● If a combined storage tank is used, install the sensor in the upper section of the tank. ● Install the sensor probe (supplied with the unit) into a sensor pocket designed for 6-mm probes. -
Page 19: Flow Temperature Sensor For Heating Circuit 1
The sensor cable is approximately 4.5 m long. The sensor probe’s diameter is 6 mm and length 50 mm. The cable can be extended if required. Use a regular insulated copper twin cable for connecting the cable and extending the cable (0.5 mm , length <... - Page 20 If the pipe has a small diameter, create a 90 degree turn in the line flow direction with a tee fitting. Place the sensor pocket in the outlet that is parallel to the original line. The probe itself should extend upstream from the turn. This will allow you to install even a long sensor pocket (150–200 mm) along the line.
-
Page 21: Commissioning
4 Commissioning 4.1 Configuring automation settings 1. Keep the operating switches in the OFF position. ● In RE 28–48 models, the operating switch is S1. ● In RE 56–96 models, the operating switches are S1 and S2 2. Keep the compressor motor protection circuit breaker (breakers) in the OFF position. -
Page 22: Automation Factory Settings
● Starting up too frequently may cause damage to the soft starter. 6. Make sure that the compressor rotates in the right direction, see the table below. ● If the compressor rotates in the wrong direction, stop the compressor immediately by moving its motor protection circuit breaker (RE 28–48: F1; RE 56–96: 1F1) to the OFF position or by turning its operating switch to the OFF position. - Page 23 2355A06 ver. 1 RE 56–96 In standard two-unit RE heat pump deliveries, the units’ automation systems have been connected for joint use in a cascade. The cascade is controlled with a sensor (B10) installed in the cascade’s shared flow line. By default, the cascade system includes one shared brine pump and two condenser circuit pumps.
-
Page 24: Bleeding The System Of Air
Master Slave Line 6600 = 1 Line 6600 = 2 Master Slave 4.4 Bleeding the system of air You can use the relay test function (see section Relay test) to make it easier to bleed the system of air. ● Use the relay test to run the pump for a while, then stop, then run the pump again. ●... -
Page 25: Operation
5 Operation 5.1 Heat pump user interface Navigate the menus and settings by turning the control knob. Select a menu or setting by pushing in the control knob. Move to the previous menu by using the arrow or text field at the bottom of the screen. - Page 26 Settings ● time and language ● changing the user level ● resetting the heat pump ● emergency operation mode ● basic settings for the heating circuit assigned to the current user interface Diagnostics menu ● testing inputs and outputs ● bus settings ●...
-
Page 27: Commissioning Menus
Once you are on the correct page, Move from the status bar to one of push in the control knob again. the setpoints by turning the control knob. Go back by moving the cursor to the lower right-hand corner and ... - Page 28 3. Set the time. 4. Set the date. 5. Continue to the next page. 6. Select Operator unit 1. 7. Select All zones. 8. Select Autonomously for both. 9. Select For zone 1 only. 10. Exit the commissioning menus ...
-
Page 29: Start Page
5.3 Start page From the start page, you can switch all heating circuits assigned to the relevant user interface ON or OFF in one go. When switched ON, all heating circuits will operate in automatic mode. When switched OFF, all heating circuits will operate in frost protection mode. -
Page 30: Heating Curve
When using factory settings, the heating circuits have Automatic mode enabled, and the time program keeps Comfort mode on permanently. If a time program is used to switch from Comfort mode to Reduced mode, Comfort mode can be temporarily restored by selecting a temporary operating mode for the heater (from the Temporary setting). -
Page 31: Domestic Hot Water Menu
X-axis: outdoor temperature, °C. Y-axis: heating water temperature, °C. Heating curves when the room temperature setpoint is 22 °C, the heating curve displacement is 0 °C, and the upper and lower limits do not restrict the heating water temperature. 5.6 Domestic hot water menu Key domestic hot water settings can be changed in the Domestic hot water menu. -
Page 32: Changing The User Level
Changing the DHW temperature DHW time program (time program setpoint. 4). Activate the time program from line 1620. 5.7 Changing the user level The heat pump automation has four distinct user levels. The user level influences the menu structure and the setpoints displayed in the menus. The user levels are end user, commissioning, engineer, and OEM. -
Page 33: Diagnostics Menu
5.8 Diagnostics menu The diagnostics menu can be accessed only at the commissioning user level or above. The sub-menus displayed depend on the user level. Diagnostics menu. 5.9 Service menu The service menu can be accessed only at the commissioning user level or above. The service menu provides access to the parameter list. -
Page 34: Resetting The Heat Pump
1. Open the parameter list. 2. Select the desired menu from 3. Scroll through the pages in the the status bar. menu and select the relevant one. 4. Move the cursor to the desired setpoint and edit it. Advanced settings for heating circuits 1. -
Page 35: Relay Test
1. From the settings menu, select 2. Select Reset HP. 3. Change the setting to Yes. Special operations. In case of a fault In the diagnostics menu, select Reset. Select Confirm. Through the parameter list Open the parameter list. Enter the fault menu and select Reset HP on line 6711. - Page 36 Connector Output Function Marking Additional information Change-over valve Q3 Before the relay test, the change- over valve is in position B (B for building, heating circuit). ● Switching the power on turns the valve to position A (A for aqua, DHW tank). ●...
- Page 37 Relay test for a speed controlled condenser circuit pump Line Connector Output Function Marking Additional information 7700 QX13 Condenser circuit pump Q9 When the test is switched on and the desired speed is 7710 Output test UX1 selected on line 7710, the pump should start to run.
-
Page 38: Cascade Connection
6 Cascade connection 6.1 Cascade connection In a cascade connection, two or more heat pumps are connected to a system that is controlled by a single heat pump controller. One of the RVS61 heat pump controllers connected to the system operates as the master controller (which controls the entire system), and the other RVS61 controllers operate as slaves (which are controlled by the master controller). -
Page 39: Lpb Bus Configuration
Heat pumps in the cascade Master Slave Slave S0/G1 S0/G2 S0/G3 Line Line Line Master controller’s sensors, actuators, and S1 = Slave S0/G2 6600 = 1 6600 = 2 6600 = 3 functions S2 = Slave S0/G3 6.2 LPB bus configuration The system’s controllers are connected to an LPB bus (DB+/MB–). - Page 40 ● Check the cables and if necessary, use cables with a greater wire cross- sectional area. ● If there is no voltage present, the bus has short-circuited. ● If the voltage is negative, the polarity is incorrect. Bus addresses Each device in the bus has its own address. Set the device address from the user interface itself (line 6600).
-
Page 41: Shared Brine Circuit Pump
The segment ID and the device address constitute the controller’s entire address. The address can be, for example, S0/G1 or S0/G2, which means segment 0’s (S0) master (G1) and its first slave (G2). The ACS program can only be connected to device address 1 (the master controller). Any slave controllers connected to the bus will be displayed in the program through the master controller. -
Page 42: Separate Heat Pump For Dhw Heating
Connect the pump using the regular brine pump output (Q8) in any of the controllers connected to the cascade. ● Select the controller to which the shared pump is connected on line 5803. ● By default, the setting for the line is 1, which is the master controller’s device address. -
Page 43: Technical Data
7 Technical data 7.1 Technical data The performance between different units may vary. This variation is due to a wide number of factors, such as the properties of the fluids used in the circuits, fouling of the heat transfer surfaces in the condenser and evaporator circuit, flow rates, individual differences between compressors (standard EN 12900) as well as refrigerant circuit charge and adjustments made to the refrigerant circuit during installation. - Page 44 RE 56–96, water and brine connections MODEL/RATED CAPACITY (kW) 3~, 400 V, 50 Hz, PE Condenser connections G 1 1/4 G 1 1/4 G 1 1/4 G 1 1/4 G 1 1/4 ISO 228 outer thread (G) Evaporator connections ISO 228 outer thread (G) Maximum permissible operating pressure, bar RE 28–48, fuse...
- Page 45 RE 04 dimensions, single-unit configuration Two units M8009 2147EN 43 (74)
- Page 46 RE 04 dimensions, two-unit configuration 44 (74) M8009 2147EN...
-
Page 47: Compressor Units
7.2 Compressor units MODEL / RATED CAPACITY (kW) 3~ 400 V, 50 Hz, PE Number of compressors Compressor type 28+28 33+33 38+38 42+42 48+48 Number of compressors Number of evaporators Number of condensers MODEL / RATED CAPACITY (kW) 3~ 400 V, 50 Hz, PE Heat pump version Refrigerant R-410A R-410A R-410A R-410A R-410A... -
Page 48: Performance Data
7.3 Performance data Capacity and coefficient of performance B0/–3 (brine in: 0, brine out: –3) Heating Water Water capacity, kW in, °C out, °C B0/−3, W30/35 27.4 32.0 36.1 41.1 47.2 54.7 63.9 72.2 82.2 94.5 B0/−3, W40/45 27.4 32.6 36.7 41.2 47.8 54.9 65.3 73.5 82.5 95.6 B0/−3, W47/55 27.6 33.2 37.3 41.7 48.3 55.2 66.4 74.6 83.3 96.6 B0/−3, W55/65... - Page 49 Flow rates Heating Water capacity, in/out, °C B0/−3, 30/35 27.4 32.0 36.1 41.1 47.2 54.7 63.9 72.2 82.2 94.5 W30/35 B0/−3, 40/45 27.4 32.6 36.7 41.2 47.8 54.9 65.3 73.5 82.5 95.6 W40/45 B0/−3, 47/55 27.6 33.2 37.3 41.7 48.3 55.2 66.4 74.6 83.3 96.6 W47/55 B0/−3, 55/65 28.1 33.9 38.2 42.6 48.9 56.2 67.9 76.4 85.1 97.8...
- Page 50 Coefficient of Water Water performance in, °C out, °C (COP), - B0/−4, W30/35 B0/−4, W40/45 B0/−4, W47/55 B0/−4, W55/65 Cooling Water Water capacity, kW in, °C out, °C B0/−4, W30/35 21.4 24.9 27.9 31.9 36.7 42.8 49.8 55.8 63.8 73.4 B0/−4, W40/45 20.1 23.8 26.7 30.1 35.0 40.1 47.6 53.4 60.3 69.9 B0/−4, W47/55...
- Page 51 Flow rates Heating Water capacity, in/out, °C B0/−4, 30/35 26.7 31.2 35.2 40.1 46.1 53.4 62.4 70.4 80.1 92.2 W30/35 B0/−4, 40/45 26.8 31.9 35.8 40.2 46.7 53.5 63.7 71.7 80.5 93.5 W40/45 B0/−4, 47/55 27.0 32.5 36.5 40.7 47.3 53.9 65.0 72.9 81.3 94.5 W47/55 B0/−4, 55/65 27.5 33.2 37.4 41.6 47.9 55.0 66.4 74.8 83.3 95.8...
- Page 52 Coefficient of Water Water performance in, °C out, °C (COP), - B5/2, W30/35 B5/2, W40/45 B5/2, W47/55 B5/2, W55/65 Cooling Water Water capacity, kW in, °C out, °C B5/2, W30/35 25.8 30.0 33.5 38.4 43.8 51.5 59.9 67.0 76.9 87.7 B5/2, W40/45 24.3 28.7 32.1 36.5 41.8 48.6 57.4 64.3 73.0 83.6 B5/2, W47/55...
- Page 53 Flow rates Heating Water capacity, in/out, °C B5/2, 30/35 30.9 36.1 40.7 46.6 53.3 61.8 72.2 81.4 93.3 106.5 W30/35 B5/2, 40/45 30.9 36.6 41.3 46.6 53.5 61.9 73.3 82.7 93.2 107.1 W40/45 B5/2, 47/55 31.0 37.1 41.8 46.8 53.8 61.9 74.2 83.6 93.7 107.6 W47/55 B5/2, 55/65 31.2 37.7 42.5 47.5 54.2 62.5 75.4 85.0 95.1 108.3...
- Page 54 Coefficient of Water Water performance in, °C out, °C (COP), - B12/7, W30/35 B12/7, W40/45 B12/7, W47/55 B12/7, W55/65 Cooling Water Water capacity, kW in, °C out, °C B12/7, W30/35 28.9 33.6 37.5 43.2 49.0 57.8 67.3 75.1 86.4 98.1 B12/7, W40/45 27.4 32.3 36.1 41.1 46.7 54.7 64.5 72.1 82.2 93.5 B12/7, W47/55...
- Page 55 Flow rates Heating Water capacity, in/out, °C B12/7, 33.9 39.8 44.7 51.4 58.5 67.9 79.5 89.4 102.8 116.9 30/35 W30/35 B12/7, 33.9 40.1 45.3 51.3 58.5 67.8 80.2 90.5 102.5 116.9 40/45 W40/45 B12/7, 33.8 40.4 45.6 51.3 58.5 67.7 80.8 91.3 102.6 116.9 47/55 W47/55 B12/7,...
- Page 56 Seasonal coefficient of performance (SCOP) and seasonal performance factor (SPF) RE 05 28 Climate Average Warm (W) Cold (C) References Strasbourg, Athens, Helsinki, City France Greece Finland Seasonal coefficient of performance SCOP (SCOP), space heating, EN 14825:2018 Low temperature application, max.
- Page 57 RE 05 33 Climate Average Warm (W) Cold (C) References Strasbourg, Athens, Helsinki, City France Greece Finland Seasonal coefficient of performance SCOP (SCOP), space heating, EN 14825:2018 Low temperature application, max. flow water temperature: 35 °C Medium-temperature application, max.
- Page 58 RE 05 38 Climate Average Warm (W) Cold (C) References Strasbourg, Athens, Helsinki, City France Greece Finland Seasonal coefficient of performance SCOP (SCOP), space heating, EN 14825:2018 Low temperature application, max. flow water temperature: 35 °C Medium-temperature application, max.
- Page 59 RE 05 42 Climate Average Warm (W) Cold (C) References Strasbourg, Athens, Helsinki, City France Greece Finland Seasonal coefficient of performance SCOP (SCOP), space heating, EN 14825:2018 Low temperature application, max. flow water temperature: 35 °C Medium-temperature application, max.
- Page 60 RE 05 48 Climate Average Warm (W) Cold (C) References Strasbourg, Athens, Helsinki, City France Greece Finland Seasonal coefficient of performance SCOP (SCOP), space heating, EN 14825:2018 Low temperature application, max. flow water temperature: 35 °C Medium-temperature application, max.
-
Page 61: 14285 Technical Data Sheets
7.4 EN 14285 Technical data sheets RE 28 RE 28 Technical data sheet ver. 1 M8009 2147EN 59 (74) - Page 62 RE 33 RE 33 Technical data sheet ver. 1 60 (74) M8009 2147EN...
- Page 63 RE 38 RE 38 Technical data sheet ver. 1 M8009 2147EN 61 (74)
- Page 64 RE 42 RE 42 Technical data sheet ver. 1 62 (74) M8009 2147EN...
-
Page 65: Operating Conditions
RE 48 RE 48 Technical data sheet ver. 1 7.5 Operating conditions The unit’s operating condition range is provided in the diagram and table below. In the diagram, the bold continuous line indicates the unit’s recommended operating envelope. The dashed line indicates the operating range where the unit can operate for a short period –... - Page 66 The unit’s performance cannot be guaranteed outside the recommended values. Operating range RE 28-96 ver. 1 X-axis: brine to evaporator (°C), Y-axis: water from condenser (°C). The bold continuous line indicates the unit’s recommended operating envelope. TEMPERATURE Minimum Minimum Maximum Maximum value value,...
-
Page 67: Condenser Circuit And Evaporator Pressure Loss
7.6 Condenser circuit and evaporator pressure loss Condenser circuit pressure loss Condenser pressure loss, RE ver. 1 Y-axis: pressure loss, kPa, X-axis: flow rate, m Water: 30/35 °C. M8009 2147EN 65 (74) -
Page 68: Pumps
Evaporator pressure loss Evaporator pressure loss (RE) ver. 1 Y-axis: pressure loss, kPa, X-axis: flow rate, m Water and ethanol solution, 30 mass-% @ 0/−3 °C 7.7 Pumps Condenser pumps Condenser pumps are included in the heat pump delivery. Designation Pump Description 1–phase, wet-motor, G 1 1/2 outer thread, installation... - Page 69 Designation Pump Description 1-phase, wet motor, G 1 1/2 outer thread, installation Wilo-Stratos PARA 25/1-12 34023075 dimension 180 mm, manual control and 0–10 V, 16–310 T16 180 mm 6h W (0.16–1.37 A), motor protection 1.6–2.5 1-phase, wet motor, DN 40 flange, distance between 34023081 Wilo-Yonos MAXO 40/0.5-12 flanges 250 mm, manual control, 15–550 W (0.17–2.4...
- Page 70 Wilo-Stratos Para 1–12, external control mode via analog input (0–10 V) Wilo-Yonos MAXO 40/0.5-12 68 (74) M8009 2147EN...
- Page 71 Wilo-Stratos 40/1-12 Wilo-Yonos MAXO 40/0.5-16 M8009 2147EN 69 (74)
- Page 72 Wilo-Yonos MAXO 50/0.5-16 Wilo-VeroLine-IPL 40/115-0.55/2 Wilo-VeroLine-IPL 50/105-0.75/2 70 (74) M8009 2147EN...
-
Page 73: Temperature Sensors
Other sensors: +/–100 K 7.9 EU product data Product fiche, space heaters COMMISSION DELEGATED REGULATION (EU) No 811/2013 ANNEX IV a supplier’s name or trademark Oilon Oilon Oilon Oilon Oilon b supplier’s model identifier RE 05... - Page 74 Information requirements for heat pump space heaters and heat pump combination heaters COMMISSION REGULATION (EU) No 813/2013 ANNEX II TABLE 2 supplier’s name or trademark Oilon Oilon Oilon Oilon Oilon supplier’s model identifier ...
- Page 75 DECLARED HEATING CAPACITY AND COEFFICIENT OF PERFORMANCE FOR PARTIAL LOAD AT AN INDOOR TEMPERATURE OF 20 °C AND THE OUTDOOR TEMPERATURES AND FLOW TEMPERATURES GIVEN BELOW (BRINE 0/–3 °C) −7 °C 27.5 33.0 37.1...
- Page 76 1) Specific precautions that shall be taken when the space heater is assembled, installed, or maintained: Pay attention to safety when tilting, lifting, carrying, or moving the unit. Always pay attention to electrical safety when working with or near electrical components.
- Page 78 Contact information of Oilon dealer: OILON GROUP P.O. Box 5 FI-15801 LAHTI FINLAND Tel: +358 3 85 761 Fax: +358 3 857 6239 Email: info@oilon.com Date of installation: www.oilon.com...
Need help?
Do you have a question about the RE 96 05 and is the answer not in the manual?
Questions and answers