Table of Contents
Advertisement
Quick Links
ACDC Header
Feature
Rated Charge Current
Battery Voltage
Auto Load Disconnect
Max Solar Voltage
Self Consumption
Load OutputManual control + Low voltage disconnect
Protection
Battery reverse polarity (fuse)
Output Short circuit
Over Temp
Overload Protection
Shut down after 60sec with load at 130%
Shut down after 5sec with load 160%
Short circuit immediate shutdown
Grounding
Common Positive
‐20 to 50⁰C
Operating Temperature
Humidity
Max 95%RH
Battery
Charge Voltage "Absorption" 14.2 / 28.4V
Charge Voltage "Float"
13.8 / 27.6V
Low Voltage Load Disconnect
11.2 / 22.4V
Low Voltage Load Reconnect
12.6 / 25.2V (manual)
13.1 / 26.2V (automatic)
Enclosure
Protection Class
Terminal Size
Weight
Dimensions (HxWxD)mm 70 x 133 x 33.5
Bluesolar-5, Bluesolar-10
Features
Load output with low battery voltage disconnect function.
Lighting control function, one timer only.
Two digit display for parameter setting.
Three stage charging (Bulk, Absorption, Float)
Over load and short circuit protected.
Reverse polarity protected.
Day / Night timing functions.
Bluesolar-5
Bluesolar-10
5A
12/24V with auto system voltage detection
Yes
28V / 55V(1)
10mA
IP20
5mm²
0.15kg
10A
Advertisement
Table of Contents
Troubleshooting

Related Manuals for Victron energy Bluesolar-10


Summary of Contents for Victron energy Bluesolar-10
- Page 1 ACDC Header Bluesolar-5, Bluesolar-10 Features Load output with low battery voltage disconnect function. Lighting control function, one timer only. Two digit display for parameter setting. Three stage charging (Bulk, Absorption, Float) Over load and short circuit protected. Reverse polarity protected.
- Page 2 Manual BlueSolar Charge controller 12/24V-10A with timer...
- Page 4 EXCEED THE PURCHASE PRICE OF THE VICTRON ENERGY PRODUCTS DESCRIBED HERE IN. Victron Energy B.V. reserves the right to revise and improve its products as it sees fit. This publication describes the state of this product at the time of its publication and may...
- Page 6 Installation and Operation Manual Specification Summary Nominal system voltage: 12 / 24VDC* Maximum PV input voltage: Nominal charge / discharge current * The controller will recognize the system rated voltage when start up. If the battery voltage is lower than 18V, it will recognize the system as 12V. If the battery voltage is greater than 18V, it will recognize the system as 24V.
-
Page 7: Table Of Contents
Contents 1 Important Safety Information ............5 2 General Information ..............6 2.1 Product Overview ..............6 2.2 Product Features ..............7 3 Installation Instructions ............... 9 3.1 General Installation Notes ............9 3.2 Mounting .................. 9 3.3 Wiring ..................11 4 Operation .................. -
Page 8: Important Safety Information
1. Important Safety Information This manual contains important safety, installation and operating instructions. The following symbols are used throughout this manual to indicate potentially dangerous conditions or mark important safety instructions, please take care when meeting these symbols. WARNING: Indicates a potentially dangerous condition. Use extreme caution when performing this task. -
Page 9: General Information
2. General Information 2.1 Product Overview 12/24V automatic recognition Efficient Series PWM charging, increases battery lifetime and improves solar system performance. Uses MOSFET as electronic switch, without any mechanical switch Automatic day/night recognition. Digital LED menu. ... -
Page 10: Product Features
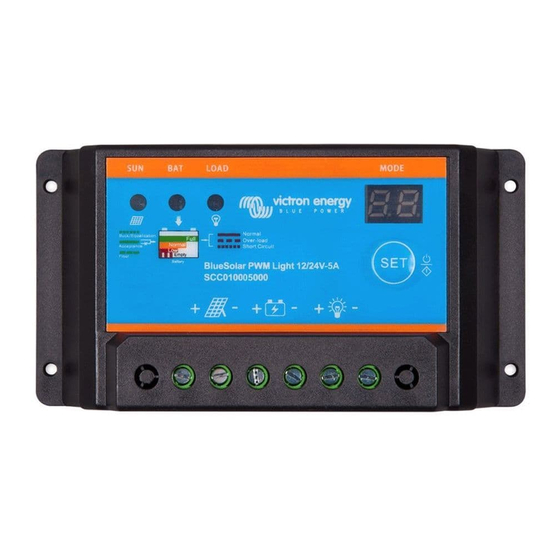
2.2 Product Features Figure 2-1 Features 1 –Temperature Sensor Measures ambient temperature. Used for temperature compensated charging and discharging. 2 – Charging status LED indicator A LED indicator that shows charging status and also indicates when a solar input fault condition exists 3 –... - Page 11 9 –Solar Module Terminals Connect solar modules. 10 –Battery Terminals Connect batteries. 11 –Load Terminals Connect loads.
-
Page 12: Installation Instructions
3. Installation Instructions 3.1 General Installation Notes Read through the entire installation section before beginning installation. Be very careful when working with batteries. Wear eye protection. Have fresh water available to wash and clean any contact with battery acid. ... - Page 13 WARNING: Risk of explosion! Never install the controller in a sealed enclose with batteries! Do not install in a confined area where battery gasses can accumulate. Step 1: Choose Mounting Location Locate the controller on a vertical surface protected from direct sun, high temperature, and water.
-
Page 14: Wiring
3.3 Wiring NOTE: Please follow the recommended connection order for maximum safety during installation. NOTE: The controller is a common positive ground controller. CAUTION: Don’t connect loads with surge power exceeding the ratings of the controller. CAUTION: For mobile applications, be sure to secure all wiring. Use cable clamps to prevent cables from swaying when the vehicle is in motion. - Page 15 Step 2: Load Wiring The controller loads can be connected to such electrical equipments as lights, pumps, motors and others. Fuse Load Figure 3-3 Load Wiring Connect the positive (+) and negative (-) to the controller load terminals as shown in Figure 3-3.
- Page 16 Step 3: Solar wiring WARNING: Risk of electric shock! Exercise caution when handling solar wiring. The solar module(s) high voltage output can cause severe shock or injury. Cover the solar module(s) from the sun before installing solar wiring. The controller can accept 12V or 24V nominal off-grid solar module(s). Solar Module Figure 3-4 Solar wiring Step 4: Confirm Wiring...
- Page 17 Step 5: Install Fuse Install a suitable fuse in each fuse holder in the following order: 1. Battery circuit 2. Load circuit Step 6: Confirm power on When battery power is applied and the controller starts up, the battery LED indicator will be green.
-
Page 18: Operation
4. Operation 4.1 PWM Technology (Series Pulse Width Modulation) The controller features advanced series pulse width modulation. 4.2 Battery Charging Information Figure 4-1 PWM Charging mode Bulk Charge In this stage, the battery voltage has not yet reached boost voltage and 100% of available solar power is used to charge the battery. -
Page 19: Led Indicators
Equalize Charge WARNING: Risk of explosion! Equalizing a flooded battery can produce explosive gases, good ventilation of the battery box is therefore necessary. NOTE: Equipment damage! Equalization may increase battery voltage to a level that is damaging to sensitive DC loads. - Page 20 Charging Status LED indicator Table 4-1 Color Indicator Charging Status Green On Solid Charging Green Fast Flashing Over voltage Battery status indicator GREEN ON when battery voltage in normal range GREEN SLOWLY FLASHING when battery full ORANGE ON in case of battery under voltage RED ON when the battery is over discharged Please refer to section 5 for troubleshooting.
-
Page 21: Operation And Settings
Overheating protection indicator When the heat sink of the controller exceeds 85°C, the controller will automatically cut off the input and output, and the LED display shows “H”, slowly flashing. Please refer to section 5 for troubleshooting. Overheating protection indicator Table 4-4 Color LED digital tube... -
Page 22: Setting The Timers
2. Test mode This mode is the same as Dusk to Dawn. But there is no 10 minutes delay when controller recognizes the starting voltage. The test mode makes it easy to check the system. 3. ON/OFF mode This mode is to turn ON and OFF the load manually. 4.5 Setting the timers Timer 1 Setting LED display... - Page 23 Load work mode Table 4-5 Timer 1 LED display No. Enable Dusk to Dawn, Load will be on all night Load will be on for 1 hour after ten minutes delay since sunset Load will be on for 2 hours after ten minutes delay since sunset Load will be on for 3 hours after ten minutes delay since sunset Load will be on for 4 hours after ten minutes delay since sunset Load will be on for 5 hours after ten minutes delay since sunset...
- Page 24 Load work mode Table 4-6 Timer 2 LED display No. Enable Load will be on for 1 hour before sunrise Load will be on for 2 hours before sunrise Load will be on for 3 hours before sunrise Load will be on for 4 hours before sunrise Load will be on for 5 hours before sunrise Load will be on for 6 hours before sunrise Load will be on for 7 hours before sunrise...
-
Page 25: Protections, Troubleshooting And Maintenance
5. Protection, Troubleshooting and Maintenance 5.1 Protection PV Array Short Circuit If a PV array short circuit occurs, clear it to resume normal operation. Load output overload If the load current exceeds the maximum load current rating, the controller will disconnect the load. -
Page 26: Troubleshooting
5.2 Troubleshooting Trouble Shooting Table 5-1 Faults Possible reasons Troubleshooting Charging LED indicator off Check that PV and battery during daytime when PV array disconnected wire connections are sunshine falls on PV correct and tight. modules properly. Battery voltage higher Check battery voltage. -
Page 27: Maintenance
NOTE: If all LED’s are off. Measure battery voltage with multimeter. At least 6V is needed to start the controller. NOTE: No charging status LED indicator with normal connection. Measure the input voltage of solar module, the input voltage must be higher than battery voltage! 5.3 Maintenance The following inspections and maintenance tasks are recommended at least two times per year for best controller performance. -
Page 28: Technical Specifications
6. Technical specifications Electrical Parameters Table 7-1 Description Parameter 12 / 24VDC Nominal System Voltage With automatic system voltage recognition Battery Voltage Range 6-36V Rated Battery Current ≤0.26V Charge Circuit Voltage Drop ≤0.15V Discharge Circuit Voltage Drop ≤6mA Self-consumption Threshold Voltage Parameters Table7-2 Description Parameter... - Page 29 Battery Voltage Parameters (temperature at 25℃) Table 7-4 Charging Parameters Battery charging setting Flooded Over Voltage Disconnect Voltage 16V; x2/24V 16V; x2/24V 16V; x2/24V Charging Limit Voltage 15.5V;x2/24V 15.5V;x2/24V 15.5V;x2/24V Equalize Charging Voltage ----- 14.6V;x2/24V 14.8V;x2/24V Boost/absorption Charging Voltage 14.2V;x2/24V 14.4V;x2/24V 14.6V;x2/24V Float Charging Voltage...
- Page 30 Environmental parameters Table 7-5 Environmental Parameter parameters Operating temperature -35℃ to +55℃ Storage temperature -35℃to +80℃ Humidity 10%-90% non condensing Enclosure IP30 Mechanical parameters Table 7-6 Mechanical Parameter Parameter 140(5.51)x65(2.56)x34(1.34) Overall dimensions mm/inches Mounting dimensions 130(5.12) x 45(1.77) mm/inches Φ4.5 Mounting hole size Terminals Net weight...
-
Page 32: Appendix A: Dimensions
APPENDIX A: Dimensions mm(inches) 140(5.51) 130(5.12) Figure 1-1 Dimensions... - Page 33 Distributor: Serial number: Version : 01 Date : 7 November 2013 Victron Energy B.V. De Paal 35 | 1351 JG Almere PO Box 50016 | 1305 AA Almere | The Netherlands General phone : +31 (0)36 535 97 00 Customer support desk...
Need help?
Do you have a question about the Bluesolar-10 and is the answer not in the manual?
Questions and answers