
Related Manuals for ASROCK Rack E3C242D4U


Summarization of Contents
Chapter 1 Introduction
1.1 Package Contents
Lists all items included in the motherboard package for installation and setup.
1.2 Specifications
Details the physical, processor, memory, expansion, storage, audio, and network specifications of the motherboard.
1.3 Unique Features
Highlights distinctive features of the motherboard, such as ASRock Rack Instant Flash utility.
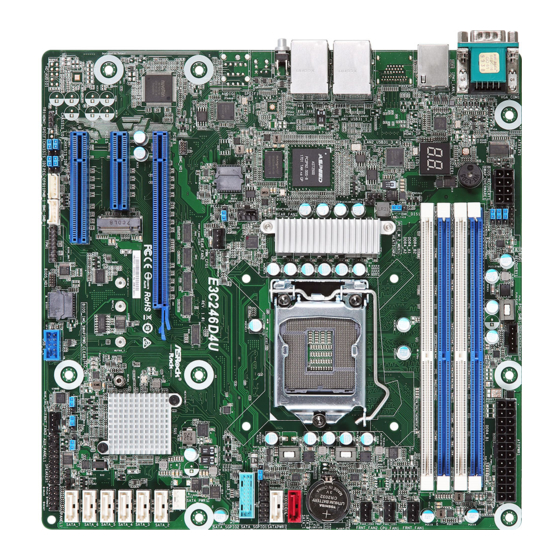
1.4 Motherboard Layout
Provides a visual guide to the physical layout of components and connectors on the motherboard.
1.5 Onboard LED Indicators
Explains the status and meaning of various LED indicators present on the motherboard.
1.6 I/O Panel
Details the rear panel connectors and their functions for external connectivity.
1.7 Block Diagram
Illustrates the internal architecture and data flow pathways of the motherboard components.
Chapter 2 Installation
2.1 Screw Holes
Instructions on properly using screw holes to secure the motherboard to the chassis.
2.2 Pre-installation Precautions
Essential safety and handling precautions to take before installing motherboard components.
2.3 Installing the CPU
Step-by-step guide for correctly installing the Central Processing Unit (CPU) into the motherboard socket.
2.4 Installing the CPU Fan and Heatsink
Procedures for mounting the CPU cooler and heatsink assembly for thermal management.
2.5 Installation of Memory Modules (DIMM)
Guidance on how to properly install DDR4 DIMM modules into the motherboard slots for dual channel operation.
2.6 Expansion Slots (PCI Express Slots)
Information on the available PCI Express slots, their specifications, and installation of expansion cards.
2.7 Jumper Setup
Explains the purpose and configuration of various jumpers on the motherboard for system settings.
2.8 Onboard Headers and Connectors
Details the function and connection pinouts for various internal headers and connectors on the motherboard.
2.9 Dr. Debug
Provides a list of diagnostic codes displayed by the Dr. Debug feature for troubleshooting boot issues.
2.10 Unit Identification purpose LED/Switch
Describes the function of the Unit Identification (UID) button and LED for locating the server.
2.11 Driver Installation Guide
Instructions on how to install necessary drivers from the support CD for optimal system functionality.
2.12 Dua LAN and Teaming Operation Guide
Explains how to configure Dual LAN and Teaming for enhanced network bandwidth and fault tolerance.
2.13 M.2_SSD (NGFF) Module Installation Guide
Step-by-step instructions for installing M.2 SSD modules into the designated slot on the motherboard.
Chapter 3 UEFI Setup Utility
3.1 Introduction
Overview of the UEFI Setup Utility, its purpose, and how to enter it.
3.1.1 UEFI Menu Bar
Describes the main menu bar items available in the UEFI Setup Utility interface.
3.1.2 Navigation Keys
Lists and explains the keyboard keys used for navigating and interacting within the UEFI Setup Utility.
3.2 Main Screen
Details the system overview information displayed on the Main screen of the UEFI Setup Utility.
3.3 Advanced Screen
Introduces the Advanced screen which contains detailed system configuration options.
3.3.1 CPU Configuration
Options for configuring CPU-related settings, including performance and virtualization features.
3.3.2 DRAM Configuration
Settings for managing DRAM frequency and other memory-related parameters.
3.3.3 Chipset Configuration
Configuration options for the motherboard chipset, including PCIe link settings and onboard devices.
3.3.4 Storage Configuration
Settings related to storage devices, including SATA controllers and S.M.A.R.T. monitoring.
3.3.5 NVMe Configuration
Displays information and settings for NVMe storage controllers and drives.
3.3.6 ACPI Configuration
Configuration options for ACPI settings, managing power states and wake-up events.
3.3.7 USB Configuration
Settings to enable or disable USB support and legacy USB functionality.
3.3.8 Super IO Configuration
Configuration for Super IO chip functionalities, including serial and SOL ports.
3.3.9 Serial Port Console Redirection
Settings for configuring serial port console redirection for out-of-band management.
3.3.10 H/W Monitor
Monitors hardware status like temperatures, fan speeds, and voltages, and allows fan control.
3.3.11 Intel SPS Configuration
Displays information related to Intel SPS (Server Platform Services) firmware.
3.3.12 Instant Flash
Utility for updating the system BIOS directly from within the UEFI environment.
3.4 Server Mgmt
Provides management features for the server, including BMC status and inventory support.
3.4.1 System Event Log
Manages system event logging, including enabling/disabling, erasing, and status codes.
3.4.2 BMC Network Configuration
Configures the Baseboard Management Controller (BMC) network settings for out-of-band access.
3.5 Security
Manages system security settings, including supervisor and user passwords, and secure boot options.
3.5.1 Key Management
Advanced options for managing Secure Boot policy variables and keys.
3.6 Boot Screen
Configures system boot settings, including boot order, option filters, and logo display.
3.6.1 CSM Parameters
Settings for the Compatibility Support Module (CSM) to manage legacy and UEFI boot options.
3.7 Event Logs
Manages SMBIOS event logs, including logging options and error handling.
3.8 Exit Screen
Options for saving changes, discarding changes, and exiting the UEFI Setup Utility.
Chapter 4 Software Support
4.1 Install Operating System
Guidance on installing supported operating systems like Windows Server and Linux distributions.
4.2 Support CD Information
Details on the contents of the support CD, including drivers, utilities, and setup instructions.
Chapter 5 Troubleshooting
5.1 Troubleshooting Procedures
Step-by-step procedures to diagnose and resolve common hardware and system issues.
5.2 Technical Support Procedures
Information on how to contact ASRock Rack technical support and what information to provide.
5.3 Returning Merchandise for Service
Procedures and requirements for returning a product for warranty service or repair.
Need help?
Do you have a question about the E3C242D4U and is the answer not in the manual?
Questions and answers