Table of Contents
Advertisement
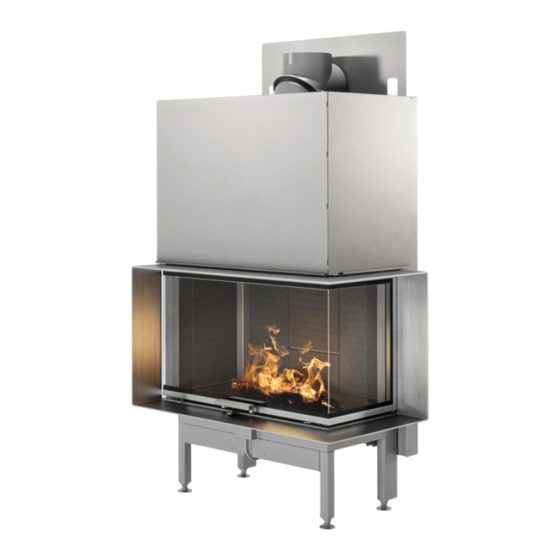
Quick Links
Advertisement
Table of Contents

Related Manuals for RAIS Attika Visio L


Summary of Contents for RAIS Attika Visio L
- Page 1 B R U G E R M A N U A L B E D I E N U N G S A N L E I T U N G U S E R M A N U A L M A N U E L D ’...
- Page 2 Raumheizer für feste Brennstoffe Appliance fired by wood Poêle pour combustibles solides Produced for: 15a B-VG ATTIKA FEUER AG, Brunnmatt 16, CH-6330 Cham / RAIS A/S, Industrivej 20, DK-9900 Frederikshavn Label for: RAIS Visio 2 L Left / Visio 2 L Right...
- Page 3 Märkplät EN 13229:2001+A1:2003+A2:2004, EC.NO: 224 Notified Body: 1235 Produced at: RAIS A/S, Industrivej 20, 9900 Frederikshavn, Danmark Visio 3 L Anordningen må kun installeres i forbindelse med ubrændbart materiale. AFSTAND TIL BRÆNDBART, BAGVÆG DK: mm SE BRUGERVEJLEDNING ABSTAND ZU BRENNBAREN BAUTEILEN, HINTEN...
- Page 4 Indstilling af spjæld / Einstellung der Luftklappe / Adjustment of the air damper / Réglage du volet d’air / Innstilling av spjeldet / Inställning av spjället Position 1 - Posisjion 1 Position 3 - Posisjion 3 Position 2 - Posisjion 2 Optænding og påfyldning / Anzünden und Nachlegen / Lighting and fuelling / Allumage et remplissage / Opptenning og påfylling / Upptänding och påfyllning VISIO...
- Page 5 FIRE ENVIRONMENTALLY FRIENDLY! 5 Eco-friendly advices for sensible heating - common sense both environmentally and economically. 1. Effective lighting. Use small pieces of wood (fir tree) and a suit- able fire lighter, for example paraffined wood wool/sawdust. Open the air damper, so plenty of air is fed to the stove and the gases from the heated wood can burn rapidly.
-
Page 6: Table Of Contents
VISIO L Revision: 27-06-2023 Date INTRODUCTION ............................7 WARRANTY ..............................8 SPECIFICATIONS ............................9 DISTANCES/DIMENSIONS .........................10 CONVECTION ............................12 CHIMNEY ..............................13 CHOICE OF MATERIAL FOR INSTALLATION .................14 INSTALLATION ............................14 FITTING THE REFLECTIVE INSULATION PANEL .................15 TRANSPORT SAFETY FITTING ......................16 INSTALLATION OF FIREPLACE INSERT VISIO L 2 ............... 17 INSTALLATION DISTANCES VISIO L 2 ....................19 INSTALLATION OF FIREPLACE INSERT VISIO L 3 ..............20 INSTALLATION DISTANCES VISIO L 3 ................... -
Page 7: Introduction
Introduction attika Thank you for purchasing a RAIS/ wood burning stove. attika A RAIS/ wood burning stove is more than just a heat source. It also shows that you care about design and quality in your home. To make the most of your wood burning stove it is important that you read the manual thoroughly, before installing and using it. -
Page 8: Warranty
In the event of repair, we ensure proper and professional execution. Warranty claims submitted for additionally delivered or repaired parts are subject to national/EU laws and regulations in terms of renewed warranty periods. Please contact RAIS A/S for the applicable warranty provisions. -
Page 9: Specifications
VISIO L are inset stoves with a vertically operated door. Specifications DTI ref.: 300-ELAB-2383-EN VISIO L 2 VISIO L 3 Nominal output (kW): 10.3 Min./Max. output (kW): 8 - 12 Heating area (m Stove’s width/depth/height (mm): 1141 x 610 X 1765 1089 X 634 X 1765 Combustion chamber’s width/ 708 X 256 X 541... -
Page 10: Distances/Dimensions
Dimensional drawings NB: The flue spigot at the top outlet can be turned freely. (Radius 102 mm). VISIO L 2 With top outlet 1596 1596 1596 1596 932,5 420,5 932,5 932,5 420,5 932,5 420,5 420,5 With rear outlet... - Page 11 VISIO L 3 With top outlet 1581 1581 1581 544,3 544,3 544,3 544,3 1088,6 1088,6 With rear outlet...
-
Page 12: Convection
Convection attika RAIS/ stoves are convection stoves. Convection means that there is a circu- lation of air, which ensures that the heat is distributed more evenly throughout the cold air entire room. The is sucked in at the base of the stove up through the convec- tion channel, which runs along the stove’s combustion chamber. -
Page 13: Chimney
Chimney The chimney is the driving force which makes the stove function. In order for the stove to perform satisfactorily the chimney height must be sufficient to ensure the correct draught of 14 to 18 Pa so as to clear the products of combustion and prevent problems of smoke emanating into the room when firing. -
Page 14: Material Selection
Material selection Choose non-combustible materials for panels/bricks with a thermal resistance greater than 0.03 m xK/W. Thermal resistance is defined as the thickness (in m) di- vided by the wall’s lambda value. Consult with your installer/chimney sweep. During testing, the wood-burning stove is installed in a cabinet made from non- flammable 50 mm calcium silicate panels (Skamotec 225). -
Page 15: Fitting The Reflective Insulation Panel
Mounting the reflektor plate - VISIO L 2 The stove is fitted with a reflector Remove the two screws, move the plate on the back side. reflector and fix it again in the right The reflector must be moved to position. -
Page 16: Transport Safety Fitting
Bend the cut-outs and mount the plate to the top of the stove. Transport safety Before installing the stove remove the transport safety: • on VISIO 1 remove 2 screws on the side. • on VISIO 2 remove 1 screw on the side. •... -
Page 17: Installation Of Fireplace Insert Visio L 2
VISIO 2 L Applies to installation in non-flammable panels or in brick. If other materials are used, they must have better or the same characteristics as 50 mm Skamotec 225. To achieve the necessary distances from the wood-burning stove to the panel/brick- work, the internal dimensions of the cassette must be 665 x 1195 x 1950 mm. - Page 18 Hole dimensions (height x width x depth) min. 570.5 x 999.3 x 549.5 mm (interior di- mensions). Hole dimension for wood-burning stove with installation frame. A height of 568 mm provides an air gap of 5 mm above the top frame. This air gap is necessary because the wood-burning stove will expand when heating up.If this air gap is not created, it can result in damage to the brickwork! 18 18...
-
Page 19: Installation Distances Visio L 2
Minimum distance to flammable material: Visio L 2 Convection air area above stove with panel installation. Must be at least 750 cm², the area can be divided into several cavities. The minimum distance from the top of the installa- tion cassette/convection opening to the combus- tible ceiling is 500 mm The minimum distance from the insulated chimney to the flammable rear wall is 110 mm... -
Page 20: Installation Of Fireplace Insert Visio L 3
VISIO 3 L Applies to installation in non-flammable panels or in brick. If other materials are used, they must have better or the same characteristics as 50 mm Skamotec 225. To achieve the necessary distances from the wood-burning stove to the panel/brick- work, the internal dimensions of the cassette must be 700 x 988 x 1950 mm. - Page 21 Hole dimensions (height x width x depth) min. 568 x 1088 x 504 mm (interior dimen- sions). Hole dimension for wood-burning stove with installation frame. A height of 568 mm provides an air gap of 5 mm above the top frame. This air gap is necessary because the wood-burning stove will expand when heating up.
-
Page 22: Installation Distances Visio L 3
250 mm must be INDUSTRIVEJ 20, 9900 FREDERIKSHAVN, DENMARK Corrections: Phone +45 98 47 90 33 - Fax +45 98 47 92 91 E-mail: info@rais.dk - Homepage: www.rais.dk made of a non-flammable Opstillingsafstand 2 Visio 3 L Drawing name: panel. -
Page 23: Convection Air
CONVECTION AIR There is a minimum area requirement for convection air. This must be com- plied with because to avoid the risk of overheating and because of the dis- tance to flammable material. Ensure that the wood-burning stove can draw in convection air underneath itself. - Page 24 In order to get the most out of your stove, guide the warm air out of the convection grate. Position the convec- tion grate just below the non-flammable top plate. The convection cavity can also be placed on top of the cassette. The insulated part of the chimney must extend all the way down to the flue spigot.
-
Page 25: Air-System
Air-system When mounting the Air system ensure that the air control system provides fresh air from the outside. In order for the Air system to function, you have to ensure in the structure that no vacuum occurs in the housing. If convection grates are installed, be sure not to block them. -
Page 26: Fuel
Operating instructions Please note that HETAS Ltd Appliance Approval only covers the use of dry seasoned wood logs on this appliance. HETAS Ltd Approval does not cover the use of other fuels either alone or mixed with the wood logs, nor does it cover instructions for the use of other fuels. Fuel The stove has been tested in accordance with EN 13229:2001, EN 13229:2001/ A1:2003, EN 13229:2001/A2:2004, and NS 3058 for stoking split, dried birchwood,... -
Page 27: Drying And Storing
Drying and storage Drying wood takes time. Proper air drying takes approx. 2 years. Here are some tips: • Store the wood sawn, split and stacked in an airy, sunny place, which is protect- ed against rain (the south side of the house is particularly suitable). •... -
Page 28: Using A Wood-Burning Stove
Using the wood burning stove Adjustment of the air damper - the damper has 3 settings For reference see drawing (in the front of the manual). Position 1 Pull the lever to the left. The damper is almost closed; there is a minimal air intake. This position must be avoided during normal operation. -
Page 29: Important Safety Advice
IMPORTANT - Warning Note! Properly installed, operated and maintained this appliance will not emit fumes into the dwelling. Occasional fumes from de-ashing and re-fuelling may occur. However, persistent fume emission is potentially dangerous and must not be tolerated. If fume emission does persist, the following immediate actions should be taken: Open doors and windows to ventilate room. -
Page 30: Warning
Advarsel Advarsel Advarsel Hvis brændet kun ulmer eller ryger, og der tilføres for lidt luft, udvikles der Hvis brændet kun ulmer eller ryger, og der tilføres for lidt luft, udvikles der Hvis brændet kun ulmer eller ryger, og der tilføres for lidt luft, udvikles der Warning!! uforbrændte røggasser. -
Page 31: Cleaning And Care
Cleaning and care Glass Most woodstoves use a ceramic glass product which is resistant to heat but requires cleaning to keep its appearance. Soot or opaque marks can easily cleaned if the marks are fresh, however If you leave the glass dirty for any length of time the acid from the wood can etch the surface of the glass permantley (wet unseasoned wood, soft wood such as used in the building industry, pallet wood should be avoided). -
Page 32: Cleaning The Door Glass
Cleaning the door glass Lock the door in position before cleaning. Use the special key that is delivered with the wood-burning stove. Turn the lock that is positioned above the side of the door. The side door can now be opened for cleaning by turning the locking hook in the top and bottom of the door. -
Page 33: Cleaning The Combustion Chamber
Cleaning the combustion chamber Scrape/shovel the ash through the grate in the middle of the stove. The ash tray be- low is removed and emptied into a non combustible container until it has cooled. You can dispose of ash with your normal household waste. REMEMBER! •... -
Page 34: Cleaning The Flue
Vermiculite flue plates B-B ( 0,1 ) Visio L 2 INDUSTRIVEJ 20, 9900 FREDERIKSHAVN, DENM Phone +45 98 47 90 33 - Fax +45 98 47 92 91 E-mail: info@rais.dk - Homepage: www.rais.dk Drawing name: Project: Established: Format: R 06-12-2018 Baffles... -
Page 35: Operating Interuptions
In case of cold chimney or difficult weather conditions you can compensate by add- ing more fresh air (open the damper) to the stove than usual. If your stove continues to malfunction, we recommend that you contact your RAIS distributor or chimney sweep. - Page 36 WARNING! If incorrectly or too damp firewood is used, it can lead to excessive formation of soot in the chimney and possible a chimney fire: • in this case shut off all air supply from outside (if installed) to the stove •...
-
Page 38: Spare Parts
Spare parts VISIO 2 L The use of spare parts other than those recommended by RAIS results in the war- ranty becoming void. All replaceable parts can be purchased as spare parts from your RAIS distributor. Pos. Description. Handle for damper - complete... - Page 39 Spare parts VISIO 3 L The use of spare parts other than those recommended by RAIS results in the war- ranty becoming void. All replaceable parts can be purchased as spare parts from your RAIS distributor. Pos. Description. Handle for damper - complete...
- Page 40 13-14 9-10 15-16 11-12...
- Page 41 9-10 11-12...
-
Page 42: Converting To Self-Locking Door
Rebuilding to a self-closing door before, the oven is built in. The door is made self-closing by dismantling some of the door’s counterweights. On the VISIO 1 & 3, the counterweights must be changed on both sides. 1. Remove the transport lock and the screws on the counter- weight cover Transport lock. - Page 43 Rebuilding to self-closing door after, the oven has been built in. The door is made self-closing by dismantling some of the door’s counterweights. On the VISIO 1 & 3, the counterweights must be changed on both sides. 1. Remove the Side Skamol sheet. 2.
-
Page 46: Installation Specifically For The Uk
Installation specifically for the UK Installation instructions The following pages give instructions for the safe and proper installation of this heat- ing appliance in the UK. These instructions cover the basic principles of installation, although detail may need slight modification to suit particular local site conditions. In all cases the installation must comply with current UK Building Regulations, Local Authority Byelaws and other specifications or regulations as they affect the installa- tion of the stove. -
Page 47: Installation Distances
The stove should be set up at a safe distance from inflammable materials. When you choose where to set up your RAIS wood burning stove, you should consider the heat distribution to the other rooms. This will enable you to get the best use out of your stove. - Page 48 ATTIKA FEUER AG Brunnmatt 16 CH-6330 Cham Switzerland www.attika.ch RAIS A/S Industrivej 20 DK-9900 Frederik- shavn Denmark www.rais.com...
Need help?
Do you have a question about the Attika Visio L and is the answer not in the manual?
Questions and answers