Inogen Rove 6 Manual
- User manual (356 pages) ,
- User manual (102 pages) ,
- User manual (232 pages)
Advertisement
- 1 GLOSSARY OF SYMBOLS
- 2 PRODUCT CONTENT AND QUICK START GUIDE
- 3 INTRODUCTION
- 4 INDICATIONS AND INTENDED USE
- 5 SAFETY INSTRUCTIONS
- 6 INOGEN ROVE 6 DESCRIPTION
-
7
GENERAL INSTRUCTIONS
- 7.1 OPERATING PRINCIPALS
- 7.2 PREPARING YOUR CONCENTRATOR FOR USE
- 7.3 USING YOUR CONCENTRATOR
- 7.4 ACCESSORIES AND COMPONENTS LIST
- 7.5 RECHARGEABLE BATTERY PACKS (BA-500, BA-508 AND BA-516)
- 7.6 CHECKING THE BATTERY STATUS WHEN INSTALLED ON THE DEVICE
- 7.7 CHECKING THE BATTERY STATUS WHEN NOT INSTALLED ON THE DEVICE
- 7.8 CHARGING THE BATTERIES WITH THE CONCENTRATOR
- 7.9 BATTERY LIFETIME AND CARE
- 7.10 NASAL CANNULA
- 7.11 AC POWER SUPPLY (BA-502/BA-501)
- 7.12 DC POWER CABLE (BA-306)
- 7.13 EXTERNAL BATTERY CHARGER (BA-503, OPTIONAL ACCESSORY NOT INCLUDED)
- 7.14 TRAVELING WITH THE DEVICE
- 7.15 STORING YOUR CONCENTRATOR
- 7.16 RESPONDING TO ALARMS
- 8 ALARM INDICATORS & DEVICE ICON GLOSSARY
- 9 TROUBLESHOOTING
- 10 CONNECTIVITY OPTIONS
- 11 CLEANING, DISINFECTION, CARE AND MAINTENANCE
- 12 DEVICE REPAIR
- 13 TECHNICAL AND PRODUCT SPECIFICATIONS
- 14 LIMITED WARRANTY STATEMENT
- 15 CONTACT INFORMATION
- 16 Documents / Resources
GLOSSARY OF SYMBOLS


PRODUCT CONTENT AND QUICK START GUIDE

The Quick Start Guide is for reference ONLY. It is imperative to read the complete user manual before use.
Before getting started, confirm that your Inogen Rove 6 Portable Oxygen Concentrator system

Make sure you have a backup oxygen supply in addition to this portable oxygen concentrator
 What is your back up oxygen supply?
DO NOT USE with a humidifier, nebulizer, CPAP or in series or parallel with any other device.
DO NOT USE near flames, smoke, or anything flammable.
DO NOT USE near pollutants, smoke, fumes, flammable anesthetics, cleaning agents or chemical vapors.
DO NOT USE in environments where your concentrator could become submerged in water. DO NOT USE near oil grease or petroleum-based products.
USING YOUR DEVICE
- Slide on a compatible battery and make sure your concentrator is in a well-ventilated location.
![]()
- Connect your concentrator to AC power.
![]()
- Connect an appropriate cannula to your concentrator.
![]()
- Press and hold the power button to turn on the concentrator.
![]()
- Set the flow setting to the rate prescribed by your clinical professional. Use the "+" and "-" buttons to adjust the flow setting.
![]()
![warning]() Note: The flow is a "dose" of oxygen (the setting will be prescribed by 2 your clinical professional).
Note: The flow is a "dose" of oxygen (the setting will be prescribed by 2 your clinical professional). - Position the nasal cannula on your face and breathe normally through your nose. A green light will flash each time a breath is detected.
![]()
![]()
Pulse Dose settings are not equal to liters per minute, please refer to the caution in NASAL CANNULA, and to section PULSE VOLUME FLOW SETTING for pulse dose flow settings.


INTRODUCTION
Please refer to this manual for detailed instructions on warnings, cautions, specifications and additional information.
Users should read this entire manual before operating the Inogen Rove 6 Portable Oxygen Concentrator. Failure to do so could result in personal injury. If you have questions about the information in this user manual or about the safe operation of this system, contact your equipment provider.
This user manual provides information for users of the Inogen Rove 6 Portable Oxygen Concentrator. For the sake of brevity, the terms "concentrator," "POC", "unit," or "device" are sometimes used in this document to refer to the Inogen Rove 6 Portable Oxygen Concentrator. "Patient" and "User" are used interchangeably.
INDICATIONS AND INTENDED USE
INTENDED USE
The Inogen Rove 6 Portable Oxygen Concentrator provides a high concentration of supplemental oxygen to patients requiring respiratory therapy on a prescriptive basis. It may be used in home, institution, vehicle, and other transport modalities.
This device is to be used as an oxygen supplement and is not intended to be life sustaining or life supporting.
INDICATIONS FOR USE AND CLINICAL BENEFIT
The Inogen Rove 6 is used on a prescriptive basis by patients requiring supplemental oxygen to increase blood oxygen saturation.
CONTRAINDICATIONS
This device is to be used as an oxygen supplement and is NOT INTENDED to be life sustaining or life supporting. ONLY use this product if the patient is capable of spontaneous breath and is able to inhale and exhale without the use of a machine.
DO NOT use in conjunction with flammable anesthetic or flammable materials.
DO NOT use this device in tracheotomized patients.
DO NOT use this device in persons whose breathing during normal resting is unable to trigger the device.
PATIENT POPULATION
Adults Only. Prescription Required.
SERVICE LIFE
The expected service life of the device is 8 years, except for the sieve beds (columns) which have an expected life of 1 year and the batteries, which have an expected life of 500 full charge/discharge cycles.
SAFETY INSTRUCTIONS

Statements that describe serious adverse reactions and potential safety hazards.

Statements that call attention to information regarding any special care to be exercised by the practitioner and/or patient for the safe and effective use of the device.
Statements calling attention to additional significant information about the device or a procedure.
To ensure the safe installation, assembly and operation of the concentrator these instructions MUST be followed. The patient is the intended operator of the device.
WARNING
Risk of injury or damage
- This device produces enriched oxygen gas, which accelerates combustion. Do not allow smoking or open flames within 2m (6.56ft) of this device while in use. Smoking during oxygen therapy is dangerous and is likely to result in facial burns or death. If you smoke, you must always turn the oxygen concentrator off, remove the cannula and leave the room where either the cannula or the oxygen concentrator is located. If unable to leave the room, you must wait 10 minutes after the flow of oxygen has been stopped.
- Do not use in conjunction with a humidifier, nebulizer, or CPAP, or connected with any other equipment. Doing so may impair performance and/or damage the equipment.
- The Rove 6 is MR Unsafe. Do not expose to MRI equipment or other devices that generate strong magnetic fields (for example, x-ray, CT scan, or other types of radiation).
- It is the responsibility of the patient to have an alternate source of oxygen in case of power outage or mechanical failure. This should be assessed upon starting oxygen therapy and be based on the patient's condition, environmental living conditions and the ability of the patient to be resupplied with backup supplies of supplementary oxygen. These attributes should be periodically reassessed as the patient's conditions change.
- If you feel ill or uncomfortable, or if the concentrator does not signal an oxygen pulse and you are unable to hear and/or feel the oxygen pulse, consult your equipment provider and/or your physician IMMEDIATELY.
- Oxygen makes materials flammable. Do not leave the nasal cannula or mask on bed coverings or chair cushions, if the oxygen concentrator is turned on but not in use. Turn the oxygen concentrator off when not in use to prevent oxygen enrichment.
- Avoid use of the device in the presence of pollutants, smoke, or fumes. Do not use the device in the presence of flammable anesthetics, cleaning agents or other chemical vapors. Do not use aerosol sprays around the device.
- Do not use power supplies, power cables or accessories other than those specific in this user manual. The use of nonspecific power supplies, power cables or accessories may create a safety hazard and/or impair equipment performance.
- Do not use oil, grease, or petroleum-based products on or near the device, on your face or upper chest to avoid the risk of fires and burns. Use only water-based lotions or salves that are oxygen-compatible during setup or use during oxygen therapy.
- Do not lubricate fittings, connections, tubing, or other accessories of the oxygen concentrator to avoid the risk of fire and burns.
- To avoid danger of choking or strangulation hazard, keep cords away from children and pets.
- It is the responsibility of the patient to periodically check the battery and replace as necessary per these instructions for use. Inogen assumes no liability for persons choosing not to adhere to manufacturer recommendations.
- To ensure you are receiving the therapeutic amount of oxygen according to your medical condition, the device must (1) be used only after one or more settings have been individually determined or prescribed for you at your specific activity levels, (2) be used with the specific combination of parts and accessories that are in line with the specification of the concentrator manufacturer and that were used while your settings were determined.
- The settings of other models or brands of oxygen therapy equipment may not correspond with the settings of this device.
- The settings of this device may not correspond with the settings for devices that provide a continuous flow oxygen.
- Use of this device at an altitude above 3,048 m (10,000 ft) or outside the temperature range of 5 – 40°C (41 – 104°F) or a relative humidity above 95% is expected to adversely affect the flowrate and the percentage of oxygen and consequently the quality of the oxygen therapy. Use of this device immediately after storage in temperatures beyond the allowable operating range may adversely affect operation of the device until the temperature returns to the allowable operating range. Wind or strong drafts can adversely affect the accurate delivery of oxygen therapy.
- If the device fails, it will cause a return to your previous condition prior to starting oxygen therapy. This state will be different for each individual patient.
- If you are unable to communicate discomfort, you may require additional monitoring and or a distributed alarm system to convey the information about the discomfort and or the medical urgency to your responsible caregiver to avoid harm.
CAUTION
Risk of minor injury or discomfort
- Use of this device has not been studied in pediatric populations. Consult your physician before using the product for pediatric patients.
- Incompatible parts and accessories can result in degraded performance or damage and may void your warranty.
- The device is designed to provide a flow of high purity oxygen. An advisory alert, "Oxygen Low", will inform you if oxygen concentration drops. If alarm persists, contact your equipment provider.
- The oxygen flow setting must be determined and recorded for each patient individually by the prescriber, including the configuration of the device, its parts and the accessories. It is the patient responsibility to check with provider to reassess settings of the therapy for effectiveness.
- It is the responsibility of the patient to plan for a back-up oxygen supply when traveling; Inogen assumes no liability for any disruptions in oxygen supply if a backup source is not secured.
- It is the responsibility of the patient to use only parts and accessories mentioned in these instructions for use. Parts and accessories used by the patient not recommended in these instructions for use are at the sole responsibility for the patient. Inogen assumes no liability for use of parts and accessories not mentioned in these instructions for use.
- It is the responsibility of the patient to periodically check the battery and replace as necessary per these instructions for use. Inogen assumes no liability for persons choosing not to adhere to manufacturer recommendations.
- Do not modify the device. Incompatible parts and accessories as a result of modifications can degrade performance or cause damage and may void your warranty unless indicated or instructed to do so.
- Do not use this product in any way other than described in the specifications and intended use sections of this manual as it may lead to product damage, loss of product function, or personal injury.
- Do not obstruct air intake or exhaust when operating the device. Blocking air circulation or placing close to a heat source may lead to internal heat buildup and shutdown or damage to the concentrator. In the event of changes to the performance of the device, please refer to the troubleshooting section of this document.
- Do not operate the device without the particle filter in place. Particles drawn into the system may damage the equipment.
- Do not wrap cords around power supply for storage. Do not drive, drag or place objects over cord. Doing so may lead to damaged cords and a failure to provide power to the concentrator.
- Do not use the DC power cord with a plug splitter. This may cause overheating of the DC power cord.
- Do not disassemble the power supply. This may lead to component failure and/or safety risk.
- Do not place anything in the device's power port other than the supplied power supply. If an extension cord is used, use an extension cord that has an Underwriters Laboratory (UL) Mark and a minimum wire thickness of 18 gauge. Do not connect any other devices to the same extension cord.
- Do not repackage concentrator, accessories, or systems for shipment in packaging not provided by Inogen.
- Do not jump start the automobile with the DC power cord connected. This may lead to voltage spikes which could shut down and/or damage the device.
- Do not leave the device in an environment which can reach high temperatures, such as an unoccupied car in high temperature environments.
- Do not touch the recessed electrical contacts of the External Battery Charger; damage to contacts may affect charger operation.
- The device should be kept dry at all times. Exposure to water could lead to electrical shock and/ or damage.
- For optimal sieve bed (columns) life, the product should be used frequently.
- The device's battery acts as a secondary power supply in the event of a planned or unexpected loss of the external power supply. Even when operating the device from an external power supply, a properly inserted battery should be maintained in the unit. Doing so will minimize the risk of interrupting operation and will keep alarms functioning.
- The power supply should be placed in a well-ventilated location as it relies on air circulation for heat dissipation. The power supply may become hot during operation; if this happens, allow to cool down before handling to avoid injury.
- Ensure the automobile power socket is clean and the adapter plug fits properly, otherwise overheating may occur.
- Ensure that the automobile power socket is adequately fused for the device power requirement (minimum 15Amp). If the power socket cannot support a 15Amp load, the fuse may blow, or the socket may be damaged.
- When powering the device in an automobile, ensure the vehicle's engine is running first before connecting DC power cord into DC auxiliary outlet. Operating the device without the engine running may drain the vehicle's battery.
- A change in altitude (for example, from sea level to mountains) may affect total oxygen available to the patient. Consult your physician before traveling to higher or lower altitudes to determine if your flow setting should be changed.
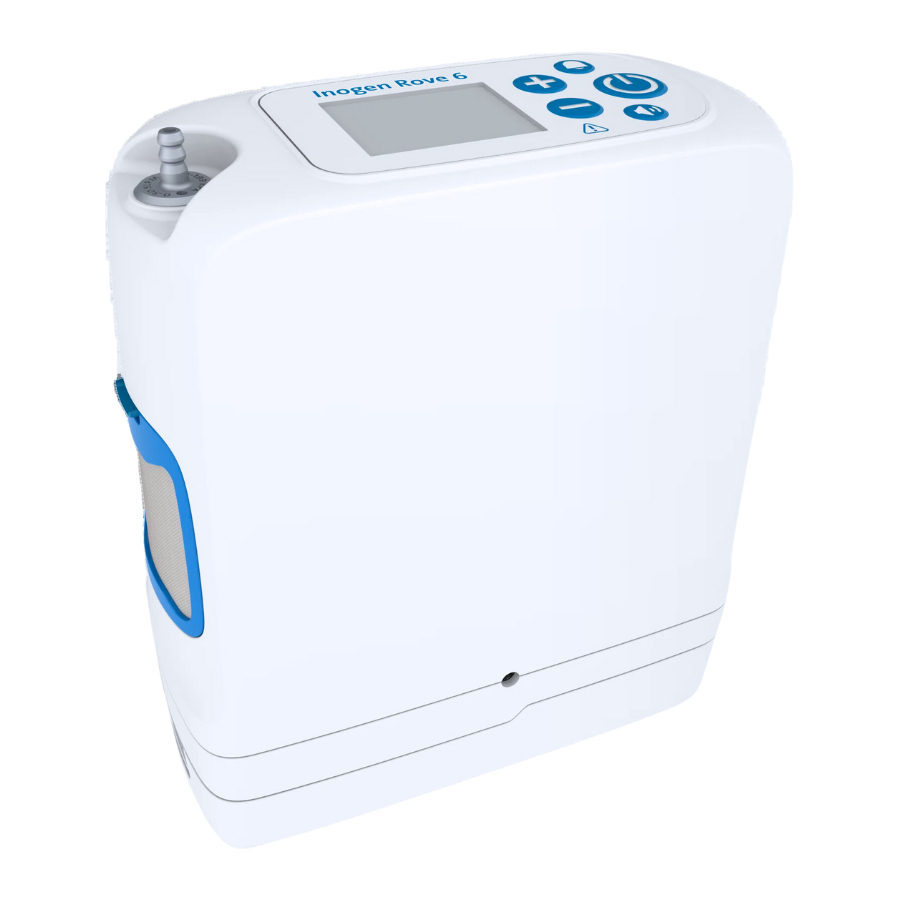
INOGEN ROVE 6 DESCRIPTION
The Inogen Rove 6 Portable Oxygen Concentrator System may include the following accessories: AC power supply, DC power cable, rechargeable battery pack and carry bag.
This section is intended to help familiarize you with the device's components and interface.
Do not perform any actions on or with your POC until after reading GENERAL INSTRUCTIONS Section, General Instructions Inogen Rove 6.

Power button
- Pressing and holding this button turns the device on and off.
Flow setting control buttons:
- Use the – or + flow setting control buttons to change the setting.
- There are six settings, from 1 to 6.
Volume control button:
- Pressing this button will change the volume level from 1 to 4.
Bell button:
- Pressing this button will toggle the device's no-breath-detect audible alarm on and off.
- When this mode is ON: The device will alarm with audible and visual signals when no breath has been detected for 60 seconds. At 60 seconds, the device will enter 'auto pulse mode'. Once another breath is detected, the device will exit 'auto pulse mode' and deliver normally on inspiration.
- This mode is enabled when there is a bell "displayed on the screen." If power is lost, the no-breath-detect audible alarm remains set in the user preferred mode.
Display:
- The display shows information about the status of the device such as flow setting, power status, battery life and alarms.
- Before use, remove the static cling FCC label from the screen.
Indicator lights:
- Breath Detect LED: A green light indicates breath detection.
- Signal/Alarm LED: A yellow light indicates either a change in operating status or a condition that may need response (alarm).
- A flashing light is higher priority than non-flashing.
Audible signals:
- An audible signal (beep) indicates either a change in operating status or a condition that may need response (alarm).
- More frequent beeps indicate higher priority conditions.
Backlight: A backlight will illuminate the screen for 15 seconds when the power button is briefly pressed.
Particle filter: The filters must be always in place during operation to keep the air going into the device free of large particles.
Cannula barb: The nasal cannula connects to the device through this barb.
Power in: Connection for external power from the AC power supply or DC power cord.
USB port: For service use only.
GENERAL INSTRUCTIONS
The product provider must ensure that, where appropriate, all users of this device are provided with the user manual.
Do not use the product without proper self-training by reading this manual. If you need additional information after reading this user manual, please contact your equipment provider.
Always inspect the device and its components for any sign of damage before use.
Do not use the device or any component that shows any sign of damage.
While the box or packaging may exhibit some damage, e.g., tears or dents, the device may still be in a usable condition. If the device or any accessory shows any sign of damage, contact your home oxygen provider.
Before you get started, check to make sure you have the following:
- Concentrator
- Battery
- Carry bag
- AC power supply
- DC power cable
- Nasal Cannula (purchased separately)
OPERATING PRINCIPALS
This device works by separating oxygen from air using a pressure swing adsorption (PSA) process. Normal air consists of 21% oxygen; this device increases the amount of oxygen up to 96% by removing the nitrogen and concentrating the output of oxygen. To accomplish this, air is pulled into the device through a small air compressor, nitrogen is separated from the oxygen and finally, the oxygen is collected and delivered to the patient on each breath.
Because the oxygen you breathe comes from your immediate environment, it is very important to keep your device clean. Although there are many filters built into the device, exposing your device to dirty and dusty environments will reduce the life of the filters causing them to need to be replaced more often.
The device maintains the following as essential performance requirements without the need for recurrent testing:
- Alarm condition when the delivery of oxygen, in both normal and single fault conditions, is not within the performance levels as indicated in this manual.
- Technical alarm condition when there is a power supply failure.
- Technical alarm condition when the battery nears depletion.
- Technical alarm condition when the oxygen concentration is below 82% volume fraction.
- Malfunction technical alarm condition.
- The delivery of an oxygen dose, in normal condition or an indication of abnormal operation.
PREPARING YOUR CONCENTRATOR FOR USE
Make sure you have a backup oxygen supply in addition to this portable oxygen concentrator.
What is your back up oxygen supply?
DO NOT USE with a humidifier, nebulizer, CPAP or in series or parallel with any other device. DO NOT USE near flames, smoke or anything flammable
DO NOT USE near pollutants, smoke, fumes, flammable anesthetics, cleaning agents or chemical vapors.
DO NOT USE in environments where your concentrator could become submerged in water.
DO NOT USE near oil, grease or petroleum-based products.
- Ensure your concentrator is in a well-ventilated location
- Air intake and exhaust must have clear access.
- Orient your concentrator in such a way that any auditory alarms may be heard.
- Always operate in an upright position.
- Ensure particle filters are in place on both sides of the device.
- Ensure you are in a location where you can hear and/or see any alarms that may occur.
![]()
- Install the Battery
![]()
Using the wrong cords can lead to a fire. Only use compatible cords from the manufacturer.
A battery should always be installed on the device for power back up and to allow the battery to charge when the concentrator is plugged into external power. To install a battery:- Align the battery with the bottom housing of the device.
- Slide the battery into place until you hear an audible click, and the latch has returned to the upper position.
- You will hear a single beep and you will see the indicator lights and display light up briefly before shutting off. This means the battery has been successfully connected to your concentrator.
![]()
DO NOT use a battery other than those specified in this manual.
- Connect the Power Supply:
- Connect the AC power brick to the power supply cable and plug the power supply cable into a standard wall outlet.

- Connect the power supply output plug to the concentrator by inserting it into the power port located at the front of the concentrator.
![]()
- You will hear a single beep and you will see the indicator lights and display screen light up briefly before shutting off. This means the power supply has successfully been connected to your concentrator.
DO NOT use a power supply other than those specified in this manual.
DO NOT use power cables, or accessories other than those specified in this manual.
- Connect the AC power brick to the power supply cable and plug the power supply cable into a standard wall outlet.


- Connect an appropriate cannula to your concentrator
![]()
- Using a single lumen cannula up to 7,62 meters (25 feet) in length is recommended. This ensures proper breath detection and oxygen delivery.
![]()
Consult your physician if additional titration may be needed to ensure proper oxygen delivery when using a particular cannula.
DO NOT lubricate fittings, connections, tubing, or other accessories of your concentrator. - Connect the nasal cannula tubing by inserting it onto the metal cannula barb on the top of the device.
- Replace your cannula routinely to avoid contamination or poor cannula performance. See 'Cannula Replacement' (section CANNULA REPLACEMENT) for more details.
- Using a single lumen cannula up to 7,62 meters (25 feet) in length is recommended. This ensures proper breath detection and oxygen delivery.

USING YOUR CONCENTRATOR
- Turn on your concentrator by pressing the ON/OFF button
![]()
- Press and hold the Power button until you hear a single short beep.
- The display will light up and the Inogen logo will appear on the display.
![]()
If the display light immediately turns off after the Inogen logo appears, you have not held the power button long enough. Retry by pressing and holding the power button down longer, until you hear a single short beep. - The 'please wait' icon (
![]() ) will appear while the concentrator powers up.
) will appear while the concentrator powers up. - The display will indicate the current flow setting and power condition.
- Following a brief start-up sequence, a warmup period up to 2 minutes will initiate. During this time-period the oxygen concentration is building to but may not have reached specification. Additional warm up time may be needed if your device has been stored in extremely cold temperatures.
- Check your concentrator's battery level
- Once your concentrator has started up fully, the display light will turn off.
- At this time, you will see a battery percentage appear on the screen where the 'please wait' icon (
![]() ) was previously.
) was previously. - If the battery is low, connect your concentrator to an external power supply, as described in PREPARING YOUR CONCENTRATOR FOR USEstep 3 or switch it out for a fully charged battery.
- If the battery has been removed, go back to PREPARING YOUR CONCENTRATOR FOR USE, step 2, "Install the Battery" for steps to re-install the battery.
- Set your concentrator's flow setting
- Set the flow setting as prescribed by your physician or clinician.
- Use the + or – setting buttons to adjust to the desired setting.
![]()
- The current setting can be viewed on the display next to the settings symbol
![]() .
.
![]()
It is normal to hear a difference in sound as you change the flow setting.
Set your concentrator to flow settings prescribed by your doctor. The flow rate is prescribed by your physician; it is a "dose" of oxygen. Too high or too low a rate may eventually lead to harm.
- Use your concentrator
- Position the nasal cannula below your nose with the small tubes directed upward into your nose and loop the tubing snuggly around your ears per the cannula manufacturer's instructions.
![]()
- Breathe through your nose. Your concentrator will sense the onset of inhalation and deliver a burst of oxygen at a precise time when you inhale. The device will sense each breath and continue to deliver oxygen in this manner. As your breathing rate changes, it will sense these changes and deliver oxygen as you need it.
- A green light will flash each time a breath is detected.
Continue to make certain the nasal cannula is properly aligned on your face and you are breathing through your nose.
DO NOT use your concentrator if you feel ill or uncomfortable.
DO NOT use your concentrator if the concentrator does not signal an oxygen pulse.
DO NOT use your concentrator if you are unable to hear and/or feel the oxygen pulse.
DO NOT use your concentrator if you cannot hear the audible alarms.
DO NOT allow smoking or open flames within 6.56 ft / 2 m of your concentrator.
DO NOT actively smoke while using your concentrator. - If you smoke, you must always turn your concentrator off, remove the cannula, and leave the room where either the cannula or your concentrator are located. If unable to leave the room, you must wait 10 minutes after the flow of oxygen has been stopped.
DO NOT leave the nasal cannula on bed coverings or chair cushions when POC is turned on but not in use.
![]()
For maintenance of the cannula, refer to the cannula manufacturer's instructions or follow the advice of your healthcare professional. If you inhale very quickly between breaths, the device may ignore one of the breaths, giving the appearance of a missed breath. This is normal, as the device senses and monitors the changes in your breathing pattern. The device will normally sense the next breath and deliver oxygen accordingly.
- Position the nasal cannula below your nose with the small tubes directed upward into your nose and loop the tubing snuggly around your ears per the cannula manufacturer's instructions.
- Carry Accessories Carry Bag:
- To use the Carry Bag (CA-500) if desired, attach a battery. Insert the device into the Carry Bag through the bottom zippered opening with the cannula barb facing up on the right front side.
- Zip up the bottom flap Vent

![]()
Make sure both intake vents are visible through the open mesh panels on the sides of the bag and that the exhaust vent is visible from the open mesh panel on the front of the bag. - Store items such as extra cannulas or ID cards in the zippered closure under the front flap of the carry bag.
![]()
This bag can be attached to a luggage or cart handle.


Backpack
- To use the Backpack (CA-550) with your concentrator, attach a battery and insert the device into the front compartment so that the particle filters are not obstructed, and the power input is accessible.
![]()

The backpack is not included with the system but may be purchased separately.
Cart
- The Cart has wheels and a telescoping handle to provide easy transport of the Inogen Rove 6. The Inogen Rove 6 can be operated using battery power during transport. Place the carry bag over the cart handle. Make sure the cart handle is inserted through the sleeve opening in the back of the carry bag.


- Turn off your concentrator
- Turn the device off by pressing and holding the power button.
![]()
- Turn the device off by pressing and holding the power button.

ACCESSORIES AND COMPONENTS LIST
To avoid injury or damage which will void warranty use only Inogen-specified power supplies.
Only use power supplies/adapters or accessories specified in this manual.
Using accessories that are not specified may create a hazard and/or negatively affect the performance of the device. Not all accessories are included with your system and can be purchased separately. The following optional accessories and replacement parts can be purchased from your equipment provider or the manufacturer Inogen, at Inogen.com or by calling +1 877 466 4364, or +31 30 7820689.
| Description | Item | Description | Item |
| Standard battery | BA-500/BA-508 | AC power cable, South Africa | RP-145 |
| Extended battery | BA-516 | Carry bag | CA-500 |
| AC power supply | BA-502/BA-501 | Backpack | CA-550 |
| AC power cable, Europe | RP-116 | External battery charger | BA-503 |
| AC power cable, United Kingdom | RP-115 | DC power cable | BA-306 |
| AC power cable, North America | RP-109 | Cannula barb kit | RP-506 |
| AC power cable, Switzerland | RP-227 | Replacement columns | RP-502 |
| AC power cable, Australia | RP-120 | Replacement particle filters | RP-501 |
Do not use the device or any accessory that shows any sign of damage.
RECHARGEABLE BATTERY PACKS (BA-500, BA-508 AND BA-516)
The battery will power the device without connection to an external power source. Your device may come with 1 or more batteries, depending on the configuration that you've ordered. This device is compatible with three different batteries: BA-500 and BA-508 are standard, 8-cell batteries while BA-516 is the extended, 16-cell battery. These batteries will power the device for different lengths of time, depending on the flow setting.

This table shows the typical durations for a new battery pack.
| Device Setting | Standard battery duration in hours (BA-500/BA-508) | Extended battery duration in hours (BA-516) |
| 1 | Up to 6:15 | Up to 12:45 |
| 2 | Up to 5:00 | Up to 10:15 |
| 3 | Up to 3:15 | Up to 6:30 |
| 4 | Up to 2:15 | Up to 5:15 |
| 5 | Up to 1:45 | Up to 3:30 |
| 6 | Up to 1:15 | Up to 2:30 |
 NOTE: Battery time varies with flow setting and environmental conditions. Time shown is an average and may vary ± 10%.
CHECKING THE BATTERY STATUS WHEN INSTALLED ON THE DEVICE
When operating on battery, the display will show the estimated percentage (%) or minutes of charge remaining. These icons indicate the device is operating on battery power and is not charging:
 Battery is full.
 Battery has approximately 40% to 50% charge remaining.
 Battery has less than 10% charge remaining.
 Battery is empty or battery status is not available.
When the device detects that the battery has less than 10 minutes remaining, a low priority alarm will sound. When the battery is empty, the alarm will change to a higher priority.
When the battery has less than 10 minutes remaining, do one of the following:
- Plug the device into an AC or DC power source using the AC power supply or DC power cable.
- Turn off the device and replace the depleted battery with a charged battery. To remove the battery, press and hold the battery latch button and slide the battery off the device.
If the battery is drained, charge the battery by plugging the device into external power or charging it with the external battery charger.
CHECKING THE BATTERY STATUS WHEN NOT INSTALLED ON THE DEVICE
- To check the battery charge when it is not installed in the device, press the green battery icon button. The battery gauge indicator lights (<10% - 100%) will illuminate to the left of the green battery icon button to indicate the level of the battery pack charge:
- 4 LEDs light up: 75% to 100% full
- 3 LEDs light up: 50% to 75% full
- 2 LEDs light up: 25% to 50% full
- 1 LED lights up: 10% to 25% full
- 1 LED Blinks: Battery is less than 10% full and needs to be recharged


CHARGING THE BATTERIES WITH THE CONCENTRATOR
The concentrator will recharge the battery any time the battery is installed and the device is connected to an external AC or DC power source (except on an airplane). You will know the battery is charging when the battery icon on the device's display has a lightning bolt going through it as shown:
 The battery is fully charged and is charging as necessary to maintain its charge.
 Battery is charging with charge level less than 10%.
 Battery is charging with charge level between 60% and 70%.
 The device is operating from an external power source with no battery present.
When starting to charge a fully drained battery, the charging process may start and stop during the first few minutes. This is normal.
Leaving your device plugged in past the full charge time will not harm the device or the battery. If using multiple batteries, make sure that each battery is labeled (1, 2, 3 or A, B, C, etc.) and rotate on a regular basis.
BATTERY LIFETIME AND CARE
The device's batteries are designed to last 500 charge/discharge cycles.
Always keep liquids away from batteries. If batteries become wet, discontinue use immediately and dispose of battery properly.
To extend the run-time of your battery, avoid running in temperatures less than 5˚C (41˚F ) or higher than 35˚C (95˚F) for extended periods of time. Store battery in a cool, dry place. Store with a charge of 40-50%.
Batteries should be charged up to a full charge and discharged down to 0% at least once every 90 days to maintain maximum life.
NASAL CANNULA
The proper placement and positioning of the prongs of the nasal cannula in the nose is critical for oxygen to be delivered. Make sure the nasal cannula is properly connected to the nozzle fitting and that the tubing is not kinked or pinched in any way. Replace the nasal cannula on a regular basis.
Nasal cannula should be rated up to 6 liters per minute to ensure proper oxygen delivery. Note that cannulas may be rated in "liters per minute" even though your prescribed pulse dose setting number does not represent a constant flow in liters per minute.
A nasal cannula must be used with the device to provide oxygen from the concentrator. A single lumen cannula up to 7.62 meters (25 feet) in length is recommended to ensure proper breath detection and oxygen delivery.

Reference manufacturer's instructions for use.
AC POWER SUPPLY (BA-502/BA-501)
The Inogen Rove 6 POC includes an AC power supply that connects to the device and an AC power cable to connect to the power supply and corresponding AC outlet. The AC power supply will automatically adapt to input voltages from 100V-240V (50-60Hz).
DC POWER CABLE (BA-306)
The DC power cable consists of a single cable with one end that plugs directly into the device and another end that goes into the DC outlet.
")
To use the DC power cable:
- Plug one end of the DC power cable into the DC auxiliary port.
- Plug the other end of the DC power cable into the device.
- Make sure device is secure before operating.
Do not touch the tip of the DC power cable after use because it will be hot. Touching the tip of the DC power cable immediately after removal from the DC auxiliary port may cause injury.
EXTERNAL BATTERY CHARGER (BA-503, OPTIONAL ACCESSORY NOT INCLUDED)
The external battery charger will charge the standard (BA-500/BA-508) and extended (BA-516) battery. It is not included as a standard accessory with the system but can be purchased separately.
You can also use your device to charge the battery when it is plugged into an AC or DC power supply. To use the external battery charger, follow these steps:
- Connect the AC power plug into an electrical outlet.
![]()
- Connect the AC input plug into the AC power supply.
![]()
- Connect the power output plug into the external battery charger.
![]()
- Attach the external battery charger by sliding it onto the battery until it audibly clicks and locks onto the battery.
![]()
- Once the devices are properly connected, a solid red light will illuminate and indicate that the battery is charging.
![]()
- When the green light illuminates, the battery is fully charged.
![]()
- Press the battery latch down and slide the charger off the battery.
![]()


Check for Errors: If the red light is flashing, unplug the device and complete steps 1-4 again. If flashing continues, contact your equipment provider.
TRAVELING WITH THE DEVICE
This device conforms to all applicable FAA acceptance criteria for POC carriage and use onboard aircraft.
It is the responsibility of the patient to check with the specific airline carrier when traveling domestically and internationally with a POC.
When traveling with the device, be sure to bring the AC Power Supply and the External Battery Charger (if you have one) with you. It is advisable to use external power (i.e., plugged into a wall) whenever it is available to keep the battery fully charged.
Bring enough charged batteries with you to power your concentrator for no less than 150% of the expected duration of your flight, ground time before and after the flight, security screenings, connections and a conservative estimate for unanticipated delays. Note that per FAA regulations, all extra batteries are to be individually wrapped and protected to prevent short circuits and carried in carry-on baggage onboard aircraft only.
The AC Power Supply cannot be used to charge the device battery when onboard aircraft. If traveling by bus, train or boat, contact your carrier to find out about power port availability.
STORING YOUR CONCENTRATOR
Store your concentrator
- Remove the battery from the concentrator.
- Store concentrator, battery and power accessories in a cool, dry place.
- Store your battery with a charge of 40-50%.
DO NOT store in temperatures less than 5˚C (41˚F) or higher than 35˚C (95˚F) for extended periods of time.
DO NOT place objects on top of the concentrator or packaged concentrator.
RESPONDING TO ALARMS
If you are unable to hear or see alarms, do not have normal tactile sensitivity, or cannot communicate discomfort, consult your clinician before using this device.
Pressing the bell button will enable (turn on) and disable (turn off) the no-breath-detect alarm. When the audible no-breath-detect alarm is ON (because the concentrator has not detected a breath for 60 seconds, see ALARM INDICATORS & DEVICE ICON GLOSSARY Section: alarms for no-breath-detect alarm conditions), the concentrator will emit three beeps, repeated every 25 seconds and will have a flashing yellow light. When this alarm is triggered, the concentrator will begin to deliver pulses of oxygen at a rate of 20 boluses per minute. When the audible no-breath-detect alarm is OFF, the concentrator will respond the same way when no breath is detected for 60 seconds BUT the repeating 3 beeps will not be produced. Whether the no-breath-detect mode is on or off, it does not impact the alarm functionality of any other device alarms or notifications.
The alarm system is tested during the startup sequence. You should see all alarm lights briefly turn on and the audible alarm indicator chirp. If alarms are suspected of misoperating, contact your distributor for verification that alarms are working correctly.
ALARM INDICATORS & DEVICE ICON GLOSSARY
OVERVIEW INFORMATION
The device uses icons and alarms to communicate status. This glossary outlines all icons and alarms to correctly interpret the status of the device.

- Battery status icon #1: will show approximately how much time is left on the current battery charge at the current flow setting, reflected in hours and minutes
- Battery status icon #2: will show the % that the battery is charged
- Battery & power supply informational icon: communicates whether or not a battery is inserted, the charge level of the battery, whether the device is connected to a power supply and whether or not the battery is charging. See power supply section for list of icons.
- Flow setting: shows which flow setting the device is on, from 1 to 6
- No-breath detect alarm icon: communicates whether the audible alarm is ON or OFF
- Volume icon: communicates alarm volume levels
- Informational icons or alarm icons: informational signals or visual alarms. This may be displayed as a single icon or multiple icons and may or may not be accompanied by audible alarms.
MODE ICONS
 | The no-breath-detect audible alarm is ON. |  | The no-breath-detect audible alarm is disabled (OFF). This is the default condition. |
 | Buzzer level 1 |  | Buzzer level 3 |
 | Buzzer level 2 |  | Buzzer level 4 |
BLUETOOTH ICONS (FOR MODELS WITH BLUETOOTH)
 | Bluetooth turned off. |  | Bluetooth turned on. |
 | Pairing with Inogen Connect application. |  | Concentrator unpaired from mobile device. |
INFORMATIONAL ICONS
The following displayed icons are not accompanied by any audible feedback or any visual change in the indicator lights.

ALARMS
The device monitors various parameters during operation and utilizes an intelligent alarm system to indicate a malfunction of the concentrator. Mathematical algorithms and time delays are used to reduce the probability of false alarms while still ensuring proper notification of an alarm condition. If multiple alarm conditions are detected, the highest priority alarm will be displayed. Note that failure to respond to the cause of an alarm condition potentially will result in discomfort or reversible minor injury only (e.g., reduced oxygen supply or a burn). In case of an alarm, seek to address the issue and/or switch to a backup source of oxygen.
Audible alarms are to warn the user of problems. To ensure that audible alarms may be heard, the maximum distance that the user can move away from it must be determined based on the surrounding noise level. Make sure the device is in a location where the alarms can be heard or seen if they occur.
The following section provides a listing and description of every possible alarm condition. The alarm system is intended to notify an operator while wearing the device in a shoulder bag or while the device is set down within range of an acceptable nasal cannula.
If the power plug is removed when a battery is connected, the alarms will work normally. If there is no battery or the device is not connected to AC or DC power, the alarms will not activate because there is no power. With the battery connected, a power loss lasting less than 30 seconds will have no effect on the alarm system.
If multiple alarm conditions are detected, the highest priority alarm will be displayed.
Failure to respond to the cause of an alarm will result in discomfort or reversible injury only (e.g. reduced oxygen supply or a burn). In case of an alarm, seek to address the issue and/or switch to a backup source of oxygen.
ALARM LOG
The device maintains a patient accessible alarm log that allows for the last alarm to be accessed and viewed on the LCD (except for the no-breath-detect, check cannula, battery low / attach plug and battery empty / attach plug alarms). The alarm log is retained in memory after the device experiences a total loss of power. To access the alarm log, ensure the concentrator is plugged and turned off. Then hold the plus (+) button for 5 seconds. Alternatively, the alarm log can be found in the Advanced Tab of the Inogen Connect App under Error Recall.
Once a new alarm is activated the new alarm overwrites the previous alarm. The alarm log is retained in memory after the device is powered down. The time elapsed since the error occurred is displayed with the last alarm on the alarm log. The device also maintains a service and repair alarm log that is not accessible by the patient.
INFORMATIONAL SIGNALS (LEVEL 1)
The following notification icons are accompanied by a single, short beep.
- Power supply failure or loss of external power: The battery has stopped charging and the device has switched to battery power. Eventually the battery will be depleted.
![]()
What To Do: Plug in the power supply to continue charging the battery. - Remove battery to cool: Remove battery to cool.
![]()
What To Do: The battery needs to be removed and must be cooled before reuse.
- Check battery: Check battery.
![]()
What To Do: Check the connection of your battery and ensure that it is properly attached and latched to the concentrator. If the battery error persists with same battery, stop using the battery and switch to a new battery or remove the battery and operate the concentrator using an external power supply.


LOW PRIORITY ALARM (LEVEL 2)
The following low priority alarms are accompanied by one beep and a solid yellow light.
- Replace columns: Column replacement is required within 30 days.
![]()
What To Do: Contact your equipment provider to arrange for service and/or order new columns from the manufacturer. - Extended start up: Oxygen concentration is <87% two minutes after the device's start up sequence and at least 10 breaths have been detected within the last minute.
![]()
What To Do: Wait a few minutes to see if the oxygen concentration improves (alarm will clear). If condition persists, a secondary alarm will sound. Follow the instructions for that alarm or contact your equipment provider. If alarm occurs frequently at start up, this may indicate that maintenance (column replacement) will soon be required. - Battery low, attach plug: Battery power is low with less than 10 minutes remaining.
![]()
What To Do: Attach an external power supply turn off and insert a fully charged battery.
- Oxygen low: The concentrator has been producing oxygen at a slightly low level (≤82%) for a period of 10 minutes.
![]()
What To Do: If condition persists, contact your equipment provider. - Service soon: The concentrator requires servicing at the earliest convenience. The concentrator is operating to specification and may continue to be used.
![]()
What To Do: Contact your equipment provider to arrange for service. - Battery HOT warning: The battery temperature is nearing the temperature limit while concentrator is running on battery power.
![]()
What To Do: If possible, move the concentrator to a cooler location or power unit with an external power supply and remove battery. If condition persists, contact your equipment provider.
- System HOT warning: Concentrator temperature is nearing temperature limit.
![]()
What To Do: If possible, move the concentrator to a cooler location. Ensure air intake and outlet vents have clear access and particle filters are clean. If condition persists, contact your equipment provider.


MEDIUM PRIORITY ALARMS (LEVEL 4)
The following medium priority alerts are accompanied by three beeps, repeated every 25 seconds, and a flashing yellow light.
- No-breath-detect: check cannula: The concentrator has not detected a breath for 60 seconds.
![]()
What To Do: Check that cannula is connected to concentrator, there are no kinks in tubing and the cannula is positioned properly in your nose.
- Oxygen error: Oxygen output concentration has been below 50% for 10 minutes.
![]()
What To Do: If condition persists, switch to your backup oxygen source and contact your equipment provider to arrange for service. - Oxygen delivery error: A breath has been recognized, but proper oxygen delivery has not been detected.
![]()
What To Do: If condition persists, switch to backup oxygen source and contact your equipment provider to arrange for service. - Battery empty, attach plug: The concentrator has insufficient battery power. The concentrator will shut down and stop producing oxygen.
![]()
What To Do: Attach an external power supply or replace with a fully charged battery. If the device has turned off, press and hold the power button to turn back on. - Battery HOT: The battery has exceeded temperature limit while concentrator is running on battery power. The concentrator will shut down and stop producing oxygen.
![]()
What To Do: If possible, move concentrator to a cooler location, then turn power off and back on. Ensure air intake and outlet vents have clear access and particle filters are clean. If condition persists, switch to external power or a backup source of oxygen and contact your equipment provider. - System HOT: Concentrator temperature is too high. The concentrator will shut down and stop producing oxygen.
![]()
What To Do: Ensure air intake and outlet vents have clear access and particle filters are clean. If condition persists, switch to a backup source of oxygen and contact your equipment provider. - Sensor fail: The concentrator's oxygen sensor has malfunctioned.
![]()
What To Do: You may continue to use the concentrator. If the condition persists, contact your equipment provider. - System COLD: The system is cold (<2˚C). The concentrator will shut down and stop producing oxygen.
![]()
What To Do: Move to a warmer environment to allow the unit to warm up before starting it. If condition persists, switch to a backup source of oxygen and contact your equipment provider. - System Error: The concentrator will shut down and stop producing oxygen.
![]()
What To Do: Switch to backup oxygen source and contact your equipment provider.


TROUBLESHOOTING
| Problem | Possible Cause | Recommended Solution |
| Any problem accompanied by information on concentrator display, indicator lights and/or audible signals | Refer to Section Alarm Indicators & Device Icon Glossary | Refer to device icon & alarm glossary |
| Concentrator does not power on when On/Off button is pressed | Battery is discharged or no battery is present | Use external power supply or replace battery with one that is fully charged |
| AC Power supply is not connected properly | Check power supply connection and verify green light is solid | |
| DC power cable is not connected properly | Check DC power cable connection at the device and at DC auxiliary outlet | |
| Malfunction | Contact your equipment provider | |
| No oxygen | Concentrator is not powered on | Press On/Off button to power concentrator |
| Cannula is not connected properly or is kinked or obstructed | Check cannula and its connection to concentrator nozzle | |
| Does not connect to Bluetooth | Other devices may be causing interference, or the devices are too far apart. | Move the concentrator away from other electronic devices and/or move it close to your mobile device. |
CONNECTIVITY OPTIONS
The Inogen Connect App pairs your portable oxygen concentrator to your mobile device or tablet using Bluetooth technology. It is not available in every country – contact your equipment provider for more information.
The app is not intended to replace the user interface panel, which is the primary source of information to which the patient should refer when operating the device.
Connection of the Inogen Rove 6 to a Bluetooth connection that includes other equipment could result in previously unidentified risks to patients, operators or other third parties. The responsible organization should identify, analyze, evaluate and control these risks. Subsequent changes to the Bluetooth connection could introduce new risks and require additional analysis.
Changes to the Bluetooth connection include:
- Changes in the Bluetooth configuration.
- Connection of additional items to the Bluetooth connection.
- Disconnecting items from the Bluetooth connection.
- Update of equipment connected to the Bluetooth connection.
- Upgrade of equipment connected to the Bluetooth connection.
PAIRING YOUR DEVICE WITH THE MOBILE APPLICATION
Instructions for use to pair your device with the mobile application are provided separately. Please make sure that they are provided by your equipment provider if they are not included in the packaging.
CYBERSECURITY
Medical device security is a shared responsibility between patients, providers, and manufacturers of medical devices. Failure to maintain cybersecurity may result in compromised device functionality, loss of data availability or integrity, or exposure of other connected devices or networks to security threats.
If using the Inogen Connect App, it is important to ensure the following:
- Make sure to keep your Operating System updated
- Make sure to keep your app updated
- Make sure to enable passwords
- Turn off the concentrator's Bluetooth when not paired with the Inogen Connect App
CLEANING, DISINFECTION, CARE AND MAINTENANCE
Operator should perform periodic visual inspection of the device.
- DO NOT perform service or maintenance while the equipment is in use.
- DO NOT disassemble the device or any of the accessories or attempt any maintenance other than tasks described in these instructions for use; disassembly creates a hazard of electrical shock and will void your warranty. Do not remove the tamper evident label. For events other than those described in this manual, contact your equipment provider for servicing by authorized personnel.
- DO NOT use any columns other than those specified in this user manual. The use of non-specified columns may create a safety hazard and/or impair equipment performance and will void your warranty.
- Use only spare parts recommended by the manufacturer to ensure proper function and to avoid the risk of fire and burns.
Periodic visual inspection of the device is required to ensure no damage to the exposed components is apparent. A typical visual inspection includes:
- Battery connectors - these should not be bent or deformed.
- Cannula barb - this should be straight and fully seated against the housing.
- Housing - the housing should be fully seated and secure with no cracking or other visible damage.
- Particle filters - these should be in place and clear of debris, dust or other obstructions.
Replacement parts can be purchased from your equipment provider or the manufacturer Inogen, at Inogen.com or by calling +1 877 466 4364, or +31 30 7820689.
CANNULA REPLACEMENT
Your nasal cannula should be replaced on a regular basis per the manufacturer's instructions for use. Consult with your physician and/or equipment provider and/or cannula manufacturer's instructions for replacement information.
CASE CLEANING AND DISINFECTION
Liquid will damage the internal components of the concentrator and its equipment. To avoid damage or injury from electrical shock:
- Remove the battery before cleaning
- Turn Off the concentrator and unplug the power cable before cleaning.
- DO NOT allow any cleaning agent to drip inside the air inlet and outlet openings.
- DO NOT spray or apply any cleaning agent directly to the cabinet.
- DO NOT hose down the product.
- DO NOT submerse the device or accessories in liquid
Harsh chemical agents can damage the concentrator and filters.
- DO NOT clean with alcohol and alcohol-based products (isopropyl alcohol), concentrated chlorine-based products (ethylene chloride), and petroleum-based products or any other harsh chemical agents.
- Mild liquid dish detergent is recommended.
Periodically clean the case as follows:
- Make sure the concentrator is off, is removed from the carry bag, and the power cord or battery is removed.
- Clean the outside case using a cloth dampened with a mild liquid detergent and water.
- A llow the concentrator to air dry, or use a dry towel, before returning the concentrator to the carry bag or backpack and prior to operating the concentrator.
The device should receive an external cleaning weekly; accessories should be cleaned as needed. The device is provided non-sterile and exterior should be cleaned and the output filter replaced prior to delivering to a new patient.
If desired, disinfection of the exterior surface may be accomplished using an appropriate surface disinfecting wipe designed to kill bacteria and viruses. If used, follow manufacturers instruction for use describing application and surface dwell times.
FILTER CLEANING AND REPLACEMENT (RP-501)
The particle filters must be cleaned weekly to ensure the ease of air flow.
To clean:
- Remove the battery from the device.
- Remove the particle filters from both intake ends of the device.
- Clean the particle filters with a mild liquid detergent and water, rinse in water and dry fully before reuse.
To purchase additional particle filters, contact your equipment provider or the manufacturer Inogen, at Inogen.com or by calling +1 877 466 4364, or +31 30 7820689.
CANNULA BARB AND OUTPUT FILTER REPLACEMENT (RP-506)
The cannula barb connects the gas pathway to the cannula while the output filter is designed to protect the user from breathing in small particles when using the device. The output filter is located inside the cannula barb and should be replaced between patient in-home use. To replace the cannula barb and output filter, follow these steps:
- Turn the spanner wrench tool counterclockwise to unscrew the cannula barb.
![]()
- Remove the cannula barb.
![]()
- Check that there is no debris left inside. Insert the new integrated cannula barb and output filter.
![]()
- Turn the spanner wrench tool clockwise until the cannula barb is securely attached. Do not overtighten.
![]()


COLUMN CHANGE (RP-502)
The device is programmed to alert you when the columns should be replaced (see 'Alarms' section). Although you will need to purchase columns from the manufacturer or your service provider, the columns are designed to be easily changed by the patient by following these steps:
- Turn off the device by pressing and holding the power button.
![]()
- If using, remove the device from the carry bag or backpack.
![]()
- Remove the battery from the device.
![]()
- Place the device on its side so that the underside is visible.
- The columns are on one side of the device.
![]()
- Unlock the columns by pushing the latch button away from the columns.
![]()
- While holding the latch button open, slide column assembly out of the device by lifting and pulling on the metal pull handle.
![]()
- Remove the columns completely from the device by pulling outward on the metal pull handle.
- Both columns are removed as one piece.
- To install new columns, first remove the four (4) dust caps from the new columns.
![]()
- Make sure there is no dust or debris where the dust caps were located.
- Insert the new columns into the device immediately after removing the dust caps. DO NOT leave the column ends exposed.
![]()


- Push the columns until the latch makes an audible click and returns to the closed position.
![]()
- Push and fold metal pull handle flush to bottom of columns.
![]()
![]()
You need to notify the device that you have replaced the columns. This can be done through the device itself or through the Inogen Connect App. - Resetting the columns through the device
- Connect the device to AC power but DO NOT power on the device.
- Press and hold the plus (+) and (-) minus button for 5 seconds. The screen will display the 'sieve reset' informational icon.
- Release the buttons once the 'sieve reset' icon is displayed on screen.
![]()
- Press the bell button once. The screen will display the 'sieve reset success' informational icon.
![]()
- Press and hold the power button to turn on the device.
- Resetting the columns through Inogen Connect App
![]()
- Open the Inogen Connect App on your mobile device or tablet.
- Navigate to the Advanced screen.
- Click on Additional Information.
- Click the Column Reset button.


BATTERY CARE AND MAINTENANCE
Lithium-ion batteries require special care to ensure proper performance and long life. Use only compatible batteries with your device.
- Keep Dry: Always keep liquids away from batteries. If batteries become wet, discontinue use immediately and dispose of battery properly.
- Effect of temperature on battery performance: The battery powers the device under most environmental conditions. To extend the run-time of your battery, avoid running in temperatures less than 5˚C (41˚F) or higher than 35˚C (95˚F ) for extended periods of time.
- Battery Storage: Remove your battery from the device when it is not in use to avoid inadvertent discharge. Store battery in a cool, dry place. Store with a charge of at least 40-50%. Batteries should be charged up to full charge and discharged down to 0% at least once every 90 days to maintain maximum lifetime. Avoid storing your device Battery in extreme temperatures, below -20˚C (-4˚F ) or above 60˚C (140˚F ), for any amount of time.
- Battery Disposal: Batteries must only be placed in the collection containers for waste portable batteries according to local governing ordinances in sorted municipal waste or by waste recycling organizations. Batteries must be discharged, or precautions against short circuits must be taken in the case of batteries that are not completely discharged (e.g. by isolating the poles with adhesive tape). Lithium-ion batteries, like all rechargeable batteries, are recyclable and should never be incinerated. Old batteries may have possible negative effects on the environment and human health, and it is the obligation for every user to follow the local rules on the separate collection and recycling of waste batteries.
DC POWER CABLE FUSE REPLACEMENT (RP-125)
The DC power cable contains a fuse. If the DC power cable is being used with a known good power source and the device is not receiving power, the fuse may need to be replaced.
To replace the fuse:

- Remove the tip by unscrewing the retainer. Use a tool if necessary.
- Remove the retainer, tip, and fuse.
- The spring should remain inside the adapter housing.
- If the spring is removed, replace the spring first before inserting the replacement fuse.
- Install a replacement fuse
- Reassemble the tip.
- Ensure the retainer ring is properly seated and tightened.
- CHOKING HAZARD: small parts exposed when changing the fuse, keep away from small children and pets.
- CRITICAL FUSE SIZING: incorrect fuse replacement size may result in fire or inadequate equipment protection. Replace only with same type and rating of fuse.
- ELECTRICAL SHOCK: completely disconnect the cable before attempting to change the fuse.
- Do not hang any type of accessory or accessory bracket from plug or cable.
DEVICE REPAIR
Do not attempt to repair the device unless otherwise specified in these instructions for use. Contact your equipment provider or Inogen for assistance.
TECHNICAL AND PRODUCT SPECIFICATIONS
SPECIFICATIONS
Inogen Rove 6 Portable Oxygen Concentrator (Model # IO-501)
| Mains Isolation | Remove both the DC input cable from device as well as the battery pack. |
| Dimensions with standard battery | 18.24 x 8.31 x 20.68 cm (7.18 x 3.27 x 8.14 in) |
| Dimensions with extended battery | 18.24 x 8.31 x 22.91 cm (7.18 x 3.27 x 9.02 in) |
| Weight with standard battery | 2.2kg (4.8 pounds) |
| Weight with extended battery | 2.6kg (5.8 pounds) |
| Nominal sound level | 39 dBA typical at setting 2 (MDS-Hi) Maximum system sound power of 62 dBA Maximum system sound pressure of 54 dBA Typical lowest alarm sound pressure of 62.3 dBA (Measured in the carry bag) Typical highest alarm sound pressure of 67.5 dBA (Measured in the carry bag) (Sound pressures measured at 1 meter per ISO 3744 |
| Warm up time | 2 minutes |
| Oxygen concentration* | 90% + 6% and - 3% at all settings |
| Inspiratory trigger pressure sensitivity | <0.12 cm H20 |
| Flow control settings | Pulse dose setting 1,2,3,4,5,6 |
| Maximum outlet pressure | < 28.9 PSI (199 kPa) |
| AC Power | 100 to 240 VAC, 50 to 60 Hz Autosensing 2.0 – 1.0A |
| DC Power | 13.5-15.0VDC,100W Max voltage: 12.0 to 16.8 VDC (+ 0.5) |
| Power Consumption | 120 W max |
| Battery type | Lithium ion |
| Rechargeable battery | 12.0 to 16.8 VDC (± 0.5V) |
| Minimum rated capacity | 8 cells battery: 6400 mAh 16 cells battery: 2x6400 mAh |
| Battery charge current | 3A per 8 cells 1,5A/ Side (BA-500) 3A per 8 cells (BA-508) 4A per 16 cells 2,0A /Side |
| Battery re-charge time | Standard (BA-500 & BA-508): up to 3 hours Extended (BA-516): up to 4 hours |
| Operating temperature** | 5 to 40˚C ( 41 to 104˚F) |
| Operating humidity | 15% to 90%, non-condensing |
| Operating atmospheric pressure | 70 kPA to 106 kPA |
| Operating altitude** | 0 to 3048 meters (0 to 10,000 ft) |
| Shipping and storage temperature | -25 to 70˚C (-13 to 158˚F) |
| Shipping and storage humidity | Up to 90%, non-condensing Store in a dry environment. |
| Measurement uncertainties: | Pulse volumes: ± 15% of rated volume Pressure: ± 0.03 psig (General) / ± 0.05 cm H2O (Inspiratory Trigger Sensitivity) Oxygen concentration: ± 3% (not accounting for temperature, barometric pressure, and time from measurement device calibration) |
| Intelligent Delivery Technology® | Inogen's devices use complex algorithms that are designed to detect shallow breathing down to 0.12 cm H20 and will change the bolus size of oxygen to meet the patient's breathing rate. Upon detection, the Inogen delivers oxygen within the first 250 milliseconds of inspiration, when oxygen therapy is most effective. |
*Based on atmospheric pressure of 101.3 kPa (14.69 psi) at 20˚ C (68˚ F) & Dry (STPD).
**Operating outside of these operational specifications can limit the concentrator's ability to meeting Oxygen Concentration specification at higher liter flow settings.
CLASSIFICATION
| Mode of operation | Continuous Duty |
| Type of Protection Against Electrical Shock | Class II |
| Degree of Protection to Concentrator components Against Electrical Shock | Type BF Not intended for cardiac application |
| Degree of Protection | IP22 |
PULSE VOLUME FLOW SETTING
Inogen Rove 6 Pulse Volumes per Flow Setting
(mL/breath ± 15% per ISO 80601-2-67)
| BREATHS PER MINUTE | 1 | 2 | 3 | 4 | 5 | 6 |
| 10 | 21.0 | 42.0 | 63.0 | 84.0 | 105.0 | 126.0 |
| 15 | 14.0 | 28.0 | 42.0 | 56.0 | 70.0 | 84.0 |
| 20 | 10.5 | 21.0 | 31.5 | 42.0 | 52.5 | 63.0 |
| 25 | 8.4 | 16.8 | 25.2 | 33.6 | 42.0 | 50.4 |
| 30 | 7.0 | 14.0 | 21.0 | 28.0 | 35.0 | 42.0 |
| 35 | 6.0 | 12.0 | 18.0 | 24.0 | 30.0 | 36.0 |
| 40 | 5.25 | 10.5 | 15.75 | 21.0 | 26.25 | 31.5 |
| TOTAL VOLUME PER MINUTE (ML/MIN) | 210 | 420 | 630 | 840 | 1050 | 1260 |
- The setting of other models or brands of oxygen therapy equipment may not correspond with the settings of this device.
- The settings of this device may not correspond with the setting for devices that provide continuous flow oxygen.
PNEUMATIC DIAGRAM
Process flows from left to right

ELECTROMAGNETIC COMPATIBILITY (EMC) INFORMATION
- Use of accessories, transducers and cables other than those specified or provided by the manufacturer of this equipment could result in increased electromagnetic emissions or decreased electromagnetic immunity of this equipment and result in improper operation.
- Avoid exposure to known sources of EMI (electromagnetic interference) such as diathermy, lithotripsy, electrocautery, RFID (Radio Frequency Identification), and electromagnetic security systems such as anti-theft/electronic article surveillance systems, metal detectors. Note that the presence of RFID devices may not be obvious. If such interference is suspected, reposition the equipment, if possible, to maximize distances.
- Portable RF communications equipment (including peripherals such as antenna cables and external antennas) should be used no closer than 30 cm (12 inches) to any part of the device, including cables specified by the manufacturer. Otherwise, degradation of the performance of this equipment could result.
- The device should not be used adjacent to or stacked with other equipment. If adjacent or stacked use is necessary, the device should be observed to verify normal operation.
If operation is not normal, the device or the other equipment should be moved.
Medical electrical equipment needs to be installed and used according to the EMC information in this manual.
This equipment has been tested and found to comply with EMC limits specified in IEC 60601-1-2. These limits are designed to provide a reasonable protection against electromagnetic interference in a typical home environment.
This concentrator contains Transmitter Module IC: 8595A-NINAB4. Contains FCC ID: XPYNINAB4. This device complies with Part 15 of the FCC rules. Operation is subject to the following two conditions: (1) this device may not cause harmful interference, and (2) this device must accept any interference received, including interference that may cause undesired operation.
GUIDANCE AND MANUFACTURER'S DECLARATION – ELECTROMAGNETIC IMMUNITY
The Concentrator is intended for use in the electromagnetic environment of home, institution, vehicle, and other transport modalities. The user of the concentrator should make sure it is used in such an environment. During the immunity testing specified below the Rove 6 will continue to deliver oxygen within specification.
| Immunity Test | IEC 60601 Test Level | Electromagnetic Environment Guidance |
| Conducted RF IEC 61000-4-6 | 3 Vrms 150 kHz to 80 MHz 6Vrms ISM and amateur frequencies | The Rove 6 Portable Oxygen Concentrator is suitable for the electromagnetic environment of typical home, institution, vehicle, train, airplane, boat and other transportation environments. |
| Radiated RF IEC 61000-4-3 | 10V/m 80 MHz to 2.7 GHz | |
| Electrostatic discharge (ESD) IEC 61000-4-2 | ± 8 kV contact ± 2, 4, 6, 8 and 15 kV air | Floors should be wood, concrete or ceramic tile. If floors are covered with synthetic material, the relative humidity should be at least 30%. |
| Electrical fast transient/burst EC 61000-4-4 | ± 2 kV for power supply lines | Mains power quality should be that of a typical home, institution, vehicle or other transpiration and mobile environments. |
| Surge IEC 61000-4-5 | ± 1 kV line(s) to line(s) | Mains power quality should be that of a typical home, institution, vehicle or other transpiration and mobile environments. |
| Voltage dips, short interruptions and voltage variations on power supply input lines IEC 61000-4-11 | 0% UT for 0.5 cycle at 0 °, 45 °, 90 °, 135 °, 180 °, 225 °, 270 °, and 315 °. 0% UT for 1 cycle | Mains power quality should be that of a typical home, institution, vehicle and other transportation and mobile environments. If the user of the Rove 6 requires continued operation during power mains interruptions, it is recommended that the device be powered from an uninterrupted power supply. |
| Power frequency (50/60 Hz) Magnetic field IEC 61000-4-8 | 30 A/m | Power frequency magnetic fields should be at levels characteristic of a typical home, institution, vehicle and various mobile environments. Power frequency magnetic fields from common appliances in the home are not expected to affect the device. |
NOTE: UT is the a.c. main voltage prior to application of the test level.
GUIDANCE AND MANUFACTURER'S DECLARATION – ELECTROMAGNETIC EMISSIONS
The concentrator is intended for use in home, institution, vehicle and other transportation and mobile environments. The user of the concentrator should assure that it is used in such an environment.
| Emissions Test | Compliance | Electromagnetic Environment Guidance |
| RF emissions CISPR 11 | Group 1 | The concentrator uses RF energy only for its internal function. Therefore, its RF emissions are very low and not likely to cause any interference in nearby equipment. |
| RF emissions CISPR 11 | Class B | The concentrator is suitable for use in all establishments, including domestic establishments and those directly connected to the public low-voltage power supply network that supplies buildings used for domestic purposes. |
| Harmonic Emissions IEC 61000-3-2 | Class A | |
| Voltage fluctuations /flicker emissions IEC 61000-3-3 | Complies |
ELECTRICAL ISOLATION DEVICE
The external power supply provides the means for electrical isolation where the AC inlet is incorporated into the power supply.
LIMITED WARRANTY STATEMENT
Columns, rechargeable batteries, carry bag and power accessories are covered for a period of 1 year only.
For complete warranty statement, please visit inogen.com/warranty
CONTACT INFORMATION
If you have questions about the information in these instructions or about the safe operation of this device, contact your equipment provider or
- Inogen, Inc. 859 Ward Drive, Suite 200 Goleta, CA 93111, USA, +1 877 466 4362
- Inogen Europe B.V., Rijnzathe 7, 3454 PV De Meern, The Netherlands, +31 30 7820689
Any serious incident that has occurred in relation to the device must be reported to Inogen Inc (see above) and to the Competent Authority of your country. Serious incident is an incident that directly or indirectly led, might have led to death, temporary or permanent serious deterioration of state of health of patient, user or other person.
If you have questions relating to Inogen prescription products, your medical condition or personal health matters, please contact your physician or healthcare provider since they are most familiar with your medical condition.
Documents / Resources
References
![inogen.com]() Portable Oxygen Concentrator for HME Providers | Inogen, Inc
Portable Oxygen Concentrator for HME Providers | Inogen, Inc![inogen.com]() Portable Oxygen Concentrator for HME Providers | Inogen, Inc
Portable Oxygen Concentrator for HME Providers | Inogen, Inc
Download manual
Here you can download full pdf version of manual, it may contain additional safety instructions, warranty information, FCC rules, etc.
Advertisement


Need help?
Do you have a question about the Rove 6 and is the answer not in the manual?
Questions and answers