Yealink W80B, W80DM Manual
- User manual (56 pages) ,
- Quick start manual (37 pages) ,
- Quick steps (6 pages)
Advertisement
Package Contents

Assemble W80B/W80DM
Procedure
- Connect the base station power and the network using method A or method B.
Method A - AC Power Option Method B - PoE (Power over Ethernet) Option ![]()


 TIP
TIP
- If you choose method a, use Yealink supplied power adapter (5 V/1.2 A). A third-party power adapter may damage the device.
- If you choose method b, you do not need to connect the power adapter. Make sure the hub/switch is PoE-compliant.
- Mount W80DM/W80B on the wall.


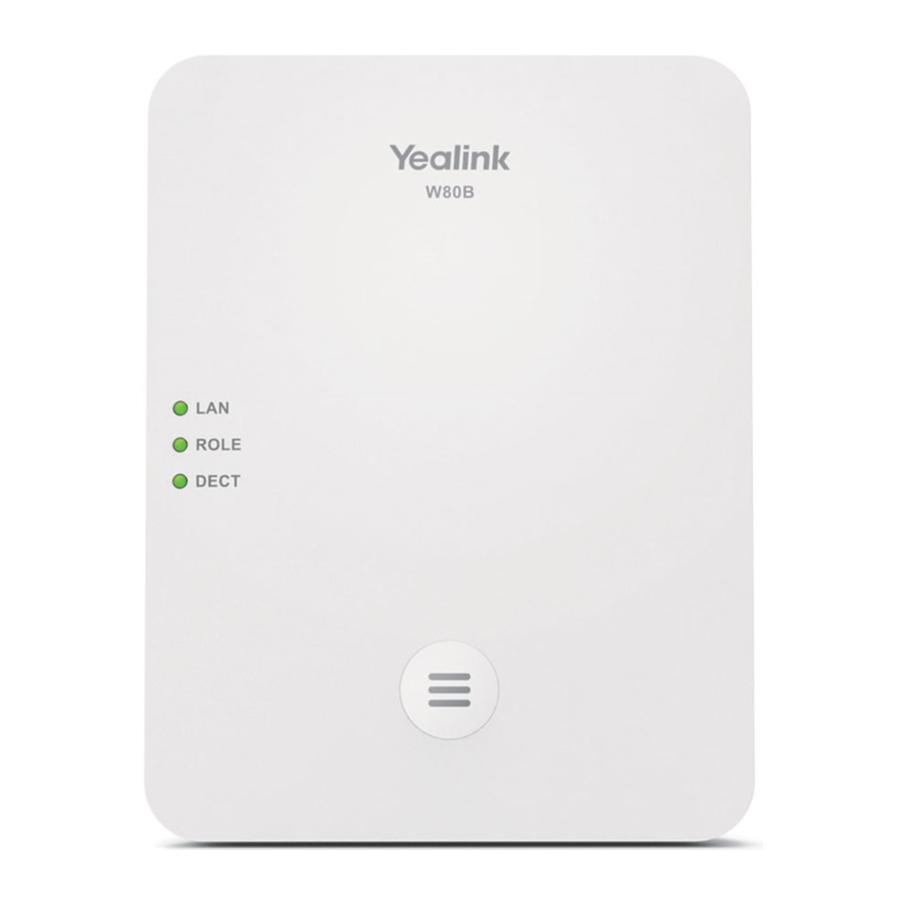
Hardware & LED Introduction
After the base station starts up successfully and the handset is registered to the base station, all LEDs on the base station glow green.

| No. | Item | Description |
| 1 | Device Key | Long press for 20 seconds to reset the device to factory configurations. |
| 2 | LAN LED |
|
| 3 | ROLE LED | Indicate the device role. |
| 4 | DECT LED | Indicate the connection status between the DECT manager (DM) and the base. |
Define the Device Role via LED Indicators
The W80DM is shipped as a DECT Manager (DM), and the W80B is shipped as a base station. The following shows the LED status after the W80DM/W80B connects to the power and network:
| Base Mode Option | Role | LAN LED | ROLE LED | DECT LED |
| 1 | Base | Green | Green | Off |
| 2 | DM | Green | Orange | Off |
Obtain the IP address of W80B/W80DM
When the base station is started, the DHCP server usually assigns it an IP address. To get the IP address of W80B/W80DM, you can choose one of the following methods.
Method 1 - via the DHCP server
If the IP address is assigned dynamically via your local network's DHCP server, you can find the current IP address on the DHCP server in the list of registered DHCP clients.
Depending on the DHCP server settings, your device's IP address may change occasionally.
Method 2 - via the Yealink Discovery Tool
You can find the IP address of all Yealink DECT devices in the LAN through a PC scanning tool - Yealink Discovery Tool.
Procedure
- RunYealink Discovery Tool.
- Confirm the network segment of your working environment with your network administrator.
- Enter the IP search rules.

Follow the following rules:

- The first two digits: match the first two digits of your IP network segment.
- The last two digits: indicate the search rule for the last two digits of the IP network segment. The dash "-" can be used to match a range of digits. The comma "," can be used as a separator.
Example: - Enter 10.81.6.1-254 to search all network segments with 10.81.6.xx;
- Enter 10.81.1,6.1-254 to search all network segments with 10.81.1.xx and 10.81.6.xx.
- Click Scan.


Method 3 - via the Ethernet Software (For Example Wireshark)
After every boot, the device will send a SIP multicast which can be seen in Wireshark if you connect the Internet port of the device and the PC to the same hub.
Procedure
- Run Wireshark.
- Filterbootp.
- Connect the Internet port of the base and the PC to the same hub.
The following picture shows that the network gateway assigns the IP address to the base.


Log In to the Web User Interface
The DM and base registration can be set up via the web user interface.
Procedure:
- Find the current IP address of the device on any paired handset.
- Open a web browser on your computer, enter the IP address into the address bar (for example, "http://192.168.0.10" or "192.168.0.10"), and then pressEnter.
- Enter the user name (default: admin) and password (default: admin)
- ClickLogin.


Connect W80B to W80DM
See Register Base Stations at the DECT Manager for detailed information.
Register Devices & Assign Accounts to Devices
Any handset must be assigned an individual SIP account. After registering with the system, the handset can use the account to receive and send VoIP connections.
The number of registered accounts must meet the following requirements:
| Supported Devices | Max number of base stations registered on the W80DM | Max number of accounts registered on the W80DM | Max number of registered accounts assigned to each handset/CP/DD Phone: |
| 30 | 100 | 1 |
Create a SIP Server Template Configuration
You can use up to ten different SIP servers in the system. In addition, you can pre-configure up to 10 SIP server templates for choosing when registering SIP accounts.
Via Web User Interface
- Log in to the web user interface of the DM.
- Go toHandset & Account > SIP Server Settings.
- Click
![]() to edit the template.
to edit the template. - Set and save the corresponding parameters.
Via Auto Provisioning
template. X.name
template. X.sip_server. Y.address
template. X.sip_server. Y.port
template. X.sip_server. Y.transport_type
template. X.sip_server. Y.expires
template. X.sip_server. Y.retry_counts
template. X.nat.traversal
template. X.outbound.enable
template. X.outbound. Y.address
template. X.outbound. Y.port
template. X.outbound.fallback_interval
| Parameters | Permitted Values | Default | Description |
| template. X. name | String within 64 characters | Blank | It sets the name of the SIP server template. |
| template. X. sip_server. Y.address | String within 64 characters | Blank | It configures the IP address or domain name of the SIP server Y in which the account is registered. |
| template. X. sip_server. Y.port | Integer from 0 to 65535 | 5060 | It configures the port of SIP server Y. |
| template. X. sip_server. Y.transport_t ype | 0-UDP 1-TCP 2-TLS 3-DNS-NAPTR, if no server port is given, the device performs the DNS NAPTR and SRV queries for the service type and port. | 0 | It configures the type of transport protocol. |
| template. X. sip_server. Y .expires | Integer from 30 to 2147483647 | 3600 | It configures the registration expiration time (in seconds) of SIP server Y. |
| template. X. sip_server. Y.retry_coun ts | Integer from 0 to 20 | 3 | It configures the retry times for the device to resend requests when the SIP server Y is unavailable or there is no response from the SIP server Y. The handset moves to the next available server after three failed attempts. |
| template. X. nat.traversal | Integer from 0 to 20 | 3 | It configures the retry times for the device to resend requests when the SIP server Y is unavailable or there is no response from the SIP server Y. The handset moves to the next available server after three failed attempts. |
| template. X. outbound.e nable | 0-Disabled 1-Enabled | 0 | It enables or disables the device to send requests to the outbound proxy server. |
| template. X. outbound. Y.address | String within 64 characters | Blank | It configures the IP address or domain name of the outbound proxy server Y.NOTE It works only if template. X.outbound.enable is set to 1 (Enabled). |
| template. X. outbound. Y.port | Integer from 0 to 65535 | 5060 | It configures the port of the outbound proxy server Y.NOTE It works only if template. X.outbound.enable is set to 1 (Enabled). |
| template. X. outbound.f allback_int erval | Integer from 30 to 2147483647 | 3600 | It configures the time interval (in seconds) for the device to detect whether the working outbound proxy server is available by sending the registration request after the fallback server takes over call control. |
X is the account ID. X=1-100.
Y is the server ID. Y=1-2.
Register Accounts
Method 1 - Import Account Registration File
You can upload an account registration file to register accounts in batches and associate the account with the handset IPUI.
Procedure

- On the web user interface, go toHandset & Account > Handset Registration.
- Export CSV template from DM page.
- Fill in the handset IPUI code and account information.
- Import the CSV template back to the DM page.
Method 2 - Use Registration Center
The registration center allows you to register groups of handsets in one registration process. You do not need to click Start Register Handset every time.
- Total Handsets: Shows how many handsets are registered in the current system.
- Registered Handsets: Shows how many handsets are registered through the registration center this time.
- Current Time: Shows the current system time. It is updated in real-time.
Procedure

- Log in to the web user interface of the DM.
- Go toHandset & Account > Registration Center.
- In theRegistration Start Time field, enter the time when the next registration process should be started.
Valid value: At least 1 minute later than the current time but no more than 24 days. - In theRegistration Duration field, enter the duration that the DM should stay in registration mode.
Default: 3 minutes. - ClickConfirm.
Method 3 - Add a Handset and Assign an Account
Via Web User Interface
- Log in to the web user interface of the DM.
- Go toHandset & Account > Handset Registration > Add Handset.
- PressReg on the handset.
Via Auto Provisioning
The following table lists the parameters you can use to change the registration settings.
account. X.enable_user_equal_phone
account. X.register_mac
account. X.register_line
account. X.unregister_on_reboot
account. X.sip_server_type sip.reg_surge_prevention
account. X.subscribe_register
phone_setting.disable_account_without_username.enable
account. X.register_expires_overlap
account. X.subscribe_expires_overlap
| Parameters | Permitted Values | Default | Description |
| account. X.enable_user_e qual_phone | 0-Disabled 1-Enabled | 0 | It enables or disables the phone to add user=phone to the SIP header of the INVITE message. |
| account. X.register_mac | 0-Disabled 1-Enabled | 0 | It enables or disables the phone to add MAC address to the SIP header of the REGISTER message. |
| account. X.register_line | 0-Disabled 1-Enabled | 0 | It enables or disables the phone to add a line number to the SIP header of the REGISTER message. 0-99 stands for line 1-100. |
| account. X.unregister_on_reboot | 0-Disabled 1-Enabled | 0 | It enables or disables the phone to unregister first before reregistering account X after a reboot. |
| account. X.sip_server_typ e | 0-Default 2-BroadSoft (It works only if "bw.enable" is set to 1 (Enabled)) 8-Genesys 10-Genesys Advanced | 0 | It configures the type of SIP server. |
| sip.reg_surge_prevention | Integer from 0 to 60 | 0 | It configures the waiting time (in seconds) for account register after startup.NOTE If you change this parameter, the phone will reboot to make the change take effect. |
| account. X.subscribe_regi ster | 0-Disabled 1-Enabled | 0 | It enables or disables the phone to subscribe to the registration state change notifications. |
| phone_setting.disable_a ccount_without_userna me.enable | 0-Disabled 1-Enabled | 0 | It enables or disables the phone to disable the account whose username is empty. |
| account. X.register_expire s_overlap | Positive integer and -1 | -1 | It configures the renewal time (in seconds) away from the registration lease. |
| account. X.subscribe_expi res_overlap | Positive integer and -1 | -1 | It configures the renewal time (in seconds) away from the subscription lease. |
X is the account ID. X=1-100
Check System Status
After setting up the DM, you can check the base signal, the base synchronization status, and the handset status.
Base Status

- Log in to the web user interface of the DM.
- Go toStatus > Base Station Group.
Handset Status
Check the handset and account registration status. Both handsets and accounts should be on Registered status.

- Log in to the web user interface of the DM.
- Go toHandset & Account > Handset Registration.
[Update Firmware](/home/app-service/uncompressTmp/f8f777da-ce08-4e42-ba12-62e58a01f1c3/10. Update Firmware)
Make sure that your device are up to date. You can get the latest firmware from Yealink Support.
Procedure
- Log in to the web user interface of the DM.
- Go toSettings > Upgrade.
- Do one of the following:
- To upgrade the base and DM, click Select File beside Upgrade Firmware.
- To upgrade the handset and DD phone, click Select File beside Select and update handset firmware.
Deploy W80B Multi-Cell Solution
If you want to deploy multiple W80Bs with RT30 repeaters, see Deploy W80B Multi-Cell Solution.
FAQ
If there is a sudden power failure, what do I need to do after the power comes?
Documents / Resources
References
Yealink Support
Yealink Support
Yealink Support
Yealink Support
Yealink Support
Yealink Support
Yealink Support
Yealink Support
Yealink Support
Yealink Support
Yealink Support
Yealink Support
Yealink Support
Yealink Support
Download manual
Here you can download full pdf version of manual, it may contain additional safety instructions, warranty information, FCC rules, etc.
Advertisement


Need help?
Do you have a question about the W80B and is the answer not in the manual?
Questions and answers