
Related Manuals for Supermicro SuperChassis GS3 Series


Summary of Contents for Supermicro SuperChassis GS3 Series
- Page 1 SuperChassis ® GS3 Chassis Series CSE-GS3A-000NBP CSE-GS3A-1K01B USER'S MANUAL Revision 1.0 MNL-2787...
- Page 2 The products sold by Supermicro are not intended for and will not be used in life support systems, medical equipment, nuclear facilities or systems, aircraft, aircraft devices, aircraft/emergency communication devices or other critical systems whose failure to perform be reasonably expected to result in significant injury or loss of life or catastrophic property damage.
-
Page 3: About This Manual
Technical Support email addresses can be found at: "Contacting Supermicro" on page 7 If you have any feedback on Supermicro product manuals, contact our writing team at: Techwriterteam@supermicro.com This manual may be periodically updated without notice. Check the Supermicro website for... -
Page 4: Conventions Used In The Manual
SuperChassis GS3 Series: Preface Conventions Used in the Manual Special attention should be given to the following symbols for proper installation and to prevent damage done to the components or injury to yourself. Warning! Indicates important information given to prevent equipment/property damage or personal injury. -
Page 5: Table Of Contents
SuperChassis GS3 Series: Contents Contents Contacting Supermicro Chapter 1: Introduction Overview Key Features Components Drive Bays Fans and Cooling Motherboard Expansion Slots External I/O Connections Control Panel 1.1 Unpacking the Chassis 1.2 Chassis Features Control Panel Chassis Front Chassis Rear Chapter 2: Chassis Setup and Maintenance 2.1 Removing Power... - Page 6 SuperChassis GS3 Series: Contents PCIe Expansion Cards Installing an Expansion Card Power Supply Installing the Power Supply Identifying the Extender Bracket Installing the GPU Chapter 3: Troubleshooting 3.1 Where to Get Replacement Components 3.2 Returning Merchandise for Service 3.3 Feedback...
-
Page 7: Contacting Supermicro
SuperChassis GS3 Series: Contacting Supermicro Contacting Supermicro Headquarters Address: Super Micro Computer, Inc. 980 Rock Ave. San Jose, CA 95131 U.S.A. Tel: +1 (408) 503-8000 Fax: +1 (408) 503-8008 Email: Marketing@supermicro.com (General Information) Sales-USA@supermicro.com (Sales Inquiries) Government_Sales-USA@supermicro.com (Gov. Sales Inquiries) Support@supermicro.com... -
Page 8: Chapter 1: Introduction
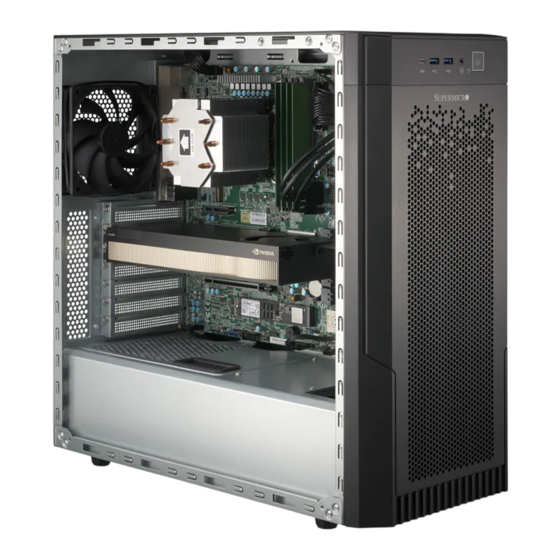
Chassis Rear Overview The Supermicro GS3 is a versatile mid- tower designed for both performance and quiet operation. This chassis supports ATX, microATX, and Mini- ITX motherboards, making it perfect for a wide range of builds. The front panel features dual USB 3.2 ports, a USB Type-C port, and an audio jack for seamless connectivity. - Page 9 SuperChassis GS3 Series: Introduction Power supply support: standard PS/2 up to 160-mm in length Chassis dimensions: (DxWxH): 430 x 205 x 450 mm...
-
Page 10: Components
SuperChassis GS3 Series: Introduction Components The primary components are described below. Drive Bays The standard configuration includes two 3.5"/2.5" storage drive bays and four 2.5" drive mounting locations. Fans and Cooling The chassis includes three 120-mm PWM fans in the front and one 120-mm PWM fan in the rear. -
Page 11: Unpacking The Chassis
SuperChassis GS3 Series: Introduction 1.1 Unpacking the Chassis Inspect the box the chassis was shipped in and note if it was damaged in any way. If any equipment appears damaged, file a damage claim with the carrier who delivered it. -
Page 12: Chassis Features
SuperChassis GS3 Series: Introduction 1.2 Chassis Features Refer to the following content for information about the features of your GS3 chassis. Control Panel The power button and the storage drive LED indicator are located on the control panel of the front of the chassis along with several USB ports. -
Page 13: Chassis Front
SuperChassis GS3 Series: Introduction Chassis Front The illustration below shows the features included on the front of the chassis. Figure 1-2. Front View Chassis Front Features Item Features Description Control Panel See previous section for details Front Bezel Vented bezel with filter that opens for access to front fans... -
Page 14: Chassis Rear
SuperChassis GS3 Series: Introduction Chassis Rear The illustration below shows the features included on the rear of the chassis. Figure 1-3. Rear View Chassis Rear Features Item Feature Description Rear fan Rear I/O Rear I/O ports PCIe Slots Seven PCI expansion slots... -
Page 15: Chapter 2: Chassis Setup And Maintenance
SuperChassis GS3 Series: Chassis Setup and Maintenance Chapter 2: Chassis Setup and Maintenance This chapter provides instructions for installing and replacing main system components for the GS3 chassis. To prevent compatibility issues, only use components that match the specifications and/or part numbers given. -
Page 16: Removing Power
SuperChassis GS3 Series: Chassis Setup and Maintenance 2.1 Removing Power Before performing some setup or maintenance tasks, use the following procedure to ensure that power has been removed from the system. This step is necessary when removing or installing non hot-swap components or when replacing a non-redundant power supply. -
Page 17: Accessing The Chassis
SuperChassis GS3 Series: Chassis Setup and Maintenance 2.2 Accessing the Chassis The GS3 has two removable side covers. Removing the Side Cover Begin by removing power from the system as described in "Removing Power" on the previous page. 1. Remove the two thumb screws on the rear of the chassis. -
Page 18: Removing The Front Bezel
SuperChassis GS3 Series: Chassis Setup and Maintenance Removing the Front Bezel Remove the front bezel by pulling off the bottom first. Generally, this is only necessary when replacing the front fans. Figure 2-3. Removing the Front Bezel... -
Page 19: System Installation
SuperChassis GS3 Series: Chassis Setup and Maintenance 2.3 System Installation Storage Drive Installation The chassis can accommodate up to four 2.5” storage drives and two 3.5” or 2.5" additional storage drives. The installation location for the 2.5" storage drives has a thickness limitation of 9.5-mm. -
Page 20: Motherboard Installation
SuperChassis GS3 Series: Chassis Setup and Maintenance Motherboard Installation Installing the I/O Shield The shield encloses the I/O ports at the rear of the chassis. Install it before installing the motherboard. The motherboard package should include a compatible shield. 1. Open the chassis left side cover. - Page 21 SuperChassis GS3 Series: Chassis Setup and Maintenance Figure 2-5. Installing the Motherboard...
-
Page 22: System Cooling
SuperChassis GS3 Series: Chassis Setup and Maintenance System Cooling Refer to the following sections for information about the cooling capabilities of the GS3 chassis. Fans The chassis includes three 120-mm PWM fans in the front and one 120-mm PWM fan in the rear. -
Page 23: Closed-Loop Liquid Cooling Installation
SuperChassis GS3 Series: Chassis Setup and Maintenance Closed-Loop Liquid Cooling Installation The chassis supports up to two closed-loop liquid cooling kits. A 240-mm or a 360-mm radiator- based liquid cooling kit can be mounted under the top of the chassis and a 240-mm radiator based liquid cooling kit can be mounted in front of the chassis. -
Page 24: Dust Filters
SuperChassis GS3 Series: Chassis Setup and Maintenance Dust Filters The chassis has one magnetic dust filter on the top and a dust filter that covers the front fans. Dust filters can be removed and cleaned to improve system air flow circulation. -
Page 25: Pcie Expansion Cards
SuperChassis GS3 Series: Chassis Setup and Maintenance PCIe Expansion Cards Begin by removing power from the system (see "Removing Power" on page 16) and removing the cover (see "Accessing the Chassis" on page 17). Installing an Expansion Card 1. Remove the shield for the PCIe slot that you wish to populate. Verify that the card you are installing is supported by the slot. -
Page 26: Gpu
SuperChassis GS3 Series: Chassis Setup and Maintenance A compatible graphics processing unit (GPU) must be installed into one of the PCIe expansion slots. Identifying the Extender Bracket If the GPU has a length between 268 mm and 320 mm, use the MCP-120-GS301-0N extender bracket for installation. - Page 27 SuperChassis GS3 Series: Chassis Setup and Maintenance Figure 2-13. Installing the GPU with the MCP-120-GS301-0N Figure 2-14. Installing the GPU with the MCP-120-GS302-0N...
-
Page 28: Chapter 3: Troubleshooting
SuperChassis GS3 Series: Troubleshooting Chapter 3: Troubleshooting The following content contains information on common issues and how to resolve them. 3.1 Where to Get Replacement Components 3.2 Returning Merchandise for Service 3.3 Feedback... -
Page 29: Where To Get Replacement Components
If you need replacement parts for your GS3 chassis, to ensure the highest level of professional service and technical support, purchase exclusively from our Supermicro Authorized Distributors/System Integrators/Resellers. A list can be found on the Supermicro website: https://www.supermicro.com Under the "Buy" menu, click the "Where to Buy" link. -
Page 30: Returning Merchandise For Service
For faster service, RMA authorizations can be requested online at the following page: https://www.supermicro.com/RmaForm Whenever possible, repack the chassis in the original Supermicro carton, using the original packaging material. If these are no longer available, be sure to pack the chassis securely, using packaging material to surround the chassis so that it does not shift within the carton and become damaged during shipping. -
Page 31: Feedback
SuperChassis GS3 Series: Troubleshooting 3.3 Feedback Supermicro values your feedback as we strive to improve our customer experience in all facets of our business. Email us at Techwriterteam@supermicro.com to provide feedback on our manuals. -
Page 32: Appendix A: Power Supply Specifications
SuperChassis GS3 Series: Power Supply Specifications Appendix A: Power Supply Specifications This appendix lists the power supply specifications for your chassis. 1000 W MFR Part Number PWS-1K01-PQ 1000 W Total Output Power 100 – 240 VAC 50/60 Hz 100 – 240 VAC/12 A Rated AC Voltage 200 –... -
Page 33: Appendix B: Standardized Warning Statements For Ac Systems
Supermicro's Technical Support department for assistance. Only certified technicians should attempt to install or configure components. Read this section in its entirety before installing or configuring components in the Supermicro GS3 chassis. These warnings may also be found on our website at the following page: https://www.supermicro.com/about/policies/safety_information.cfm... - Page 34 SuperChassis GS3 Series: Standardized Warning Statements for AC Systems 此警 告符 號代 表危 險 。 您 正 處 於 可 能 身 體 可 能 會 受 損 傷 的 工 作 環 境 中 。 在 您 使 用 任 何 設 備 之 前 , 請 注 意 觸 電 的...
-
Page 35: Installation Instructions
SuperChassis GS3 Series: Standardized Warning Statements for AC Systems אזהרה הצהרות תקנון חבלה מפני המשתמש את להזהיר מנת על ,התעשייה תקני פי על אזהרות הן הבאות הצהרות תמיכה מחלקת עם קשר ליצור יש ,כלשהי בבעיה היתקלות או שאלות ויש במידה... -
Page 36: Circuit Breaker
SuperChassis GS3 Series: Standardized Warning Statements for AC Systems 設置 手順 書 システムを電源 に接続する前 に、 設置 手順 書をお読 み下さ い。 警告 将此 系统 连接 电源 前,请先 阅读 安装 说明 。 警告 將系 統與 電源 連接 前, 請先 閱讀 安裝 說明 。... - Page 37 SuperChassis GS3 Series: Standardized Warning Statements for AC Systems サーキッ ト ・ ブレーカ ー こ の製品 は、 短 絡( 過 電流 ) 保 護装 置がある建 物での設置 を前提 と し ています。 保護 装置 の定格 が250 V、 20 Aを超えないこ と を確認 下さ い。...
-
Page 38: Power Disconnection Warning
SuperChassis GS3 Series: Standardized Warning Statements for AC Systems 경고! 이 제품은 전원의 단락(과전류)방지에 대해서 전적으로 건물의 관련 설비에 의존합니다. 보호장 치의 정격이 반드시 250V(볼트), 20A(암페어)를 초과하지 않도록 해야 합니다. Waarschuwing Dit product is afhankelijk van de kortsluitbeveiliging (overspanning) van uw electrische installatie. -
Page 39: Equipment Installation
SuperChassis GS3 Series: Standardized Warning Statements for AC Systems ¡Advertencia! El sistema debe ser disconnected de todas las fuentes de energía y del cable eléctrico quitado de los módulos de fuente de alimentación antes de tener acceso el interior del chasis para instalar o para quitar componentes de sistema. - Page 40 SuperChassis GS3 Series: Standardized Warning Statements for AC Systems 機器 の設置 トレーニングを受 け認 定 さ れた人 だけがこ の装 置 の設 置 、 交 換 、 またはサービスを許 可 さ れていま す。 警告 只有 经过 培训 且具 有资 格的 人员 才能 进行 此设 备的安 装 、 更换 和维 修 。...
-
Page 41: Restricted Area
SuperChassis GS3 Series: Standardized Warning Statements for AC Systems Waarschuwing Alleen geautoriseerd personeel en gekwalificeerd onderhoudspersoneel mag deze apparatuur installeren, vervangen of onderhouden. Restricted Area Warning! This unit is intended for installation in restricted access areas. A restricted access area can be accessed only through the use of a special tool, lock and key, or other means of security. -
Page 42: Battery Handling
SuperChassis GS3 Series: Standardized Warning Statements for AC Systems Attention Cet appareil doit être installée dans des zones d'accès réservés. L'accès à une zone d'accès réservé n'est possible qu'en utilisant un outil spécial, un mécanisme de verrouillage et une clé, ou tout autre moyen de sécurité. - Page 43 SuperChassis GS3 Series: Standardized Warning Statements for AC Systems 警告 如 果 更 换 的 电 池 类型 不 正 确 。 请 只 使 用 同 类电 池 或 制 造 商 推 荐 的 功 能 相 当 的 电 池 更 换 原...
-
Page 44: Redundant Power Supplies
SuperChassis GS3 Series: Standardized Warning Statements for AC Systems 경고! 배터리를 잘못된 종류로 교체하면 폭발의 위험이 있습니다. 기존 배터리와 동일하거나 제조사 에서 권장하는 동등한 종류의 배터리로만 교체해야 합니다. 제조사의 안내에 따라 사용된 배터 리를 처리하여 주십시오. WAARSCHUWING Er bestaat explosiegevaar als de batterij wordt vervangen door een verkeerd type. Vervang de batterij slechts met hetzelfde of een equivalent type die door de fabrikant aanbevolen wordt. -
Page 45: Backplane Voltage
SuperChassis GS3 Series: Standardized Warning Statements for AC Systems Attention Cette unité peut avoir plus d'une connexion d'alimentation. Pour supprimer toute tension et tout courant électrique de l'unité, toutes les connexions d'alimentation doivent être débranchées. אחד מספק יותר קיים אם... - Page 46 SuperChassis GS3 Series: Standardized Warning Statements for AC Systems 警告 當系 統正 在進 行時 , 背 板上 有危 險的 電壓或 能量 , 進 行維 修時 務必 小心 。 Warnung Wenn das System in Betrieb ist, treten auf der Rückwandplatine gefährliche Spannungen oder Energien auf.
-
Page 47: Comply With Local And National Electrical Codes
SuperChassis GS3 Series: Standardized Warning Statements for AC Systems Comply with Local and National Electrical Codes Warning! Installation of the equipment must comply with local and national electrical codes. 地方 および国の電 気規 格に準 拠 機器 の取り 付 けはその地方および国の電気 規格 に準拠 する必 要があり ます。... -
Page 48: Product Disposal
SuperChassis GS3 Series: Standardized Warning Statements for AC Systems 경고! 현 지역 및 국가의 전기 규정에 따라 장비를 설치해야 합니다. Waarschuwing Bij installatie van de apparatuur moet worden voldaan aan de lokale en nationale elektriciteitsvoorschriften. Product Disposal Warning! Ultimate disposal of this product should be handled according to all national laws and regulations. -
Page 49: Fan Warning
SuperChassis GS3 Series: Standardized Warning Statements for AC Systems Attention La mise au rebut ou le recyclage de ce produit sont généralement soumis à des lois et/ou directives de respect de l'environnement. Renseignez-vous auprès de l'organisme compétent. המוצר סילוק !אזהרה... - Page 50 SuperChassis GS3 Series: Standardized Warning Statements for AC Systems 警告 ! 警 告! 危 险 的 可 移 动 性 零 件 。 请 务 必 与 转 动 的 风 扇 叶 片 保 持 距 离 。 当 您 从 机 架 移 除 风 扇...
-
Page 51: Power Cable And Ac Adapter
タ ー を 該 当 する地 域 の条 例 や安 全 基 準 に適 合 するコ ード サイ ズやプラ グと 共 に使 用 下 さ い。 他 の ケー ブルやアダ プタ を使 用すると 故障 や火災の原 因になるこ と があり ます。 電 気 用 品 安 全 法 は、 ULまたはCSA認 定 のケーブル(UL/CSAマーク がコ ード に表 記 )を Supermicro が指定 する製品 以外 に使 用するこ と を禁止 し ています。... - Page 52 遵 照 当 地 法 规 和 安 全 要 求 的 合 规 的 电 源 线 尺 寸 和 插 头.使 用 其 它 线 材 或 适 配 器 可 能 会 引 起 故 障 或 火 灾 。 除 了 Supermicro所 指 定 的 产 品,电 气 用 品 和 材 料 安 全 法 律 规 定 禁 止 使 用...
- Page 53 준수하여 제공되거나 지정된 연결 혹은 구매 케이블, 전원 케이블 및 AC 어댑터를 사용하십시 오. 다른 케이블이나 어댑터를 사용하면 오작동이나 화재가 발생할 수 있습니다. 전기 용품 안전법 은 UL 또는 CSA 인증 케이블 (코드에 UL / CSA가 표시된 케이블)을 Supermicro 가 지정한 제품 이외의 전기 장치에 사용하는 것을 금지합니다.
- Page 54 SuperChassis GS3 Series: Standardized Warning Statements for AC Systems Stroomkabel en AC-Adapter Waarschuwing! Bij het aansluiten van het Product uitsluitend gebruik maken van de geleverde Kabels of een andere geschikte aan te schaffen Aansluitmethode, deze moet altijd voldoen aan de lokale voorschriften en veiligheidsnormen, inclusief de juiste kabeldikte en stekker. Het gebruik van niet geschikte Kabels en/of Adapters kan een storing of brand veroorzaken.
Need help?
Do you have a question about the SuperChassis GS3 Series and is the answer not in the manual?
Questions and answers