Bosch Kiox BUI330 Manual
- Original operating instructions (149 pages) ,
- Owner's manual (55 pages) ,
- Quick start manual (81 pages)
Advertisement
Product description and specifications
Intended use
The Kiox on-board computer is designed to control Bosch eBike systems and display riding data.
To access the full functionality of the Kiox on-board computer, you will need a compatible smartphone installed with the eBike Connect app (available from the App Store or Google Play Store) and a registration with the eBike Connect portal (www.ebike-connect.com).
Product features
The numbering of the components shown refers to the illustrations on the graphics pages at the beginning of the manual.


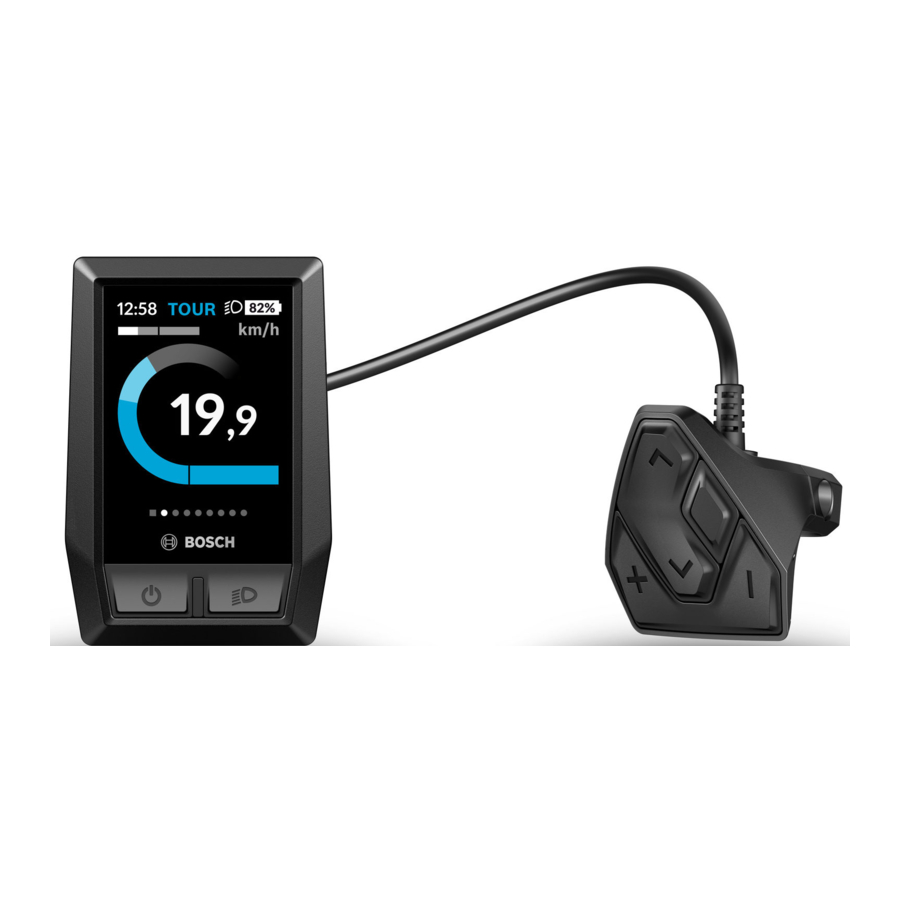
- On-board computer
- Display
- Bike light button
- On/off button for on-board computer
- Holder for on-board computer
- USB port
- Operating unit
- Next/right page button >
- Select button
- Previous/left page button <
- Decrease assistance level button –/ Scroll down button
- Increase assistance level button +/ Scroll up button
- Push assistance button
- Drive unit contacts
- Locking screw for on-board computer
- Headset screw
- Protective cover for USB port A)
- Magnetic holder
- Holder for operating unit
A) Available as spare part
Technical data
| On-board computer | Kiox | |
| Product code | BUI330 | |
| Max. charging current of USB portA) | mA | 1000 |
| USB port charging voltage | V | 5 |
| USB charging cableB) | 1 270 016 360 | |
| Operating temperature | °C | −5 to +40 |
| Charging temperature | °C | 0 to +40 |
| Storage temperature | °C | +10 to +40 |
| Internal lithium-ion battery | V mAh | 3.7 230 |
| Protection ratingC) | IP x7 | |
| Weight, approx. | g | 60 |
Bluetooth® Low Energy
| MHz | 2400–2480 |
| mW | < 10 |
A) At an ambient temperature of <25°C
B) Not included as part of standard delivery
C) When the USB cover is closed
Fitting
Fitting and removing the on-board computer (see figure A)
Fit the lower part of the Kiox into the holder (5) first and tilt it forward gently until you can feel that the on-board computer is firmly fixed in the magnetic holder.
To remove the on-board computer, hold it by the top end and pull it towards you until it disengages from the magnetic holder.

- Remove the on-board computer when you park the eBike.
The on-board computer can be secured in place to prevent it from being removed from the holder. To do this, loosen the headset screw (16) until the Kiox holder can be swivelled sideways. Put the on-board computer in the holder. Screw the locking screw (M3 thread, 6 mm long) from below into the thread provided in the on-board computer (using a longer screw may damage the on-board computer). Swivel the holder back into place and tighten the headset screw in accordance with the manufacturer's specifications.
Operation
Before initial commissioning
The Kiox is supplied with a partially charged battery. Before using it for the first time, this battery must be charged for at least one hour via the USB port (see "Power supply of the onboard computer") or via the eBike system.
The control unit should be attached such that the buttons are almost perpendicular to the handlebars.
When using the on-board computer for the first time, the language selection page is displayed initially. You can then choose to have essential functions and indications explained via the <Intro to Kiox> menu item. The menu item can also be called up at a later time via <Settings> → <Information>.
Selecting system settings
Fit the on-board computer in the holder and proceed as follows with the bicycle stationary:
Go to the status page (use the < button (10) on the control unit to get to the first display) and call up the <Settings> with the select button.
You can use the – (11) and + (12) buttons to select the setting you want. You can open the settings, as well as any additional submenus, using the select button (9). You can use the < button (10) to go back to the previous menu from any settings menu.
The following settings can be changed in the <Sys settings>:
- <Brightness>
- <Time>
- <Date [DD.Mon. YYYY]>
- <Time zone>
- <24h form (24h time format)>
- <Brgh backg. (Bright background)>
- <Imp. units (Imperial units)>
- <Language>
- <Factory reset>
Starting up the eBike system
Requirements
The eBike system can only be activated when the following requirements are met:
- A sufficiently charged eBike battery is inserted (see operating instructions for the battery).
- The on-board computer is properly fitted to the holder.
Switching the eBike system on/off
The following options are available for switching on the eBike system:
- Once the on-board computer and the eBike battery are fitted, briefly press the on/off button(4) on the on-board computer.
- With the on-board computer inserted, push the on/off button on the eBike battery (bicycle manufacturer-specific solutions are possible when there is no access to the battery on/off button; see the battery operating instructions).
The drive is activated as soon as you start pedalling (except if you are using the push-assistance function or if the assistance level is set to OFF). The motor output depends on the settings of the assistance level on the on-board computer. As soon as you stop pedalling when in normal operation, or as soon as you have reached a speed of 25/45 km/h, the eBike drive switches off the assistance. The drive is automatically reactivated as soon you start pedalling again and the speed is below 25/45 km/h.
The following options are available for switching off the eBike system:
- Briefly press the on/off button(4) of the on-board computer.
- Switch off the eBike battery using its on/off button (bicycle manufacturer-specific solutions are possible when there is no access to the battery on/off button; see the bicycle manufacturer operating instructions).
- Remove the on-board computer from its holder.
If no power is drawn from the eBike drive for about 10 minutes (e.g. because the eBike is not moving) and no button is pressed on the on-board computer or the operating unit of the eBike, the eBike system, and therefore also the battery, will switch off automatically to save energy.
Power supply of the on-board computer
If the on-board computer is in the holder (5), a sufficiently charged eBike battery is inserted into the eBike and the eBike system is switched on, then the on-board computer battery is powered and charged by the eBike battery.
If the on-board computer is removed from the holder (5), the power is supplied by the on-board computer battery. If the on-board computer battery's charge is running low, a warning message appears on the display.
To charge the on-board computer battery, slide the on-board computer back onto the holder (5). Note that if you do not charge the eBike battery straight away, the eBike system will automatically switch off after 10 minutes of inactivity. If this happens, the on-board computer battery will also stop charging.
You can also charge the on-board computer via the USB port (6). To do this, open the protective cap (17). Use a Micro USB cable to connect the USB port on the on-board computer to a commercially available USB charger (not included with the product as standard) or to the USB port of a computer (max. 5 V charging voltage; max. 500 mA charging current).
If the on-board computer is removed from the holder (5), all values for the functions are saved and can still be scrolled through.
If the Kiox battery is not recharged, the date and time will be retained for up to 6 months. When the on-board computer is switched on again, the date and time will be reset if a Bluetooth® connection to the app has been established and
the smartphone has successfully identified the current location via GPS.
Note: The Kiox only charges while it is switched on.
Note: If the Kiox is switched off during charging via a USB cable, the Kiox can only be switched on again once the USB cable has been disconnected.
Note: To maximise the lifespan of the on-board computer's battery, it should be recharged for one hour every three months.
Battery Charge Indicator
The battery charge indicator of the eBike battery d (see "Start page") can be read on the status page and in the status bar. The eBike battery's state of charge is also indicated by the LEDs on the eBike battery itself.
| Colour of the indicator | Explanation |
| White | The eBike battery is over 30% charged. |
| Yellow | The eBike battery is between 15% and 30% charged. |
| Red | The eBike battery is between 0% and 15% charged. |
| Red +! | The capacity for assisting the drive has been used up, and assistance is switched off. The remaining capacity will be provided for the bike lights and the on-board computer. |
If the eBike battery is being charged on the bike, a corresponding notification will be displayed.
If the on-board computer is removed from the holder (5), the state of charge that was last displayed for the battery is saved.
Storage mode/resetting the Kiox
The on-board computer has an energy-saving storage mode which minimises the rate at which the internal battery discharges. Setting to this mode erases the date and time. This mode can only be activated by pressing and holding the on/off button (4) of the on-board computer for at least 8 seconds.
If the on-board computer does not start when the on/off button (4) is pressed briefly, the on-board computer is in storage mode.
You can deactivate storage mode by pressing the on/off button (4) for at least 2 seconds.
The on-board computer detects whether it is in a fully functional condition. If you press and hold the on/off button (4) for at least 8 seconds while in a fully functional condition, the on-board computer will go into storage mode. If, contrary to expectations, the Kiox is not in a fully functional condition and cannot be operated, pressing and holding the on/ off button (4) (for at least 8 seconds) will reset it. After being reset, the on-board computer will restart automatically
after approx. 5 seconds. If the Kiox does not restart, press the on/off button (4) for 2 seconds.
To reset the Kiox to its factory settings, select <Settings> → <Sys settings> → <Factory reset>. All user data will be lost.
Setting the assistance level
On the operating unit (7), you can set the level of assistance you want the eBike drive to provide you with while pedalling. The assistance level can be changed at any time, even while cycling.
Note: In some models, the assistance level may be preset and cannot be changed. There may also be fewer assistance levels available than stated here.
The following assistance levels are available as a maximum:
- OFF: Motor assistance is switched off. The eBike can just be moved by pedalling, as with a normal bicycle. The push assistance cannot be activated at this assistance level.
- ECO: Effective assistance with maximum efficiency, for maximum range
- TOUR: Steady assistance, long range for touring
- SPORT/eMTB:
SPORT: Powerful assistance, for mountain biking and cycling in urban traffic
eMTB: Optimum assistance whatever the terrain, rapid acceleration when starting from a standstill, improved dynamics and top performance (eMTB only available in combination with the drive units BDU250P CX, BDU365, BDU450 CX and BDU480 CX. A software update may be required.) - TURBO: Maximum assistance even at high pedalling speeds, for sport cycling
To increase the assistance level, press the + (12) button on the operating unit repeatedly until the desired assistance level appears on the display. To decrease the assistance level, press the – (11) button.
The requested motor output appears on the display h (see "Start page"). The maximum motor output depends on the selected assistance level. If the on-board computer is removed from the holder (5), the assistance level that was last displayed is saved.
Switching the push assistance on/off
The push assistance aids you when pushing your eBike. The speed in this function depends on the selected gear and can reach a maximum of 6 km/h. The lower the selected gear, the lower the speed of the push assistance function (at full power).
- The push assistance function must only be used when pushing the eBike. There is a risk of injury if the wheels of the eBike are not in contact with the ground while using the push assistance.
To activate the push assistance, briefly press the WALK button on your on-board computer. After activation, press the + button within 3 s and keep it pressed. The eBike drive is switched on.
Note: The push assistance cannot be activated at assistance level OFF.
The push assistance is switched off as soon as one of the following occurs:
- You release the+ button;
- The wheels of the eBike are locked (e.g. by applying the brakes or hitting an obstacle);
- The speed exceeds6 km/h.
The push assistance function is subject to local regulations; the way it works may therefore differ from the description above, or the function may even be deactivated completely. Switching bicycle lights on/off
On the model on which the lighting is powered by the eBike system, the front and rear lights can be switched on and off at the same time via the on-board computer using the bike light button (3).
Check that your bike lights are working correctly before every use.
With the light switched on, the lighting c indicator (see "Start page") appears in the status bar on the display.
Switching the bike lights on and off has no effect on the backlighting of the display.
Creating a user ID
In order to use all the features of the operating system, you must register online.
With a user ID, you can analyse your ride data and routes, among other things.
You can set up a user ID via your Bosch eBike Connect smartphone app or simply at www.eBike-Connect.com. Enter the details required for registration. The Bosch eBike Connect smartphone app is available to download free of charge from the App Store (for Apple iPhones) or from the Google Play Store (for Android devices).
Connecting to the On-Board Computer using the Bosch eBike Connect App
Follow these steps to establish a connection to your smartphone:
- Load the app.
- Select the tab<My eBike>.
- Select<Add new eBike device>.
- AddKiox.
The app will then display an instruction to press and hold the bike lighting button (3) on the on-board computer for 5 seconds.
Press and hold the button (3) for at least 5 seconds. The onboard computer automatically activates the Bluetooth® Low Energy connection and switches to pairing mode. Follow the instructions on the screen. Once pairing is complete, the user data is synchronised.
Note: The Bluetooth® connection does not have to be activated manually.
Activity tracking
In order to record activities, you must be registered with and logged into the eBike Connect portal or the eBike Connect app.
To record activities, you must consent to the storage of your location data in the portal and/or in the app. Without this, your activities will not be shown in the portal or the app. Your position is only recorded if the on-board computer is connected to the eBike Connect app.
eShift (optional)
eShift is the integration of electronic gear-shifting systems into the eBike system. The eShift components are electrically connected to the drive unit by the manufacturer. The separate operating instructions describe how to operate the electronic gear-shifting systems.
eSuspension (optional)
eSuspension is the integration of electronic shock absorption and suspension elements into the eBike system. You can use the Quick Menu to select predefined settings for the eSuspension system.
For details of these settings, please refer to the operating instructions provided by the eSuspension manufacturer. eSuspension is only available in combination with the Kiox on-board computer and can only be used with the BDU450 CX, BDU480 CX and BDU490P drive units.
ABS – anti-lock braking system (optional)
If the wheel is fitted with a Bosch eBike ABS with no external control lights, the control lights will be shown on the Kiox display when the system starts and in the event of a fault. For detailed information on the ABS and how it works, please refer to the ABS operating instructions.
Lock (premium function)
The Lock function is available to purchase from the <Shop> in the eBike Connect app. Once the Lock function is switched on by disconnecting the on-board computer, the eBike drive unit assistance is deactivated. It can only then be activated using the on-board computer belonging to the eBike.
Software updates
Software updates are transferred to the on-board computer in the background of the app as soon as it is connected to the app. When an update is complete, this will be displayed the next three times the on-board computer is restarted.
Alternatively, you can check in the <Sys settings> whether an update is available.
Powering external devices via the USB port
The USB port can be used to operate or charge most devices that can be powered via USB (e.g. various mobile phones).
Charging requires the on-board computer to be mounted and a sufficiently charged battery to be inserted in the eBike. Open the protective cap (17) for the USB port on the onboard computer. Use a Micro-A – Micro-B USB charging cable (available from your Bosch eBike dealer) to connect the USB port on the external device to the USB port (6) on the on-board computer.
Once the electrical load has been disconnected, the USB port must be carefully resealed with the protective cap (17). USB connections are not waterproof. When cycling in the rain, do not connect any external devices and make sure that the USB port is fully sealed by the protective cover (17).

If electrical loads are connected, this can affect the range of the eBike.
Displays and settings of the onboard computer
Please note: All screenshots showing the display and text on the following pages are from the approved software version. The display and/or text may change slightly following a software update.
Operating logic
You can use the < (10) and > (8) buttons to switch between the different riding value information pages (even while riding). This way, you can keep both hands on the handlebars while cycling.
You can use the + (12) and – (11) buttons to increase or decrease the assistance level.
The <Settings> that can be accessed via the Status screen cannot be changed while riding.
You can use the select button (9) to perform the following functions:
- You can access the quick menu while riding.
- You can access the settings menu from theStatus screen while stationary.
- You can confirm values and acknowledge informative hints.
- You can exit a dialogue.
If the on-board computer is removed from its holder and not switched off, it will display information regarding the last journey, as well as status information, on a loop.
If no button is pressed after the on-board computer is removed from the holder, it will switch itself off after 1 minute.
Order of pages
Provided the on-board computer is fitted to the holder, you can view the following displays one after the other:
- Start page
- Time and range
- Distance and journey time
- Power and cadence
- Average and maximum speed
- Distance, range, power and heart rate
- Heart rate
- Calories burnt and total distance
- Status page
Start page
When you insert the on-board computer into the holder while it is switched on, it will display the start page.

- Time/speed indicator
- Assistance level indicator
- Lighting indicator
- Battery charge indicator of the eBike battery
- Unit of speed indicator
- Speed
- Navigation bar
- Motor output
- Your performance
- Average speed
- Performance evaluation
A) Can be changed via the <Settings> status page.
The a ... d indicators form the status bar and are shown on every page. If the speed is already being displayed on the screen itself, the a indicator will change to the current time in hours and minutes. The status bar displays:
- Speed/time: The current speed in km/h or mph or the current time
- Assistance level: Indicates the current level of assistance using a colour code
- Light: A symbol that indicates whether the light is on
- eBike battery state of charge: Indicates the current state of charge as a percentage
The performance evaluation k graphically displays your current speed (white bar) in comparison to your average speed j. The graphic shows you whether your current speed is faster or slower than your average speed (left of the black line = lower than average value; right of the black line = higher than average value).
The navigation bar g indicates which page you are on. Your current page is highlighted. You can use the < (10) and > (8) buttons to move to additional pages.
From the initial start page, you can access the status page via the < (10) button.
Status screen

As well as the status bar, the status page also shows you the current time and the state of charge of all your eBike's batteries, as well as the state of charge of your smartphone battery if the smartphone is connected via Bluetooth®. It may also display symbols to indicate an activated Bluetooth® function or a device connected via Bluetooth® (e.g. a heart-rate monitor). You will also be
shown the date of the most recent synchronisation between the smartphone and Kiox.
You can access the <Settings> from the bottom section.
<Settings>
You can access the settings menu via the status page. The <Settings> cannot be accessed or changed while riding.
You can use the – (11) and + (12) buttons to select the setting you want. You can open the settings, as well as any additional submenus, using the select button (9). You can use the < button (10) to go back to the previous menu from any settings menu.
You can find the following superordinate sections on the first navigation level:
- <Registration> – Information about registration: This menu item is only displayed if you have not yet registered with eBike Connect.
- <My eBike> – Settings for your eBike
You can reset the counters (such as the number of kilometres travelled that day or average values) to zero either automatically or manually, and you can reset the range. You can change the wheel circumference value that was preset by the manufacturer by ±5%. If your eBike features eShift, you can also configure your eShift system here. The bicycle manufacturer or dealer may base the service date on the distance travelled and/or a period of time. The due date for the service is displayed under <Next Service: [DD. Mon. YYYY] or at [xxxxx] [km]>. The bike component page displays the serial number and hardware and software versions for each component in addition to other key data which is relevant for the components. - <My profile> – Active user data
- <Bluetooth> – Switching the Bluetooth® function on or off:
Connected devices are displayed. - <Sys settings> – A list of setting options for your on board computer
You can display the speed and distance in kilometres or miles, display the clock in 12- or 24-hour format, adjust the time, date and time zone and select your preferred language. You can reset the Kiox to its factory settings, run a software update (if available) and choose between a black or white design. - <Information> – Information about your Kiox Information on FAQs (frequently asked questions), certification, contact information, information on licences You can find a detailed description of each parameter in the online operating instructions at www.Bosch-eBike.com/Kiox-manual.
Quick Menu
Selected settings are displayed on the Quick Menu. These settings can be changed even while riding.
You can access the Quick Menu via the select button (9). It cannot be accessed from the Status screen.
The following settings can be changed via the Quick Menu:
- <Reset trip data?>
All data on the journey so far is reset to zero. - <eShift>
You can set the cadence here. - <eSuspension>
This is where you can set a manufacturer-defined shock absorption or suspension mode.
Error code display
The eBike system's components are continuously and automatically monitored. If an error is detected, the corresponding error code is displayed on the on-board computer. The drive may be automatically shut down, depending on the type of error. However, if you wish to continue cycling, you will always be able to do so without assistance from the drive. Before undertaking any other journeys, the eBike should be checked.
- Have all repairs performed only by an authorised bike dealer.
| Code | Cause | Corrective measures |
| 410 | One or more buttons of the on-board computer are disabled. | Check whether any buttons are stuck, e.g. as a result of dirt finding its way in. Clean the buttons if need be. |
| 414 | Operating unit connection problem | Have the connections checked |
| 418 | One or more buttons on the operating unit are disabled. | Check whether any buttons are stuck, e.g. as a result of dirt finding its way in. Clean the buttons if need be. |
| 419 | Configuration error | Restart the system. If the problem persists, contact your Bosch eBike dealer. |
| 422 | Drive unit connection problem | Have the connections checked |
| 423 | eBike battery connection problem | Have the connections checked |
| 424 | Communication problem between components | Have the connections checked |
| 426 | Internal time-out error | Restart the system. If the problem persists, contact your Bosch eBike dealer. With this error, it is not possible to bring up the wheel circumference in the basic settings menu or to adjust it. |
| 430 | Internal battery of the on-board computer is flat (does not apply to BUI350) | Charge the on-board computer (in the holder or via the USB port) |
| 431 | Software version error | Restart the system. If the problem persists, contact your Bosch eBike dealer. |
| 440 | Internal drive unit fault | Restart the system. If the problem persists, contact your Bosch eBike dealer. |
| 450 | Internal software error | Restart the system. If the problem persists, contact your Bosch eBike dealer. |
| 460 | Error at USB port | Remove the cable from the USB port of the on-board computer. If the problem persists, contact your Bosch eBike dealer. |
| 490 | Internal fault of the on-board computer | Have the on-board computer checked |
| 500 | Internal drive unit fault | Restart the system. If the problem persists, contact your Bosch eBike dealer. |
| 502 | Bike light fault | Check the light and the associated wiring. Restart the system. If the problem persists, contact your Bosch eBike dealer. |
| 503 | Speed sensor fault | Restart the system. If the problem persists, contact your Bosch eBike dealer. |
| 504 | Speed signal distortion detected. | Check that the spoke magnet is positioned correctly, and adjust it if necessary. Check that nothing has been tampered with (tuning). Drive assistance is reduced. |
| 510 | Internal sensor fault | Restart the system. If the problem persists, contact your Bosch eBike dealer. |
| 511 | Internal drive unit fault | Restart the system. If the problem persists, contact your Bosch eBike dealer. |
| 530 | Battery fault | Switch off the eBike, remove the eBike battery and reinsert the eBike battery. Restart the system. If the problem persists, contact your Bosch eBike dealer. |
| 531 | Configuration error | Restart the system. If the problem persists, contact your Bosch eBike dealer. |
| 540 | Temperature error | The eBike is outside of the permissible temperature range. Switch off the eBike system and allow the drive unit to either cool down or heat up to the permissible temperature range. Restart the system. If the problem persists, contact your Bosch eBike dealer. |
| 550 | An impermissible load has been detected. | Remove the load. Restart the system. If the problem persists, contact your Bosch eBike dealer. |
| 580 | Software version error | Restart the system. If the problem persists, contact your Bosch eBike dealer. |
| 591 | Authentication error | Switch off the eBike system. Remove the battery pack and reinsert it. Restart the system. If the problem persists, contact your Bosch eBike dealer. |
| 592 | Incompatible component | Use a compatible display. If the problem persists, contact your Bosch eBike dealer. |
| 593 | Configuration error | Restart the system. If the problem persists, contact your Bosch eBike dealer. |
| 595, 596 | Communication error | Check the wiring to the drive and restart the system. If the problem persists, contact your Bosch eBike dealer. |
| 602 | Internal battery fault | Restart the system. If the problem persists, contact your Bosch eBike dealer. |
| 603 | Internal battery fault | Restart the system. If the problem persists, contact your Bosch eBike dealer. |
| 605 | Battery temperature error | The battery is outside of the permissible temperature range. Switch off the eBike system and allow the battery to either cool down or heat up to the permissible temperature range. Restart the system. If the problem persists, contact your Bosch eBike dealer. |
| 606 | External battery fault | Check the wiring. Restart the system. If the problem persists, contact your Bosch eBike dealer. |
| 610 | Battery voltage error | Restart the system. If the problem persists, contact your Bosch eBike dealer. |
| 620 | Charger fault | Replace the charger. Contact your Bosch eBike dealer. |
| 640 | Internal battery fault | Restart the system. If the problem persists, contact your Bosch eBike dealer. |
| 655 | Multiple battery faults | Switch off the eBike system. Remove the battery pack and reinsert it. Restart the system. If the problem persists, contact your Bosch eBike dealer. |
| 656 | Software version error | Contact your Bosch eBike dealer so that they can perform a software update. |
| 7xx | Error relating to third-party components | Observe the information in the operating instructions of the respective component manufacturer. |
| 800 | Internal ABS fault | Contact your Bosch eBike dealer. |
| 810 | Implausible signals from the wheel speed sensor | Contact your Bosch eBike dealer. |
| 820 | Fault in the wire to the front wheel speed sensor | Contact your Bosch eBike dealer. |
| 821 to 826 | Implausible signals from the front wheel speed sensor The sensor disc may be missing, defective or fitted incorrectly; there is a significant difference in diameter between the front wheel and the rear wheel; extreme riding situation, e.g. riding solely on the rear wheel | Restart the system and carry out a test ride lasting at least two minutes. The ABS indicator light must go out. If the problem persists, contact your Bosch eBike dealer. |
| 830 | Fault in the wire to the rear wheel speed sensor | Contact your Bosch eBike dealer. |
| 831 833 to 835 | Implausible signals from the rear wheel speed sensor The sensor disc may be missing, defective or fitted incorrectly; there is a significant difference in diameter between the front wheel and the rear wheel; extreme riding situation, e.g. riding solely on the rear wheel | Restart the system and carry out a test ride lasting at least two minutes. The ABS indicator light must go out. If the problem persists, contact your Bosch eBike dealer. |
| 840 | Internal ABS fault | Contact your Bosch eBike dealer. |
| 850 | Internal ABS fault | Contact your Bosch eBike dealer. |
| 860, 861 | Fault in the power supply | Restart the system. If the problem persists, contact your Bosch eBike dealer. |
| 870, 871 880 883 to 885 | Communication error | Restart the system. If the problem persists, contact your Bosch eBike dealer. |
| 889 | Internal ABS fault | Contact your Bosch eBike dealer. |
| 890 | ABS indicator light is defective or missing; ABS may not be working. | Contact your Bosch eBike dealer. |
| No display | Internal fault of the on-board computer | Restart your eBike system by switching it off and back on. |
Maintenance and servicing
Maintenance and cleaning
Do not clean any of the components with pressurised water. Keep the screen of your on-board computer clean. Dirt can cause faulty brightness detection.
Clean your on-board computer using a soft cloth dampened only with water. Do not use cleaning products of any kind. Have your eBike system checked by an expert at least once a year (including mechanical parts, up-to-dateness of system software).
In addition, the bicycle dealer may base the service date on the distance travelled and/or on a period of time. In this case, the on-board computer displays a message telling you when the service date is due each time it is switched on. Please have your eBike serviced and repaired by an authorised bicycle dealer.
- Have all repairs performed only by an authorised bike dealer.
After-sales service and advice on using products
If you have any questions about the eBike system and its components, contact an authorised bicycle dealer. For contact details of authorised bike dealerships, please visit www.bosch-ebike.com.
Safety instructions

Read all the safety information and instructions. Failure to observe the safety information and follow instructions may result in electric shock, fire and/or serious injury.
Save all safety warnings and instructions for future reference.
The term battery is used in these instructions to mean all original Bosch eBike rechargeable battery packs.
- Do not allow yourself to be distracted by the on-board computer's display. If you do not focus exclusively on the traffic, you risk being involved in an accident. If you want to make entries in your on-board computer other than switching the assistance level, stop and enter the appropriate data.
- Set the display brightness so that you can adequately see important information such as speed and warning symbols. Incorrectly set display brightness may lead to dangerous situations.
- Do not open the on-board computer. Opening the onboard computer may damage it beyond repair and void any warranty claims.
- Do not use the on-board computer as a handle. Lifting the eBike up by the on-board computer can cause irreparable damage to the on-board computer.
- Do not stand your bicycle upside down on its saddle and handlebars if the on-board computer or its holder protrude from the handlebars. This may irreparably damage the on-board computer or the holder. Also remove the on-board computer before placing the bicycle on a wall mount to ensure that the on-board computer does not fall off or become damaged.
![]()
When using the on-board computer with Bluetooth® and/or WiFi, interference can occur with other devices and equipment, aircraft and medical devices (e.g. pacemakers, hearing aids). Likewise, injury to people and animals in the immediate vicinity cannot be excluded entirely. Do not use the on-board computer with Bluetooth® in the vicinity of medical devices, petrol stations, chemical plants, areas with a potentially explosive atmosphere or on blast sites. Do not use the on-board computer with Bluetooth® in aeroplanes. Avoid using the on-board computer near your body for extended periods.- TheBluetooth® word mark and logos are registered trademarks owned by Bluetooth SIG, Inc. and any use of such marks by Bosch eBike Systems is under licence.
- The on-board computer is equipped with a wireless interface. Local operating restrictions, e.g. in aeroplanes or hospitals, must be observed.

Privacy notice
If the on-board computer is sent to Bosch Service because it requires servicing, the data stored on the on-board computer may be transmitted to Bosch.
Documents / Resources
References
Bosch eBike Connect
![www.bosch-ebike.com]() Downloads: catalogue, instructions, handling eBike batteries
Downloads: catalogue, instructions, handling eBike batteries![www.bosch-ebike.com]() Premium eBike systems and smart functions
Premium eBike systems and smart functions
Download manual
Here you can download full pdf version of manual, it may contain additional safety instructions, warranty information, FCC rules, etc.
Advertisement


Need help?
Do you have a question about the Kiox and is the answer not in the manual?
Questions and answers