Bosch Kiox 300 (BHU3600) Manual
- Original operating instructions (617 pages) ,
- Instruction manual (111 pages) ,
- Operating instructions manual (83 pages)
Advertisement
- 1 Introduction
- 2 Product description and specifications
- 3 Assembly
-
4
Operation
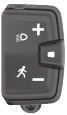
- 4.1 LED Remote
- 4.2 Mini Remote
- 4.3 Status page
- 4.4 Start page
- 4.5 Trip page
- 4.6 Range page
- 4.7 Fitness page
- 4.8 Elevation profile screen
- 4.9 Creating a User ID
- 4.10 Connecting to the On-Board Computer Using the eBike Flow App
- 4.11 ABS – anti-lock braking system
-
4.12
- 4.13 Adapting the Assistance Level
- 5 Displays and Settings of the eBike Flow App
- 6 Maintenance and servicing
- 7 Safety instructions
- 8 Documents / Resources
Introduction
Congratulations on purchasing this eBike on-board computer. Kiox 300 reliably displays all important riding data.
Updates
Kiox 300's range of functions is continually being expanded. Keep your eBike Flow smartphone app up to date. You can use this app to download new functions and transfer them to your Kiox 300.
In addition to the functions shown here, changes to software relating to troubleshooting and functional enhancements may be introduced at any time.
Product description and specifications
Intended use
The Kiox 300 on-board computer is designed to display cycling data.
To access the full functionality of the Kiox 300 on-board computer, you will need a compatible smartphone installed with the eBike Flow app (available from the Apple App Store or the Google Play Store).


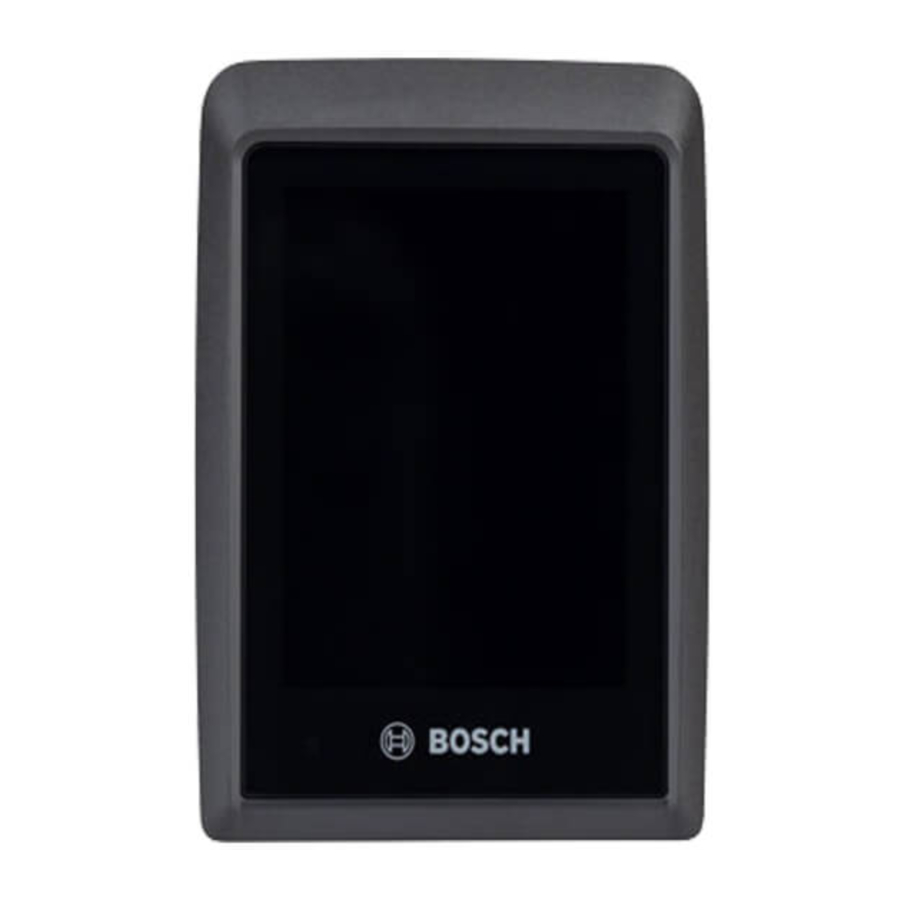
Product features

- Display
- Cable outlet
- Removal blocker
- Snap-in hook
- Adapter tray
- Display contacts
- Holder contacts
- Display mount
- Display mount fastening screw
- Bridge for retaining strapa)
- The retaining strap is not included in the scope of delivery.
Technical data
| On-board computer | Kiox 300 | |
| Product code | BHU3600 | |
| Operating temperatureA) | °C | −5 to +40 |
| Storage temperature | °C | +10 to +40 |
| Protection rating | IP54 | |
| Weight, approx. | g | 32 |
- Temperatures outside of this range may cause faults in the display.
The license information for the product can be accessed at the following Internet address: https://www.bosch-ebike.com/licences
Assembly
Fitting and Removing the Display

To fit the display (1), attach the display (1) to the front edge of the display mount (8) in the direction of travel, on the snap-in hook (4) ❶ and press the rear side of the display (1) on the display mount (8) ❷.
To remove the display (1), pull the display (1) towards you ❶ until you are able to lift off the display (1) ❷.
A retaining strap can be secured to the bridge (10).
Note: The eBike system switches off if you ride below 3 km/h and take the on-board computer out of the holder. This does not apply to eBikes with assistance up to 45 km/h.
Inserting the Removal Blocker
Note: Depending on the design/mounting of the display mount, it may not be possible to insert the removal blocker. The display must be mounted.

Insert the removal blocker (3) into the adapter tray (5) from below until you hear the removal blocker (3) click into place.
From this point onwards, you can no longer lift off the display (1) from the display fixture (8) without removing the display mount (8) from the adapter tray (5) by loosening the two fastening screws (9).
Note: The removal blocker (3) is not an anti-theft device.
Operation
The on-board computer can be operated and the indicators can be controlled via one of the depicted operating units.
The meaning of the buttons on the operating unit for the display indicators can be found in the following overview. Depending on how long it is pressed for, the select button has two functions.
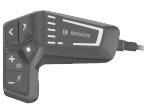
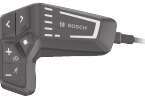
LED Remote

 | Scroll to the left |
 | Scroll to the right |
 | Scroll up |
 | Scroll down |
 | Change to the second page level (press briefly) Open the settings menu on the status page (press briefly) |
 | Open page-related options e.g. <Reset trip> (press and hold > 1 s) |
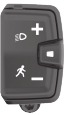
Mini Remote

| Increase assistance level |
| Decrease assistance level |
| Select button (press briefly) Scroll through the screens (press briefly) |
| Select button (press and hold > 1 s) Open settings menu (press and hold > 1 s) |
Note: The fault codes can be acknowledged using the button on the two operating units.
Note: All screenshots showing the display and text on the following pages are from the approved software version. The display and/or text may change following a software update.
Status page
From the initial start screen, you can access the status screen via the button on the LED Remote and via the button on the Mini Remote.

- Battery charge
- Assistance level
- Bicycle lights
- Time
- Connection indicator
- Smartphone connection
- Connection status
- Settings Menu
Calling up the settings menu
You can access the settings menu from this screen.
Briefly press the select button ![]() to call up the settings menu.
to call up the settings menu.
Press and hold the select button ![]() > 1 s to call up the settings menu.
> 1 s to call up the settings menu.
Note: The settings menu cannot be called up while riding.
The <SETTINGS> settings menu contains the following menu items:
- <My eBike>
You can find the following menu items here.- <Range reset>
The value for the range can be reset here. - <Auto trip reset>
The settings for automatic reset can be adjusted here. - <Wheel circumf.>
The value of the wheel circumference can be adjusted or reset to the standard setting here. - <Service>
The next service date is shown here, provided that it has been set by the bicycle dealer. - <Components>
The components used with their version numbers are displayed here. - <My Kiox>
You can find the following menu items here. - <Statusbar>
You can choose between the <Battery>, <Time> or <Speed> displays here. - <Language>
You can select your preferred system language here. - <Units>
You can choose between metric or imperial measurements here. - <Time>
You can set the time here. - <Time format>
You can select one of the two time formats here. - <Brightness>
You can set the display brightness here. - <Settings reset>
You can reset all of the system settings to the default values here.
- <Range reset>
- Under the <Information> menu item, you will find the contact details (<Contact>) and certificates (<Certificates>).
Leaving the settings menu
Press the ![]() button to save the settings and leave the settings menu.
button to save the settings and leave the settings menu.
Press the or button to leave the settings menu without saving the settings.
Press the ![]() button to access the start page.
button to access the start page.
Press and hold the ![]() button > 1 s to save the settings and leave the settings menu.
button > 1 s to save the settings and leave the settings menu.
Start page
If you did not select another page before the last time you switched off, you will be shown this page.

- Battery charge
- Assistance level
- Bicycle lights
- Unit of speed indicator
- Indicator name
- Your performance
- Speed
- Motor output
aa. Vertical navigation bar
ab. Horizontal navigation bar
The a ... c indicators form the status bar and are shown on every page. The navigation bars aa and ab briefly indicate which level and which screen you are on.
When operating the on-board computer via LED Remote, the navigation bars aa and ab can be seen on all screens. When operating the on-board computer via Mini Remote, only the horizontal navigation bar ab will be shown.
From the start screen, you can change to the status screen or access other screens. The statistical data, battery range and average values are displayed on these pages.
From each of these screens, you can access the second level of data via LED Remote.
When operating the on-board computer via Mini Remote, a second level of data is not available.
If you are on a different screen to the start screen when the eBike is switched off, the most recently displayed screen will appear again when the eBike is switched on.
Press the ![]() button or
button or ![]() button to scroll through the screens.
button to scroll through the screens.
Press the ![]() button to access the second level of data.
button to access the second level of data.
Press and hold the ![]() button > 1 s to reset the statistical data for your journey or excursion (not on the <SETTINGS> screen).
button > 1 s to reset the statistical data for your journey or excursion (not on the <SETTINGS> screen).
Briefly press the select button ![]() to scroll through all the screens. This is how you access, e.g. the status screen.
to scroll through all the screens. This is how you access, e.g. the status screen.
Start screen level 2
(only with LED Remote)

- Battery charge
- Assistance level
- Bicycle lights
- Unit of speed indicator
- Average speed
- Maximum speed
Trip page

- Battery charge
- Assistance level
- Bicycle lights
- Distance
- Journey time
- Speed
When operating the on-board computer via Mini Remote, the total distance r is displayed instead of the speed l.
Trip screen level 2
(only with LED Remote)

- Battery charge
- Assistance level
- Bicycle lights
- Total distance
- Energy consumed
Range page

- Battery charge
- Assistance level
- Bicycle lights
- Operating range
ac. Smartphone battery state of charge
Range screen level 2
(only with LED Remote)

- Battery charge
- Assistance level
- Bicycle lights
- Range depending on the assistance level
Fitness page

- Battery charge
- Assistance level
- Bicycle lights
- Your performance
- Performance indicator (above average)
If the needle of the performance indicator is on the right-hand side or in the middle, the background will turn green. This means that your performance is greater than or equal to the average value. - Cadence
- Performance indicator (below average)
If the needle of the performance indicator is on the left-hand side, the background will turn orange. This means that your performance is below the average value.
Fitness screen level 2
(only with LED Remote)

- Battery charge
- Assistance level
- Bicycle lights
- Average output in watts
- Average cadence in revolutions per minute
Elevation profile screen
The elevation profile screen provides you with information relating to the elevation and ascent.
| <ELEVATION> | Altitude above sea level indicator |
| <ASCENT> | Ascent indicator |
| <MAX. ELEVATION> | Maximum altitude above sea level indicator |
Creating a User ID
To be able to use all functions of the on-board computer, you must register online.
With a user ID, you can view your ride data, among other things.
You can create a user ID via your eBike Flow app. Enter the details required for registration. Download the eBike Flow app free of charge from the Apple App Store (for iPhones) or from the Google Play store (for Android devices).
Connecting to the On-Board Computer Using the eBike Flow App
Follow these steps to establish a connection to your smartphone:
- Load the app.
- Select Connect now.
- Follow the instructions on the smartphone screen.
You can use the app to record activities and to adjust assistance levels.
ABS – anti-lock braking system
(optional)
If the eBike is equipped with a Bosch eBike ABS system, the ABS indicator lamp on the operating unit lights up when the system starts and, if necessary, the ABS indicator light lights up in the Kiox 300 display.
The indicator light goes out as soon as you are riding the eBike faster than 4 km/h and no fault is detected by the ABS.
If an ABS fault occurs during the journey, the orange ABS indicator light on the operating unit lights up and an orange light flashes on the state of charge and mode indicators. You see a fault display in the Kiox 300 display and in the eBike Flow app (if available). If necessary, you are shown an animated ABS indicator lamp in the Kiox 300 display as a pop-up. This indicates that the ABS is inactive. If you acknowledge the fault, the ABS indicator lamp on the operating unit continues to light up orange. You can continue the journey. While the ABS indicator lamp is lit up, the ABS is inactive. If necessary, the displays on the on-board computer alternate and the ABS indicator lamp also appears in the statusbar.
For details on the ABS and how it works, please refer to the ABS operating instructions.
<eBike Lock>
The <eBike Lock> can be activated for each user via the eBike Flow app. In the process, a key for unlocking the eBike is saved on the smartphone.
The <eBike Lock> is automatically enabled in the following cases:
- Switching off the eBike system via the control unit
- Automatically switching off the eBike system
- Removing the on-board computer
If the eBike system is switched on and the smartphone is connected to the eBike via Bluetooth®, the eBike will be unlocked.
<eBike Lock> is linked to your user account.
If you lose your smartphone, you can log in to your user account on the eBike Flow app using another smartphone and unlock then the eBike.

If you select a setting in the app that could have negative consequences in combination with the <eBike Lock> (e.g. deleting your eBike or user account), you will be shown warning messages beforehand. Please read through these thoroughly and adhere to the warnings that are issued (e.g. before deleting your eBike or user account).
Setting Up the <eBike Lock>
In order to be able to set up the <eBike Lock>, the following conditions must be fulfilled:
- The eBike Flow app is installed.
- A user account has been created.
- The eBike is not currently updating.
- The eBike is connected to the smartphone via Bluetooth®.
- The eBike is stationary.
- The smartphone is connected to the Internet.
- The eBike battery is sufficiently charged and the charging cable is not connected.
You can set up the <eBike Lock> in the eBike Flow app in the Settings menu item.
From now on, you can deactivate the assistance from your drive unit by switching on <eBike Lock> in the eBike Flow app. This deactivation can only be can only be overridden if your smartphone is in the vicinity of the eBike system when the system is switched on. To do this, your smartphone must have Bluetooth® switched on and the eBike Flow app must be active in the background. The eBike Flow app does not need to be open. When the <eBike Lock> is activated, you can continue to use your eBike without assistance from the drive unit.
Compatibility
The <eBike Lock> is compatible with these Bosch eBike product lines:
| Drive unit | Product line |
| BDU374x | Performance Line CX |
| BDU33xx | Performance Line |
How it works
In combination with the <eBike Lock>, the smartphone functions similarly to a key for the drive unit. The <eBike Lock> is activated by switching off the eBike system. As long as the <eBike Lock> is active after the function is switched on, this will be indicated by the operating unit LED Remote flashing white and by a padlock symbol on the display.
Note: The <eBike Lock> alone does not provide adequate theft protection; it is simply a supplement to a mechanical lock! The <eBike Lock> does not provide any form of mechanical lock for the eBike. Only the assistance from the drive unit is deactivated. The drive unit will be unlocked for as long as the smartphone is connected to the eBike via Bluetooth®.
If you wish to give other users temporary or permanent access to your eBike or you want to take your eBike to a service, you will need to deactivate the <eBike Lock> in the eBike Flow app in the <Settings> menu item. If you wish to sell your eBike, you will also need to delete the eBike from your user account in the eBike Flow app in the <Settings> menu item.
When the eBike system is switched off, the drive unit will emit a "Lock" sound (i.e. an audio signal that is played once) to indicate that the assistance from the drive unit is switched off.
Note: The audio signal will only be played if the system is switched on.
When the eBike system is switched on, the drive unit will emit two "Unlock" sounds (i.e. an audio signal that is played twice) to indicate that the assistance from the drive unit is enabled again.
The "Lock" sound will help you determine whether or not the <eBike Lock> on your eBike is active. The audio signal is activated by default, but it can be deactivated in the eBike Flow app in the <Settings> menu item by selecting the lock symbol under your eBike.
Note: If you can no longer set up or switch off the <eBike Lock>, please contact your bicycle dealer.
Replacing eBike Components and the <eBike Lock>
Replacing the Smartphone
- Install the eBike Flow app on the new smartphone.
- Log in with the same account that was used to activate the <eBike Lock>.
- The <eBike Lock> is displayed as set up in the eBike Flow app.
Replacing the drive unit
- The <eBike Lock> is displayed as deactivated in the eBike Flow app.
- Activate the <eBike Lock> by pushing the <eBike Lock> controller to the right.
- If you are handing in your eBike to a bicycle dealer for maintenance, it is recommended that you temporarily deactivate the <eBike Lock> to prevent false alarms.
Adapting the Assistance Level
The assistance level can be adapted within certain limits using the eBike Flow app. This gives you the option of adjusting your eBike to your personal requirements.
It is not possible to create a completely new mode. You can only adjust the modes that have been enabled by the manufacturer or dealer on your system. This may be fewer than 4 modes.
Due to technical limitations, you cannot adjust the eMTB and TOUR+ modes. In addition, restrictions in your country may mean that it is not possible to adjust a particular mode.
The following parameters are available for making adjustments:
- Assistance in relation to the base value of the mode (within the legal requirements)
- Drive response
- Top limit speed (within the legal requirements)
- Maximum torque (within the limits of the drive)
The parameters are dependent on each other and influence each other. For example, it is not fundamentally possible to simultaneously set a low torque value and high assistance.
Note: Please ensure that your modified mode retains the position, name and colour on all on-board computers and controls.
Displays and Settings of the eBike Flow App
A smartphone is not included with the product. An Internet connection is required for registering with a smartphone. Depending on the contract, this can incur costs from your telephone provider.
Please note: All screenshots showing the display and text on the following pages are from the approved software version. Since a software update may be implemented over the course of the year, it is possible that the display and/or text of the interface may change.
The following description of the eBike Flow app applies to the Kiox 300 onboard computer.
Depending on the smartphone's operating system, the eBike Flow app can be downloaded free of charge from the Apple App Store and the Google Play store.
Use your smartphone to scan the code in order to download the eBike Flow app.

Alternatively, you can call up the code on your on-board computer under <SETTINGS> → <App connect>.
Activating the eBike Flow App
In order to be able to use all eBike Flow functions, a smartphone with the eBike Flow app is required.
Proceed as follows to perform activation:
- Open the Google Play store (Android) or the Apple App Store (iOS) on your smartphone.
- Search for eBike Flow.
- Install the eBike Flow app and open it.
- Register as described in the next section.
Registration via Smartphone
- Load the eBike Flow app.
- Follow the instructions.
- Create a user account or log in to an existing user account.
- Register your Bosch ID.
- Read and accept the terms and conditions and the privacy policy.
- After confirming these, an e-mail will be sent to the address you have specified with the provisions of the agreement.
- Activate your user account by clicking on the Activate user account button in the e-mail you have received.
Main Menu of the eBike Flow App
| Symbol | Menu item | Function |
 | <Home> | This is the start screen for the app. |
 | <Ride> | The map allows you to find your bearings, plan and start navigation and to record your journeys. |
 | <Statistics> | Under this menu item, you can view the routes you have recorded. |
 | <Settings> | Under this menu item, you can view and edit your personal details, data protection settings and app settings. In addition, you can find information about the components of your eBike. |
Navigation
The navigation function on the Kiox 300 assists you when exploring unfamiliar areas. You can start navigation on your smartphone in the eBike Flow app. You need the latest software version in order to use navigation. To do this, keep your eBike Flow app and your on-board computer up to date.
Route guidance
- Do not use your smartphone while riding. If you do not focus exclusively on the traffic, you risk being involved in an accident. Only enter the relevant data having stopped first.
For route guidance on the Kiox 300, you need a Bluetooth® connection to your smartphone during the entire journey. Route and GPS information is transmitted from your smartphone during the journey.
Select your destination via the <Ride> button. You can also enter your destination in the input field or by pressing and holding a point on the map. When you have set a destination, you will be shown three different routes (<Leisure>, <Daily> and <eMTB>). Pressing on the <Go> button starts the navigation and shows it on the on-board computer.
You are provided with additional information, e.g. distance to the destination, during the navigation. Briefly press the ![]() button on one of the operating units LED Remote or Mini Remote to call up this information.
button on one of the operating units LED Remote or Mini Remote to call up this information.
In addition, further navigation information (e.g. turn-by-turn instructions) is shown during the journey. Briefly press the ![]() button on one of the operating units LED Remote or Mini Remote to hide this information.
button on one of the operating units LED Remote or Mini Remote to hide this information.
You can find further information about your current route (e.g. a detailed map view) at any time in the eBike Flow app.
Maintenance and servicing
Maintenance and cleaning
Do not clean any of the components with pressurised water.
Keep the screen of your on-board computer clean. Dirt can cause faulty brightness detection.
Clean your on-board computer using a soft cloth dampened only with water. Do not use cleaning products of any kind.
Have your eBike system checked by an expert at least once a year (including mechanical parts, up-to-dateness of system software).
In addition, the bicycle dealer may base the service date on the distance travelled and/or on a period of time. In this case, the on-board computer displays a message telling you when the service date is due each time it is switched on.
Please have your eBike serviced and repaired by an authorised bicycle dealer.
- Have all repairs performed only by an authorised bike dealer.
Note: If you are handing in your eBike to a bicycle dealer for maintenance, it is recommended that you temporarily deactivate the <eBike Lock> and <eBike Alarm> to prevent false alarms.
After-sales service and advice on using products
If you have any questions about the eBike system and its components, contact an authorised bicycle dealer.
For contact details of authorised bike dealerships, please visit www.bosch-ebike.com.
Transport
- If you transport your eBike attached to the outside of your car, e.g. on a bike rack, remove the on-board computer and the eBike battery to avoid damaging them.
Safety instructions
Read all the safety information and instructions. Failure to observe the safety information and follow instructions may result in electric shock, fire and/or serious injury.
Save all safety warnings and instructions for future reference.
The term battery is used in these instructions to mean all original Bosch eBike rechargeable battery packs.
- Read and observe the safety warnings and directions contained in all the eBike system operating instructions and in the operating instructions of your eBike.
- Do not attempt to secure the display or operating unit while riding.
- Do not allow yourself to be distracted by the on-board computer's display. If you do not focus exclusively on the traffic, you risk being involved in an accident. If you want to make entries in your on-board computer other than switching the assistance level, stop and enter the appropriate data.
- Do not use your smartphone while riding. If you do not focus exclusively on the traffic, you risk being involved in an accident. Only enter the relevant data having stopped first.
- Set the display brightness so that you can adequately see important information such as speed and warning symbols. Incorrectly set display brightness may lead to dangerous situations.
- Do not open the on-board computer. Opening the on-board computer may damage it beyond repair and void any warranty claims.
- Do not use the on-board computer as a handle. Lifting the eBike up by the on-board computer can cause irreparable damage to the on-board computer.
- Do not stand your bicycle upside down on its saddle and handlebars if the on-board computer or its holder protrude from the handlebars. This may irreparably damage the on-board computer or the holder. Also remove the on-board computer before placing the bicycle on a wall mount to ensure that the on-board computer does not fall off or become damaged.
Safety information relating to the navigation system
- Do not plan your routes whilst you are cycling. Stop and wait until you are stationary before entering a new destination. If you do not focus exclusively on the traffic, you risk being involved in an accident.
- Abandon your route if the navigation system suggests a path or road that is too ambitious, risky or dangerous for you based on your cycling ability. Have your navigation system propose an alternative route.
- Do not ignore any road signs, even if the navigation system tells you to take a specific route. The navigation system cannot take roadworks or temporary diversions into account.
- Do not use the navigation system in situations that are safety-critical or unclear (road closures, diversions, etc.). Always carry extra maps and means of communication with you.
Privacy notice
If the on-board computer is sent to Bosch Service because it requires servicing, the data stored on the on-board computer may be transmitted to Bosch.
Robert Bosch GmbH
72757 Reutlingen
Germany
www.bosch-ebike.com
Documents / Resources
References
Download manual
Here you can download full pdf version of manual, it may contain additional safety instructions, warranty information, FCC rules, etc.
Advertisement


Need help?
Do you have a question about the Kiox 300 and is the answer not in the manual?
Questions and answers