Advertisement
INTRODUCTION
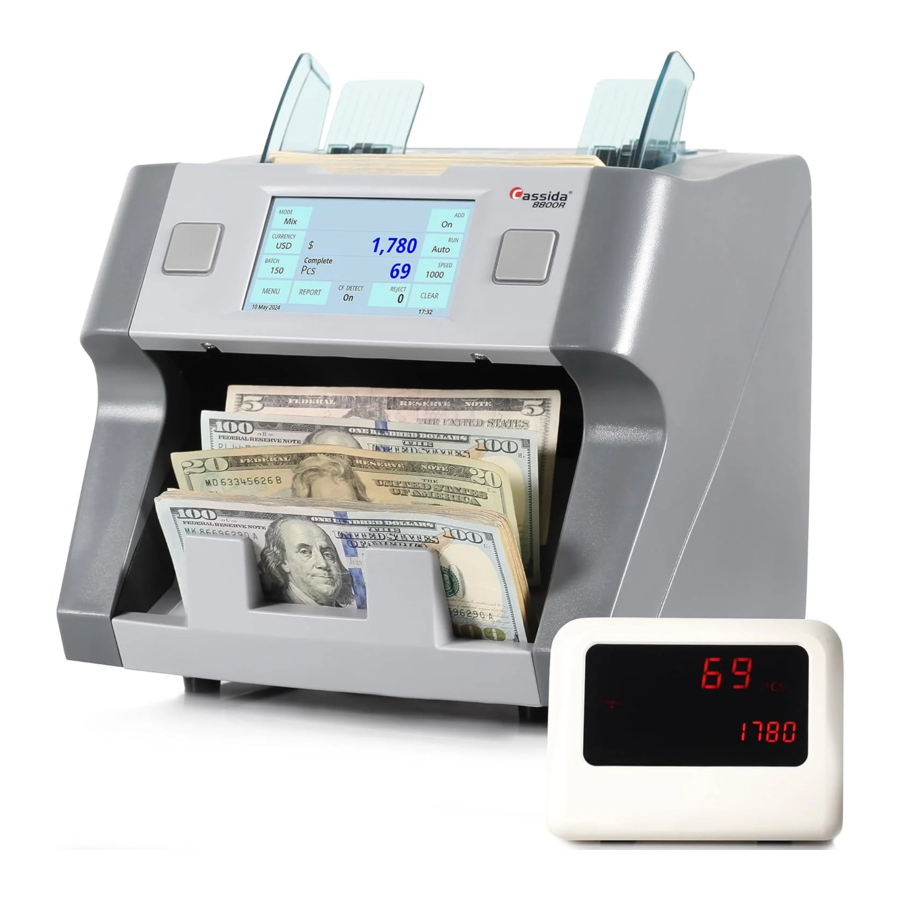
About the Cassida 8800R V2
The Cassida 8800R V2 is a 1-pocket bill counter, reader and sorter. It has a convenient touch control panel and display which offers best-in-class user experience with high level of performance.
The Cassida 8800R V2 comes with a variety of operating modes and functions: Mix, Sort, VSort, Count, Face, Orient, Add and Batch to meet all counting needs.
Box Contents
- Cassida 8800R V2 Bill Counter & Reader
- Power Cord
- User Manual (Use the QR code on the unit)
- Cleaning Brush
- Calibration Sheet (White Paper Card)
- External Display
Specifications
| Power supply | AC 100-240 V, 50/60Hz |
| Power consumption | ≤ 60W |
| Counting speed | up to 1,200 bills/min |
| Applicable bill thickness | 0.07-0.15mm |
| Hopper capacity | 500 bills |
| Stacker capacity | 200 bills |
| Batch range | 1 - 999 bills |
| Feeding system | Roller friction system |
| Display | Touch screen TFT, 4.3'' |
| Counterfeit detection | UV, MG, IR and 2 CIS |
| Ambient temperature | 32°F - 104°F (0° - 40°C) |
| Operating humidity | 40% - 90% |
| Size | 9.5'' x 10.5'' x 1 1'' (240mm x 266mm x 280mm) |
| Weight | 13 lbs (5.8 kg) |
Front View

- Bill Guides
- Hopper
- Hopper/Start Sensor
- Control Panel
- TFT Touch Screen
- Stacker
- Stacker Sensor
Rear View

- Carrying Handle
- Back Door Handle
- External Display Port
- USB Ports (RJ-1 1)
- Printer Port (RS-232)
- Power Switch
- Fuse
- Power Outlet
Control Panel and Touch Screen

| KEY | FUNCTION |
| Start or Stop the count or validate/confirm settings |
| Shows selected mode and enters mode menu |
| Shows selected currency and enters currency menu |
| Activates/Deactivates Batch function and shows set batch # |
| Enters the menu |
| Shows current date |
| Enters the report screen |
| Activates/Deactivates Add function |
| Auto/Manual count start |
| Shows selected counting speed and allows to change it |
| Resets the count |
| Shows current time |
| Shows rejected bills |
| Indicator that shows if counterfeit detection is ON/OFF |
| Shows total numbers of counted bills |
| Shows total value of counted bills |
GETTING STARTED
Powering Up
Ensure the hopper and stacker are empty. Attach power cable to rear of the machine, plug into a three-prong outlet and turn the power switch, located on the rear of the machine, to the ON position. The unit will load and conduct a power on self-test (POST). The screen will display "0" when the unit is ready to operate.
Loading the Hopper
In order to avoid jams and ensure proper operating speed of the machine, it is important to correctly load the hopper. Cassida recommends to not use more that 500 bills at a time and change to manual mode until the technique of loading bills is mastered. Follow the 3-step loading technique below to ensure smooth bill feeding.
- Make A Stack
Correct or remove bills that are severely wirnkled, damaged or folded. Square the bill stack.


- Load the Stack
Make sure the bill stack is square, as shown in the diagrams below. Cassida recommendeds that no more than 500 bills at a time be loaded into the machine.


- Feed the Bills
See diagrams below for proper bill feeding.


Carrying the Unit
To carry unit, simply lift up the carrying handle as shown on the right.

OPERATING MODES & FUNCTIONS
Auto & Manual Mode
After turning the machine on for the first time it will default to AUTO mode, and "AUTO START" will be displayed on the home screen. In this mode the machine starts counting automatically. To switch to MANUAL start count, press "RUN" button on the touch screen. If Manual mode is selected, "MANUAL" will be displayed in "RUN" button on the home screen.
If the machine is set to operate in MANUAL mode, it will stop counting automatically; to begin the count the START button must be pressed each time. To go back to AUTO mode press "RUN" button again on the touch screen, when "AUTO" is displayed, the unit is back to its default mode.
Mix Mode
After turning the machine on for the first time it will default to Mix mode, and "Mix" is displayed on the home screen.
Mix mode is used to count a stack of mixed denominations. To count mixed bills, follow the procedure described in LOADING THE HOPPER. The machine will start counting and will move the bills from the hopper to the stacker as it counts them. The machine will stop counting when the hopper is completely emptied. Total number of bills and total value will be displayed on the home screen. When the operation is completed, a detailed report can be viewed by pressing the "REPORT" button. of the rejected bills can be viewed by tapping "REJECT" on the touch screen.
To return to "Mix" mode from another mode, press the "MODE" button on the touch screen and choose "Mix" in the mode sub-menu screen.
Sort Mode
This mode is available by pressing the "MODE" button on the touch screen and choosing "Sort" in the mode sub-menu screen.

Sort mode "Auto" allows the user to count and sort bills by one denomination, which is automatically determined by the first bill scanned in the stack. If a bill passing through the machine does not conform to the denomination determined by the first bill, the machine will stop and prompt a removal of the bill that is different in denomination. This bill is not included in the total count. This feature ensures that there are no bills of other denominations in a large stack of single denomination bills. Sort "Auto" is the default option when the unit is in Sort mode.
When in Sort "Auto" mode, "Auto" will be displayed on the "SORT" button on the home screen next to the "MODE" button. Pressing this "SORT" button will return the user to the Sort sub-menu screen.

There is also an option to sort by one particular or multiple denominations by making the necessary selection in the Sort mode sub-menu. If one denomination is selected in Sort mode, it will be displayed on the "SORT" button on the home screen next to the "MODE" button. With this option selected, only the chosen denomination will be counted, and bills of different denominations will be rejected.

If multiple denominations are selected from the Sort sub-menu, "Multi" will be displayed on the "SORT" button on the home screen next to the "MODE" button. With this option selected, only the chosen denominations will be counted. Bills of different denominations will be rejected.

The total number of bills and total value will be displayed on the home screen. When operation is completed, a detailed report can be viewed by pressing the "REPORT" button. Report of the rejected bills can be viewed by tapping "REJECT" on the touch screen. To return to Sort mode from another mode, press the "MODE" button, on the touch screen and choose "Sort" in the mode sub-menu screen.
VSort Mode
This mode is available by pressing the "MODE" button on the touch screen and choosing "VSort" in the mode sub-menu screen.
VSORT mode allows the user to count a mixed stack of bills and separate them by denomination, similar to a cash register. This mode identifies the first bill in the hopper when the machine begins to count, and if a different denomination is detected, the machine stops and displays a message. The user must follow the instructions displayed on that message. Every time a denomination changes, the user must remove all bills from the stacker and separate them by denomination. When counting is finished, the user will have separated all bills into piles of each denomination. VSORT by default works with ADD mode, allowing the user to keep track of the total number of bills along with the total value displayed on the home screen.
When the operation is completed, a detailed report can be viewed by pressing the "REPORT" button. Report of the rejected bills can be viewed by tapping "REJECT" on the touch screen.
To return to VSort mode from another mode, press the "MODE" button, on the touch screen and choose "VSort" in the mode sub-menu screen.
Face Mode
This mode is available by pressing the "MODE" button on the touch screen and choosing "Face" in the mode sub-menu screen.
Face mode allows the user to sort bills based on whether they are loaded into the 8800R V2 face up or face down. The first bill in the hopper determines the sorting and counting orientation. If the first bill through the machine is facing up, the machine will count all bills facing up and stop every time the bills are facing down and display a message on the screen.
The bills that are facing the opposite direction will not be counted. Total number of bills and total value will be displayed on home screen. When the operation is completed, a detailed report can be viewed by pressing the "REPORT" button. Report of the rejected bills can be viewed by tapping "REJECT" on the touch screen.
To return to Face mode from another mode, press the "MODE" button, on the touch screen and choose "Face" in the mode sub-menu screen.
Orientation Mode
This mode is available by pressing the "MODE" button on the touch screen and choosing "Orient" in the mode sub-menu screen.
Orientation mode allows the user to count and sort bills by one of the 4 orientations. The first bill in the hopper determines the counting orientation. Any time a bill passes through the machine and does not conform to the orientation determined by the first bill, the machine will stop and display a message on the screen with the instructions to remove the nonconforming bill from the stacker. This bill will not be added to the count. Total number of bills and total value will be displayed on the home screen.
When the operation is completed, a detailed report can be viewed by pressing the "REPORT" button. Report of the rejected bills can be viewed by tapping "REJECT" on the touch screen.
To return to Orientation mode from another mode, press the "MODE" button, on the touch screen and choose "Orient" in the mode sub-menu screen.
Count Mode
This mode is available by pressing the "MODE" button on the touch screen and choosing "Count" in the mode sub-menu screen.
Count mode allows the user to simply count the total number of bills. It does not recognize or record the denomination of any bills. In the Count mode, the counterfeit detection is deactivated.
To return to Count mode from another mode, press the "MODE" button, on the touch screen and choose "Count" in the mode sub-menu screen.
Add Function
This function is available by pressing the "ADD" button. When the ADD function is activated "On" will be displayed on the home screen.
In this function, the unit will count multiple stacks of bills while keeping track of the total amount and value of bills counted. Place the first stack of bills to be counted into the hopper. The number and value of bills will be displayed on screen. When ready to count the next stack of bills, empty the stacker and add the new stack to be counted into the hopper. The unit will continue counting and add the new count to the total. When the operation is completed, a detailed report can be viewed by pressing the "REPORT" button. Report of the rejected bills can be viewed by tapping "REJECT" on the touch screen.
To exit the ADD function, press the ADD button again.
When the ADD function is activated "Off" will be displayed on the home screen.
Batch Function
This function is available by pressing the BATCH button. An additional screen will pop up allowing to enter the batch size on it. When the BATCH function is activated, batch size is displayed on the home screen.
Batch function allows to set a specific target number of bills to be counted. The unit will continue running until the specified target number of bills is reached in the stacker, regardless of whether additional bills remain in the hopper. Upon reaching target batch size the unit will stop and display a "Complete" message along with the number of bills counted. Once the stacker is emptied, the unit will automatically proceed to count next batch. If the hopper runs out of bills before a batch is completed, the unit will display "Incompete". User may then add bills to the hopper to complete the batch or remove the incomplete batch from the stacker.
To exit the BATCH function, press the BATCH button.
An additional screen will pop up showing the number in the "BATCH AMOUNT" box.
Press "CLEAR" button to reset the batch amount to 0 and then press "OK" button.
"Off" will be displayed on the home screen.
Add + Batch Function
This function batches the desired quantity of bills and monitors the running total at the same time. To activate this function, press the ADD and BATCH button. When the ADD and BATCH functions are activated "On" will be displayed under the "ADD" button and batch size under the "BATCH" button on the home screen
To exit the ADD+BATCH follow the function exit instructions described in sections Add Function and Batch Function.
Currency Function
"CURRENCY" function allows to choose different currencies supported by machine. The currency sub-menu screen with the list of availbale currencies USD, CAD, MXN, BRL, ARS, COP, VES, RUB, GBP, EUR can be entered by pressing the "CURRENCY" button on the touch screen.
Multi-Currency Function
"MULTI-CURRENCY" function allows to count a stack of mixed currencies. This function can be activated by pressing "CURRENCY" button on the touch screen and choosing "Multi" in currency sub-menu screen. The unit can automatically detect and handle up to 5 mixed currencies (USD, CAD, MXN, EUR and GBP) at a time. The total number of bills and total value for each currency will be displayed on the home screen.
Auto-Currency Function
"AUTO" function allows users sort and count individual currencies out of stacks of mixed currencies. This function can be activated by pressing"CURRENCY" button or the function choosing "AUTO" in currency sub-menu. The currency of the first bill in the hopper determines the sorting and counting currency type for the entire stack. Report of the rejected bills can be viewed by tapping "REJECT" on the touch screen.
Speed Function
"SPEED" function gives users the ability to modify the counting speed of the unit. To change the counting speed, press the "SPEED" button on the touch screen. In the "MIX", "SORT", "DSORT", "FACE", and "ORIENT" modes, speed settings can be adjusted to either 800 or 1000 bills per minute. In "COUNT" mode, there is a broader range of speed options, including 800, 1000, and 1200 bills per minute.
AFTER-COUNT FUNCTIONS
Report
This function is available by pressing the REPORT button. It provides an on-screen report of the total amount of each denomination counted, the value of the counted bills of that denomination, and a grand total value of all bills counted.
Serial Number Report
This function is available by pressing the REPORT button and "DETAIL" button when in the report screen; it provides an on-screen report of each bill counted with its serial number and denomination.
This function is available by pressing the "PRINT" button while in the report screen. If a printer is connected to the machine, a detailed printout of the counting report will be produced.
Cassida recommends using the Universal Cash Handling Thermal Printer that comes with all the necessary cables to work with Cassida's products.
The Cassida 8800R V2 has a printer port in the back on the machine (RS-232 Port), refer to section VIEWS OF THE CASSIDA 8800R V2 to see its location.
Ensure the printer power is ON before printing. (*Printer is not included)
Menu
The Menu can be accessed by pressing the MENU button. To navigate and choose desired settings in submenu touch needed button on the touchscreen.
| Sub-Menu | Description |
| DATA & TIME | Sets the date & time displayed on the home screen and printed reports |
| OLD USA | Accept/reject non-circulation (small portrait) bills |
| PRINTING | Access printing settings |
| BEEP | Key beep: beeping that acknowledges user inputs (pressing control panel buttons or items on the touchscreen) |
| SLEEP | Sets the sleep mode downtime |
| SERVICE | Opens service sub-menu. Password: 6666 |
| Opens calibration options screen |
| Sets the sensitivity for each detection sensor. Note that the optimum sensitivity values are preset by default. |
| Displays the total number of bills counted and other usage-related data. |
| Displays the last image of the bill run through the unit |
| Displays sensor data. Helps to understand which sensor needs attention |
| Displays sensor waveforms. Helps to understand which sensor needs attention |
| Runs diagnostics to check for possible malfunction |
| Opens the screen with options to save bills images |
| RESET | Resets all settings to their default values |
| ABOUT | Displays hardware and software version information |
DETECTION FEATURES
Counterfeit Detection
The Cassida 8800R V2 is able to identify bills suspected of being counterfeit using:
- Ultraviolet (UV) light detection system
- Magnetic (MG) ink detection system
- Infrared (IR) anti-counterfeit detection system
- Contact Image Sensor (CIS)
These features are available by default.
When a suspect bill is detected, the unit will beep three times and display a UV SUSPECT, MG SUSPECT or IR SUSPECT message with instructions on the screen. The suspect bill will not be added to the count.
Please note that a suspect UV, MG or IR bill does not necessarily mean that the bill is counterfeit. There are several reasons a genuine bill may be recognized as counterfeit. Possible reasons for a bill to be indicated as suspect include: direct sunlight exposure, worn out bill, excessively dirty bill or advanced counterfeiting techniques used to produce the bill. Separate equipment may be required to determine definitively whether a note is counterfeit.
Half Note Detection
The Cassida 8800R V2 incorporates image sensors that notify users if a half note passes through the counting mechanism. This feature is activated automatically in all modes.
If the unit detects a half note, it will beep and display a HALF NOTE message with instructions on the screen. To clear the error, all bills must be removed from the stacker. To avoid miscount, bills need to be recounted.
Double Note Detection
Bills may stick to each other due to excessive dirt, folding or various other reasons. The Cassida 8800R V2 uses infrared light-based technology to determine whether two bills are stuck together. This feature is active automatically in all modes.
If a double bill is encountered the unit will beep and display a DOUBLE message with instructions on the screen. To clear the error, all bills must be removed from the stacker. To avoid a miscount, bills need to be recounted.
Chain Note Detection
The Cassida 8800R V2 utilizes a self-checking system that alerts the user in cases when several notes pass through the counting mechanism at once. This feature is activated in all modes.
If the unit detects a chain error, it will beep and display a CHAIN message with instructions on the screen. To clear the error, all bills must be removed from the stacker. To avoid miscount, bills need to be recounted.
Contact Image Sensor
The Cassida 8800R V2 utilizes a contact image sensor, (CIS), to recognize the value of the bill. This feature is activated in MIX, SORT, VSORT, FACE and ORIENT modes.
If the unit is unable to recognize the bill, it will beep and display an IMAGE message with instructions on the screen. To clear the error, the suspect bill must be removed from the stacker. Please note that suspicious bills are not added to the count.
MAINTENANCE
 ATTENTION: Always POWER OFF unit and disconnect from power source before cleaning
Most operational problems can be avoided by regular care and preventative maintenance. Taking regular care of the Cassida 8800R V2 will significantly increase its lifetime.
To avoid problems, make sure there are no metal clips, staples, or rubber bands in the bills being counted. Be sure to follow the proper procedure for loading the hopper, refer to section Loading the Hopper. Also be sure to follow the proper procedure for adjusting the feed gap, refer to section Feed Gap Adjustment.
For best results, it is recommended to use an air duster and a soft bristle brush to remove any dust or debris from the interior of the unit.
Dirty sensors can affect the Cassida 8800R V2's performance and cause genuine bills to be rejected. It is suggested that the user performs weekly maintenance on the unit to maintain top performance.
- To avoid malfunction caused by foreign objects, please clean your machine frequently
- Clean Hopper and Stacker sensors with the provided soft bristle brush or a dry cloth frequently
- Clean CIS line with provided soft bristle brush or a dry cloth frequently
- Clean all other sensors with provided soft bristle brush or a dry cloth frequently
- Rubber rollers may be cleaned with a slightly damp cloth. If available use a small amount of isopropyl alcohol to dampen the cloth and clean the rollers. Wait until the rollers completely dry before turning on the machin.

- Hopper Sensor
- Stacker Sensors
- Upper Sensors Block
- Lower Sensors Block
Feed Gap Adjustment
Feed gap adjustment of the unit is always performed before shipment. However, feed gap adjustments may be required periodically. The rubber components in the feed mechanism will wear over time, causing the feed gap to get larger. This can lead to Double or Half Note errors. On the other hand, if the feed gap is adjusted too tight, this can lead to Chain errors or bill jamming. To adjust the feed gap properly, you will need a flathead screw driver (not included).

- Ensure the machine is turned off
- Locate the feed gap adjustment screw (see diagram to the right) on the top right of the machine.
![]()
-
- In case of Chain errors or bill jamming loosen the feed gap by turning the knob clockwise towards the "+" mark. Adjust 1 mark, then re-test the machine. Repeat if necessary.
![]()
- In case if more than one bill is being pulled into the feed mechanism and Double or Half Note errors, tighten the feed gap by turning the knob counterclockwise towards the"-"mark. Adjust 1 mark, then re-test the machine to see if the problem is corrected. Repeat if necessary.
![]()
- In case of Chain errors or bill jamming loosen the feed gap by turning the knob clockwise towards the "+" mark. Adjust 1 mark, then re-test the machine. Repeat if necessary.


Calibration Procedure
The contact image sensor (CIS) and infrared sensors (IR) within the unit are precisely calibrated at the factory. However, with regular use, the sensor's sensitivity may alter, potentially causing False errors. To address this, the unit can be re-calibrated using the white calibration card (white laminated paper) provided with the product. Please follow the steps below to calibrate the sensor:
- Ensure the machine is turned on
- Use the control panel to navigate by pressing "MENU" then select "SERVICE" buttons. When prompted, enter the password "6666", followed by selecting "CALIBRATION."
- Rotate the 8800R V2 to the back.
- Pull back door handle to get access to sensor blocks. When inside, get access to upper and lower sensor block with CIS sensors. Put provided laminated calibration card between the two sensor blocks.


- Carefully proceed to close the back door with the calibration card inside the machine.
- Turn the machine around and press the "START" button to start the calibration process.
- Calibration will begin and the calibration screen will display a message "In Progress".
- Upon seeing the "CIS Calibration Successful!" message, turn off the unit, reopen the back panel door, and carefully remove the calibration card.
- Reset the machine by turning it off, then on.
- The CIS calibration is done
- The same steps must be taken for the UV + IR calibration process.
Troubleshooting
Error message display:
| Error Message | Cause | Solution |
DOUBLE ERROR | The thickness of the last counted note is out of range of expected thickness. Two or more bills may be stuck together. | Remove all bills from stacker. Re-count. If excessive errors occur, ensure:
|
CHAIN ERROR | Two or more notes have passed through the unit at the same time. | |
HALF ERROR | A half bill was detected. | |
VALUE CHANGE | The last counted bill has a different denomination. | Machine is in SORT or VSORT mode. Follow instructions on the screen. |
SUSPICIOUS BILL | Unable to recognize bill (IMAGE), size of the bill is out of normal range (SIZE) or missing counterfeit magnetic (MG), ultraviolet (UV) or infrared (IR) features. | Remove last bill from stacker. The bill is not added to count. If excessive errors occur, ensure:
|
SIZE SUSPECT | The size of the bill is out of range. | |
HOPPER SENSOR ERROR | Hopper sensor reading out of range. The foreign object covering the hopper sensor. | Remove bills or foreign objects from the hopper. Clean Hopper sensor (ref. section Maintenance). |
STACKER SENSOR ERROR | Stacker sensor reading out of range. The foreign object covering the stacker sensor. | Remove bills or foreign objects from the stacker. Clean Stacker sensor (ref. section Maintenance) |
ERROR: MACHINE JAMMED | Bills or foreign objects stuck inside the machine. | Open the back door and remove the stuck bills or foreign objects. Ensure the detection block is securely back in position and close the back door. (ref. section Maintenance). |
Other possible errors:
| Error Message | Cause | Solution |
LOWER LEFT COUNTING SENSOR | Issue with the lower left counting sensor. | Clean the sensor. See section Maintenance for location of sensors. |
UPPER LEFT COUNTING SENSOR | Issue with the upper left counting sensor. | Clean the sensor. See section Maintenance for location of sensors. |
ENCODER SENSOR | Issue with the encoder sensor. | Restart the machine. Make sure rollers are turning and nothing prevents them from turning. If not resolved contact Cassida technical support. |
| START SENSOR | Issue with the start sensor. | Clean the sensor. See section Maintenance for location of sensors. |
| BACK DOOR OPEN | Back door not securely closed or there is a foreign object covering the sensor. | Ensure back door is closed. Press start to continue. |
| UNIT DOES NOT TURN ON. | Power cord is not properly connected. issue with the fuse | Insure the power cord is properly connected. Replace the fuse at the back of the machine. If issue persist contact tech support |
| UNIT FAILS TO DETECT COUNTERFEIT BILLS. | Unit could be in a Count mode Sensors may have collected dust | Check the selected mode. Clean the sensors or refer to the Maintencense section for the instructions |
| INACCURATE COUNTING. | Bills are improperly loaded in the hopper. Feed gab issue | Bills should be loaded into the hopper correctly (ref. section "LOADING THE HOPPER").The feed gap needs adjustment (ref.section "FEED GAP ADJUSTMENT"). |
| BILLS ARE JAMMED. | Bills were incorrectly inserted into the hopper (refer to section Loading the Hopper). Feed Gap is not adjusted properly (refer to section Feed Gap Adjustment). | Turn off the machine. Remove any jammed bills by turning rollers or wheels manually if necessary. Look for any foreign objects inside the unit (paper clips, rubber bands, etc.). Remove foreign objects, if any. Ensure: Bills are loaded properly (refer to section Loading the Hopper) Feed Gap is adjusted properly (refer to section Feed Gap Adjustment) |
Contact Information
Technical Support Contact Information:
Email: support@cassidausa.com
Phone: 1-888-800-0303 option 1 then 2
If you need to contact Cassida Technical Service Center, please have the following information with you:
- Product Model: Located on the back of the machine.
- Serial Number: Located on the back of the machine.
- Nature of the Problem: What happened, and when did it happen?
Did the machine display an error message? - Steps Taken: Steps already taken to resolve the problem, and the results (if any)
Important Safety Notes
This manual contains important information on safety measures and operational features. Please read it carefully before operating your bill counter and reader, and keep it for future reference. While every effort has been made to include all features into this user manual, specifications stated may not reflect all the features of the later software versions. If you have questions about your Cassida 8800R V2 and its operation, please contact technical support at www.CassidaUSA.com/support
 |  |  |  |
| CHOKING HAZARD. SMALL PARTS. Not for children under 3 years old. |  RISK OF ELECTRICAL SHOCK. This equipment is to be serviced by trained personnel only. | DO NOT DISPOSE IN TRASH. Follow appropriate local electronics scrap procedure. |  HAZARDOUS MOVING PARTS Do not place fingers, hair, clothes, lanyard... near moving parts. |
When using this unit, basic safety precautions should always be observed, including the following:
- Do not use this unit in areas where it may be exposed to water or any other liquids
- Only use the power cord supplied with the machine. Plug the power cord into a properly grounded wall outlet. Do not remove the ground pin from the power cord. Failure to properly ground the machine can result in severe injury or fire.
- Make certain the unit is installed on a flat surface. Do not operate the machine in areas with high temperature, humidity or smoke, as these conditions may prevent proper operation.
- This unit is designed for indoor use in a ventilated environment. Keep the machine away from direct sunlight and strong magnetic fields. These could interfere with the counterfeit detection sensors.
- When not using the unit for an extended period of time, disconnect the power cord from the wall outlet.
- Unplug the unit from the wall outlet before cleaning. Use a damp cloth or specifically designed maintenance accessories such as an air duster, soft bristle brush, or cleaning cards.
- To avoid the risk of electrical shock, do not disassemble this unit. Disassembly will expose you to dangerous voltages and other safety risks. Incorrect reassembly can cause electrical shock when the appliance is subsequently used.
- Take the unit to a qualified technician when service or repair is required. Do not try to replace any parts yourself, unless assisted by a Cassida Technical Service Center. Supplied spare parts are intended for use by qualified personnel only.
Documents / Resources
References
Download manual
Here you can download full pdf version of manual, it may contain additional safety instructions, warranty information, FCC rules, etc.
Advertisement


Need help?
Do you have a question about the 8800R V2 and is the answer not in the manual?
Questions and answers