Cassida C300 Manual
- User manual (15 pages) ,
- Cleaning procedure (5 pages) ,
- User manual (52 pages)
Advertisement
Introduction
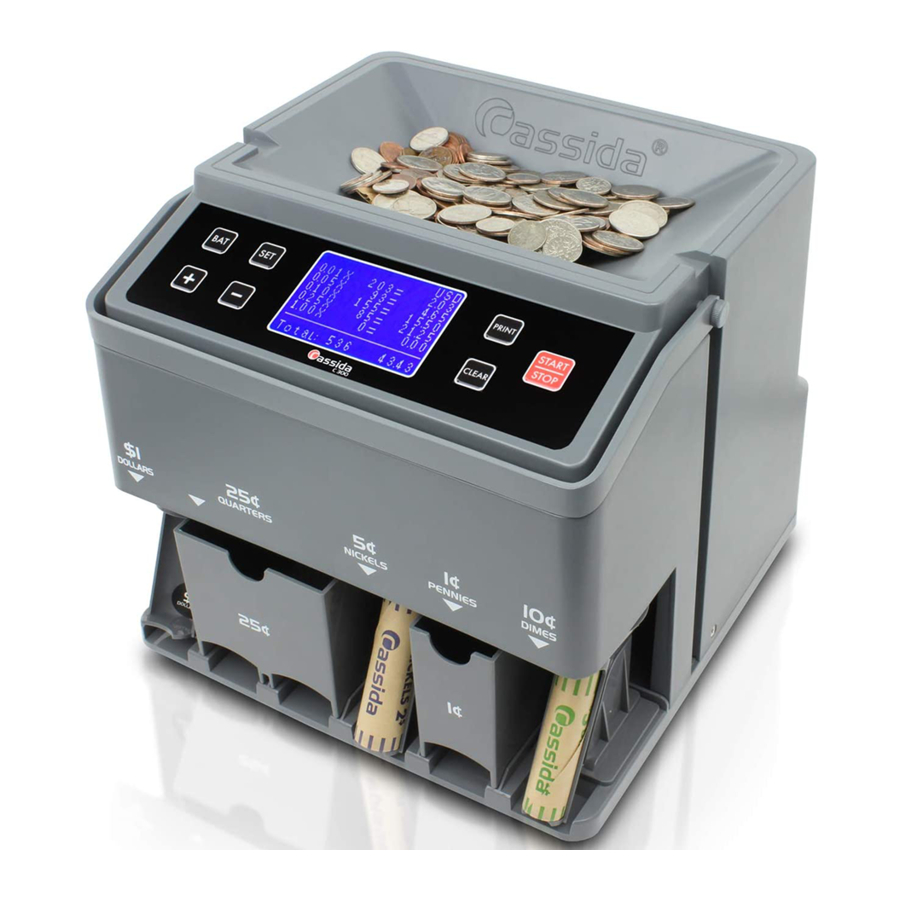
About the Cassida C300
The Cassida C300 is a multi-functional coin processing machine which incorporates all the features of a professional coin counter, sorter and wrapper at a very affordable price. Its large hopper is capable of holding 1,900 coins (Dimes) and the coin trays can each accumulate up to 850 coins (Dimes) for the larger tray and 400 coins (Dimes) for the smaller trays.
New innovative coin tubes are designed for quick loading and unloading. Wrapping coins just became faster and easier with the C300.
Displaying the subtotal for each denomination and the total value on a large 3.4'' LCD screen make the Cassida C300 an easy all-in-one tool for any coin handling needs. The Cassida C300's lightweight, compact and stylish design will easily fit into your business environment.
This manual contains important information on safety measures and operational features of the Cassida C300 Coin Counter, Sorter and Wrapper. Please read it carefully before operating your machine and keep it for future reference.
While every effort has been made to include all features into this user manual, specifications stated may not reflect all the features of the later software versions.
If you have questions about your Cassida C300 and its operation, please contact technical support at www.cassidausa.com/support.
Box Contents
- Cassida C300 Automatic Coin Counter Sorter and Wrapper
- User Manual
- Cleaning Cloth
- Coin Trays (vary by country)
- Coin Tubes (vary by country)
Specifications
| Hopper capacity | Up to 1,900 coins (varies for each currency) | ||
| Coin tray capacities | Denomination | US model | Other countries |
| $1 | 120 | (denominations and capacities vary by country) | |
| 25¢ | 385 | ||
| 10¢ | 400 | ||
| 5¢ | 210 | ||
| 1¢ | 400 | ||
| Batch range | 0-999 coins | ||
| Display | 3.4'' LCD | ||
| Dimensions | 279mm (w) x 288mm (h) x 265mm (d) 11" (w) x 11.3" (h) x 10.4" (d) | ||
| Weight | 3.6 kg (7.9 lbs) | ||
| Counting speed | up to 300 coins/minute | ||
| Input power | 110 VAC / 60 Hz or 220 VAC / 50Hz (refer to input power label on rear of this unit) | ||
| Power consumption | 45 watts maximum | ||
| Ambient temperature | 0ºC - 40ºC (32ºF - 104ºF) | ||
| Ambient humidity | 30 to 80% | ||
Front and Rear Views

- Control Panel
Controls the operation of the unit. - Coin Hopper
Holds coins that need to be counted. - Coin Trays
Each tray holds a specific denomination of counted and sorted coins. - Plastic Housing
Each coin tubes hold a specific denomination of counted and sorted coins. - Carrying Handle
Helps to carry the unit. - Power Switch
Turns the machine on and off. - Printer Port
Connects to serial printer (RS-232). - Power Cord
Connects to a power outlet.
Control Panel

| Name | Function |
| BAT | Enter batch screen and select preset batch quantities (0, 10, 20, 25, 50, 80, 100, 120, 150, 200, 300, 400, 500, 600, 700, 800, 900) |
| SET | Select denomination to set batch quantity |
| + (Plus) |
|
| - (Minus) |
|
| Print the value and the quantity of coins on the screen | |
| CLEAR | Clear the value and the quantity of coins on the screen |
| START/STOP | Start or stop operation of the machine |
GETTING STARTED
Powering Up

Before turning on the Cassida C300, make certain no coins are present in the coin hopper, otherwise this will cause an "EA" error when the C300 self-test is performed. To clear the "EA" error, press the "START/STOP" button, then empty any coins present in the coin trays.
Plug the power cord attached to the C300 into a three-prong outlet. Turn on the power switch located on the rear of the unit. The machine will conduct a self-check. The main display will show the report screen when the test has been successfully completed.
Counting
The C300 always operates in a batching mode by default. To enable simple counting, all batch quantities need to be set to zero. To set batch quantities to zero, press and hold the "-" button for approximately three seconds until "C" is displayed on the top left corner of the LCD display.
- Before loading the hopper, make sure there are no uncounted coins remaining in it from the previous count.
- To count coins, place them into the hopper and press the "START/STOP" button.
- The C300 will start counting and will automatically sort all coins into the appropriate coin trays or tubes.
- The machine will automatically stop when all coins in the hopper are counted or if the batch quantity for any coin denomination is reached.
- To stop the machine, press the "START/STOP" button.
- To resume counting, press the "START/STOP" button.
- When a coin tray becomes full, stop the machine and empty the tray to ensure correct machine operation. Stopping the machine will not alter or reset the count. You can continue counting by pressing the "START/STOP" button.
- As it counts, the Cassida C300 will automatically display the total value of counted coins and the breakdown by denomination on the screen.
- To reset the coin count before starting a new batch, press the "CLEAR" button.
Adding
The C300 operates in ADD mode by default. In ADD mode, the coin count is added to the count from previous batches. To start a new count, press the "CLEAR" button. This will reset the coin count to zero.
Setting Batch Quantities
Each denomination can be assigned a batch quantity.
- Setting batch quantities for coin rolls
- Press and hold the "+" button for approximately three seconds until "L" is shown on the display. This automatically programs each coin denomination for bank coin roll amounts as follows:
| Denomination | Quantity |
| $2 | 25 (Canadian model only) |
| $1 | 25 |
| 25¢ | 40 |
| 10¢ | 50 |
| 5¢ | 40 |
| 1¢ | 50 |
 NOTE: (Other countries denominations and capacities vary by country)
- Setting batch quantities for coin trays
- Press and hold the "SET" button for approximately three seconds until "H" is shown on the display. This automatically programs each coin denomination for coin tray amounts as follows:
| Denomination | Quantity |
| $1 | 100 |
| 25¢ | 350 |
| 10¢ | 400 |
| 5¢ | 200 |
| 1¢ | 350 |
NOTE: (Other countries denominations and capacities vary by country)
- Setting other batch quantities
- Press the "BAT" button to access the batch screen.
- Press the ''SET'' button to select a desired denomination to batch.
- To assign a batch quantity for this denomination press the "BAT" button until the desired batch quantity appears on the display (0, 10, 20, 25, 50, 80, 100, 120, 150, 200, 300, 400, 500, 600, 700, 800, 900).
- Fine adjustments to batch quantity can be made by pressing the "-" or "+" button.
- Repeat this procedure to set the desired batch quantities for other coin denominations.
- Once all denominations are set, press the "START/STOP" button to start counting.
NOTE: The C300 will stop when a desired batch quantity is completed for any of the denominations. ''BAT FULL'' will be displayed on the top left corner of the screen and the denomination line will be blinking.
- To resume counting, press the "START/STOP" button.
- Pressing the "CLEAR" button twice will reset the count and the machine will start batching from zero.
NOTE: When operating in batch mode, the C300 will keep a running total for each denomination coin. For example, after four batches of 50 pennies have been dispensed, the C300 will stop and display:

The batch quantities you choose will be stored in the C300's internal memory and will not be reset when the machine is turned off. However, the count will be reset if the machine is turned off.
Clearing Batch Quantities
There are two ways to clear the batch quantities:
- Press and hold the "-" button on the report screen for approximately three seconds. The C300 will then beep and display a "C" message on the screen, indicating all batch quantities have been reset to zero.
- Press the "BAT" button to access the batch screen, then ''SET'' to select a desired denomination to reset. Press the '"CLEAR"' button to clear the batch quantity or press and hold the "CLEAR" button on the report screen for approximately three seconds to clear all batch quantities.
Using the Coin Tubes
The C300 coin tubes allow you to sort coins directly into preformed paper bank roll wrappers. For optimum operation, we strongly recommend using Cassida's preformed coin wrappers.
To use the coin tube attachments, perform the following steps:
- Remove the coin tray(s) for the denomination coins that will be using coin tubes.
- Insert the appropriate preformed paper wrapper completely into the tube with the crimped side on the bottom.
![]()
Figure 1 - Coin roll inserted into coin tube
![]()
Ensure the wrapper is completely inserted so that the paper is touching the bottom of the tube as shown in Figure 1. - Ensure that the wrapper shape is round, and the upper tip is not bent over so coins can easily fall into the tubes.

Figure 2 - Check wrappers - Secure the coin tubes to the C300 by gently sliding each tube into the proper slot at the base of the machine as shown in Figure 3 and 4.

Figure 3 - Installing coin tube

Figure 4 - Coin tube in proper position


NOTE: Coin tube slots for each country varies. Use coin denomination labels to help you place the coin tubes. Coin tubes should be placed exactly underneath the coin denomination label arrow.
- Set coin roll batch quantities (see "Setting Batch Quantities" section) for each coin denomination by pressing and holding the "+" button for approximately three seconds until "L" is shown in the display. This programs each coin denomination for standard bank coin roll sizes.
- Load coins into the coin hopper and press the "START/STOP" button. The C300 will automatically dispense the correct number of coins into each coin tube.
- When the number of dispensed coins equals the batch quantity for any denomination, the C300 will stop and display 'BAT FULL'' on the top left corner of the screen with the line of the denomination blinking.
- Remove the full coin wrapper from the coin tube and crimp the open end of the wrapper.
- Insert a new wrapper while making sure the crimped side is inserted completely on the bottom and the upper end is not bent.
- Press the "START/STOP" button to continue batching.
QUICKLOAD™ Coin Tubes: There is no need to remove the coin tubes from the slot to change a wrapper. Use the large opening to simply slide in and out the wrappers and save time.
Printing

The C300 has a printer port located on the back of the machine; refer to section FRONT AND REAR VIEWS to see its location.
This function is available by pressing the ''PRINT'' button while on the report screen showing all the counts. If a printer is connected to the machine, a detailed printout of the counting report will be produced.
Cassida recommends using the Universal Cash Handling Thermal Printer that comes with all the necessary cables to work with Cassida's products.
Maintenance
ATTENTION: Always power off unit and disconnect from power source before cleaning
Most operational problems can be avoided with regular care and preventive maintenance. Taking regular care of your coin sorter will significantly increase its lifetime and help you avoid costly repairs.
To get the best results out of your machine, the following maintenance is recommended on a regular basis:
- Clean all external parts of the machine with a Cassida air duster or a soft cloth.
- Remove the three housing screws and carefully lift up the housing.
- Remove any foreign objects from the distribution plate.
- Vacuum or use the air duster to clean the dust left in the distribution plate.
- Clean all sensors using a Cassida air duster followed by a CleanPro swab (or a microfiber cloth lightly moistened with isopropyl alcohol).
- Running sensor
- Counting sensors
CLEANING PROCEDURE
Dirty sensors can affect the overall performance of the Cassida's C300, which can lead to a variety of errors such as E1 to E9 and EA codes. We at Cassida suggest performing weekly cleaning on the unit to maintain top performance.
STEPS
- Turn the power switch off and disconnect the power cord from the outlet.
- Using a Phillips screwdriver, remove the three screws located at the bottom edge of the housing, that secure it. The picture below shows the location of the three screws:

![]()
Use at your own risk, Cassida is not responsible for any damage to the unit and/or electronics when performing the cleaning procedure. - Remove the housing by slowly lifting straight up. Be aware, two cables will remain attached to the housing.

![]()
Do not pull or twist the cables.
Count Sensor Cleaning (E1 to E8 Error Troubleshooting). - Refer to the pictures below to locate counting sensors (one dark, one clear) positioned at the top of the coin discharge chutes which are placed under the distribution wheel.


- Using a special cleaning swab (or a microfiber cloth/swab lightly moistened with isopropyl alcohol), clean the round end of each pair of counting sensors in each coin path. Next inspect the coin discharge paths for any debris that might be obstructing the sensors (paper coin tube wrappers, etc.).
- Check if the sensors are aligned, if not, straighten them up gently. Too much force can damage the sensors.
Run Sensor Cleaning (E9 Error Troubleshooting)


- Locate the run sensor pair.

- Gently wipe the run sensor pair with a special cleaning swab (or a microfiber cloth/swab lightly moistened with isopropyl alcohol).
- Check if the sensors are aligned, if not, gently straighten them up. Too much force can damage the sensors.
EA Error Troubleshooting - Inspect the interior of the machine. Remove coins or any other foreign objects that may be preventing the coin platter from rotating.
![]()
- Clean the dust from the distribution wheel and sensors using an air duster. Spray the air duster from left to right in a circular motion as shown below. Intensify the spraying around sensors.
* Be cautious and always keep the nozzle 1-2 inches away from the unit.

- Reinstall the housing. Housing must be properly lined up with the AC power cord and power switch at the back of the machine. Do not force the housing while placing it back, as this could damage the coin feed mechanism built into the housing.

- Reinstall all three cover screws removed in "Maintenance and Troubleshooting" Section, Step 2.

- Ensure all cleaned parts are dry of the cleaning agent prior to use.


Troubleshooting
Error message display
| Error code | Cause | Corrective action |
 | A counting sensor may have collected dust, or is obscured by a foreign object. | Clean the counting sensor using a Cassida air duster and CleanPro swab (refer to Maintenance section, step 4-6.). Inspect coin outlet openings for possible foreign material that may be present (rubber bands, paper, etc.). |
 | Run sensor does not detect rotation of the coin platter. | Clean the running sensor (refer to Maintenance section, step 7-9.). If the error persists, contact Cassida Technical Support. |
 | Coins present in the hopper when the machine/distribution wheel is turned on or defective coin sensor. | Press the "START/STOP" button to clear the error. Empty any coins in coin trays back into the hopper. Inspect the interior of the machine for possible foreign material that may be preventing the coin platter from rotating (refer to Maintenance section, step 10.). If the error persists, contact Cassida Technical Support. |
Other possible errors
| Problem description | Cause/Action |
| Does not function after the unit has been turned on. | Ensure the power cord is connected properly. Unplug the machine from any power source and replace the fuse (F2AL250V) located on the bottom of the machine. |
| Inaccurate counting. | Clean counting sensors using a Cassida air duster and CleanPro swab (refer to Maintenance section). |
| Coins are jammed. | Turn off the machine. Remove the three housing screws and carefully lift up the housing (refer to Maintenance section). Remove any foreign objects or coins from the distribution plate (refer to Maintenance section). Turn the unit on and restart counting. |
Contact information
Technical Support Contact Information:
Email: support@cassidausa.com
Tel: (888) 800-0303
Please have the following information with you before contacting Cassida Technical Service Center:
- Product Model: Located on the back side of the machine.
- Serial Number: Located on the bottom of the machine.
- Nature of the Problem: What happened, and when did it happen? Did the machine display an error message?
- Steps Taken: Steps already taken to resolve the problem, and the results (if any).
Important Safety Notes
- CHOKING HAZARD. SMALL PARTS. Not for children under 3 years old.
![]()
RISK OF ELECTRICAL SHOCK.
This equipment is to be serviced by trained personnel only.- DO NOT DISPOSE IN TRASH. Follow appropriate local electronics scrap procedure.
![]()
HAZARDOUS MOVING PARTS. Do not place fingers, hair, clothes, lanyard... near moving parts.


When using this unit, basic safety precautions should always be observed, including the following:
- Do not use this unit in areas where it may be exposed to water or any other liquids.
- Only use the power cord supplied with the machine. Plug the power cord into a properly grounded wall outlet. Do not remove the ground pin from the power cord. Failure to properly ground the machine can result in severe injury or fire.
- Make certain the unit is installed on a flat surface. Do not operate the machine in areas with high temperature, humidity or smoke as these conditions may prevent proper operation.
- Do not start the unit when the rear access panel is open. Ensure no coins are in the hopper when the machine is first turned on.
- When not using the unit for an extended period of time, disconnect the power cord from the wall outlet.
- Unplug the unit from the wall outlet before cleaning. Use a damp cloth or specifically designed maintenance accessories such as the Cassida air duster or soft bristle brush.
- To avoid the risk of electrical shock, do not disassemble this unit. Disassembly will expose you to dangerous voltages and other safety risks. Incorrect reassembly can cause an electrical shock when the appliance is subsequently used.
- Take the unit to a qualified technician when service or repair is required. Do not try to replace any parts yourself.
Documents / Resources
References
Download manual
Here you can download full pdf version of manual, it may contain additional safety instructions, warranty information, FCC rules, etc.
Advertisement


Need help?
Do you have a question about the C300 and is the answer not in the manual?
Questions and answers