Table of Contents
Advertisement
Available languages
Available languages
Quick Links
Installation and Operating Manual
Warmhaltebecken
Serien RCTHW2
Installations- und Bedienungshandbuch
P 15
Registrieren Sie sich online!
Puits Chauffant
Séries RCTHW2
Manuel d'installation et d'utilisation
P 43
S'inscrire en ligne!
Warmhoudbak
Modelreeksen RCTHW2
Handleiding voor Installatie en Bediening
P 70
Registreer online!
P/N 07.04.1050.00
HEATMAX
Heated Wells
RCTHW2 Series
For
and Non-
Original Instructions
Instrucciones originales
Instructions originales
Originalanleitung
Istruzioni originali
Vertaling van de
originele instructies
®
Models
Contenedores Térmicos
Series RCTHW2
Manual de Instalación y Operación
¡Regístrese en línea!
Pozzo Riscaldato
Serie RCTHW2
Manuale per l'installazione e l'uso
Registratevi online!
P 29
P 57
© 2025 Hatco Corporation
Advertisement
Chapters
Table of Contents

Related Manuals for Hatco HEATMAX RCTHW2 Series


Summary of Contents for Hatco HEATMAX RCTHW2 Series
- Page 1 Séries RCTHW2 Serie RCTHW2 Manuel d’installation et d’utilisation Manuale per l’installazione e l’uso P 43 P 57 S’inscrire en ligne! Registratevi online! Warmhoudbak Modelreeksen RCTHW2 Handleiding voor Installatie en Bediening P 70 Registreer online! P/N 07.04.1050.00 © 2025 Hatco Corporation...
-
Page 2: Table Of Contents
To prevent possible harm to the Completing online warranty registration will prevent delay in environment or human health from uncontrolled waste obtaining warranty coverage. Access the Hatco website at disposal, recycle responsibly to promote the sustainable www.hatcocorp.com, select the Support pull-down menu, reuse of material resources. -
Page 3: Important Safety Information
Connection must be properly them to operate safely in Hatco equipment. grounded and of correct voltage, size, and configuration for electrical specifications FIRE HAZARD: of unit. -
Page 4: Model Description
Damage to any startup. This is a temporary condition. countertop material is not covered under Operate unit without food product until the Hatco warranty. For other surfaces, smoke dissipates. verify with manufacturer that material is suitable for prolonged temperatures up to NOTICE 100°C (212°F). -
Page 5: Model Designation
AS-3112 NOTE: The specification label is located on the back of countertop units and the bottom of built-in units. See Plug Configurations label for serial number and verification of unit electrical information. NOTE: Receptacle not supplied by Hatco ® RCTHW2CEM-0225... -
Page 6: Electrical Rating Chart
SPECIFICATIONS Electrical Rating Chart Model Voltage Hertz Phase Watts Amps Plug Configurations Shipping Weight 220 V 2520 W 11.5 A CCC 16A, CEE 7/7 Schuko, RCTHW2-3 230 V 50/60 Hz 2755 W 12.0 A 12 kg (27 lbs) BS-1363, AS 3112 240 V 3000 W 12.5 A... -
Page 7: Installation
Unit is designed and recommended for use in or on metallic countertops. Damage to any countertop material 3. After completing installation of the unit, the drain valve may is not covered under the Hatco warranty. For other ® be connected to an external drain pipe, if desired. - Page 8 INSTALLATION Installing the Unit 1. Cut the appropriate opening in the countertop for the unit being installed (see below). Mounting Plate Countertop Cutout RCTHW2-3B 550 mm (21-11/16″) RCTHW2-6B 570 mm (22-1/2″) 344 mm (13-9/16″) Control Box Cutout RCTHW2-6B Countertop Cutout Dimensions Installing the Unit NOTE: The countertop must be level to ensure proper draining of the well.
-
Page 9: Connecting The Auto-Fill Function
INSTALLATION Connecting the Auto-Fill Function Electrical Connections Use the following procedure to connect the unit to the on-site RCTHW2-6 and RCTHW2-6B models are equipped with a water supply for the Auto-Fill function. A qualified installer power cord only. These units must have the appropriate plug should perform the water connections. -
Page 10: Operation
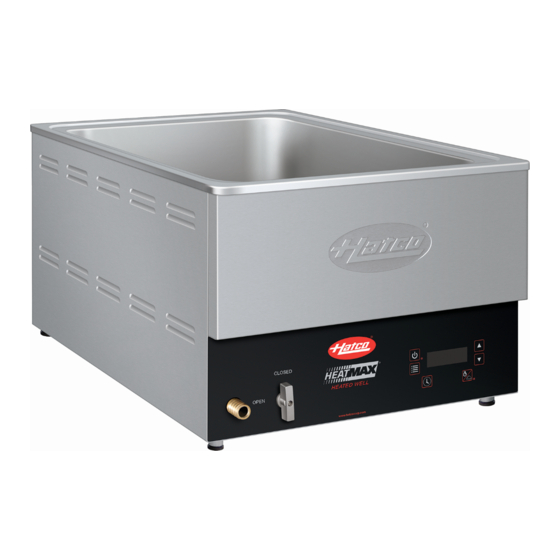
OPERATION General Temperature Button Use the following procedure to operate HEATMAX Heated ® Wells. Power I/O Button WARNING Read all safety messages in the IMPORTANT SAFETY INFORMATION section before operating this equipment. Up/Down Arrows NOTICE Do not operate unit without water in well. Damage to unit could occur. -
Page 11: Changing Between Fahrenheit And Celsius
OPERATION Changing the Holding Temperature 5. Put the unit into Heat Mode or Hold Mode. • Heat Mode will keep the heating elements on to Use the following procedure to change the holding temperature. continuously boil the water in the well. 1. -
Page 12: Maintenance
This unit has no “user-serviceable” parts. If service is required on this unit, contact an Authorized Hatco Service Agent or contact the Hatco Service Department at +1-414-671-6350. OPTIONS AND ACCESSORIES... -
Page 13: Troubleshooting Guide
Troubleshooting Questions? If you continue to have problems resolving an issue, please contact the nearest Authorized Hatco Service Agency or Hatco for assistance. To locate the nearest Service Agency, log onto the Hatco website at www.hatcocorp.com, select the Support pull- down menu, and click on “Find A Service Agent”;... -
Page 14: International Limited Warranty
INTERNATIONAL LIMITED WARRANTY WARRANTY, EXCLUSIVE REMEDY: Notwithstanding anything herein to the contrary, the limited warranty herein will not cover components in Seller’s sole Hatco Corporation (Seller) warrants that the products it ® discretion such as, but not limited to, the following: coated... -
Page 15: Wichtige Informationen Für Den Benutzer
7.00 Uhr bis 17.00 Uhr Montag bis eingebauten Geräte), die Spannung und das Kaufdatum in die Donnerstag folgenden Zeilen. Haben Sie bitte dies Information zur Hand, 7.00 Uhr bis 16.00 Uhr Freitag) wenn Sie Hatco wegen einer Service-Unterstützung anrufen. Telefon: +1-414-671-6350 Modellbezeichnung ________________________________ E-mail: support@hatcocorp.com... -
Page 16: Wichtige Sicherheitshinweise
Ausrüstung oder des Eigentums zu vermeiden. WARNUNG WARNUNG GEFAHR VON ELEKTROSCHOCKS: GEFAHR VON ELEKTROSCHOCKS: • Das Gerät darf nur von einem qualifizierten • Verwenden Sie bei der Reparatur von Hatco ® Elektriker installiert werden. Geräten ausschließlich Hatco Ersatzteile. Einbau muss alle örtlichen elektrischen Wenn Sie keine Original-Hatco-Ersatzteile Vorschriften erfüllen. -
Page 17: Modellbezeichnung
Arbeitsplatten konstruiert. Fertigungsöle rauchen bei der anfänglichen Schäden an Arbeitsplatten sind nicht von Inbetriebnahme bis zu 30 Minuten lang. der Hatco-Garantie abgedeckt. Klären Sie Das ist ein vorübergehender Zustand. Zur bei anderen Oberflächen mit dem Hersteller Gewährleistung des sicheren Betriebs muss ab, ob das Material für einen längeren... -
Page 18: Modellbeschreibung
CCC 16A AS-3112 zu ermitteln und die korrekte Steckdose zu installieren. Steckerkonfigurationen ANMERKUNG: Die Plakette mit den Spezifikationen befindet ANMERKUNG: Die Steckdose wird nicht von Hatco ® sich auf der Rückseite der Thekengeräte bereitgestellt. sowie auf der Unterseite der eingebauten Geräte. -
Page 19: Tabelle Der Elektrischen Anschlüsse
TECHNISCHE DATEN Tabelle Der Elektrischen Anschlüsse Modell Spannung Hertz Phase Watts Ampere Steckerkonfiguration Versandgewicht 220 V 2520 W 11.5 A CCC 16A, CEE 7/7 Schuko, RCTHW2-3 230 V 50/60 Hz 2755 W 12.0 A 12 kg (27 lbs) BS-1363, AS 3112 240 V 3000 W 12.5 A... -
Page 20: Aufstellen Des Gerät
Das Gerät wurde für die Verwendung in oder auf Ablassventil metallischen Arbeitsplatten konstruiert. Schäden an Schlauchschelle Arbeitsplatten sind nicht von der Hatco -Garantie ® Ablassschlauch abgedeckt. Klären Sie bei anderen Oberflächen mit dem Hersteller ab, ob das Material für einen längeren Zeitraum Temperaturen von bis zu 100°C standhalten kann. - Page 21 AUFSTELLEN DES GERÄTS Einbau des Geräts 5. Führen Sie das Stromkabel und den Abflussschlauch durch den Arbeitsplattenausschnitt, und senken Sie das 1. Die entsprechende Öffnung für das vorliegende Modell Gerät in den Ausschnitt ab. aus der Tischfläche ausschneiden. Befestigungsplatte RCTHW2-3B 550 mm Tischflächen- (21-11/16″)
-
Page 22: Anschluss Der Funktion Zur Automatischen Befüllung
AUFSTELLEN DES GERÄTS Anschluss der Funktion zur automatischen Anschluss über Festverdrahtung Befüllung Stellen Sie die entsprechenden Verbindungen zwischen dem Netzkabel und der Stromversorgung am Standort her. Gehen Sie wie folgt vor, um das Gerät an die Wasserversorgung vor Ort für die Funktion zur automatischen Befüllung Steckerverbindung anzuschließen. -
Page 23: Betrieb
BETRIEB Allgemeines Temperature Button Aufwärts/ Gehen Sie wie folgt vor, um das Gerät zu bedienen HEATMAX Abwärtspfeiltasten Warmhaltebecken. Ein-/Ausschalter WARNUNG Lesen Sie alle Sicherheitshinweise im Abschnitt WICHTIGE SICHERHEITSHINWEISE, bevor Sie das Gerät verwenden. HINWEIS Verwenden Sie das Gerät nicht ohne Nahrungsmittel/ Wasser in der Wanne. -
Page 24: Wechseln Zwischen Fahrenheit Und Celsius
BETRIEB Wechseln zwischen Fahrenheit und 5. Schalten Sie das Gerät in den Heizmodus oder den Haltemodus. Celsius • Im Heizmodus bleiben die Heizelemente eingeschaltet, 1. Drücken Sie die Taste , um den Betrieb abzuschalten um das Wasser im Becken kontinuierlich auf und das Gerät in den Standby-Modus zu versetzen. -
Page 25: Allgemeines
Wasserstrahl geeignet. Es darf nicht mit einem nicht-scheuernden Reiniger entfernt werden. Schwer Sprühstrahl gereinigt werden. erreichbare Stellen können mit einer kleinen Bürste und • Verwenden Sie bei der Reparatur von Hatco Geräten ® milder Seife gereinigt werden. ausschließlich Hatco Ersatzteile. Wenn Sie keine 5. -
Page 26: Richtlinien Zur Störungsbeseitigung
Haben Sie Fragen zur Störungsbeseitigung? Wenn Sie weiterhin Probleme beim Beheben einer Störung haben, dann setzen Sie sich bitte mit einem autorisierten Hatco- Servicebetrieb in Ihrer Nähe oder mit Hatco in Verbindung. Um den nächstgelegenen Serviceanbieter zu finden, melden Sie sich www.hatcocorp.com... -
Page 27: Internationale Beschränkte Garantie
AU SSCH LIE S S LIC H E Fünf (5) Jahre Teilegarantie: ABHILFE: 3CS- und FR-Tanks Die Hatco Corporation (Verkäufer) garantiert, dass die von ihr Zehn (10) Jahre Teilegarantie: hergestellten Produkte (Produkte) bei normalem Gebrauch und Elektrische Booster-Heizungstanks Service und bei Lagerung, Wartung und Installation in strikter Gas-Booster-Heizungstanks Übereinstimmung mit den Werksempfehlungen frei von Material-... -
Page 28: Hinweise Zur Garantieleistung
Sie auf “Find A Service Agent” (Einen Servicepartner finden) • Kaufdatum • Rufen Sie Hatco-Service unter der Rufnummer • Name Ihres Unternehmens +1-414-671-6350 an • Versandadresse • Senden Sie eine E-Mail an Hatco Service: • Kontaktperson und Telefonnummer support@hatcocorp.com RCTHW2CEM-0225... -
Page 29: Información Importante Para El Propietario
HEATMAX Heated y verduras. También puede usarse para contener una gran Wells. Hatco recomienda que se lean todas las instrucciones de variedad de alimentos, incluyendo sopas, curry, salsas y instalación, uso y seguridad que se encuentran en este manual diversas coberturas. -
Page 30: Información Importante De Seguridad
• No tire la unidad por el cable de comuníquese con un agente de servicio alimentación. autorizado de Hatco o con el Departamento • No use la unidad si el cable de alimentación de Servicio de Hatco al +1-414-671-6350. está deshilachado o desgastado. -
Page 31: Denominación Del Modelo
Cuando la unidad contenga alimentos, no la respetar esas indicaciones de diseño. La mueva ni la cambie de posición. Apague la garantía de Hatco no cubrirá ningún daño unidad, saque los alimentos y deje enfriar la ocasionado en materiales de las mesadas. -
Page 32: Descripción Del Modelo
NOTA: Etiqueta de especificaciones ubicada en la parte trasera Configuraciones del Enchufe de las unidades de mostrador y en la parte inferior de las unidades empotradas. Para comprobar el número NOTA: Hatco no proporciona el tomacorriente. ® de serie y la información relativa a la electricidad de este aparato, consulte la etiqueta. -
Page 33: Cuadro De Clasificación Eléctrica
ESPECIFICACIONES Cuadro de Clasificación Eléctrica Configuraciones del Modelo Voltaje Hercios Fase Vatios Amperios Enchufe Peso de Envio 220 V 2520 W 11.5 A CCC 16A, CEE 7/7 Schuko, RCTHW2-3 230 V 50/60 Hz 2755 W 12.0 A 12 kg (27 lbs) BS-1363, AS 3112 240 V 3000 W... -
Page 34: Instalación
La unidad está diseñada para ser usada en o sobre Abrazadera Válvula de drenaje mesadas metálicas y se recomienda respetar esas de la manguera indicaciones de diseño. La garantía de Hatco no cubrirá ® Manguera de drenaje ningún daño ocasionado en materiales de las mesadas. - Page 35 INSTALACIÓN Instalación de la Unidad 5. Guíe el cable eléctrico y la manguera de drenaje a través de la abertura de la encimera y baje la unidad dentro del 1. Practique un orificio en el mostrador teniendo en cuenta recorte. las dimensiones del modelo que desea instalar.
-
Page 36: Conexión De La Función De Llenado Automático
INSTALACIÓN Conexión de la función de llenado automático Conexiones eléctricas Utilice el siguiente procedimiento para conectar la unidad Los modelos RCTHW2-6 y RCTHW2-6B están equipados al suministro de agua del sitio para la función de llenado únicamente con un cable de alimentación. Estas unidades automático. -
Page 37: Operación
OPERACIÓN Generalidades Flechas hacia Utilice el siguiente procedimiento para operar los HEATMAX arriba/abajo Temperature Button Heated Wells. Botón de encendido/apagado ADVERTENCIA Lea todos los mensajes de seguridad de la sección Información de seguridad importante antes de operar el equipo. AVISO No opere la unidad sin alimentos o agua en el cajón térmico. -
Page 38: Cambio Entre Fahrenheit Y Celsius
OPERACIÓN Cambio entre Fahrenheit y Celsius 5. Coloque la unidad en modo calentar o modo mantener. • El modo calentar mantendrá encendidos los elementos 1. Presione el botón para detener el funcionamiento y calentadores para hervir continuamente el agua en el poner la unidad en modo de espera. -
Page 39: Generalidades
Esta unidad no tiene piezas a las que el usuario pueda realizar mantenimiento. Si necesita realizar mantenimiento en esta unidad, comuníquese con un agente de servicio autorizado de Hatco o con el Departamento de Servicio de Hatco al +1-414-671-6350. OPCIONES Y ACCESORIOS... -
Page 40: Guía De Resolución De Problemas
¿Tiene preguntas sobre cómo resolver un problema? Si no logra resolver un problema, póngase en contacto con el agente de servicio autorizado de Hatco más cercano para obtener ayuda. Para encontrar la Agencia de Servicios más cercana, ingrese en el sitio web de Hatco www.hatcocorp.com, seleccione el Menú... -
Page 41: Garantía Internacional Limitada
GARANTÍA, RESARCIMIENTO EXCLUSIVO: Garantía de diez (10) años para repuestos: Tanques de calentadores de refuerzo eléctricos Hatco Corporation (el Vendedor) garantiza que los productos Tanques de calentadores de refuerzo a gas que fabrica (los Productos) estarán libres de defectos en cuanto a materiales y mano de obra en condiciones normales de uso Garantía de noventa (90) días solo para las piezas:... -
Page 42: Información Del Servicio De Garantía
• Proporcionará piezas de repuesto, según sea requerido la fecha de envío desde Hatco , lo que ocurra primero. ® • Presentará un reclamo bajo la garantía a Hatco para su Ante cualquier problema con la unidad durante el período de procesamiento garantía, realice lo siguiente: Problemas no relacionados con la garantía... -
Page 43: Informations Importantes Pour Le Propriétaire
(Horario de verano—junio a septiembre: date d’achat de votre appareil ci-dessous. Veuillez avoir cette 7:00 a.m. a 5:00 p.m., lunes a jueves information à portée de la main si vous appelez Hatco pour 7:00 a.m. a 4:00 p.m., viernes) assistance. -
Page 44: Consignes De Sécurité Importantes
• Cet appareil n’est pas étanche aux jets. doit être réparé, contacter un réparateur Ne pas utiliser de jet sous pression pour Hatco agréé ou le Service après-vente Hatco nettoyer l’appareil. au +1-414-671-6350. • Ne pas tirer l’appareil par son cordon électrique. -
Page 45: Description Du Modèle
L’éteindre, enlever les fonctionner encastrée ou posée sur un aliments et laisser complètement refroidir comptoir en métal. La garantie Hatco avant de déplacer ou nettoyer. ne couvre pas les dommages faits au comptoir. Pour les autres surfaces, vérifier Les huiles de fabrication standard et auprès de leurs fabricants que le matériau... -
Page 46: Désignation Du Modèle
NOTA: L’étiquette des caractéristiques techniques se situe Configuration des fiches au dos des appareils à poser et sous les appareils NOTA: Prise non fournie par Hatco ® encastrables. Reportez-vous à l’étiquette du numéro de série et les données électriques de l’appareil. -
Page 47: Tableau Des Valeurs Nominales Électriques
CARACTÉRISTIQUES TECHNIQUES Tableau des valeurs nominales électriques Poids Modèle Tension Hertz Phase Watts Intensité Configuration de Fiches d’embarquement 220 V 2520 W 11.5 A CCC 16A, CEE 7/7 Schuko, RCTHW2-3 230 V 50/60 Hz 2755 W 12.0 A 12 kg (27 lbs) BS-1363, AS 3112 240 V 3000 W... -
Page 48: Installation
L’unité est conçue et recommandée pour fonctionner encastrée ou posée sur un comptoir en métal. La garantie Valve d'écoulement Hatco ne couvre pas les dommages faits au comptoir. Collier de serrage ® Pour les autres surfaces, vérifier auprès de leurs fabricants Tuyau d'écoulement... - Page 49 INSTALLATION Installation de l’appareil 5. Guidez le cordon électrique et le tuyau de vidange à travers la découpe du plan de travail et abaissez l’appareil 1. Découper dans le comptoir l’ouverture appropriée pour dans la découpe. l’appareil installé (voir ci dessous). Plaque de montage RCTHW2-3B...
-
Page 50: Branchement De La Fonction Auto-Remplissage
INSTALLATION Branchement de la fonction auto-remplissage Branchements électriques Suivez la procédure suivante pour brancher l’unité sur Les modèles RCTHW2-6 et RCTHW2-6B sont équipés d’un l’alimentation en eau du site pour la fonction auto-remplissage. cordon d’alimentation uniquement. Ces appareils doivent Un installateur qualifié doit procéder aux branchements de disposer de la prise électrique adéquate ou être câblés l’alimentation en eau. -
Page 51: Mode D'emploi
MODE D’EMPLOI Généralités Temperature Button Suivez les procédures suivantes pour faire fonctionner les puits Bouton d’alimentation I/O chauffants HEATMAX. AVERTISSEMENT Lire tous les messages de sécurité de la section Consignes Flèches de sécurité importantes avant d’utiliser ce matériel. haut/bas AVIS Ne pas faire fonctionner l’unité... -
Page 52: Passer Des Degrés Fahrenheit Aux Degrés Celsius Et Inversement
MODE D’EMPLOI Passer des degrés Fahrenheit aux degrés 5. Mettez l’appareil en mode chauffage ou en mode maintien. Celsius et inversement • Le mode chauffage maintiendra les éléments chauffants allumés pour faire bouillir en continu l’eau dans le puits. 1. Appuyez sur le bouton pour arrêter le fonctionnement et mettre l’appareil en mode veille. -
Page 53: Maintenance
Cet appareil ne contient aucune pièce réparable par d’entretien. l’utilisateur. Si cet appareil doit être réparé, contacter un réparateur Hatco agréé ou le Service après-vente Hatco au AVERTISSEMENT +1 414-671-6350. DANGER DE DÉCHARGE ÉLECTRIQUE : Nettoyage quotidien •... -
Page 54: Guide De Dépannage
Vous avez des questions en ce qui concerne les pannes? Si le problème persiste, veuillez contacter l’agence d’entretien agréée Hatco la plus proche ou Hatco pour obtenir une assistance. Pour trouver l’agence d’entretien la plus proche, rendez-vous sur le site Internet de Hatco (www.hatcocorp.com) et sélectionnez le menu déroulant Support (Assistance), puis cliquez sur «... -
Page 55: Garantie Limitée Internationale
Nonobstant toute disposition contraire des présentes, la garantie limitée des présentes ne couvrira pas, à la seule Hatco Corporation (le Vendeur) garantit que les produits qu’elle discrétion du vendeur, les éléments suivants, mais sans s’y fabrique (les Produits) seront exempts de défauts de matériaux limiter : ampoules à... -
Page 56: Informations De Service
INFORMATIONS DE SERVICE La garantie sur l’unité est d’un an à partir de la date d’achat ou Le revendeur Hatco procédera comme suit : de 18 mois à partir de la date d’expédition de Hatco , selon la ® • Fournira les pièces détachées requises première échéance. -
Page 57: Informazioni Importanti Per Il Proprietario
Max. può essere utilizzata per scaldare un’ampia varietà di cibi come Hatco consiglia di leggere tutte le istruzioni di installazione, zuppe, curry, sughi e diversi condimenti. Le temperature degli funzionamento e sicurezza contenute nel presente manuale elementi riscaldanti sono monitorate da un controller elettronico prima di installare o utilizzare l’unità. -
Page 58: Importanti Informazioni Sulla Sicurezza
Hatco. Ogni elettricista qualificato. L’installazione inadempienza nell’uso di pezzi di ricambio deve rispettare tutte le normative originali Hatco renderà nulle le garanzie e può elettriche locali. L’installazione da parte determinare tensioni elettriche pericolose per di personale non qualificato annulla gli operatori generando scosse elettriche o la garanzia dell’unità... -
Page 59: Descrizione Dei Modelli
I danni al materiale del piano di lavoro non metallico non sono coperti dalla Gli oli normali e di produzione approvati garanzia Hatco. Per altre superfici, verificare possono causare fumi fino a 30 minuti con il produttore che il materiale sia durante l’avvio iniziale. -
Page 60: Designazione Del Modello
NOTA: Etichetta delle specifiche situata sul retro delle unità Configurazioni delle spine del piano di lavoro e sulla parte inferiore delle unità NOTA: Presa non fornita da Hatco ® integrate. Vedere l’etichetta per le informazioni relative al numero di serie e verificare i dati elettrici dell’unità. -
Page 61: Tabella Dei Valori Elettrici Nominali
DATI TECNICI Tabella di corrispondenza electtrica Configurazione della Peso di Modello Tensione Hertz Fase Watts Ampere Spina Spedizione 220 V 2520 W 11.5 A CCC 16A, CEE 7/7 Schuko, RCTHW2-3 230 V 50/60 Hz 2755 W 12.0 A 12 kg (27 lbs) BS-1363, AS 3112 240 V 3000 W... -
Page 62: Installazione
L’unità è progettata per piani di lavoro metallici, nei o sui quali se ne consiglia l’utilizzo. I danni al materiale del piano di lavoro non metallico non sono coperti dalla garanzia Hatco . Per altre superfici, verificare con il produttore che ®... - Page 63 INSTALLAZIONE Installazione dell’unità 5. Guidare il cavo elettrico e il tubo di scarico attraverso l'apertura del piano di lavoro e sistemare l'unità 1. Realizzare un’apertura di dimensione corretta nel piano di nell'apertura. lavoro per l’inserimento dell’unità. Piastra di montaggio RCTHW2-3B 550 mm (21-11/16″) Apertura del...
-
Page 64: Collegamento Della Funzione Di Riempimento Automatico
INSTALLAZIONE Collegamento della funzione di Collegamenti elettrici riempimento automatico I modelli RCTHW2-6 e RCTHW2-6B sono dotati solo di cavo di alimentazione. Queste unità devono avere la spina adeguata Attenersi alla seguente procedura per collegare l’unità installata o devono essere cablate all'alimentazione elettrica. all’alimentazione di acqua in loco per la funzione di riempimento automatico. -
Page 65: Funzionamento
FUNZIONAMENTO Informazioni Generali Temperature Button Frecce verso Procedere come segue per azionare l'unità Pozzetti riscaldati l'alto/verso Pulsante di il basso HEATMAX. alimentazione I/O AVVERTENZA Prima di usare l’unità, leggere tutti i messaggi di sicurezza contenuti nella sezione Importanti informazioni sulla sicurezza. -
Page 66: Commutazione Tra Gradi Fahrenheit E Celsius
FUNZIONAMENTO Commutazione tra gradi Fahrenheit e 5. Mettere l'unità in modalità Riscaldamento o Mantenimento. Celsius • La modalità Riscaldamento manterrà accesi gli elementi riscaldanti in modo che l'acqua continui a bollire nel 1. Premere il pulsante per arrestare il funzionamento e pozzetto. -
Page 67: Manutenzione
Questa unità non contiene parti su cui “l’utente” può intervenire. Se l’unità richiede un intervento di assistenza mettersi in contatto con un Agente di assistenza autorizzato di Hatco o con il Reparto di assistenza di Hatco al numero telefonico +1-414-671-6350. OPZIONI E ACCESSORI... -
Page 68: Guida Alla Soluzione Dei Problemi
Per trovare il centro assistenza più vicino, accedere al sito Web Hatco all’indirizzo www.hatcocorp.com, selezionare il Support (Assistenza) e fare clic su “Find A Service Agent” (Trova un centro di assistenza); o contattare il Team assistenza e ricambi Hatco al numero/indirizzo e-mail: Telefono: +1-414-671-6350 e-mail: support@hatcocorp.com... -
Page 69: Garanzia Limitata Internazionale
GARANZIA, RIMEDIO ESCLUSIVO: Nonostante qualsiasi disposizione contraria qui contenuta, la presente Garanzia limitata non coprirà i componenti Hatco Corporation (Venditore) garantisce che i prodotti da unicamente discrezione del Venditore come, ma non limitato essa fabbricati (Prodotti) saranno privi di difetti nei materiali... -
Page 70: Belangrijke Informatie Voor De Eigenaar
HEATMAX- warmhoudbakken. koken. Het toestel kan ook gebruikt worden voor het bewaren Hatco beveelt aan dat u voor het installeren of gebruiken van van een verscheidenheid aan voedingswaren, zoals soep, een toestel alle voorschriften rond de installatie, de veiligheid kerrieschotel, jus en verschillende sauzen. -
Page 71: Belangrijke Veiligheidsinformatie
Hatco. • Zet de stroomschakelaar UIT, trek de stekker uit het stopcontact/schakel BRANDGEVAAR: de stroomonderbreker uit en laat het •... -
Page 72: Modelbeschrijving
Schade aan het materiaal van een bovenblad Tijdens de eerste ingebruikneming kunnen valt niet onder de garantie van Hatco . Voor ® standaard en erkende industriële oliën tot andere oppervlakken, neemt u best contact op 30 minuten rookvorming veroorzaken. -
Page 73: Modelbenaming
Stekkerconfiguraties OPMERKING: Het specificatielabel bevindt zich op de achterkant van werkbladtoestellen en op OPMERKING: Stopcontact niet door Hatco geleverd. de onderkant van ingebouwde toestellen. Raadpleeg het etiket voor het serienummer en informatie over de elektriciteit van het apparaat. -
Page 74: Tabel Met Elektrische Gegevens
SPECIFICATIES Tabel met elektrische gegevens Model Spanning Hertz Fase Watts Ampère Stekkerconfiguratie Verzendgewicht 220 V 2520 W 11.5 A CCC 16A, CEE 7/7 Schuko, RCTHW2-3 230 V 50/60 Hz 2755 W 12.0 A 12 kg (27 lbs) BS-1363, AS 3112 240 V 3000 W 12.5 A... -
Page 75: Installatie
Afvoerslang De eenheid is ontworpen en aanbevolen voor gebruik in of op een metalen bovenblad. Schade aan het materiaal van een bovenblad valt niet onder de garantie van Hatco ® Voor andere oppervlakken, neemt u best contact op met de fabrikant om na te gaan of het materiaal bestand is tegen langdurige blootstelling aan temperaturen tot 100°C (212°F). - Page 76 INSTALLATIE Het apparaat installeren 5. Leid het elektriciteitssnoer en de afvoerslang door de uitsparing in het werkblad en laat het apparaat in de 1. Snijdt een geschikte opening in het aanrecht om het uitsparing zakken. apparaat in te installeren. Montageplaat RCTHW2-3B 550 mm (21-11/16″)
-
Page 77: Aansluiten Van De Automatische Vulfunctie
INSTALLATIE Aansluiten van de automatische vulfunctie Elektrische aansluitingen Voer de volgende procedure uit om het toestel aan te sluiten De modellen RCTHW2-6 en RCTHW2-6B zijn alleen op de watertoevoer voor de automatische vulfunctie. De uitgerust met een netsnoer. Het apparaat moet een geschikte aansluitingen op de watertoevoer moeten uitgevoerd worden stekker hebben of met vaste bedrading op de stroomtoevoer door een erkend installateur. -
Page 78: Werking
WERKING Algemeen Temperature Button Volg de volgende procedure voor gebruik van de HEATMAX ® warmhoudbakken. Aan-uitknop WAARSCHUWING Lees alle veiligheidsvoorschriften onder Belangrijke veiligheidsinformatie voor u dit apparaat bedient. Pijltjes omhoog/ omlaag ATTENTIE De eenheid niet gebruiken zonder water in de reservoirs. De eenheid kan beschadigd raken. -
Page 79: De Weergave In Fahrenheit Of Celsius Wijzigen
WERKING De weergave in Fahrenheit of Celsius 5. Zet het apparaat in de verwarmings- of warmhoudmodus. wijzigen • De verwarmingsmodus houdt de verwarmingselementen aan om het water in de bak continu te doen koken. 1. Druk op de -knop om het apparaat uit te schakelen en in stand-by te zetten. -
Page 80: Onderhoud
Dit apparaat bevat geen onderdelen die door de gebruiker kunnen worden vervangen. Als het apparaat moet worden hersteld neemt u contact op met een erkend Hatco servicevertegenwoordiger of de Hatco serviceafdeling op het nummer +1-414-671-6350. -
Page 81: Oplossen Van Problemen
Vragen over het oplossen van problemen? Als het u niet lukt om een probleem op te lossen, kunt u met het dichtstbijzijnde door Hatco erkende serviceagentschap of met Hatco contact opnemen voor assistentie. Ga voor het dichtstbijzijnde servicepunt naar onze website www.hatcocorp.com, selecteer in het vervolgkeuzelijst van Support (Ondersteuning) en klik op “Find A Service Agent”... -
Page 82: Internationale Beperkte Garantie
INTERNATIONALE BEPERKTE GARANTIE GARANTIE, EXCLUSIEF VERHAAL: Tien (10) jaar garantie op onderdelen: Verwarmtanks elektrische booster Hatco Corporation (Verkoper) garandeert dat de producten die ® Verwarmtanks gasbooster zij vervaardigt (Producten) vrij van defecten in materialen en vakmanschap zullen zijn bij normaal gebruik en onderhoud en Negentig (90) dagen garantie op onderdelen: wanneer ze worden opgeslagen, onderhouden en geïnstalleerd... - Page 83 NOTES RCTHW2CEM-0225...
- Page 84 Water bijvullen, laag waterpeil Humidity, Humidity Cycle Feuchtigkeit, Befeuchtungszyklus Humedad, ciclo de humedad Umidità, ciclo di umidità Humidité, Cycle Humidité Vochtigheid, bevochtigingscyclus HATCO CORPORATION P.O. Box 340500 Milwaukee, WI 53234-0500 U.S.A. Telephone +1-414-671-6350 support@hatcocorp.com www.hatcocorp.com February 2025 P/N 07.04.1050.00 RCTHW2CEM-0225...
Need help?
Do you have a question about the HEATMAX RCTHW2 Series and is the answer not in the manual?
Questions and answers