Table of Contents
Advertisement
Quick Links
INSTRUCTION MANUAL
EN
Grassland walk behind mower
SR600
Read this instruction manual carefully before any use of the machine, keep it as a reference. For any question
about this manual, please report to your OREC dealer or to the distributor of your country or
to :https://www.orec-jp.com.
Update : November 2024
Only the English version of this manual can be used as a reference."
Advertisement
Table of Contents

Related Manuals for OREC SR600


Summary of Contents for OREC SR600
- Page 1 SR600 Read this instruction manual carefully before any use of the machine, keep it as a reference. For any question about this manual, please report to your OREC dealer or to the distributor of your country or to :https://www.orec-jp.com. Update : November 2024...
- Page 2 INTRODUCTION About manual Read this manual before the use of the machine. If you are lending or transferring this machine, be sure to give this manual along with the machine. If this manual is lost or damaged, please order directly from the dealer. ...
-
Page 3: Table Of Contents
Instructions to the dealer The assembly, the installation and the first application of the machine is under the OREC dealer’s responsability. Read the instruction manual as well as the safety measures. Check that all the before delivery and at delivery check points specified in the following lists have been verified and possibly modified before delivering the machine to its owner. - Page 4 Never modify this machine in a way that will impede safe work(cutting covers, installing non-genuine parts, using unspecified belts and oil, removing safety devices, etc.). We cannot be held responsible for any accidents or malfunctions caused by these modifications. Please make sure that there are no people, animals, vehicles, equipment, buildings, or other tangible assets nearby. Also, be sure to check the safety of your surroundings, and do not approach dangerous areas such as obstacles in the field, side ditches, and weak road shoulders, or places that require caution.
- Page 5 To prevent people (especially children) and pets from entering the work area (within a 15m radius), please place signs indicating that grass mowing work is in progress, guard ropes, and netting to prevent scattering, and do not allow people (especially children) or pets to come within a 15m radius. If people or pets approach, immediately stop work and stop the engine.
- Page 6 Label description of warning labels : Note their location and replace them immediately in case of damage or when missing Beware of thrown objects Stay away from the machine Remove the spark plug wire Read owner’s manual before maintenance Beware of rotating parts under the shields Always wear protective No hands under the mowing...
-
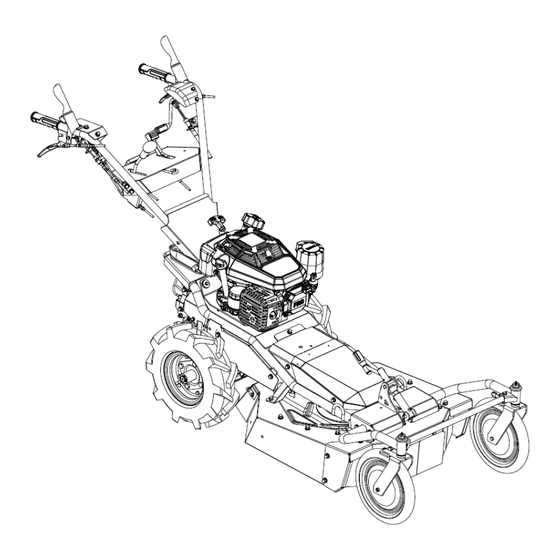
Page 8: Machine Description
2. MACHINE DESCRIPTION 2.1 MACHINE DESCRIPTION 1.Blade Clutch Lever 2.Blade Tension Lever 3.Driving Clutch Lever Recoil Stater Fuel Cap 4.Side Clutch Lever Air Cleaner Engine Oil Cap Belt Cover Muffler 5.Cutting Height Adjustment Lever 6.Handle Rotation Lever 7.Change Speed Lever 8.Simple inclinometer 9.Throttle Lever 10.Fixing Hook (Rear) - Page 9 2.2 FUNCTION OF EACH PARTS 2.2.1 BLADE CLUTCH LEVER Lock the blade tension lever in the ‘OFF’ position in the normal position. Before operating the blade tension lever, the blade tension lever can be held together with the handle to put the blade tension lever in the ‘ON’ position. If the blade clutch lever is released when the blade tension lever is in the ‘IN’...
- Page 10 2.2.11 SHATTERPROOF FRONT FLAPPER Minimises scattering of stones and other foreign objects. Must be worn during work as it is extremely dangerous. 2.2.12 REAR COVER Minimises scattering of stones and other foreign objects. Must be worn during work as it is extremely dangerous. Depending on the amount of grass in the blade cover, it opens and closes vertically to reduce the load on the engine.
-
Page 11: Inspection Before Use
3. INSPECTION BEFORE USE Before starting work, check "1.2 Before starting work" and be sure to perform a pre-start inspection in accordance with the "Pre-start Inspection Chart" and "7.1 Periodic Inspection Chart" below. ※If you have any questions or find anything unusual, be sure to consult the dealer where you purchased the product. - Page 12 「Recommended oil」 3.2 FUEL INSPECTION AND REFUELLING 1) Level the unit, remove the fuel cap, and inspect the amount of fuel from the fuel supply port. Fuel cap 2) If the fuel level is low, refer to the figure on the left and fill the tank below the upper limit of the specified oil level.
-
Page 13: Operation
4. OPERATION WARNING ※「1. Please read "1. Precautions for use" before operation. In particular, please read and understand "1.1 Working Conditions", "1.2 Before Operating" and "1.3 During Operation" carefully before operating and working on the equipment. 4.1 STARTING & STOPPING THE ENGINE 4.1.1 STARTING THE ENGINE 1) Both the driving clutch lever and blade clutch lever should be in the "OFF"... -
Page 14: Stopping The Engine
CAUTION 1)During the first week (3-4 hours) after the purchase of a new product, please operate the machine moderately to avoid overloading the machine as a break-in period. 2)Please note that using the throttle lever in the " " position will adversely affect various engine parts and shorten the life of the engine. -
Page 15: Changing Speed
4.2.2 CHANGING SPEED 1) Remove your hand from the driving clutch lever and put it in the "OFF" position to stop the machine. CAUTION Repeatedly operating the change speed lever with the driving clutch lever in the "ON" position may cause a malfunction. 2)Operate the changing speed lever to ensure that it is in the required gearshift position of "[1]", "[2]", "[3]", and "R". - Page 16 3) When the driving clutch lever is in the “OFF” position, the parking brake is effective regardless of the speed change lever position. If the brake is not working, adjust the brake wires or replace the parts as soon as possible. 4.3 HOW TO MOW WELL WARNING 1) For safety reasons, always work with the standard covers and flappers installed.
-
Page 17: Mowing On Slopes
6)Pull the blade tension lever. WARNING The Blade rotates at a high speed, so please be very careful! 7)To start and begin work, hold the driving clutch lever together with the handle. (See Section 4.2.1 "How to Drive.") 8)To finish the work, first remove your hand from the driving clutch lever, turn it to the "OFF"... -
Page 18: Handle Position
7) If an obstacle is hit during operation, stop the engine immediately, remove the ignition cap from the spark plug to prevent it from starting, and inspect it for damage. Repair any abnormality immediately. Unrepaired restarting may result in an unexpected accident. 8) For safety reasons, always stop the engine when leaving the machine. -
Page 19: How To Load
4.5.1 HOW TO LOAD 1)Choose a flat area with no hazardous materials around. 2)Ensure that the bridge that meets the standard is applied at a loose slope (15 degrees or less) and at a width that matches the product. 3)Ensure that the wheels of the machine are positioned in the center of the bridge. 4)Lower the engine speed and put the work clutch in the "OFF"... -
Page 20: Inspection,Replacement And Lubrication
5. INSPECTION,REPLACEMENT AND LUBRICATION 5.1 OIL INSPECTION CAUTION 1) The machine is not lubricated with oil at the time of shipment. Before using the machine for the first time, be sure to lubricate the specified parts with the specified amount of oil. 2) Periodic oil changes are highly recommended to ensure that the machine is always used in the best possible condition. -
Page 21: Oil Filter
5.1.2 INSPECTION AND REFILLING of Engine Oil Inspection and refuelling 1)Before each operation, visually check the amount of engine oil and dirt with reference to <3.1 Engine oil inspection>, and if the amount is not as specified or if the oil is dirty, replenish or replace the entire amount (see below). <refer to 3.1 3.1 ENGINE OIL INSPECTION>... - Page 22 5.1.3 LUBRICATION MOVING PARTS CAUTION 1) Lubricate grease nipples with grease and other parts with engine oil (#30) as needed about every 30 hours. Failure to lubricate the grease may cause damage due to poor lubrication. 2) Gearbox grease deteriorates after prolonged use and loses its original performance. * Replace the entire amount every two years or every 100 hours.
-
Page 23: Engine Maintenance
5.2 ENGINE MAINTENANCE 5.2.1 AIR FILTER CLEANING WARNING ●Continued operation with air cleaner/recoil starter clogged with grass debris, etc., not only causes lack of power and high fuel consumption, but also increases exhaust gas temperature, which may cause fuel to ignite and cause a fire, which is very dangerous. - Page 24 CAUTION 1) Always perform inspections and adjustments on a large, flat area with the engine stopped. 2) Make sure that each control lever operates properly. (at the beginning of each work). 3) Wires and belts will initially stretch, so readjust it after 2 to 3 hours of operation. 4) Wires and belts are consumables.
- Page 25 5.3.1.1 SIDE CLUTCH WIRE ADJUSTMENT If the drive does not connect when the side clutch lever is returned, …Turn the adjusting nut toward A.… If the drive is not disengaged when the side clutch lever is depressed, …Turn the adjusting nut toward B.… Ⓐ...
- Page 26 5.3.1.4 CHANGE WIRE ADJUSTMENT WARNING This product uses a gearshift system by wire. The gearshift position may shift due to initial stretching of the wire. In this case, follow the instructions below to adjust the wire tension with the engine stopped. Continuing to work in this state may, in the worst case, cause the gear to shift out of gear during operation, resulting in a serious accident.
- Page 27 5.3.1.7 BLADE BRAKE WIRE ADJUSTMENT If the blade does not stop after a short time (5 seconds) when the blade tension lever is in the ‘OFF’ position, …Turn the adjusting nut toward A.… If the blade tension lever is in the ‘in’ position and the blade does not rotate, …Turn the adjusting nut toward B.…...
-
Page 28: Blade Replacement
CAUTION 1) After adjustment, ensure that the locknuts and mounting bolts are securely tightened. 2) Always install the cover removed for adjustment as it was originally. 3) After adjustment, be sure to check the operation of the clutch lever etc. ‘on’ and ‘off’ respectively. 4) The belt may have some initial elongation, so readjust the belt after 2 to 3 hours of operation from new. -
Page 29: Long Term Storage
*If it is in abnormal condition as shown in the figure below, replace it. switching sides REPLACEMENT WEAR CRACK BEND REFERENCE; ・ Use of the blade in dry soil or sand will cause rapid wear of the blade, so inspect the blade frequently. ・... - Page 30 5.5.2 NOTES FOR NEXT USE CAUTION 1) Use fresh fuel. 2) Perform a pre-work inspection. 3) Make sure that each control lever operates properly. (at the beginning of each work). 4) Check all bolts and nuts for looseness and dropouts. 5) Move the unit slightly to check for abnormal noise or abnormal heat generation.
-
Page 31: Chart
6. CHART Model SR600 L x W x H(㎜) 1195×680×1145 Cutting Width (㎜) Weight (㎏) Cutting Height (㎜) 50~110 Blade Straight Blades (both side)×1 LA27×1 Driving Belt Cutting LB61×1 Front Wheel:large-diameter tires (φ300×40)×2 Tire size Rear Wheel:Lugs Tires 400-7 (φ400)×2 Up/Down:One-touch variable (5-step adjustment) -
Page 32: Inspection Chart
7. INSPECTION CHART 7.1 REGULAR INSPECTION SHEET Lack of inspection or maintenance leads to accident or trouble of machine. In order to ensure the good performance and safe condition of machine, make inspection referring the table below. About the frequency of maintenance, refer the indication D(daily), M(monthly), and Y(yearly). Reference Where to check Check point... - Page 33 7.2 ENGINE FAILURE AND HOW TO HANDLE In case of engine trouble, refer to table below and take proper countermeasure. Problem Cause Solution Engine cannot Throttle lever is not in「 」 「 」 Move the throttle lever in position. be started position.
-
Page 34: Self-Diagnosis Table
7.3 SELF-DIAGNOSIS TABLE Problem Cause Solution Grass is wet. Wait until grass get dry. Grass is tall. Mow higher and cut twice. grass Cutting height is too low. Raise the cutting height. discharged well. Engine power is too low. Increase the power to the max. Mowing speed is too fast. -
Page 35: Slope Guide
7.4 SLOPE GUIDE The maximum slope angle you can safely operate the machine on is 10 degrees. Use this slope guide to determine the degree of slope before operating. Do not operate the machine on a slope greater than 10 degrees. Copy or cut this page and always bring it with machine. -
Page 37: Limited Warranty
The machine must not have been damaged in a road accident, roughly handled or improperly used. This guarantee does not compel OREC or its dealer to reimburse the labour costs or the carriage costs to the repairer. NO OTHER GUARANTEE SHALL BE APPLIED TO THIS MACHINE EXCEPT THE LEGAL GUARANTEE. OREC SHALL... -
Page 38: Ec Conformity Declaration
10. EC CONFORMITY DECLARATION Business name and address of manufacturer: OREC CO., LTD. 548-22 HIYOSHI HIROKAWA-MACHI YAME-GUN FUKUOKA JAPAN owner of the technical documents S.A.T. sarl – 257, chemin de Clermont 38489 Pont de Beauvoisin France Designation : brush cutter...
Need help?
Do you have a question about the SR600 and is the answer not in the manual?
Questions and answers