Advertisement
Owner's Manual
6541-BZL
This Owner's Manual provides assembly, install and
user guidance. It applies to all 6541-BZL sold by
Ranger Design. For a list of compatible models, visit our
website at rangerdesign.com.
Contents
Warnings ....................2
Parts Included ............3
Included) ....................4
Installation ..................5
Add-on Installation .. 11
This Owner's Manual must remain in vehicle at all times.
6541-BZL
as shown
Scan the QR code for the
latest Installation Guide.
For more information,
visit rangerdesign.com.
Advertisement
Table of Contents

Related Manuals for Ranger design BrightDrop Zevo 600 E-Floor


Summary of Contents for Ranger design BrightDrop Zevo 600 E-Floor
-
Page 1: Table Of Contents
Owner’s Manual 6541-BZL This Owner’s Manual provides assembly, install and user guidance. It applies to all 6541-BZL sold by Ranger Design. For a list of compatible models, visit our website at rangerdesign.com. Contents Warnings ....2 Parts Included ....3 6541-BZL Tools Required (Not as shown Included) ....4... -
Page 2: Warnings
FR: Si vous avez besoin de ces instructions en français, s'il vous plait contacter notre service à la clientèle. +1-800-565-5321 ES: Si necesita estas instrucciones en español, comuníquese con el Servicio de atención al cliente de Ranger Design. +1-800-565-5321 Page 2 | 6541-BZL Installation Guide | REV. A... -
Page 3: Parts Included
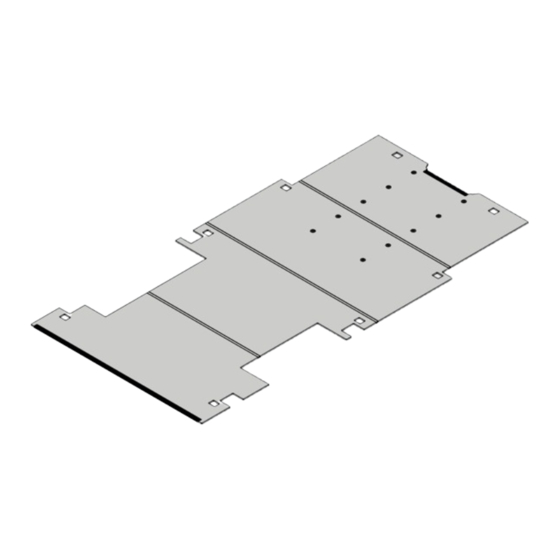
Parts Included Floor Sill – Qty. 1 P/N EN-884x20 I Beam Extrusion – Qty. 1 P/N EN-881x72.25 I Beam Extrusion – Qty. 1 P/N EN-881x82.375 I Beam Extrusion – Qty. 1 P/N EN-881x53.625 Panel Plug – Qty. 10 Floor Sill – Qty. 1 P/N 70-689 P/N EN-884x79 Front Floor Panel –... -
Page 4: Tools Required (Not Included)
Parts Included P/N & Fastener Kit Content P/N 96-6500 Part Description Qty. P/N & P/N 96-6500 P/N 90-482 Part Description Qty. Bolt Carriage 5/16"-18 × 1/2" P/N 90-204 ZINC Hex Bolt 5/16"-18 × 3/4" GR-5 ZINC P/N 99-114 Hex Insert 5/16-18 x 13mm"... -
Page 5: Installation
Installation STEP 1 Remove OEM floors. a. Start by removing the OEM floor, b. Keep all fasteners and hardware for reuse later in the process. For technical support, contact us at 1-800-565-5321 6541-BZL Installation Guide | REV. A | Page 5... - Page 6 Installation STEP 2 Front and Middle Front Floor installation. a. Install Front underlayment. b. Install Front floor panel. c. Install I-Beam. d. Install Middle-Front underlayment. e. Install Middle-Front panel. Install I-Beam. TOOLS FRONT ƒ Rubber Mallet Left Side and Direction Indicator REAR Page 6 | 6541-BZL Installation Guide | REV.
- Page 7 Installation STEP 3 Middle Rear and Rear installation . NOTE: ƒ Underlayment placement should be seamlessly connected from edge to edge. a. Install Middle-Rear underlayment. b. Install Middle-Rear floor panel. c. Install I-Beam. d. Install Rear underlayment. e. Install Rear panel. TOOLS ƒ...
- Page 8 Installation STEP 4 Install OEM D-Rings to the floor. TOOLS ƒ Rubber Mallet Left Side and Direction Indicator Page 8 | 6541-BZL Installation Guide | REV. A For technical support, contact us at 1-800-565-5321...
- Page 9 Installation STEP 5 Install locking panel plugs . TOOLS ƒ Rubber Mallet Locking Panel Plug For technical support, contact us at 1-800-565-5321 6541-BZL Installation Guide | REV. A | Page 9...
- Page 10 Installation STEP 6 Install front and rear sills. TOOLS ƒ Rubber Mallet Page 10 | 6541-BZL Installation Guide | REV. A For technical support, contact us at 1-800-565-5321...
-
Page 11: Add-On Installation
Add-on Installation NOTE: For add-ons to the floor (Not included in floor purchase). ƒ STEP 7 Use add-on part as template. a. Use add-ons as template for marking. b. Use a marker and drill a 7/16" hole for wood inserts. TOOLS ƒ... - Page 12 Add-on Installation STEP 8 Install wood inserts with ranger provided hardware for installation. a. Install wood inserts to floor. b. Use Ranger provided hardware to install add-on unit/s. NOTE: Lock washers and flat washers are available from add on hardware bag. ƒ...
- Page 13 For any feedback or suggestions you may have, please contact cs@rangerdesign.com. Copyright © 2024 All rights reserved. This manual or any portion thereof may not be reproduced or used in any manner whatsoever without the express written permission of Ranger Design, Inc.
Need help?
Do you have a question about the BrightDrop Zevo 600 E-Floor and is the answer not in the manual?
Questions and answers